vue+springboot前后端分离交互(快速上手)
文章目录
- 前言
- 安装vue-cli脚手架
- 启动vue项目管理器
- 数据交互
- Element-ui的使用
- 路由和动态导航栏
- 分页查询数据
- 添加数据
- 修改删除数据
前言
本人是学习完SpringBoot的技术之后,认为现在的thymeleaf+SpringBoot的开发方式使用的并不多,现在大部分在使用的是前后端分离的开发方式,其中的一种是Vue+SpringBoot的开发方式。
前后端分离开发现在是流行的大趋势,所以我建议想要快速构建项目的小伙伴们一定要好好了解学习一下vue+springboot的开发方式。
idea,node.js mysql
这里我们按照大多数人的开发习惯,都以idea开发工具来准备。
需要先安装好nodejs,当然了,看到这里的同学们肯定也学习过vue了,node.js肯定也安装好了。这里就不再做过多的赘述了。
安装 node.js
node.js官网:https://nodejs.org/zh-cn/
具体代码地址:百度网盘下载
链接:https://pan.baidu.com/s/1fWO0i5iGxz2U8U4vmABIzA
提取码:wmlg
安装vue-cli脚手架
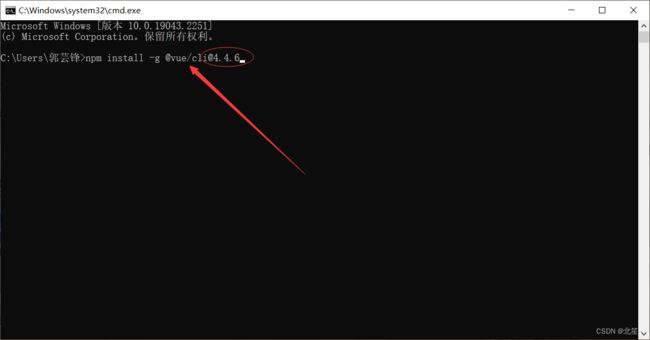
使用cmd命令打开命令行,输入以下命令
vue3.0以上的版本安装命令改成这个样子npm install -g @vue/cli

npm install -g @vue/cli@4。4.6
这里我本人建议还是直接装4.4.6版本的脚手架,因为看了很多视频,其他版本多多少少都有不兼容的东西,后期学习其他的还得更换,所以还是直接安装4.4.6版本的标胶稳妥。当然了,这只是我个人的建议,希望可以让你们少走些弯路,少掉些头发 哈哈~~
启动vue项目管理器
安装成功之后
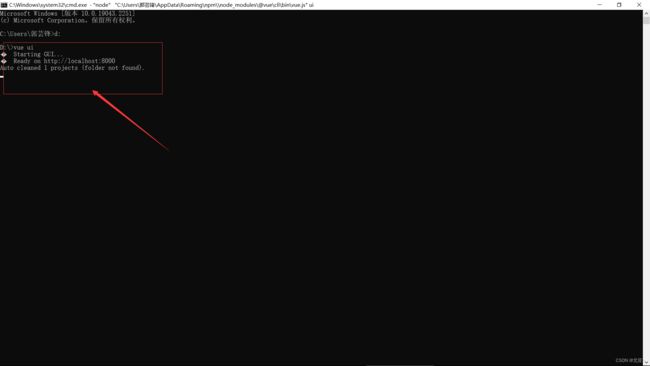
命令行窗口输入:vue ui(注意在你想要创建项目的位置上,想在d盘上创建项目就切换到d盘之后再输入该命令。)

启动成功!

等启动成功之后会进入vue的项目管理器了。

之后使用方法在我上一篇博客已经写了:https://blog.csdn.net/lj20020302/article/details/129402966。
数据交互
前后端数据交互,需要axios来进行操作,所以我们先要下载axios。
在vue项目下载打开终端:输入以下命令

安装完成之后在你需要请求的页面上加如下代码:
created() {
        const _this = this;
        axios.get('http://localhost:8082/list').then(function (resp) {
          _this.students =resp.data;
        })
  }
我们初始化函数,写一个回调函数,然后打印data。这次可以打印出来自己的数据库里面的数据了。
跨域问题的话,我们新建一个配置类 CrosConfig 可以参考下面的代码:
package com.guo.config;

import org.springframework.context.annotation.Bean;
import org.springframework.context.annotation.Configuration;
import org.springframework.web.servlet.config.annotation.CorsRegistry;
import org.springframework.web.servlet.config.annotation.WebMvcConfigurer;

@Configuration
public class CrosConfig {
    @Bean
    public WebMvcConfigurer corsConfigurer() {
        return new WebMvcConfigurer() {
            @Override
            public void addCorsMappings(CorsRegistry registry) {
                registry.addMapping("/**")
                        .allowCredentials(false)
                        .allowedMethods("POST", "GET", "PUT", "OPTIONS", "DELETE")
                        .allowedOrigins("*");
            }
        };
    }

}
这样前后端简单的数据交互就已经完成了。
Element-ui的使用
官方网站:https://element.eleme.cn/2.0/#/zh-CN/
Vue集成Element UI
Element UI的主要标签:
- el-container:构建整个页面框架
- el-aside:构建左侧菜单
- el-menu:左侧菜单内容,常用属性:
- :default-openeds:默认展开的菜单,通过菜单的index值 来关联。
- :default-active:默认选中的菜单,通过菜单的index值来关联。
- el-submenu:可展开的菜单,常用属性:
index:菜单的下标,文本类型,不可以是数值类型。
- template:对应el-submenu的菜单名。
- i:设置菜单图标,通过class属性设置:
- el-icon-message
- el-icon-menu
- el-icon-setting
- el-menu-item:菜单的子节点,不可再展开,常用属性: index:菜单的下标,文本类型,不能是数值类型。
在官网里面有很多组件,可以自由发挥。


路由和动态导航栏
我们开发的时候需要的是动态读取页面的效果,
所以我们要在标签上定义一个item拿到路由里面的index,通过index值不一样来展示动态的效果,$route.path==item2.path?‘is-active’:''是通过当我们访问的路径和router里面的子页面的路径一致的时候,‘is-active’:当这个条件成立的时候被激活。
比如我们访问的是localhost:8080/BookManage的时候,而router里面里子页面的路径也是/BookManage的时候,条件成立,选中该属性。
 <el-submenu v-for="(item,index) in $router.options.routes" :index="index+''" v-if="item.show">
            <template slot="title">{{item.name}}</template>
            <el-menu-item v-for="(item2,index2) in item.children" :index="item2.path"
                          :class="$route.path==item2.path?'is-active':''">{{item2.name}}</el-menu-item>
          </el-submenu>
- 标签添加router属性
- 在页面中添加标签,它是一个容器,动态渲染你选择的router。
- 标签的index 值就是要跳转的router。
:index=“item2.path” 把要跳转页面的路径用放上面就ok了。
如果不添加的话是跳转不了你的子页面的,因为我们加载页面的时候是先加载主页面,这个标签是给加载的主页面开一个窗口,让它跟app.vue一样可以加载窗口。
分页查询数据
<el-pagination
                background
                layout="prev, pager, next"
                :page-size="pageSize"
                :total="total"
                @current-change="page">
        </el-pagination>
@current-change 点击响应
整体的页面就是这个样子的

我们只需要在后端代码里添加一个PageRequest
@GetMapping("/findAll/{page}/{size}")
    public Page<Book> findAll(@PathVariable("page") Integer page, @PathVariable("size") Integer size){
        PageRequest request = PageRequest.of(page,size);
        return bookRepository.findAll(request);
    }
就可以实现分页查询的效果了。
添加数据
同样的,这些东西Element UI都给我们写好了,只需要我么会用就ok,所以这个Element UI是可以非常快速的搭建前端网页。

Element UI 表单数据校验
定义rules对象,在rules对象中设置表单各个选项的检验规则
rules: {
                    name: [
                        { required: true, message: '图书名称不能为空', trigger: 'blur' }
                    ],
                    author:[
                        { required: true, message: '作者不能为空', trigger: 'blur' }
                    ]
                }
- required: true:是否位必填项
- message: ‘图书名称不能为空’:提示信息
- trigger: ‘blur’:触发事件,(失去焦点)
前端表单是需要双向绑定的
:model="ruleForm" :rules="rules"
model绑定数据,rules绑定的是检验。
前端的js代码如下:
submitForm(formName) {
//与后端数据交互,把前端的数据传到后端,用post直接传一个对象this.ruleForm
                const _this = this
                this.$refs[formName].validate((valid) => {
                    if (valid) {
                        axios.post('http://localhost:8181/book/save',this.ruleForm).then(function(resp){
                            if(resp.data == 'success'){
                                _this.$alert('《'+_this.ruleForm.name+'》添加成功!', '消息', {
                                    confirmButtonText: '确定',
                                    callback: action => {
                                        _this.$router.push('/BookManage')//点击确定直接回调到/BookManage页面
                                    }
                                })
                            }
                        })
                    } else {
                        return false;
                    }
                });
后端直接调JPA的save方法
@PostMapping("/save")
    public String save(@RequestBody Book book){
        Book result = bookRepository.save(book);
        if(result != null){
            return "success";
        }else{
            return "error";
        }
    }
修改删除数据
修改数据
我们首先需要在bookmanger页面获取以下它的id:
edit(row) {
                this.$router.push({
                    path: '/update',
                    query:{
                        id:row.id
                    }
                })
            },
然后再回到update页面,
methods: {
            submitForm(formName) {
                const _this = this
                this.$refs[formName].validate((valid) => {//这个valid 表示的是验证是否通过输出回是一个布尔类型的值
                    if (valid) {//如果为ture,则进行下面的请求
                        axios.put('http://localhost:8181/book/update',this.ruleForm).then(function(resp){
                            if(resp.data == 'success'){
                                _this.$alert('《'+_this.ruleForm.name+'》修改成功!', '消息', {
                                    confirmButtonText: '确定',
                                    callback: action => {
                                        _this.$router.push('/BookManage')
                                    }
                                })
                            }
                        })
                    } else {
                        return false;
                    }
                });
            },
            resetForm(formName) {
                this.$refs[formName].resetFields();//置为空
            }
        },
        created() {
            const _this = this
			//我们在路径里面给它拼接一下,把它的id给返回到我们的后端程序里。
            axios.get('http://localhost:8181/book/findById/'+this.$route.query.id).then(function(resp){
                _this.ruleForm = resp.data
            })
        }
方法的解析都在代码里面的注释里。
后端controller请求
 @PostMapping("/save")
    public String save(@RequestBody Book book){
        Book result = bookRepository.save(book);
        if(result != null){
            return "success";
        }else{
            return "error";
        }
    }

    @GetMapping("/findById/{id}")
    public Book findById(@PathVariable("id") Integer id){
        return bookRepository.findById(id).get();
    }

    @PutMapping("/update")
    public String update(@RequestBody Book book){
        Book result = bookRepository.save(book);
        if(result != null){
            return "success";
        }else{
            return "error";
        }
    }
删除数据
删除往往是CURD里面最简单的一个操作,只需要调用Jpa自带的删除方法就ok了。
后端请求:
 @DeleteMapping("/deleteById/{id}")
    public void deleteById(@PathVariable("id") Integer id){
        bookRepository.deleteById(id);
    }
deleteBook(row){
                const _this = this
                axios.delete('http://localhost:8181/book/deleteById/'+row.id).then(function(resp){
                    _this.$alert('《'+row.name+'》删除成功!', '消息', {
                        confirmButtonText: '确定',
                        callback: action => {
                            window.location.reload()
                        }
                    })
                })
            }
看到这里,说明读者大大们的动手能力很强了。vue+springboot的快速入门操作已经差不多完成了。
加油叭,程序猿


