基于容器的gitlab代码库安装及备份和还原
前言
按照公司要求 ,每月都必须对代码库的文件进行备份,防止业务突然损坏,却还没有进行业务备份。
1.安装gitlab
为了方便安装gitlab,采用docker直接启动gitlab
1.1 安装docker
前面介绍过安装docker
1.2 实验环境
192.168.1.81       备份代码库

192.168.1.82		 还原代码库
1.3导入gitlab镜像
获取镜像链接
[链接:https://pan.baidu.com/s/1WQwTvQ75TQ7pLS4NoHXhUg?pwd=12o5
提取码:12o5]
[root@Zoey gitlab]# docker load < gitlab-ce.tar.gz


[root@Zoey gitlab]# docker images
REPOSITORY         TAG       IMAGE ID       CREATED         SIZE
gitlab/gitlab-ce   latest    fe83bde77572   20 months ago   2.25GB
[root@Zoey gitlab]#
1.4 运行gitlab容器
docker run -d \
 --name gitlab \
 --hostname gitlab \
 --restart always \
 -p 443:443 -p 80:80 -p 2002:22 \
 -v /opt/gitlab/config:/etc/gitlab \
 -v /opt/gitlab/data:/var/opt/gitlab \
 -v /opt/gitlab/logs:/var/log/gitlab \
 -e GITLAB_SKIP_UNMIGRATED_DATA_CHECK=true \
 gitlab/gitlab-ce:latest
[root@Zoey gitlab]# docker run -d \
>  --name gitlab \
>  --hostname gitlab \
>  --restart always \
>  -p 443:443 -p 80:80 -p 2002:22 \
>  -v /opt/gitlab/config:/etc/gitlab \
>  -v /opt/gitlab/data:/var/opt/gitlab \
>  -v /opt/gitlab/logs:/var/log/gitlab \
>  -e GITLAB_SKIP_UNMIGRATED_DATA_CHECK=true \
>  gitlab/gitlab-ce:latest
2e618a775e139cc26e4970460375efc234b89247213f70937ebb6583e71e255b
[root@Zoey gitlab]# docker ps
CONTAINER ID   IMAGE                     COMMAND             CREATED         STATUS                            PORTS                                                                                                             NAMES
2e618a775e13   gitlab/gitlab-ce:latest   "/assets/wrapper"   4 seconds ago   Up 3 seconds (health: starting)   0.0.0.0:80->80/tcp, :::80->80/tcp, 0.0.0.0:443->443/tcp, :::443->443/tcp, 0.0.0.0:2002->22/tcp, :::2002->22/tcp   gitlab
[root@Zoey gitlab]#
注意 : 启动容器后需要等一段时间
保证初始化完成,因为gitlab需要很多个服务集成的

保证初始化完成,因为gitlab需要很多个服务集成的

1.5 查看gitlab安装版本检查是否安装成功
[root@Zoey gitlab]# docker exec -it gitlab cat /opt/gitlab/embedded/service/gitlab-rails/VERSION
14.2.3
[root@Zoey gitlab]#
安装完成
1.6.修改gitlab配置
[root@Zoey gitlab]# docker exec -it gitlab bash
root@gitlab:/#
root@gitlab:/#
进入 /etc/gitlab/gitlab.rb
root@gitlab:/# vi /etc/gitlab/gitlab.rb
在后面添加

# 加入如下配置


external_url 'http://192.168.1.81'  	# gitlab访问地址,可以写域名。如果端口不写的话默认为80端口

gitlab_rails['gitlab_ssh_host'] = '192.168.1.81'   #ssh主机ip,这里会体现在项目使用ssh克隆

gitlab_rails['gitlab_shell_ssh_port'] = 2002  #ssh主机端口,这里会体现在项目使用ssh克隆
root@gitlab:/# gitlab-ctl reconfigure
2.页面直接访问
2.1 获取密码
默认用户:root
默认密码:
容器获取 cat /etc/gitlab/initial_root_password
2.2 获取中文
root登录在偏好设置里的个性化找到语言设置 更改为简体中文 在刷新
2.3 创建用户
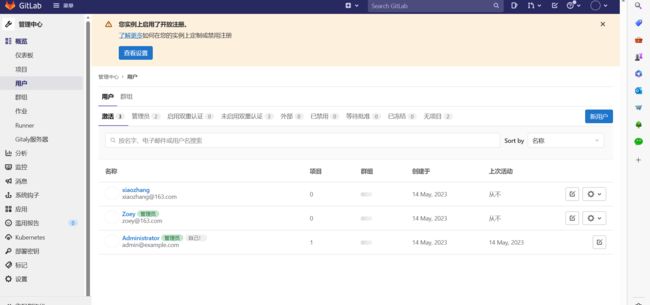
默认为root用户
创建一个Zoey的管理员用户和xiaozhang的开发用户、

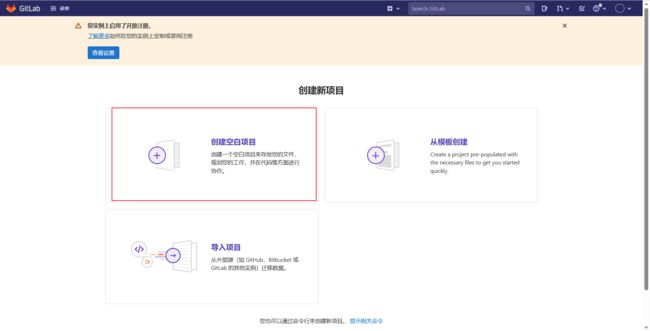
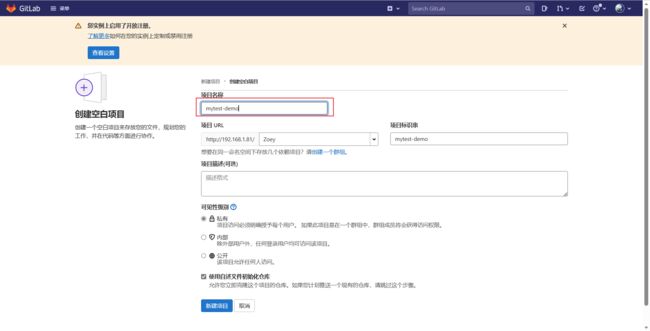
2.4 创建项目
2.5 客户端git项目
[root@Zoey ~]# git clone http://192.168.1.81/Zoey/mytest-demo.git
bash: git: 未找到命令
[root@Zoey ~]# yum install git -y
[root@Zoey ~]# git clone http://192.168.1.81/Zoey/mytest-demo.git
正克隆到 'mytest-demo'...
Username for 'http://192.168.1.81': Zoey
Password for 'http://[email protected]':
remote: Enumerating objects: 3, done.
remote: Counting objects: 100% (3/3), done.
remote: Total 3 (delta 0), reused 0 (delta 0), pack-reused 0
Unpacking objects: 100% (3/3), done.
[root@Zoey ~]# ls
anaconda-ks.cfg  gitlab  mytest-demo
[root@Zoey ~]# cd mytest-demo/
[root@Zoey mytest-demo]# ls -a
.  ..  .git  README.md
[root@Zoey mytest-demo]#
2.6 创建项目
将准备好的代码文件拷贝到项目目录
[root@Zoey ~]# cp -r vue/   mytest-demo/
[root@Zoey ~]# cd !$
cd mytest-demo/
[root@Zoey mytest-demo]# ls
README.md  vue
[root@Zoey mytest-demo]# git add .
[root@Zoey mytest-demo]# git commit -m 'add files'

*** Please tell me who you are.

Run

git config --global user.email "[email protected]"
git config --global user.name "Your Name"

to set your account's default identity.
Omit --global to set the identity only in this repository.

fatal: unable to auto-detect email address (got 'root@Zoey.(none)')

[root@Zoey mytest-demo]# git config --global user.email "[email protected]"
[root@Zoey mytest-demo]# git config --global user.name "Zoey"

[root@Zoey mytest-demo]# git add .
[root@Zoey mytest-demo]# git commit -m 'add files'

[root@Zoey mytest-demo]# git push origin main
Username for 'http://192.168.1.81': Zoey
Password for 'http://[email protected]':
Counting objects: 5403, done.
Delta compression using up to 4 threads.
Compressing objects: 100% (5185/5185), done.
Writing objects:  27% (1459/5402), 17.70 MiB | 8.21 MiB/s
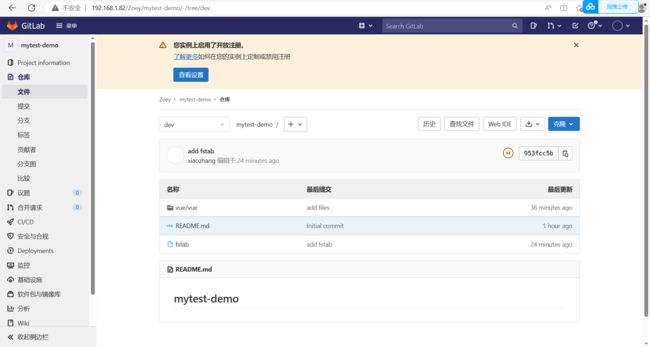
提交成功后,在浏览器刷新项目:

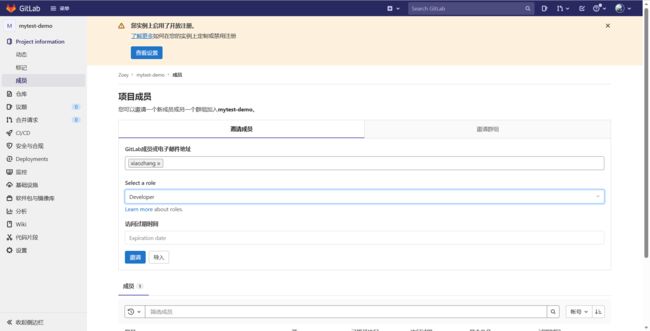
代码已经同步到服务器gitlab仓库了。为了真实性,为 spring-demo项目添加一个开发者。
点击成员

2.7 开发用户的登录
切换到开发者用户。开发者登录后可直接查看spring-demo项目

将项目克隆到本地,随意添加点文件并提交
[root@zoey82 data]# git clone http://192.168.1.81/Zoey/mytest-demo.git
正克隆到 'mytest-demo'...
Username for 'http://192.168.1.81': xiaozhang
Password for 'http://[email protected]':

[root@zoey82 data]# ls
docker  mytest-demo
[root@zoey82 data]#
[root@zoey82 mytest-demo]# git checkout -b dev    #创建新的分支
切换到一个新分支 'dev'
[root@zoey82 mytest-demo]# cp -a /etc/fstab ./   #随意拷贝一个文件
[root@zoey82 mytest-demo]# git config --global user.email "[email protected]"
[root@zoey82 mytest-demo]# git config --global user.name "xiaozhang"
[root@zoey82 mytest-demo]#
[root@zoey82 mytest-demo]# git add .
[root@zoey82 mytest-demo]# git commit -m 'add fstab'
[root@zoey82 mytest-demo]# git push origin dev     #提交新的分支
刷新项目,可以看到多了一个dev分支,该分支多了一个fstab文件
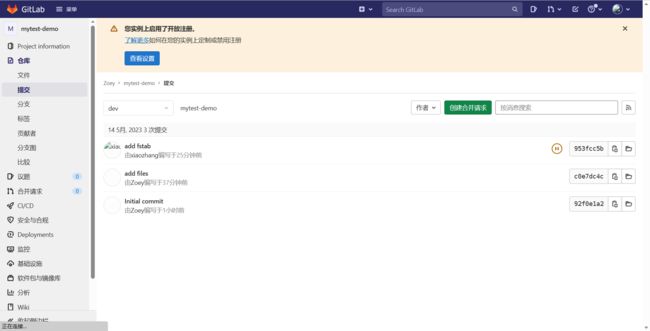
提交也产生了记录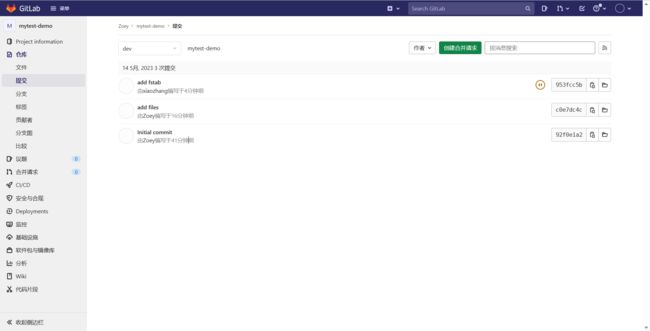
至此,安装创建项目完成
3.代码库备份
[root@Zoey ~]# docker exec gitlab gitlab-rake gitlab:backup:create
备份完成后,备份文件目录:
root@gitlab:/# cd /var/opt/gitlab/backups/
root@gitlab:/var/opt/gitlab/backups# ls

1684072304_2023_05_14_14.2.3_gitlab_backup.tar
将备份文件拷贝到本地:
[root@Zoey ~]# docker cp gitlab:/var/opt/gitlab/backups/1684072304_2023_05_14_14.2.3_gitlab_backup.tar   ./
[root@Zoey ~]# ls
1684072304_2023_05_14_14.2.3_gitlab_backup.tar
4.代码库的恢复
我们在192.168.1.82恢复代码库
4.1 根据1所示安装gitlab
[root@zoey82 ~]# docker ps
CONTAINER ID   IMAGE                     COMMAND             CREATED          STATUS                    PORTS                                                                                                             NAMES
d1b28b062d0f   gitlab/gitlab-ce:latest   "/assets/wrapper"   16 minutes ago   Up 16 minutes (healthy)   0.0.0.0:80->80/tcp, :::80->80/tcp, 0.0.0.0:443->443/tcp, :::443->443/tcp, 0.0.0.0:2002->22/tcp, :::2002->22/tcp   gitlab
[root@zoey82 ~]#
一定要检查为healthy,不然没有初始化完成就进行恢复,会出现问题
4.2 将恢复的代码库进行上传
[root@Zoey ~]# scp 1684072304_2023_05_14_14.2.3_gitlab_backup.tar 192.168.1.82:/root
4.3 将备份文件拷贝到容器中对应的目录下
[root@zoey82 ~]# docker cp 1684072304_2023_05_14_14.2.3_gitlab_backup.tar gitlab:/var/opt/gitlab/backups/
4.4 授予权限
#注意:这里需要修改文件权限,否则会报没有权限执行
docker exec -it gitlab bash
chown -R git:git /var/opt/gitlab/backups/1684072304_2023_05_14_14.2.3_gitlab_backup.tar
4.5 关闭容器内相关数据连接服务
注意:恢复备份文件前,先停止容器内相关数据连接服务:
gitlab-ctl stop puma
gitlab-ctl stop sidekiq
4.6 还原代码库
gitlab-rake gitlab:backup:restore
root@gitlab:/# gitlab-rake gitlab:backup:restore


出现报错
ERROR:  must be owner of extension btree_gist
ERROR:  must be owner of extension btree_gist
ERROR:  must be owner of extension pg_trgm
解决方案:
1. 修改postgresql配置
vi /var/opt/gitlab/postgresql/data/postgresql.conf
#如下修改:
listen_addresses = '*'

vi /var/opt/gitlab/postgresql/data/pg_hba.conf
#最后添加:
local   all         all                               trust
host    all         all                               127.0.0.1/32 trust


2. 重启gitlab服务
gitlab-ctl restart

3. 修改gitlab账号为超级用户
su - gitlab-psql
/opt/gitlab/embedded/bin/psql -h 127.0.0.1 gitlabhq_production
ALTER USER gitlab WITH SUPERUSER;
\q
exit
在次执行备份
root@gitlab:/# gitlab-rake gitlab:backup:restore
5.验证备份
6.总结
备份恢复
最大的原因就是恢复是对备份的检查 ,检查是否备份成功。


