SpringCloud在Gateway中统一配置knife4j(swagger)文档
之前用的swagger,但是感觉它的界面不是很友好,所以切换成了knife4j,这个界面确实好很多
先给大家看一下效果
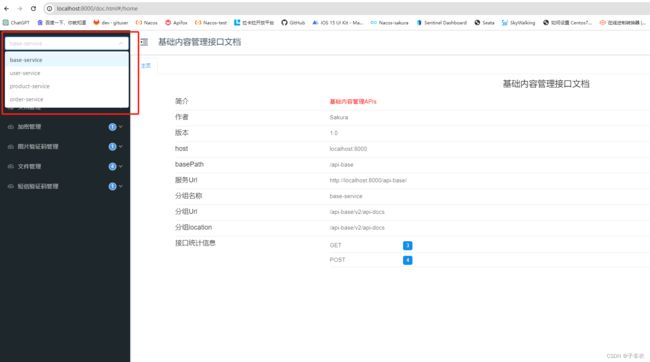
注意左上角红框里面的内容,这个就是单机文档和多服务文档的区别,可以在这里选择不同的服务
接下来我们看这个是怎么实现的
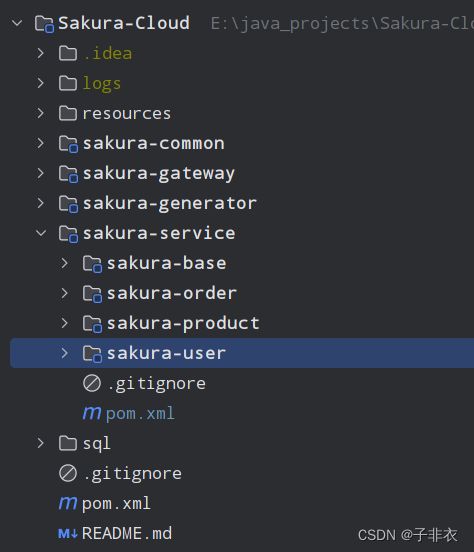
首先我的项目结构是这样的(项目GitHub地址)
好了开始上代码
这个jar很简洁,就这一个,不过里面已经整合了swagger所有jar包,所以在使用的时候和swagger一模一样
我这个放在common里面,因为我其它模块都引入的这个模块,不是这样的话你们就在每个模块加入这个jar包
		<!--swagger 因swaggerUI不够清晰换成knife4j-->

            com.github.xiaoymin
            knife4j-spring-boot-starter
            2.0.9
因为对外暴露的只有Gateway,所以我们需要在gateway里面添加一些配置,用来扫描其它服务的路径并转发过去
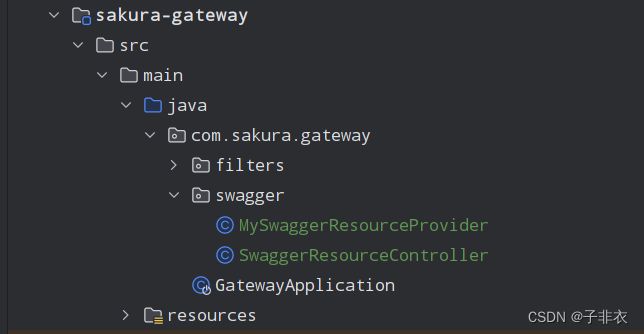
SwaggerResourceController
package com.sakura.gateway.swagger;

import lombok.RequiredArgsConstructor;
import org.springframework.http.HttpStatus;
import org.springframework.http.ResponseEntity;
import org.springframework.web.bind.annotation.RequestMapping;
import org.springframework.web.bind.annotation.RestController;
import springfox.documentation.swagger.web.SwaggerResource;

import java.util.List;

/**
 * @author Sakura
 * @date 2023/10/20 10:53
 */
@RestController
@RequestMapping("/swagger-resources")
@RequiredArgsConstructor
public class SwaggerResourceController {


    private final  MySwaggerResourceProvider swaggerResourceProvider;

    @RequestMapping
    public ResponseEntity<List<SwaggerResource>> swaggerResources() {
        return new ResponseEntity<>(swaggerResourceProvider.get(), HttpStatus.OK);
    }
}
MySwaggerResourceProvider
package com.sakura.gateway.swagger;

import lombok.RequiredArgsConstructor;
import org.springframework.cloud.gateway.config.GatewayProperties;
import org.springframework.cloud.gateway.route.RouteLocator;
import org.springframework.cloud.gateway.support.NameUtils;
import org.springframework.stereotype.Component;
import springfox.documentation.swagger.web.SwaggerResource;
import springfox.documentation.swagger.web.SwaggerResourcesProvider;

import java.util.ArrayList;
import java.util.List;

/**
 * @author Sakura
 * @date 2023/10/20 10:52
 */
@Component
@RequiredArgsConstructor
public class MySwaggerResourceProvider implements SwaggerResourcesProvider {

    public static final String API_URI = "/v2/api-docs";
    private final RouteLocator routeLocator;
    private final GatewayProperties gatewayProperties;


    @Override
    public List<SwaggerResource> get() {
        List<SwaggerResource> resources = new ArrayList<>();
        List<String> routes = new ArrayList<>();
        //取出gateway的route
        routeLocator.getRoutes().subscribe(route -> routes.add(route.getId()));
        //结合配置的route-路径(Path),和route过滤,只获取有效的route节点
        gatewayProperties.getRoutes().stream().filter(routeDefinition -> routes.contains(routeDefinition.getId()))
                .forEach(routeDefinition -> routeDefinition.getPredicates().stream()
                        .filter(predicateDefinition -> ("Path").equalsIgnoreCase(predicateDefinition.getName()))
                        .forEach(predicateDefinition -> resources.add(swaggerResource(routeDefinition.getId(),
                                predicateDefinition.getArgs().get(NameUtils.GENERATED_NAME_PREFIX + "0")
                                        .replace("/**", API_URI)))));
        return resources;
    }

    private SwaggerResource swaggerResource(String name, String location) {
        SwaggerResource swaggerResource = new SwaggerResource();
        swaggerResource.setName(name);
        swaggerResource.setLocation(location);
        swaggerResource.setSwaggerVersion("2.0");
        return swaggerResource;
    }
}
这里有一点要注意,因为我也是综合其他人的配置来弄的,但是我参考的那个人读取配置的方法有些问题,导致我这里一直报错
所以大家要看一下gateway的路由配置是什么样的,然后做出适当调整
我的路由是下面这样配置的,最终gateway转发的断言规则路径应该api-base这种
这里面的配置就是最开始左上角里面的选项内容

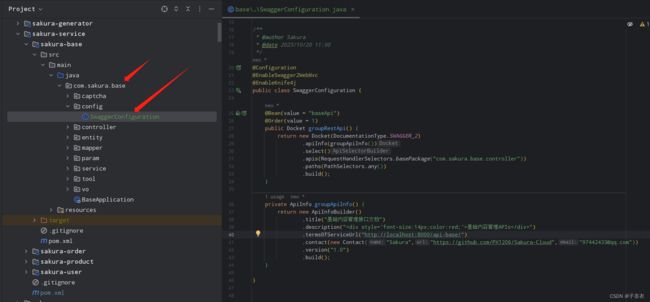
gateway配置好后我们还需要在每个模块配置单独的项目说明
比如我在base里面加了一个SwaggerConfiguration配置用来描述该模块
.apis(RequestHandlerSelectors.basePackage(“com.sakura.base.controller”))是你当前项目模块需要扫描接口的位置,可以配置多个
其它的配置可以参考文档首页展示内容自己根据项目调整即可
package com.sakura.base.config;

import com.github.xiaoymin.knife4j.spring.annotations.EnableKnife4j;
import org.springframework.context.annotation.Bean;
import org.springframework.context.annotation.Configuration;
import org.springframework.core.annotation.Order;
import springfox.documentation.builders.ApiInfoBuilder;
import springfox.documentation.builders.PathSelectors;
import springfox.documentation.builders.RequestHandlerSelectors;
import springfox.documentation.service.ApiInfo;
import springfox.documentation.service.Contact;
import springfox.documentation.spi.DocumentationType;
import springfox.documentation.spring.web.plugins.Docket;
import springfox.documentation.swagger2.annotations.EnableSwagger2WebMvc;

/**
 * @author Sakura
 * @date 2023/10/20 11:00
 */
@Configuration
@EnableSwagger2WebMvc
@EnableKnife4j
public class SwaggerConfiguration {

    @Bean(value = "baseApi")
    @Order(value = 1)
    public Docket groupRestApi() {
        return new Docket(DocumentationType.SWAGGER_2)
                .apiInfo(groupApiInfo())
                .select()
                .apis(RequestHandlerSelectors.basePackage("com.sakura.base.controller"))
                .paths(PathSelectors.any())
                .build();
    }

    private ApiInfo groupApiInfo() {
        return new ApiInfoBuilder()
                .title("基础内容管理接口文档")
                .description("基础内容管理APIs")
                .termsOfServiceUrl("http://localhost:8000/api-base/")
                .contact(new Contact("Sakura","https://github.com/PX1206/Sakura-Cloud","[email protected]"))
                .version("1.0")
                .build();
    }

}
好了,这样文档系统就配置完成了,大家有什么疑问都可以直接问我