【PyQt】(自定义类)阴影遮罩-升级版
这是之前发的代码(自定义类)阴影遮罩的升级版。
升级就升级在,优化了对非矩形控件的遮盖效果,例如圆角按钮,以及默认方法不满足时可以传入其他的遮盖方法。
自定义阴影遮罩Mask:
class Mask(QWidget):
    __exclude=None
    __color=None
    clicked=pyqtSignal(object)#单击遮罩时触发,以实现其他操作
    def __init__(self,parent=None,*exclude,color=QColor(0,0,0,128)):
        super().__init__(parent)
        exclude=list(exclude)
        for pst in range(len(exclude)):
            if(type(exclude[pst])!=tuple):
                exclude[pst]=(exclude[pst],self.Trans_WidMask_Default)
            else:
                if(len(exclude[pst])<2):
                    exclude[pst]=(exclude[pst][0],self.Trans_WidMask_Default)
                elif(type(exclude[pst][1])==bool):
                    if(exclude[pst][1]==False):
                        exclude[pst]=(exclude[pst][0],self.Trans_WidMask_Default)
                    else:
                        exclude[pst]=(exclude[pst][0],self.Trans_WidMask_Style)
        self.__exclude=exclude
        self.__color=color
        self.show()
        self.__wid=QWidget()
    def mousePressEvent(self,event):
        self.clicked.emit(self)
    def paintEvent(self,event):
        self.resize(self.parent().size())
        bit=QBitmap(self.size())
        bit.fill(Qt.black)
        painter_bit=QPainter(bit)
        for item,offset in self.__Get_Offset().items():
            wid,trans=item
            pix=trans(wid)
            # pix=self.Trans_WidMask_Default(wid)
            # pix=self.Trans_WidMask_Style(wid)
            painter_bit.drawPixmap(QRect(offset,wid.size()),pix)
        painter_bit.end()

        painter_self=QPainter(self)
        painter_self.fillRect(0,0,self.size().width(),self.size().height(),self.__color)
        painter_self.end()
        self.setMask(bit)
    def __Get_Offset(self):
        record={}
        parent_self=self.parent()
        for item in self.__exclude:
            if(not item[0].isVisible()):
                continue
            wid=item[0]
            parent_wid=wid.parent()
            offset=QPoint(0,0)
            while (True):
                offset+=wid.pos()
                if(not parent_wid):
                    break
                if(parent_wid==parent_self):
                    break
                wid=wid.parent()
                parent_wid=wid.parent()
            if(parent_wid):
                record[item]=offset
        return record

    @classmethod
    def Trans_WidMask_Default(self,wid):
        pix=QPixmap(wid.size())
        pix.fill(Qt.white)
        return pix
    @classmethod
    def Trans_WidMask_Style(self,wid):
        arr=self.Trans_PixToArray(wid.grab())
        #洪填,将外围填充
        arr=cv2.cvtColor(arr,cv2.COLOR_RGBA2GRAY)
        h, w = arr.shape[:2]
        mask = np.zeros([h+2, w+2],np.uint8)
        arr_copy=arr.copy()
        arr=cv2.rectangle(arr,(0,0),(w-1,h-1),(int(arr[0][0]),))
        cv2.floodFill(arr, mask, (0,0), (0,), (2,), (2,), cv2.FLOODFILL_FIXED_RANGE)#参数是试出来的...懒得研究洪填
        arr=arr==arr_copy
        arr=arr*255
        arr=arr.astype(np.uint8)
        return self.Trans_ArrayToPix(arr)
    @staticmethod
    def Trans_PixToArray(pix):#pix是RGBA四通道QPixmap。不使用PIL.Image模块
        h,w=pix.height(),pix.width()
        buffer = QImage(pix).constBits()
        buffer.setsize(h*w*4)
        arr = np.frombuffer(buffer, dtype=np.uint8).reshape((h,w,4))
        return arr.copy()
    @staticmethod
    def Trans_ArrayToPix(arr):#arr对应四通道图片。不使用PIL.Image模块
        arr=cv2.cvtColor(arr,cv2.COLOR_RGBA2BGRA)
        img=QImage(arr.data, arr.shape[1], arr.shape[0], arr.shape[1]*4, QImage.Format_RGBA8888)
        return QPixmap(img)
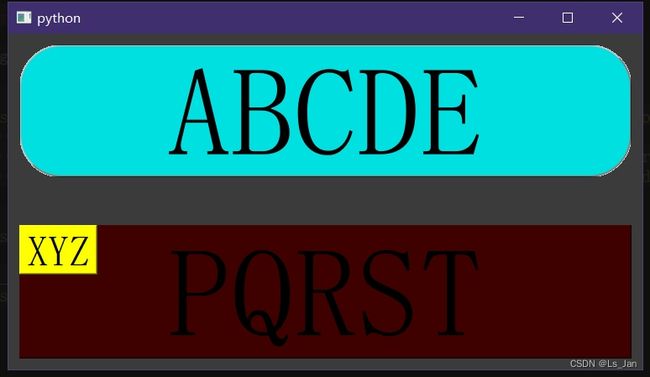
测试代码+运行结果:
if __name__=='__main__':
    import sys
    from PyQt5.QtWidgets import QApplication

    app = QApplication(sys.argv)

    lb_1=QPushButton("ABCDE")
    lb_1.setStyleSheet("font-size:150px ; border:2px groove gray;border-radius:50px;padding:2px 4px;border-style: outset;}"
                                           "QPushButton{background-color: rgb(0, 224, 224);}"
                                           "QPushButton:hover{background-color:rgb(0, 255, 255); color: black;}"
                                           "QPushButton:pressed{background-color:rgb(0, 192, 192);border-style: inset;")

    lb_2=QPushButton("PQRST")
    lb_2.setStyleSheet("font-size:150px ; background-color:#FF0000")

    lb_3=QPushButton("XYZ",lb_2)
    lb_3.setStyleSheet("font-size:50px ; background-color:#FFFF00")

    win=QWidget()
    vbox=QVBoxLayout(win)
    vbox.addWidget(lb_1)
    vbox.addStretch(1)
    vbox.addWidget(lb_2)
    win.show()
    win.resize(755,400)


	#【创建阴影遮罩】
    # msk=Mask(win,lb_1,lb_2,color=QColor(0,0,0,192))
    # msk=Mask(win,lb_1,lb_3,color=QColor(0,0,0,192))
    msk=Mask(win,(lb_1,True),lb_3,color=QColor(0,0,0,192))
    # msk.setParent(None)
    msk.clicked.connect(lambda msk:msk.hide())#单击隐藏遮罩

    sys.exit(app.exec())
说明:
- 与前篇文章(自定义类)阴影遮罩的用法大致一致,是“即用即贴”型,不用时就调用
msk.setParent(None)撤走即可。 - 简单说明Mask的构造函数
Mask(parent=None,*exclude,color=QColor(0,0,0,128)):
exclude元素可以有4种样式:wid、(wid,False)、(wid,True)、(wid,Func),其中wid等价于(wid,False)。
exclude元素的第二参数如果为False那么将对应调用Mask.Trans_WidMask_Default[普通型],为True将调用Mask.Trans_WidMask_Style[样式表型],当这两种方法都不能满足遮盖需求时,即可自己编写第三种方法并将第二参数设置为该函数。
上面的说明看不懂没关系,试着运行下测试代码就知道了。 - 遮罩单击时会触发
clicked信号,用于实现“点击空白位置以取消”的操作。(感觉还不够用的话就自己改Mask代码吧
参考:
- (自定义类)阴影遮罩:https://blog.csdn.net/weixin_44733774/article/details/134587980
- QPixmap与numpy.array互转:https://blog.csdn.net/weixin_44733774/article/details/134578487
- OpenCV中floodfill的使用(洪水填充):https://blog.csdn.net/remakeprogramer/article/details/113724635
未经本人同意不得私自转载。本文发布于CSDN:https://blog.csdn.net/weixin_44733774/article/details/134609775