基本调用流程
做了一个利用ffmpeg解码出yuv数据,通过SDL2显示数据的demo,记录一下。
视频源使用的是网上源:http://clips.vorwaerts-gmbh.de/big_buck_bunny.mp4
也不知道是谁家的,先感谢一下吧。
代码算是最基本的代码了,没有做过度的抽取封装,个人觉得这种代码更加易学。
能够直观的看出FFmpeg和SDL2的接口调用顺序。
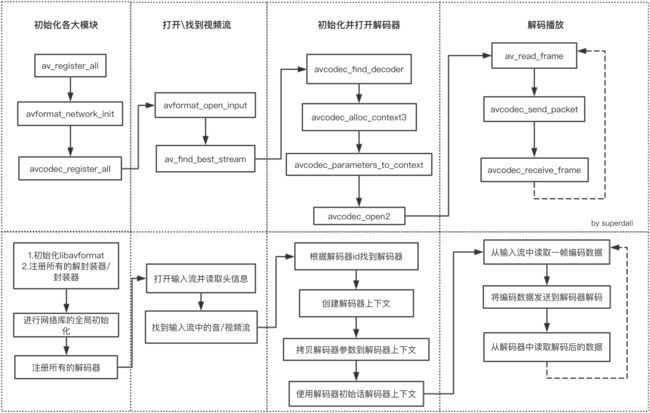
其中FFmpeg的调用顺序如下:
SDL调用流程如下:
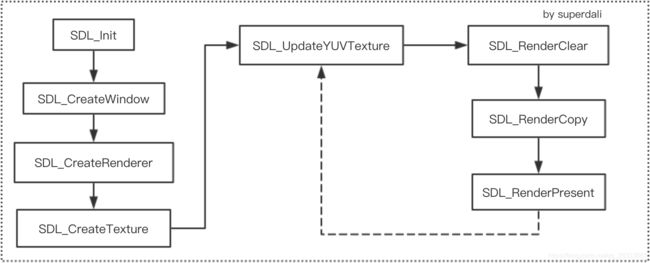
上面两张图的虚线部分都表示一个循环。
- FFmpeg中的循环的作用是:不断的从源文件流中取数据,发送到解码器后台线程解码,然后读取解码后的数据送到SDL中显示。
- SDL中的循环的作用是:将解码后的YUV数据,不断的更新到纹理,并将新的纹理不断的渲染到窗体中,展现播放的效果。
关于其中一些关键调用和结构体,可以看相关系列文章:
ffmpeg相关
SDL2相关
代码
CMakeLists.txt文件(CMake文件)
cmake_minimum_required(VERSION 3.10)
project(PlayFFmpeg)
set(CMAKE_CXX_STANDARD 11)
set(MY_LIBRARY_DIR /usr/local/Cellar)
set(FFMPEG_DIR ${MY_LIBRARY_DIR}/ffmpeg/4.1.3_1)
set(SDL_DIR ${MY_LIBRARY_DIR}/sdl2/2.0.9_1/)
find_package(Threads REQUIRED)
include_directories(${FFMPEG_DIR}/include/
${SDL_DIR}/include/)
link_directories(${FFMPEG_DIR}/lib/
${SDL_DIR}/lib/)
add_executable(PlayFFmpeg main.cpp)
target_link_libraries(
PlayFFmpeg
avcodec
avdevice
avfilter
avformat
SDL2
)
源码:
#include
#include
最简单的才是最容易学的,代码没经过封装,其中一些比较重要的步骤都做了注释说明,相信就更加易懂了。
祝你学的愉快!