用mtcnn+keras+facenet实现简易的人脸识别
人工智能-人脸识别
采用mtcnn+keras+facenet深度学习算法
文章目录
- 人工智能-人脸识别
-
- 采用mtcnn+keras+facenet深度学习算法
-
-
- 前言:
-
- 在前段时间的挑板杯和互联网+的双赛中,我们和校企合作的项目疲劳驾驶检测预警,在经专家点评后发现其中的人脸识别功能算法需要完善,所以经过多方学习,根据哔站大牛[**Bubbliiiing**](https://space.bilibili.com/472467171)的项目,决定用python来实现简单的人脸检测和识别
- 环境介绍:
-
- 基础环境:
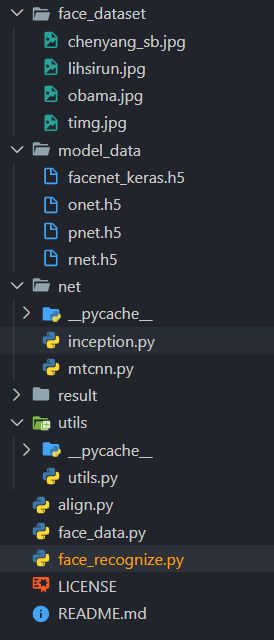
- 代码结构
- 核心代码:
- 核心原理:
-
- 附:论文下载地址:
- 实现步骤:
- 实现结果
- 代码地址:
- 致谢:
-
前言:
在前段时间的挑板杯和互联网+的双赛中,我们和校企合作的项目疲劳驾驶检测预警,在经专家点评后发现其中的人脸识别功能算法需要完善,所以经过多方学习,根据哔站大牛Bubbliiiing的项目,决定用python来实现简单的人脸检测和识别
环境介绍:
采用主流的深度学习算法tensorflow-gpu、opencv、keras 、mtcnn、facenet等
基础环境:
tensorflow-gpu==1.15.0
keras ==2.1.5
opencv-python==3.4.3
有关tensorflow的相关说明:
注释:[安装tensorflow注意安装的是gpu版本,如果用cpu版本会使电脑cpu跑满,影响运行速度(在tensorflow2.0版本之后gpu和cpu版本整合在一起,需要手动去切换)安装gpu版本时需要提前安装其对应版本的附属环境cuda和cudnn,如果版本出不匹配,则还是用cpu跑程序,详细安装可参考win10安装tensorflow(GPU版本)]
1、检验tensorflow是否安装成功:
	import tensorflow as tf
	# Create TensorFlow object called tensor
	hello_constant = tf.constant('Hello World!')

	with tf.Session() as sess:
    # Run the tf.constant operation in the session
    	output = sess.run(hello_constant)
   		print(output.decode())# bytestring decode to string.
如果出现以下则表示成功
2021-01-15 12:22:08.731542: I tensorflow/core/common_runtime/gpu/gpu_device.cc:1304] Created TensorFlow device (/job:localhost/replica:0/task:0/device:GPU:0 with 2917 MB memory) -> physical GPU (device: 0, name: GeForce GTX 1650, pci bus id: 0000:01:00.0, compute capability: 7.5)
Hello World!
2、检验程序是否用gpu跑:
	import tensorflow as tf
	a = tf.constant([1.0, 2.0, 3.0, 4.0, 5.0, 6.0], shape=[2, 3], name='a')
	b = tf.constant([1.0, 2.0, 3.0, 4.0, 5.0, 6.0], shape=[3, 2], name='b')
	c = tf.matmul(a, b)
	sess = tf.Session(config=tf.ConfigProto(log_device_placement=True))
	print(sess.run(c))
如果出现以下则表示成功:
2021-01-15 12:29:48.283362: I tensorflow/core/common_runtime/direct_session.cc:359] Device mapping:
/job:localhost/replica:0/task:0/device:GPU:0 -> device: 0, name: GeForce GTX 1650, pci bus id: 0000:01:00.0, compute capability: 7.5
MatMul: (MatMul): /job:localhost/replica:0/task:0/device:GPU:0
代码结构
- 其中face_dataset为人脸存放数据
- model_data为mtcnn模型存放位置 (其中包含mtcnn三个神经网络模型和一个Keras FaceNet 模型(由Hiroki Taniai提供!))
- net为调用mtcnn代码存放位置
核心代码:
face_recognize.py(根据数据库中的文件和实时检测的人脸进行检测识别)
# face_recognize
import cv2
import os
import numpy as np
from net.mtcnn import mtcnn
import utils.utils as utils
from net.inception import InceptionResNetV1
import tensorflow as tf
config = tf.ConfigProto()#//对session进行参数配置
config.allow_soft_placement=False #如果你指定的设备不存在,允许tensorflow自动分配设备
config.gpu_options.per_process_gpu_memory_fraction=0.5#分配百分之七十的显存给程序使用,避免内存溢出,可以自己调整
config.gpu_options.allow_growth = True#//按需分配显存,这个比较重要
session = tf.Session(config=config)
config = tf.ConfigProto()
os.environ["CUDA_DEVICE_ORDER"] = "PCI_BUS_ID"
os.environ["CUDA_VISIBLE_DEVICES"] = "0" # 使用第一块GPU
class face_rec():
    def __init__(self):
        self.mtcnn_model = mtcnn()
        self.threshold = [0.5,0.8,0.9]
        self.facenet_model = InceptionResNetV1()
        model_path = 'model_data/facenet_keras.h5'
        self.facenet_model.load_weights(model_path)
        face_list = os.listdir('face_dataset')
        self.known_face_encodings=[]
        self.known_face_names=[]
        for face in face_list:
            name = face.split(".")[0]
            img = cv2.imread('face_dataset/'+face)
            img = cv2.cvtColor(img,cv2.COLOR_BGR2RGB)
            rectangles = self.mtcnn_model.detectFace(img, self.threshold)
            rectangles = utils.rect2square(np.array(rectangles))
            rectangle = rectangles[0]
            landmark = (np.reshape(rectangle[5:15],(5,2)) - np.array([int(rectangle[0]),int(rectangle[1])]))/(rectangle[3]-rectangle[1])*160
            crop_img = img[int(rectangle[1]):int(rectangle[3]), int(rectangle[0]):int(rectangle[2])]
            crop_img = cv2.resize(crop_img,(160,160))
            new_img,_ = utils.Alignment_1(crop_img,landmark)
            new_img = np.expand_dims(new_img,0)
            face_encoding = utils.calc_128_vec(self.facenet_model,new_img)
            self.known_face_encodings.append(face_encoding)
            self.known_face_names.append(name)
    def recognize(self,draw):
        height,width,_ = np.shape(draw)
        draw_rgb = cv2.cvtColor(draw,cv2.COLOR_BGR2RGB)
        rectangles = self.mtcnn_model.detectFace(draw_rgb, self.threshold)
        if len(rectangles)==0:
            return
        rectangles = utils.rect2square(np.array(rectangles,dtype=np.int32))
        rectangles[:,0] = np.clip(rectangles[:,0],0,width)
        rectangles[:,1] = np.clip(rectangles[:,1],0,height)
        rectangles[:,2] = np.clip(rectangles[:,2],0,width)
        rectangles[:,3] = np.clip(rectangles[:,3],0,height)
        face_encodings = []
        for rectangle in rectangles:
            landmark = (np.reshape(rectangle[5:15],(5,2)) - np.array([int(rectangle[0]),int(rectangle[1])]))/(rectangle[3]-rectangle[1])*160
            crop_img = draw_rgb[int(rectangle[1]):int(rectangle[3]), int(rectangle[0]):int(rectangle[2])]
            crop_img = cv2.resize(crop_img,(160,160))
            new_img,_ = utils.Alignment_1(crop_img,landmark)
            new_img = np.expand_dims(new_img,0)
            face_encoding = utils.calc_128_vec(self.facenet_model,new_img)
            face_encodings.append(face_encoding)
        face_names = []
        for face_encoding in face_encodings:
            matches = utils.compare_faces(self.known_face_encodings, face_encoding, tolerance = 0.9)
            name = "Unknown"
            face_distances = utils.face_distance(self.known_face_encodings, face_encoding)
            best_match_index = np.argmin(face_distances)
            if matches[best_match_index]:
                name = self.known_face_names[best_match_index]
            face_names.append(name)
        rectangles = rectangles[:,0:4]
        for (left, top, right, bottom), name in zip(rectangles, face_names):
            cv2.rectangle(draw, (left, top), (right, bottom), (0, 0, 255), 2)
            font = cv2.FONT_HERSHEY_SIMPLEX
            cv2.putText(draw, name, (left , bottom - 15), font, 0.75, (255, 255, 255), 2)
        return draw
if __name__ == "__main__":
    dududu = face_rec()
    video_capture = cv2.VideoCapture(0)
    while True:
        ret, draw = video_capture.read()
        dududu.recognize(draw)
        cv2.imshow('Video', draw)
        if cv2.waitKey(2) & 0xFF == ord('q'):
            break
    video_capture.release()
    cv2.destroyAllWindows()
face_data.py (用于捕捉人脸,并保存到数据库中)
import cv2
face = cv2.CascadeClassifier('D:\OpenCV\Face_Identify\haarcascade_frontalface_default.xml')
cap = cv2.VideoCapture(0)
name = input('enter your name: ')
while True:
    ret, img = cap.read()
    gray = cv2.cvtColor(img, cv2.COLOR_BGR2GRAY)
    faces = face.detectMultiScale(gray,1.3,5)
    for (x, y, w, h) in faces:
        cv2.rectangle(img, (x, y), (x + w, y + h), (255, 0, 0), 2)
        cv2.imwrite("face_dataset/" + str(name) + ".jpg", gray[y:y + h, x:x + w])
    cv2.namedWindow('frame',0)
    cv2.imshow('frame', img)
    if cv2.waitKey(10) & 0xFF == ord('q'):
        break
cap.release()
cv2.destroyAllWindows()
核心原理:
MTCNN原名为:多任务级联卷积神经网络,这个框架利用了检测和对准之间固有的关系来增强他们的性能,通过3个CNN级联的方式对任务进行从粗到精的处理,分为三个阶段:
***阶段1:***使用P-Net是一个全卷积网络,用来生成候选窗和边框回归向量(bounding box regression vectors)。使用Bounding box regression的方法来校正这些候选窗,使用非极大值抑制(NMS)合并重叠的候选框。全卷积网络和Faster R-CNN中的RPN一脉相承。
***阶段2:***使用R-Net改善候选窗。将通过P-Net的候选窗输入R-Net中,拒绝掉大部分false的窗口,继续使用Bounding box regression和NMS合并。
***阶段3:***最后使用O-Net输出最终的人脸框和特征点位置。和第二步类似,但是不同的是生成5个特征点位置。
![]()
附:论文下载地址:
Joint Face Detection and Alignment using
Multi-task Cascaded Convolutional Networks
实现步骤:
- 点击face_data.py文件捕捉人脸并将捕捉的人脸图像保存在face_dataset文件夹中
- 点击face_recognize.py文件通过检测数据库中的人脸和实时检测到的人脸进行判断
实现结果
代码地址:
https://github.com/2837657164/face-recognize/tree/v1.0
致谢:
https://blog.csdn.net/weixin_44791964
https://kpzhang93.github.io/
