多线程(进程池代码)

线程池介绍

那究竟什么是线程池呢?

线程池是一种线程使用模式.

线程过多会带来调度开销,进而影响缓存局部性和整体性能.
而线程池维护着多个线程,等待着监督管理者分配可并发执行的任务.
这避免了在处理短时间任务时创建与销毁线程的代价.
线程池不仅能够保证内核的充分利用,还能防止过分调度.
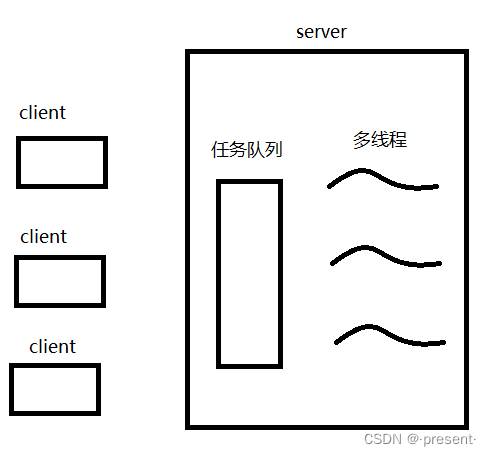
前面我们介绍过生产者消费者模型,线程池其实看作是它的一个变型
把任务队列和消费者(线程)进行了封装,统称为server
用户不需要再关心线程创建的问题,只需要构建好任务,把它直接送往server里面即可,server会帮我们解决对应的任务
多线程(进程池代码)_第1张图片
具体的应用场景有哪些呢?

    1. 需要大量的线程来完成任务,且完成任务的时间比较短.
      WEB服务器完成网页请求这样的任务,使用线程池技术是非常合适的.因为单个任务小,而任务数量巨大,你可以想象一个热门网站的点击次数.
    1. 对性能要求苛刻的应用,比如要求服务器迅速响应客户请求。
    1. 接受突发性的大量请求,但不至于使服务器因此产生大量线程的应用。突发性大量客户请求,在没有线程池情况下,将产生大量线程,虽然理论上大部分操作系统线程数目最大值不是问题,短时间内产生大量线程可能使内存到达极限,从而出现错误

第一个版本(基本框架搭建)

了解基本概念后,我们就可以具体实现相应的代码
本质上就是创建一个类
不过该类里面会自动封装相应的锁,条件变量,以及对应创建销毁线程的方法
一旦实例化,就有相应的线程为我们服务,用户不需要再考虑线程创建的问题,而只需要传任务即可
具体代码如下:

    1. 任务队列我们依旧用queue进行实现,并且不对任务的上限做约束
    1. 线程数目我们先设定为5个,如果有需求,再进行对应的调整即可
  1 #pragma once
  2 #include <iostream>
  3 #include <vector>
  4 #include <queue>
  5 #include "Task.hpp"
  6 #include <pthread.h>
  7 
  8 const static int N = 5;  //默认线程数量
  9 template <class T>
 10 class ThreadPool
 11 {
 12 public:
 13   ThreadPool(int num = N):_num(num),_threads(num)
 14   {
 15     pthread_mutex_init(&_mutex,nullptr);
 16     pthread_cond_init(&_cond,nullptr);
 17   }
 18   ~ThreadPool()
 19   {
 20     pthread_mutex_destroy(&_mutex);
 21     pthread_cond_destroy(&_cond);
 22   }
 23   void LockQueue()
 24   {
 25     pthread_mutex_lock(&_mutex); //给任务队列上锁
 26   }
 27   void UnlockQueue()
 28   {
 29     pthread_mutex_unlock(&_mutex); //给任务队列解锁
 30   }                                                                                                                                                                 
 31   void ThreadWait()
 32   {
 33     pthread_cond_wait(&_cond,&_mutex);  //没有任务,线程自动进入等待
 34   }
 35   void ThreadWakeUp()
 36   {
 37     pthread_cond_signal(&_cond);  //唤醒任务队列里面的线程
 38   }
 39   //判断任务队列是否为空                                                                                                                                            
 40   bool Isempty()
 41   {
 42     return _tasks.empty();
 43   }
 44   T popTask()
 45   {
 46     T t = _tasks.front();
 47     _tasks.pop();
 48     return t;
 49   }
 50   void PushTask(const T&t)
 51   {
 52     LockQueue();  //给任务队列加锁
 53     _tasks.push(t); //任务入列
 54     ThreadWakeUp(); //唤醒线程进行工作
 55     UnlockQueue(); //任务队列解锁
 56   }
 57   static void* ThreadRoutine(void* args)
 58   {
 59      //每个线程自己挂接,这样自动销毁
 60      pthread_detach(pthread_self());
 61      //将传进啦的this指针,转成我们的对象,这样即可访问里面的方法和成员变量
 62      ThreadPool<Task>* tp = static_cast<ThreadPool<Task> *>(args);
 63      while (true)
 64      {
 65        tp->LockQueue();  //每个线程访问任务队列时,都必须先加锁
 66        //任务队列不为空
 67        while(tp->Isempty())
 68        {
 69           tp->ThreadWait();  //假如没有任务,则等待                                                                                                                 
 70        }
 71        //有任务,取出对应的任务
 72        T t = tp->popTask();
 73        //归还锁,让其它线程也能够拿到
 74        tp->UnlockQueue();
 75        t();  //执行任务
 76        std::cout << "ThreadRoutine done:" << t.formatRes() << std::endl;
 77      }
 78   }
 79   //创建对应的线程
 80   void start()
 81   { 
 82     //创建对应的线程
 83     for(int i = 0;i < _num;i++)
 84     {
 85        pthread_create(&_threads[i],nullptr,ThreadRoutine,(void*)this);
 86     }
 87   }
 88 private:
 89   std::vector<pthread_t> _threads; //线程编号向量
 90   int _num;   //线程数量
 91 
 92   std::queue<T> _tasks;  //任务数量
 93   pthread_mutex_t _mutex; //锁
 94   pthread_cond_t _cond;   //条件变量
 95 };

第二个版本(封装自己的线程)

在第一个版本中,我们采用的是原生线程库里面的线程进行的封装
但我们还可以进一步进行改造,用我们之前自己封装的线程,来实现线程池.

//自己封装的线程
#include 
#include 
#include 
#include 
#include 
class Thread{
public:
  typedef enum
  {
     NEW = 0,
     RUNNING,
     EXITED
  }ThreadStatus;
    typedef void* (*func_t)(void*);
public:
  Thread(int num,func_t func,void* args):_tid(0),_status(NEW),_func(func),_args(args)
  {
     //名字由于还要接收用户给的编号,因此在构造函数内进行初始化
     char buffer[128];
     snprintf(buffer,sizeof(buffer),"thread-%d",num);
     _name = buffer;
  }
  ~Thread()
  {}
  //返回线程的状态
  int status()  {return _status;}
  //返回线程的名字
  std::string name() {return _name;}
  //返回线程的id
  //只有线程在运行的时候,才会有对应的线程id
  pthread_t GetTid()
  {
    if (_status == RUNNING)
    {
      return _tid;
    }
    else
    {
      return 0;
    }
  }
  //pthread_create函数默认第三个参数是void *(*start_routine) (void *)
  //而类成员函数具有默认参数this指针,直接传并不匹配,所以我们用static修饰,使其变成类成员函数
  //但是会有新的问题——无法访问类内成员,也就无法调用_func
  static void * ThreadRun(void* args)
  {
    Thread* ts = (Thread*)args;  //此时就获取到我们对象的指针
    // _func(args);  //无法回调相应的方法(成员变量无法直接被访问)
    (*ts)(); //传this指针进来,用仿函数回调_func
    return nullptr;
  }
  void operator()() //仿函数
  {
     //假如传进来的线程函数不为空,则调用相应的函数
     if(_func != nullptr)  _func(_args);
  }
  //线程运行
  void Run()
  {
    //线程创建的参数有四个
    int n = pthread_create(&_tid,nullptr,ThreadRun,this);
    if(n != 0)  exit(0);
    _status = RUNNING;
  }

  //线程等待
  void Join()
  {
    int n = pthread_join(_tid,nullptr);
    if (n != 0)
    {
       std::cerr << "main thread join error :" << _name << std::endl;
       return;
    }
    _status = EXITED;
  }
private:
   pthread_t _tid;    //线程id
   std::string _name; //线程的名字
   func_t _func;       //未来要回调的函数
   void*_args;
   ThreadStatus _status; //目前该线程的状态
};
//V2版本
#pragma once
#include 
#include 
#include 
#include "Task.hpp"
#include 

const static int N = 5;  //默认线程数量
template <class T>
class ThreadPool
{
public:
  ThreadPool(int num = N):_num(num),_threads(num)
  {
    pthread_mutex_init(&_mutex,nullptr);
    pthread_cond_init(&_cond,nullptr);
  }
  ~ThreadPool()
  {
    pthread_mutex_destroy(&_mutex);
    pthread_cond_destroy(&_cond);
  }
  void LockQueue()
  {
    pthread_mutex_lock(&_mutex); //给任务队列上锁
  }
  void UnlockQueue()
  {
    pthread_mutex_unlock(&_mutex); //给任务队列解锁
  }
  void ThreadWait()
  {
    pthread_cond_wait(&_cond,&_mutex);  //没有任务,线程自动进入等待
  }
  void ThreadWakeUp()
  {
    pthread_cond_signal(&_cond);  //唤醒任务队列里面的线程
  }
  //判断任务队列是否为空
  bool Isempty()
  {
    return _tasks.empty();
  }
  T popTask()
  {
    T t = _tasks.front();
    _tasks.pop();
    return t;
  }
  void PushTask(const T&t)
  {
    LockQueue();  //给任务队列加锁
    _tasks.push(t); //任务入列
    ThreadWakeUp(); //唤醒线程进行工作
    UnlockQueue(); //任务队列解锁
  }
  static void* ThreadRoutine(void* args)
  {
     //每个线程自己挂接,这样自动销毁
     pthread_detach(pthread_self());
     //将传进啦的this指针,转成我们的对象,这样即可访问里面的方法和成员变量
     ThreadPool<Task>* tp = static_cast<ThreadPool<Task> *>(args);
     while (true)
     {
       tp->LockQueue();  //每个线程访问任务队列时,都必须先加锁
       //任务队列不为空
       while(tp->Isempty())
       {
          tp->ThreadWait();  //假如没有任务,则等待
       }
       //有任务,取出对应的任务
       T t = tp->popTask();
       //归还锁,让其它线程也能够拿到
       tp->UnlockQueue();
       t();  //执行任务
       std::cout << "ThreadRoutine done:" << t.formatRes() << std::endl;
     }
  }
  //创建对应的线程
  void start()
  { 
    //创建对应的线程
    for(int i = 0;i < _num;i++)
    {
       pthread_create(&_threads[i],nullptr,ThreadRoutine,(void*)this);
    }
  }
private:
  std::vector<pthread_t> _threads; //线程编号向量
  int _num;   //线程数量

  std::queue<T> _tasks;  //任务数量
  pthread_mutex_t _mutex; //锁
  pthread_cond_t _cond;   //条件变量
};

第三个版本(封装自己的锁)

在第二个版本中,我们用自己封装的线程,来实现线程池.
再进一步改造,我们还可以用我们自己封装的锁,来进一步进行封装.

//自己封装的锁
#pragma once

#include 
#include 

class Mutex
{
public:
  Mutex(pthread_mutex_t* mutex):pmutex(mutex)
  {}
  ~Mutex()
  {}
  void Lock()
  {
     pthread_mutex_lock(pmutex);
  }
  void Unlock()
  {
    pthread_mutex_unlock(pmutex);
  }
private:
   pthread_mutex_t* pmutex;
};

class LockGuard
{
public:
   LockGuard(pthread_mutex_t* mutex):_mutex(mutex)
   {
     //在创建的时候,就自动上锁
     _mutex.Lock();
   }
   ~LockGuard()
   {
     //销毁的时候,自动解锁
     _mutex.Unlock();
   }

private:
  Mutex _mutex;
};

我们自己实现的锁,会在创建时,自动上锁;出了作用域后,自动进行解锁
因此我们原来线程池代码可以进一步进行优化
给任务队列进行上锁,解锁的成员函数,都可以直接删除
假如要上锁,只需要创建对应LockGuard对象即可,然后把临界区的代码用中括号全部括起来

#pragma once
#include 
#include 
#include 
#include "Task.hpp"
#include 
#include "Thread.hpp"
#include "mymutex.hpp"

const static int N = 5;  //默认线程数量
template <class T>
class ThreadPool
{
public:
  ThreadPool(int num = N):_num(num)
  {
    pthread_mutex_init(&_mutex,nullptr);
    pthread_cond_init(&_cond,nullptr);
  }
  ~ThreadPool()
  {
    for(auto &t:_threads)
    {
      t.Join();
    }
    pthread_mutex_destroy(&_mutex);
    pthread_cond_destroy(&_cond);
  }
  pthread_mutex_t* Getlock()
  {
    return &_mutex;
  }

  void ThreadWait()
  {
    pthread_cond_wait(&_cond,&_mutex);  //没有任务,线程自动进入等待
  }
  void ThreadWakeUp()
  {
    pthread_cond_signal(&_cond);  //唤醒任务队列里面的线程
  }
  //判断任务队列是否为空
  bool Isempty()
  {
    return _tasks.empty();
  }
  T popTask()
  {
    T t = _tasks.front();
    _tasks.pop();
    return t;
  }
  void PushTask(const T&t)
  {
    LockGuard lockguard(&_mutex);
    _tasks.push(t); //任务入列
    ThreadWakeUp(); //唤醒线程进行工作
  }
  static void* ThreadRoutine(void* args)
  {
     //将传进啦的this指针,转成我们的对象,这样即可访问里面的方法和成员变量
     ThreadPool<Task>* tp = static_cast<ThreadPool<Task> *>(args);
     while (true)
     {
       T t;
       //任务队列不为空
       {
         LockGuard lockguard(tp->Getlock());
         while(tp->Isempty())
         {
            tp->ThreadWait();  //假如没有任务,则等待
         }
          //有任务,取出对应的任务
         t = tp->popTask();
       }
       t();  //执行任务
       std::cout <<  " Routine done:" << t.formatRes() << std::endl;
     }
  }
  //创建对应的线程
  void Init()
  {
    for(int i = 0;i < _num;i++)
    {
      _threads.push_back(Thread(i,ThreadRoutine,(void*)this));
    } 
  }
  void start()
  {
    for (auto &t:_threads)
    { 
      t.Run();   //调用自定义线程里面的Run函数,创建相应的线程
    }
  }
  void Check()
  {
    for(auto &t:_threads)
    {
      std::cout << t.name()<< " is Running..." <<std::endl;
    }
  }
private:
  std::vector<Thread> _threads; //线程编号向量
  int _num;   //线程数量

  std::queue<T> _tasks;  //任务数量
  pthread_mutex_t _mutex; //锁
  pthread_cond_t _cond;   //条件变量
};

我们可以用我们实现的线程池,完成加减乘除的任务
首先实现一个Task类,该类会用传入其中的x,y,运算符创建对象
调用对应的仿函数,即可完成对应的四则运算任务

#pragma once
#include 
#include 

class Task
{
public:
   //无参构造
   Task()
   {}
   Task(int x,int y,char op):_x(x),_y(y),_op(op),_result(0),_exitflag(0)
   {}
   ~Task()
   {}
   void operator()()
   {
     switch(_op)
     {
      case '+':
      {
         _result = _x + _y;
         break;
      }
      case '-':
      {
         _result = _x - _y;
         break;
      }
      case '*':
      {
         _result = _x * _y;
         break;
      }
      case '/':
      {
         if(_y == 0)
           _exitflag = -1;
         else
            _result = _x / _y;
         break;
      }
      case '%':
      {  
         if (_y == 0)
           _exitflag = -2;
         else
          _result = _x % _y;
         break;
      }
      default:
        break;
     }
   }
   std::string formatArgs()
   {
     return std::to_string(_x) + _op + std::to_string(_y) + "="; 
   }
   std::string formatRes()
   {
     return std::to_string(_result) + "(" + std::to_string(_exitflag) + ")";
   }
private:
  int _x;
  int _y;

  char _op; //运算符
  int _result; //运算的结果
  int _exitflag; //退出成功与否
};

主函数传参时,把对应构建好的Task类对象传入即可,剩下的工作,线程池会自动帮我们创建好对应的线程,执行并显示我们的任务

#include 
#include "Task.hpp"
#include 
#include 
//#include "ThreadPool_V1.hpp"
//#include "ThreadPool_V2.hpp"
#include "ThreadPool_V3.hpp"
int main()
{
  ThreadPool<Task>* tp = new ThreadPool<Task>();
  tp->Init();
  tp->start();  //线程池启动
  tp->Check();  //看线程是否启动成功
  while(true)
  {
    int x,y;
    char op;
    std::cout << "Please enter x:";
    std::cin >> x;

    std::cout << "Please enter y:";
    std::cin >> y;

    std::cout << "Please enter op(+-*/%):";
    std::cin >> op;
    
    Task t(x,y,op);
    tp->PushTask(t);  //将任务传入线程池中即可
  }
  return 0;
}

结果显示:
多线程(进程池代码)_第2张图片

第四个版本(线程安全版本)

IT行业这么火, 涌入的人很多. 俗话说林子大了啥鸟都有. 大佬和菜鸡们两极分化的越来越严重. 为了让菜鸡们不太拖大佬的后腿,
于是大佬们针对一些经典的常见的场景, 给定了一些对应的解决方案, 这个就是 设计模式
其中单例模式就是设计模式中的一种
所谓的单例模式就是指,有一个特殊类,有且只有用它来创建一个对象
为什么要设计这种模式呢?
拿我们线程池来举例,线程池这个对象,大多数时候,我们并不需要创建多个,假如任务很多,我们只要相应调节线程池里面的线程数目即可,假如创建多个线程池对象,这样其实效率并不高.
单例对象的最终目的就是为了提高效率

那具体如何设计这个特殊类呢?(懒汉模式)
1.构造函数私有化,拷贝,赋值函数删除(这样外面的用户也就不能再创建对象了)
2.类成员变量中加入类指针,并用static进行修饰
3.在类内提供相应接口函数,每次用户调用该接口时,用类指针创建对象,但是假如类指针不为空,也就是已经创建了一个对象,则直接返回该对象的指针,不会再创建新的对象

具体改造后的代码如下:

#pragma once
#include 
#include 
#include 
#include "Task.hpp"
#include 
#include "Thread.hpp"
#include "mymutex.hpp"

const static int N = 5;  //默认线程数量
template <class T>
class ThreadPool
{
private:
  ThreadPool(int num = N):_num(num)
  {
    pthread_mutex_init(&_mutex,nullptr);
    pthread_cond_init(&_cond,nullptr);
  }
  ThreadPool(const ThreadPool<T>& tp) = delete;  //删除构造函数
  void operator=(const ThreadPool<T>& tp) = delete; //删除赋值函数

public:
  static ThreadPool<T>* GetInstance()
  {
      if(nullptr == instance)//提高效率 
      {
          LockGuard lockguard(&instance_lock); 
          if(nullptr == instance) //保证有且只有一个线程可以创建对象
          {
            instance = new ThreadPool<T>();
            instance->Init();
            instance->start();
          }
      }
      return instance;
  }
  ~ThreadPool()
  {
    for(auto &t:_threads)
    {
      t.Join();
    }
    pthread_mutex_destroy(&_mutex);
    pthread_cond_destroy(&_cond);
  }
  pthread_mutex_t* Getlock()
  {
    return &_mutex;
  }

  void ThreadWait()
  {
    pthread_cond_wait(&_cond,&_mutex);  //没有任务,线程自动进入等待
  }
  void ThreadWakeUp()
  {
    pthread_cond_signal(&_cond);  //唤醒任务队列里面的线程
  }
  //判断任务队列是否为空
  bool Isempty()
  {
    return _tasks.empty();
  }
  T popTask()
  {
    T t = _tasks.front();
    _tasks.pop();
    return t;
  }
  void PushTask(const T&t)
  {
    LockGuard lockguard(&_mutex);
    _tasks.push(t); //任务入列
    ThreadWakeUp(); //唤醒线程进行工作
  }
  static void* ThreadRoutine(void* args)
  {
     //将传进啦的this指针,转成我们的对象,这样即可访问里面的方法和成员变量
     ThreadPool<Task>* tp = static_cast<ThreadPool<Task> *>(args);
     while (true)
     {
       T t;
       //任务队列不为空
       {
         LockGuard lockguard(tp->Getlock());
         while(tp->Isempty())
         {
            tp->ThreadWait();  //假如没有任务,则等待
         }
          //有任务,取出对应的任务
         t = tp->popTask();
       }
       t();  //执行任务
       std::cout <<  " Routine done:" << t.formatRes() << std::endl;
     }
  }
  //创建对应的线程
  void Init()
  {
    for(int i = 0;i < _num;i++)
    {
      _threads.push_back(Thread(i,ThreadRoutine,(void*)this));
    } 
  }
  void start()
  {
    for (auto &t:_threads)
    { 
      t.Run();   //调用自定义线程里面的Run函数,创建相应的线程
    }
  }
  void Check()
  {
    for(auto &t:_threads)
    {
      std::cout << t.name()<< " is Running..." <<std::endl;
    }
  }
private:
  std::vector<Thread> _threads; //线程编号向量
  int _num;   //线程数量

  std::queue<T> _tasks;  //任务数量
  pthread_mutex_t _mutex; //锁
  pthread_cond_t _cond;   //条件变量

  static ThreadPool<T>* instance; //类对象指针
  static pthread_mutex_t instance_lock; //类对象锁
};

//对对象指针进行初始化
template <class T>
ThreadPool<T>* ThreadPool<T>::instance = nullptr;

//对类对象锁进行初始化
template <class T>
pthread_mutex_t ThreadPool<T>::instance_lock = PTHREAD_MUTEX_INITIALIZER;

这里有个细节需要注意
在实现GetInstance函数时,我们采取双检查加锁的方式
原因在于,加锁解锁必定要在临界区之前,否则将毫无意义,依旧会出现多个线程创建多个对象,出现并发问题
但是单例只会被创建一次,申请锁这个操作本身是一种消耗
因此我们在外层再套一层判断,假如不为空,则不会进去,也就不会再因为申请锁这个操作而白白消耗
提高效率的同时,还保证了线程安全
多线程(进程池代码)_第3张图片

你可能感兴趣的:(Linux,开发语言,c++)