Chipyard BOOM环境搭建
Chipyard BOOM环境搭建
- 安装流程
-
- 安装依赖
- 下载chipyard并配置BOOM
- 使用BOOM进行Dhrystone测试:
- 使用BOOM核仿真自己编写的C程序
- 移植到FPGA上
-
- Linux
-
- 综合生成SmallBOOMConfig的bitstream
- FireMarshal构建Linux
- 设置SD Card
- 从SDCard传输和运行Linux
- BareMetal(!!!未实现。。待续)
-
- 创建MCS File
- Flash the image
- 踩的一些坑
-
- build the toolchain时遇到的问题以及解决措施
-
- 问题1:虚拟机磁盘空间不足,对磁盘扩容
- 问题2:ubuntu编译qemu报错:‘ERROR: pixman >= 0.21.8 not present.’
- 问题3:提示“Failed to connect to boringssl.googlesource.com port 443: Connection timed out”
- 问题4:dromajo没有那个文件或目录。停止。
- make CONFIG时遇到的问题以及解决措施
-
- 问题5:bash:java:未找到命令
- 问题6:Picked up JAVA_TOOL_OPTIONS:-Xmx8G -Xss8M -Djava.io.tmpdir=/.../.jaca_tmp
- 问题7:verilator_bin --cc --exe -CFLAGS ... 报错:Invalid Option: --threads-dpi
- 问题8:BOOM仿真自己编写编译的C程序:tohost and fromhost symbols not in ELF; can't communicate with target
- !!!失败了只记录一下报错——BOOM移植到FPGA(arty7-35T)遇到的问题以及解决措施
-
- 问题9:执行`chipyard/fpga/fpga-shells/xilinx/common/tcl/vivado.tcl" line 7`报错
- 问题10:vivado安装文件中没有对应的板子的文件
- 问题11:`error: [synth 8-2715] syntax error near "dpi-c`
- 问题12:`chipyard.fpga.arty.ArtyFPGATestHarness.BoomArtyConfig.harness.v`中找不到`module 'SimDRAM'`
- 问题13:报错`vivado/Vivado/2019.1/bin/loader: 行 267: 23806 已杀死 "$RDI_PROG" "$@"`
- 问题14:place_design failed
- BOOM移植到FPGA(VCU118)遇到的问题以及解决措施
-
- 问题15:缺少vcu9p device
- 问题16:VMWare Ubuntu 综合资源不足
- 问题17:FileNotFoundError: [Errno 2] No such file or directory: 'guestmount': 'guestmount'
- 参考
-
- 附录
-
- RISC-V toolchain编译指令
- Linux查看CPU信息
安装流程
安装依赖
安装依赖可以避免后续的很多问题。
Docs » 1. Chipyard Basics » 1.4. Initial Repository Setup
查看对应版本需要安装的依赖,本文使用的环境是ubuntu 18.04:
#!/bin/bash
set -ex
sudo apt-get install -y build-essential bison flex software-properties-common curl
sudo apt-get install -y libgmp-dev libmpfr-dev libmpc-dev zlib1g-dev vim default-jdk default-jre
# install sbt: https://www.scala-sbt.org/release/docs/Installing-sbt-on-Linux.html#Ubuntu+and+other+Debian-based+distributions
echo "deb https://repo.scala-sbt.org/scalasbt/debian /" | sudo tee -a /etc/apt/sources.list.d/sbt.list
curl -sL "https://keyserver.ubuntu.com/pks/lookup?op=get&search=0x2EE0EA64E40A89B84B2DF73499E82A75642AC823" | sudo apt-key add
sudo apt-get update
sudo apt-get install -y sbt
sudo apt-get install -y texinfo gengetopt
sudo apt-get install -y libexpat1-dev libusb-dev libncurses5-dev cmake
# deps for poky
sudo apt-get install -y python3.8 patch diffstat texi2html texinfo subversion chrpath wget
# deps for qemu
sudo apt-get install -y libgtk-3-dev gettext
# deps for firemarshal
sudo apt-get install -y python3-pip python3.8-dev rsync libguestfs-tools expat ctags
# install DTC
sudo apt-get install -y device-tree-compiler
sudo apt-get install -y python
# install git >= 2.17
sudo add-apt-repository ppa:git-core/ppa -y
# sudo apt-get update
sudo apt-get install git -y
# install verilator
sudo apt-get install -y autoconf
git clone http://git.veripool.org/git/verilator
cd verilator
git checkout v4.034
autoconf && ./configure && make -j$(nproc) && sudo make install
下载chipyard并配置BOOM
参考Welcome to RISCV-BOOM’s documentation!
# Download the template and setup environment
git clone https://github.com/ucb-bar/chipyard.git
cd chipyard
./scripts/init-submodules-no-riscv-tools.sh

# build the toolchain
./scripts/build-toolchains.sh riscv-tools

# add RISCV to env, update PATH and LD_LIBRARY_PATH env vars
# note: env.sh generated by build-toolchains.sh
source env.sh

cd sims/verilator
make CONFIG=SmallBoomConfig
./scripts/build-toolchains.sh riscv-tools执行成功:

make CONFIG=SmallBoomConfig执行成功:
![]()
使用BOOM进行Dhrystone测试:
# 对SmallBoom运行dhrystone程序
./simulator-chipyard-SmallBoomConfig $RISCV/riscv64-unknown-elf/share/riscv-tests/benchmarks/dhrystone.riscv
./simulator-chipyard-LargeBoomConfig $RISCV/riscv64-unknown-elf/share/riscv-tests/benchmarks/dhrystone.riscv执行成功:

如果想要切换BOOM CONGIF,重新执行make步骤即可:
# 切换BOOM CONFIG:如选择LargeBoomConfig进行编译
make CONFIG=LargeBoomConfig
# 然后运行dhrystone程序
./simulator-chipyard-LargeBoomConfig $RISCV/riscv64-unknown-elf/share/riscv-tests/benchmarks/dhrystone.riscv
BOOM的配置文件在generators/chipyard/src/main/scala/config/BoomConfigs.scala中,也可自行编写Boom的其它配置项。

使用BOOM核仿真自己编写的C程序
编译C程序生成可执行文件:
riscv64-unknown-elf-gcc -fno-common -fno-builtin-printf -specs=htif_nano.specs -c test.c
riscv64-unknown-elf-gcc -static -specs=htif_nano.specs test.o -o test.riscv
spike test.riscv
BOOM核仿真运行:
./simulator-chipyard-SmallBoomConfig ./test.riscv
移植到FPGA上
Linux
10.2.4. Running Linux on VCU118 Designs
综合生成SmallBOOMConfig的bitstream
由于软件仿真效率太低,考虑将BOOM核移植到FPGA上(型号:EK-U1-VCU118-G)。参考:10.1. General Setup and Usage
在chipyard/fpga/src/main/scala/arty/Configs.scala下添加如下配置:
!!!arty7资源不足,因此忽略BoomArtyConfig的配置
class BoomArtyConfig extends Config(
  new WithFPGAFrequency(50) ++
  new WithArtyTweaks ++
  new chipyard.SmallBoomConfig)

class WithFPGAFrequency(fMHz: Double) extends Config(
  new chipyard.config.WithPeripheryBusFrequency(fMHz) ++ // assumes using PBUS as default freq.
  new chipyard.config.WithMemoryBusFrequency(fMHz)
)
class WithFPGAFreq25MHz extends WithFPGAFrequency(25)
class WithFPGAFreq50MHz extends WithFPGAFrequency(50)
class WithFPGAFreq75MHz extends WithFPGAFrequency(75)
class WithFPGAFreq100MHz extends WithFPGAFrequency(100)
在chipyard/fpga/src/main/scala/vcu118/Configs.scala查看配置如下,core设置为small core:
class BoomVCU118Config extends Config(
  new WithFPGAFrequency(50) ++
  new WithVCU118Tweaks ++
  new chipyard.SmallBoomConfig)
  //new chipyard.MegaBoomConfig)
安装vivado后配置路径,返回chipyard目录,执行如下命令:
# in the chipyard top level folder
source ./env.sh
# 配置vivado路径,如果which vivado有返回可以忽略
# source ../../vivado/Vivado/2019.1/settings64.sh
./scripts/init-fpga.sh
cd fpga
# 查看vivado是否配置
which vivado
make SUB_PROJECT=vcu118 CONFIG=BoomVCU118Config bitstream
将VMware内存调至16GB后综合过程仍然显示vivado资源不足,借用实验室的服务器完成综合:

可以看到在obj目录下生成如下文件:

FireMarshal构建Linux
首先setup FireMarshal
# 进入firemasrshal目录
cd chipyard/software/firemasrshal
# 添加子模块:
./init-submodules.sh
# 将FireMarshal board从firechip切换到prototype
echo "board-dir : 'boards/prototype'" > marshal-config.yaml
# 构建build-root linux,默认使用base-workloads
./marshal -v -d build br-base.json
# 在移植到SDCard前将二进制文件扁平化,移除DRAM偏移
./marshal -v -d install -t prototype br-base.json
查看br-base.json可以看到配置如下:

上述步骤生成了如下文件:br-base-bin-nodisk-flat用来写入SDCard,br-base-bin-nodisk可以用Spike模拟运行。

在chipyard/software/firemarshal/boards/prototype/base-workloads/br-base/overlay/root/hello下写入hello.c测试程序,编译程序:

riscv64-unknown-elf-gcc -g hello.c -o hello
按照上面的步骤重新构建build-root linux:
# 构建build-root linux,默认使用base-workloads
./marshal -v -d build br-base.json
# 在移植到SDCard前将二进制文件扁平化,移除DRAM偏移
./marshal -v -d install -t prototype br-base.json
spike模拟运行br-base-bin-nodisk:
spike br-base-bin-nodisk
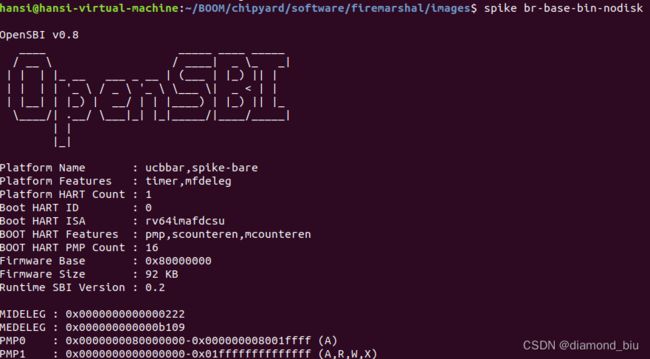
输入root用户,密码为fpga:

查看cpuinfo,可以看到成功启动了linux。
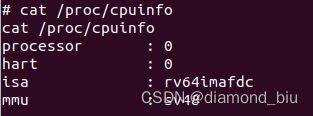
hello存放在root目录下,可以运行hello程序。


设置SD Card
SD卡分为两部分:一部分存储Linux的二进制文件,另一部分存储可被DUT访问的文件系统。
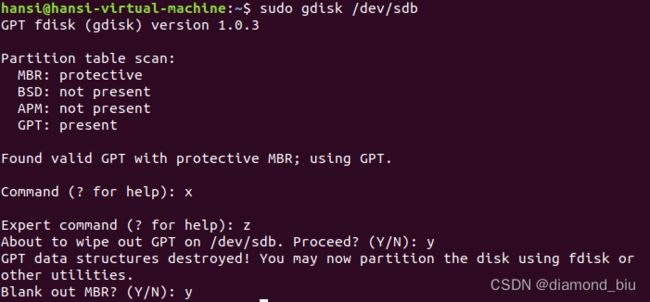
- 使用gdisk擦除GPT。
x进入特权目录,使用z命令擦除后,m命令退出特权目录。
本实验使用的SDCard的路径是/dev/sdb。
sudo gdisk /dev/sdb
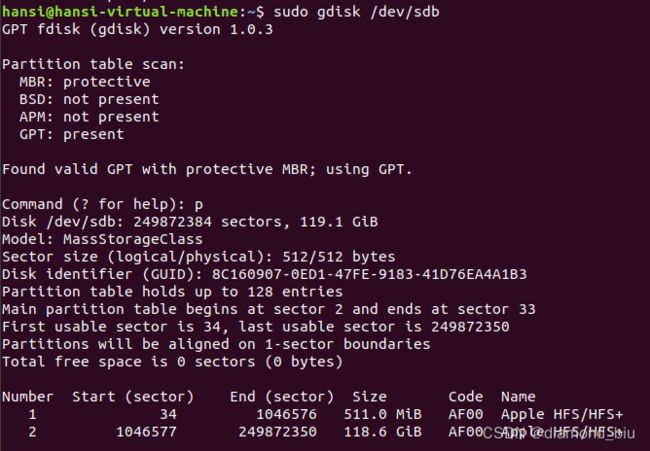
3.bootrom认为要加载入memory的linux binary被放在SDCard的34 sector。修改默认分区对齐值为1以确保可以写入34。x进入特权目录,使用I命令修改,m命令退出特权目录。

4.创建512M的分区来存储Linux binary。

5.创建第二个分区用剩余空间来存储其他文件。

6. w将改变写入。

7.在第二个分区上设置文件系统。/dev/sdb2指向第二个分区。
sudo mkfs.hfs -v "PrototypeData" /dev/sdb2
sudo apt install hfsprogs
sudo mkfs.hfs -v "PrototypeData" /dev/sdb2
从SDCard传输和运行Linux
有了Linux boot binary且SDCard被设置正确(分区1的34扇区),就可以将binary传输给分区1了。使用dd加载Firemashal生成的br-base-bin-nodisk-flat
sudo dd if=images/br-base-bin-nodisk-flat of=/dev/sdb1

接着,program FPGA,将VCU118的JTAG和UART连接服务器。打开vivado,添加硬件设备。


右键选中xcvu9p_0,Program Device。选中obj目录下的bitstream,确定完成Program。
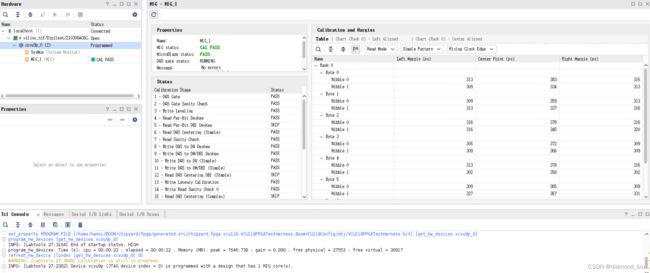
插入SDCard,通过UART console连接到linux,安装screen依赖后使用screen连接到串口。
sudo screen -S FPGA_UART_CONSOLE /dev/ttyUSB1 115200
连接后,按下CPU_RESET复位DUT。
可以看到终端开始有输出,Linux binary被load。
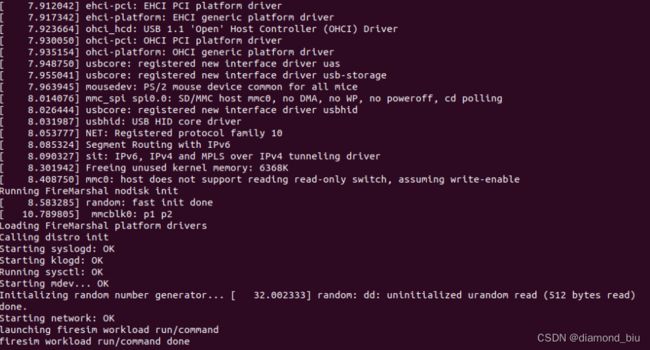
使用用户名root和密码fpga登录。
查看cpu信息:

并运行hello示例程序:

![]()
至此成功在BOOM上移植了Linux。
BareMetal(!!!未实现。。待续)
创建MCS File
利用Vivado创建MCS(Memory Configuration File Format)文件以便于将设计保存在开发板的SPI flash上,从而使得开发板上电后设计可以被自动读取。
打开vivado,进入File->Hardware Manager,在Tools栏选中Generate Memory Configuration File,进行如下设置:
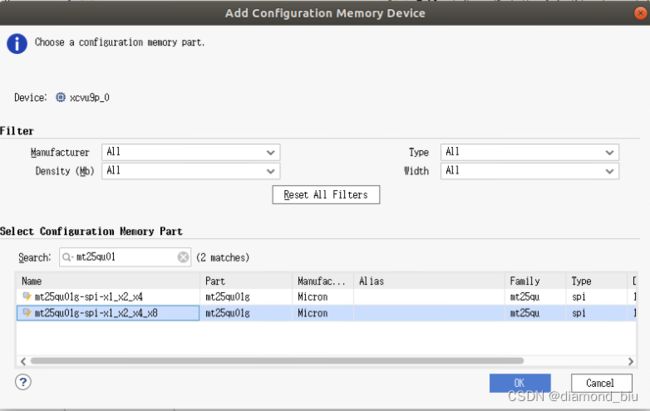
- Memory Part:选择指定开发板的memory part,在下方board.tcl中可以查看对应为mt25qu01g-spi-x1_x2_x4_x8,注意需要使用vivado打开工程后再查找,否则找不到x8位宽的设备。
- Filename:指定生成的MCS文件的位置与名称
- Interface:选择指定开发板的SPIx8
- Bitfile:选择先前Chipyard生成的Bitstream文件
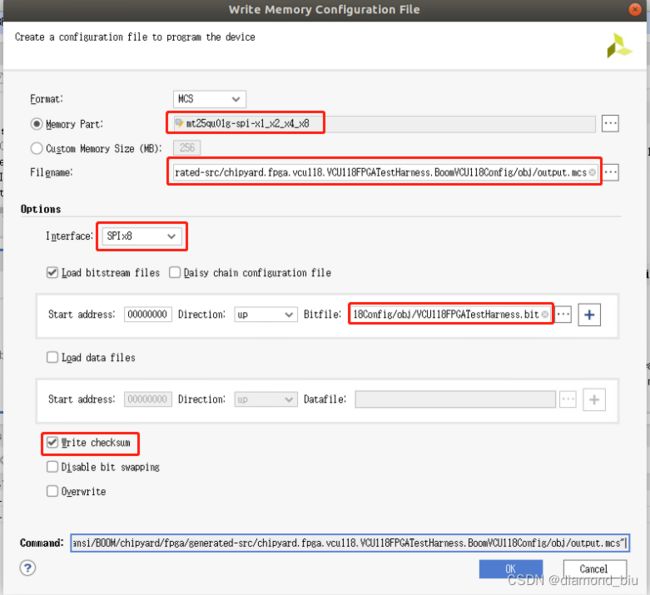
OK后再设置的路径下可以看到生成对应的mcs文件:

Flash the image
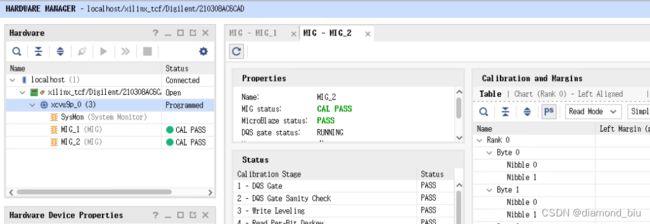
连接服务器USB与VCU开发板的JTAG,flow->hardware manager。vivado中不显示设备,可能是因为缺少USB 3.0,关闭虚拟机,在设置中添加USB 3.0设备管理器。还是找不到,查了下ESXI 6.7的需要在服务器控制台部分手动添加USB设备。


之后就可以在vivado里找到这个设备了
右键xcvu9p,选择add configuration memory device,配置与前文相同。
OK,继续进行配置:configuration file为前文生成的mcs文件,PRM文件为对应的.prm文件。
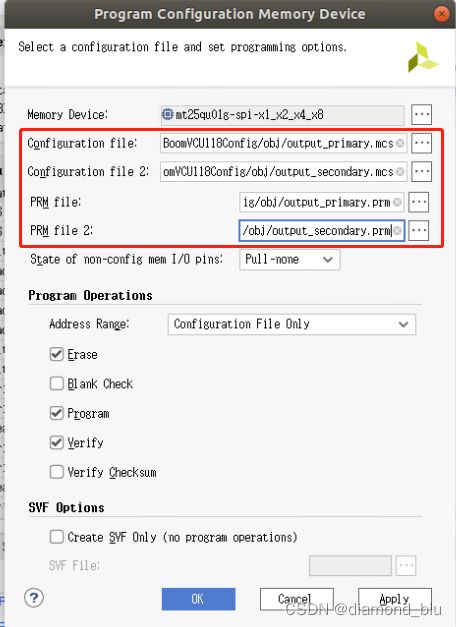
OK,开始flash MCS文件。

踩的一些坑
build the toolchain时遇到的问题以及解决措施
问题1:虚拟机磁盘空间不足,对磁盘扩容
//查看磁盘使用率
df -hl
解决:VMware虚拟机 Linux系统 Ubuntu 16.04 硬盘/磁盘扩容
问题2:ubuntu编译qemu报错:‘ERROR: pixman >= 0.21.8 not present.’

解决:ubuntu编译qemu报错:‘ERROR: pixman >= 0.21.8 not present.’ 解决方案
apt-cache search pixman
apt-get install libpixman-1-dev
问题3:提示“Failed to connect to boringssl.googlesource.com port 443: Connection timed out”

解决:
参考:OPTEE repo更新提示“Failed to connect to boringssl.googlesource.com port 443: Connection timed out”的解决方案
qemu-v8分支会自动下载edk2,而edk2的Openssl在下载boringssl时访问boringssl.googlesource.com,而GFW屏蔽了googlesouce,所以会导致链接超时。
使用git config --global url.A.insteadOf B命令将boringssl.googlesource.com替换为谷歌的github镜像库https://github.com/google/boringssl.git
git config --global url."https://github.com/google/boringssl.git".insteadOf "https://boringssl.googlesource.com/boringssl"
git config --global url."https://hub.fastgit.org/google/boringssl.git".insteadOf "https://boringssl.googlesource.com/boringssl"
repo sync
问题4:dromajo没有那个文件或目录。停止。

解决:
在GitHub chipyard项目找到对应位置,手动下载dromajo-secrect文件,注意文件夹名称与chipyard中一致。
git clone git://github.com/riscv-boom/dromajo.git
make CONFIG时遇到的问题以及解决措施
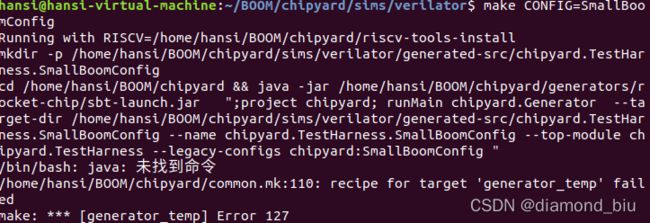
问题5:bash:java:未找到命令
//安装jdk
sudo apt install openjdk-8-jdk-headless
//编辑环境变量
sudo gedit /etc/profile
//添加:
//export JAVA_HOME=/usr/lib/jvm/java-8-openjdk-amd64
//export JRE_HOME=$JAVA_HOME/jre
//export CLASSPATH=$JAVA_HOME/lib:$JRE_HOME/lib:$CLASSPATH
//export PATH=$JAVA_HOME/bin:$JRE_HOME/bin:$PATH
//使其生效
source /etc/profile
//查看是否安装成功
java -version
问题6:Picked up JAVA_TOOL_OPTIONS:-Xmx8G -Xss8M -Djava.io.tmpdir=/…/.jaca_tmp
![]()
解决:无视这个错误,等待即可。
问题7:verilator_bin --cc --exe -CFLAGS … 报错:Invalid Option: --threads-dpi

解决:
Failed to build verilator · Issue #72 · nvdla/hw · GitHub
和这个帖子类似的问题,应该是apt install verilator命令直接安装的版本不够高,没有办法识别参数,参考:Installation——Verilator 4.221 documentation,手动安装最新版本的verilator。
git clone https://github.com/verilator/verilator   # Only first time
# Every time you need to build:
unsetenv VERILATOR_ROOT  # For csh; ignore error if on bash
unset VERILATOR_ROOT  # For bash
cd verilator
git pull         # Make sure git repository is up-to-date
git tag          # See what versions exist
#git checkout master      # Use development branch (e.g. recent bug fixes)
#git checkout stable      # Use most recent stable release
#git checkout v{version}  # Switch to specified release version
autoconf         # Create ./configure script
./configure      # Configure and create Makefile
make -j `nproc`  # Build Verilator itself (if error, try just 'make')
sudo make install
问题8:BOOM仿真自己编写编译的C程序:tohost and fromhost symbols not in ELF; can’t communicate with target
直接使用riscv64-unknown-elf-gcc -o test.riscv test.c命令编译:
riscv64-unknown-elf-gcc -o test.riscv test.c
./simulator-chipyard-LargeBoomConfig ./test.riscv
报如下错误:tohost and fromhost symbols not in ELF; can't communicate with target
This emulator compiled with JTAG Remote Bitbang client. To enable, use +jtag_rbb_enable=1.
Listening on port 36041
[UART] UART0 is here (stdin/stdout).
warning: tohost and fromhost symbols not in ELF; can't communicate with target
这是因为:
Without linux or any other os is Bare Metal. And chipyard doesn’t ship with an booting/running linux, it is baremetal.
Bare Metal没有OS,chipyard没有配备引导/运行的linux,它是Bare Metal。
解决:
How do I compile a c program such that the binary can be run/simulated by an RTL config?
7.3. Baremetal RISC-V Programs
根据chipyard document中的方法,按照如下步骤编译原始C程序生成可执行文件,即可在裸金属运行:
riscv64-unknown-elf-gcc -fno-common -fno-builtin-printf -specs=htif_nano.specs -c test.c
riscv64-unknown-elf-gcc -static -specs=htif_nano.specs test.o -o test.riscv
spike test.riscv
当仅使用spike test.riscv而非spike pk test.riscv即可模拟运行即可。此时就可以用BOOM成功仿真了:

!!!失败了只记录一下报错——BOOM移植到FPGA(arty7-35T)遇到的问题以及解决措施
问题9:执行chipyard/fpga/fpga-shells/xilinx/common/tcl/vivado.tcl" line 7报错
{unknown option} {}

    while executing
"source [file join $scriptdir "prologue.tcl"]"
    (file "/home/hansi/BOOM/chipyard/fpga/fpga-shells/xilinx/common/tcl/vivado.tcl" line 7)
INFO: [Common 17-206] Exiting Vivado at Wed Apr  6 14:42:43 2022...
Makefile:115: recipe for target '/home/hansi/BOOM/chipyard/fpga/generated-src/chipyard.fpga.arty.ArtyFPGATestHarness.BoomArtyConfig/obj/ArtyFPGATestHarness.bit' failed
make: *** [/home/hansi/BOOM/chipyard/fpga/generated-src/chipyard.fpga.arty.ArtyFPGATestHarness.BoomArtyConfig/obj/ArtyFPGATestHarness.bit] Error 1
解决方案:
Swap two arguments to resolve bug #941
Merge pull request #941 from zslwyuan/patch-3
查看chipyard/fpga/Makefile,对应位置的代码是merge后的代码,但还是报了一样的错,bug中提到这是针对2020版本的vivado报错进行的修改,本文使用的是2019.1版本的vivado,所以尝试修改回之前的版本试试看。
成功解决了这个报错,但是出现了新的问题。
问题10:vivado安装文件中没有对应的板子的文件
ERROR: [Board 49-71] The board_part definition was not found for digilentinc.com:arty:part0:1.1. The project's board_part property was not set, but the project's part property was set to xc7a35ticsg324-1L. Valid board_part values can be retrieved with the 'get_board_parts' Tcl command. Check if board.repoPaths parameter is set and the board_part is installed from the tcl app store.
INFO: [Common 17-17] undo 'set_property'

    while executing
"rdi::add_properties -dict {BOARD_PART digilentinc.com:arty:part0:1.1 TARGET_LANGUAGE Verilog DEFAULT_LIB xil_defaultlib IP_REPO_PATHS /home/hansi/BOOM..."
    invoked from within
"set_property -dict [list \
	BOARD_PART $part_board \
	TARGET_LANGUAGE {Verilog} \
	DEFAULT_LIB {xil_defaultlib} \
	IP_REPO_PATHS $ipdir \
	] [current_..."
    (file "/home/hansi/BOOM/chipyard/fpga/fpga-shells/xilinx/common/tcl/prologue.tcl" line 78)

    while executing
"source [file join $scriptdir "prologue.tcl"]"
    (file "/home/hansi/BOOM/chipyard/fpga/fpga-shells/xilinx/common/tcl/vivado.tcl" line 7)
INFO: [Common 17-206] Exiting Vivado at Wed Apr  6 20:01:41 2022...
Makefile:115: recipe for target '/home/hansi/BOOM/chipyard/fpga/generated-src/chipyard.fpga.arty.ArtyFPGATestHarness.BoomArtyConfig/obj/ArtyFPGATestHarness.bit' failed
make: *** [/home/hansi/BOOM/chipyard/fpga/generated-src/chipyard.fpga.arty.ArtyFPGATestHarness.BoomArtyConfig/obj/ArtyFPGATestHarness.bit] Error 1
解决:Missing Board Files for ARTY-A7-35T
下载并提取文件:Vivado Version 2015.1 and Later Board File Installation (Legacy)
将所需的board复制到vivado/Vivado/2019.1/data/boards/board_files路径下即可。
问题11:error: [synth 8-2715] syntax error near "dpi-c
连续很多行报错都是SimSRAM.v存在syntax error。
解决:Errors while generating bitstream for Rocket Chip core verilogs using vivado 2016.1
回答中说明SimSRAM.v文件在综合过程中不是必须的,可以使用空文件代替。syntax error是因为这是sv的语法,vivado 2016.1不支持,需要2018.1以后的版本。(但是这里2019.1也存在问题
所以这里删除SimSRAM.v文件中的全部内容即可。
问题12:chipyard.fpga.arty.ArtyFPGATestHarness.BoomArtyConfig.harness.v中找不到module 'SimDRAM'
ERROR: [Synth 8-439] module 'SimDRAM' not found [/home/hansi/BOOM/chipyard/fpga/generated-src/chipyard.fpga.arty.ArtyFPGATestHarness.BoomArtyConfig/chipyard.fpga.arty.ArtyFPGATestHarness.BoomArtyConfig.harness.v:335]
	Parameter LINE_SIZE bound to: 32'sb00000000000000000000000001000000
	Parameter CLOCK_HZ bound to: 32'sb00000010111110101111000010000000
	Parameter ID_BITS bound to: 32'sb00000000000000000000000000000100
	Parameter ADDR_BITS bound to: 32'sb00000000000000000000000000100000
	Parameter MEM_SIZE bound to: 32'sb00010000000000000000000000000000
	Parameter DATA_BITS bound to: 32'sb00000000000000000000000001000000
ERROR: [Synth 8-6156] failed synthesizing module 'ArtyFPGATestHarness' [/home/hansi/BOOM/chipyard/fpga/generated-src/chipyard.fpga.arty.ArtyFPGATestHarness.BoomArtyConfig/chipyard.fpga.arty.ArtyFPGATestHarness.BoomArtyConfig.harness.v:1]
解决:找到报错的部分,删除整个module SimDRAM即可。
问题13:报错vivado/Vivado/2019.1/bin/loader: 行 267: 23806 已杀死 "$RDI_PROG" "$@"
Start Technology Mapping
---------------------------------------------------------------------------------
/home/hansi/vivado/Vivado/2019.1/bin/loader: 行 267: 23806 已杀死               "$RDI_PROG" "$@"
Makefile:115: recipe for target '/home/hansi/BOOM/chipyard/fpga/generated-src/chipyard.fpga.arty.ArtyFPGATestHarness.BoomArtyConfig/obj/ArtyFPGATestHarness.bit' failed
make: *** [/home/hansi/BOOM/chipyard/fpga/generated-src/chipyard.fpga.arty.ArtyFPGATestHarness.BoomArtyConfig/obj/ArtyFPGATestHarness.bit] Error 137
Parent process (pid 23806) has died. This helper process will now exit
解决:
/tools/Xilinx/Vivado/2019.1/bin/loader: line 267: 18166 Killed “$ RDI_PROG” " $@" Vivado build interruption
64434 - Vivado Synthesis - getting a Segmentation fault after using up a lot of memory.
在Makefile文件中添加vivado -stack 2000参数
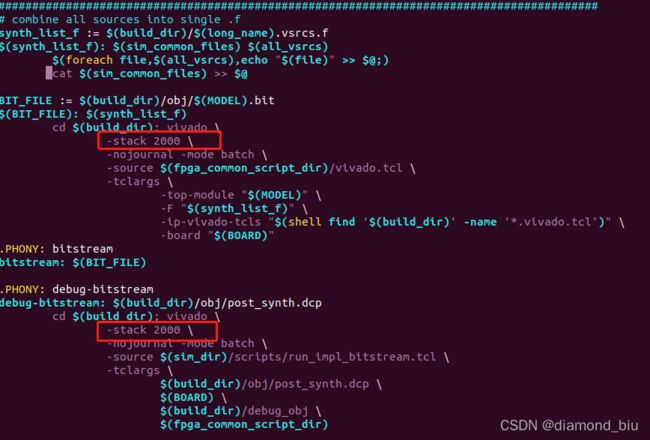
还是不行,看到有解决方法提示RAM太小,把虚拟机内存大小从原本8GB调整到16GB,问题解决。
问题14:place_design failed
报错:
Phase 1.2 IO Placement/ Clock Placement/ Build Placer Device
ERROR: [Place 30-640] Place Check : This design requires more Register as Flip Flop cells than are available in the target device. This design requires 51080 of such cell types but only 41600 compatible sites are available in the target device. Please analyze your synthesis results and constraints to ensure the design is mapped to Xilinx primitives as expected. If so, please consider targeting a larger device.
ERROR: [Place 30-640] Place Check : This design requires more Slice Registers cells than are available in the target device. This design requires 51081 of such cell types but only 41600 compatible sites are available in the target device. Please analyze your synthesis results and constraints to ensure the design is mapped to Xilinx primitives as expected. If so, please consider targeting a larger device.
ERROR: [Place 30-640] Place Check : This design requires more Slice LUTs cells than are available in the target device. This design requires 191762 of such cell types but only 20800 compatible sites are available in the target device. Please analyze your synthesis results and constraints to ensure the design is mapped to Xilinx primitives as expected. If so, please consider targeting a larger device. Please set tcl parameter "drc.disableLUTOverUtilError" to 1 to change this error to warning.
ERROR: [Place 30-640] Place Check : This design requires more LUT as Logic cells than are available in the target device. This design requires 111786 of such cell types but only 20800 compatible sites are available in the target device. Please analyze your synthesis results and constraints to ensure the design is mapped to Xilinx primitives as expected. If so, please consider targeting a larger device. Please set tcl parameter "drc.disableLUTOverUtilError" to 1 to change this error to warning.
ERROR: [Place 30-640] Place Check : This design requires more LUT as Memory cells than are available in the target device. This design requires 79976 of such cell types but only 9600 compatible sites are available in the target device. Please analyze your synthesis results and constraints to ensure the design is mapped to Xilinx primitives as expected. If so, please consider targeting a larger device. Please set tcl parameter "drc.disableLUTOverUtilError" to 1 to change this error to warning.
ERROR: [Place 30-640] Place Check : This design requires more LUT as Distributed RAM cells than are available in the target device. This design requires 79938 of such cell types but only 9600 compatible sites are available in the target device. Please analyze your synthesis results and constraints to ensure the design is mapped to Xilinx primitives as expected. If so, please consider targeting a larger device. Please set tcl parameter "drc.disableLUTOverUtilError" to 1 to change this error to warning.
ERROR: [Place 30-640] Place Check : This design requires more LUT6 cells than are available in the target device. This design requires 77493 of such cell types but only 32600 compatible sites are available in the target device. Please analyze your synthesis results and constraints to ensure the design is mapped to Xilinx primitives as expected. If so, please consider targeting a larger device.
ERROR: [Place 30-640] Place Check : This design requires more RAMD64E cells than are available in the target device. This design requires 78176 of such cell types but only 9600 compatible sites are available in the target device. Please analyze your synthesis results and constraints to ensure the design is mapped to Xilinx primitives as expected. If so, please consider targeting a larger device.
INFO: [Timing 38-35] Done setting XDC timing constraints.
Phase 1.2 IO Placement/ Clock Placement/ Build Placer Device | Checksum: bf3f60f9

Time (s): cpu = 00:01:00 ; elapsed = 00:00:50 . Memory (MB): peak = 7312.086 ; gain = 0.000 ; free physical = 9339 ; free virtual = 14080
Phase 1 Placer Initialization | Checksum: bf3f60f9

Time (s): cpu = 00:01:00 ; elapsed = 00:00:50 . Memory (MB): peak = 7312.086 ; gain = 0.000 ; free physical = 9339 ; free virtual = 14080
ERROR: [Place 30-99] Placer failed with error: 'Implementation Feasibility check failed, Please see the previously displayed individual error or warning messages for more details.'
Please review all ERROR, CRITICAL WARNING, and WARNING messages during placement to understand the cause for failure.
Ending Placer Task | Checksum: bf3f60f9

Time (s): cpu = 00:01:00 ; elapsed = 00:00:50 . Memory (MB): peak = 7312.086 ; gain = 0.000 ; free physical = 9339 ; free virtual = 14080
INFO: [Common 17-83] Releasing license: Implementation
11 Infos, 0 Warnings, 0 Critical Warnings and 10 Errors encountered.
place_design failed
ERROR: [Common 17-69] Command failed: Placer could not place all instances

    while executing
"source [file join $scriptdir "place.tcl"]"
    (file "/home/hansi/BOOM/chipyard/fpga/fpga-shells/xilinx/common/tcl/vivado.tcl" line 29)
板子资源不足,卒。。。。arty7 35T资源支撑不了BOOM。
尝试了下用arty7 35T生成tinyrocket的bitstream,很快就完成了并且没有报错。
make SUB_PROJECT=arty CONFIG=TinyRocketConfig bitstream
对比了一下所需资源,差了十几倍。
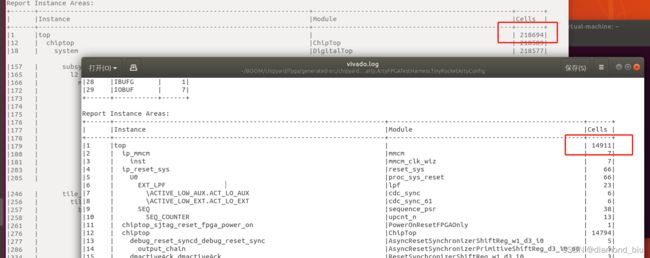
生成BOOM的bitstream只能考虑换一个板子了。
BOOM移植到FPGA(VCU118)遇到的问题以及解决措施
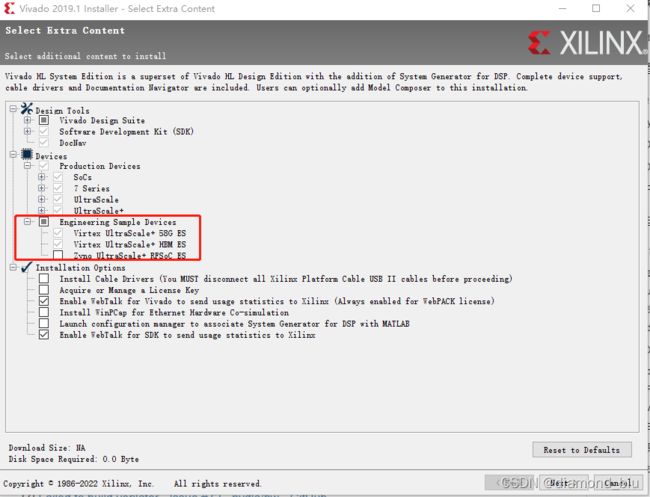
问题15:缺少vcu9p device
本文使用的vivado版本为2019.1,添加VCU所需设备:vivado->help->add design tools or device,选择Engineering Sample Devices下的UltraScale+系列,点击next->install即可。
问题16:VMWare Ubuntu 综合资源不足
解决: 按步骤执行生成bitsream的命令
make SUB_PROJECT=vcu118 CONFIG=BoomArtyConfig bitstream
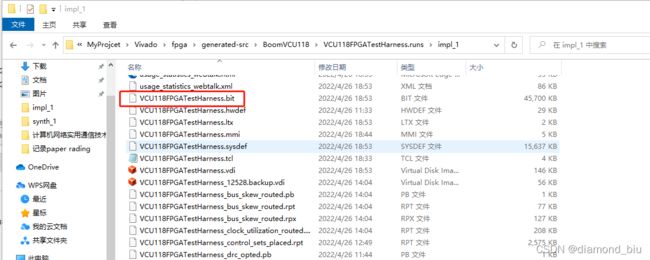
chipyard提供的脚本可以创建vivado工程,虽然虚拟机综合失败,但会在该目录下生成.xpr文件
![]()

将整个fpga目录和generator目录复制到主机上继续综合即可顺利完成:

问题17:FileNotFoundError: [Errno 2] No such file or directory: ‘guestmount’: ‘guestmount’
解决:安装库libguestfs-tools。
安装失败的话还是换源,这里有个f开头的库没法打开。。http://cn.archive.ubuntu.com/ubuntu/pool/universe/f/阿里源看了下可以。
gedit /etc/apt/source.list
# 阿里源
deb http://mirrors.aliyun.com/ubuntu bionic main multiverse restricted universe
deb http://mirrors.aliyun.com/ubuntu bionic-updates main multiverse restricted universe
deb http://mirrors.aliyun.com/ubuntu bionic-security main multiverse restricted universe
deb http://mirrors.aliyun.com/ubuntu bionic-proposed main multiverse restricted universe
deb http://mirrors.aliyun.com/ubuntu bionic-backports main multiverse restricted universe
参考
[1] Docs » 1. Chipyard Basics » 1.4. Initial Repository Setup
[2] Welcome to RISCV-BOOM’s documentation!
[3] VMware虚拟机 Linux系统 Ubuntu 16.04 硬盘/磁盘扩容
[4] ubuntu编译qemu报错:‘ERROR: pixman >= 0.21.8 not present.’ 解决方案
[5] OPTEE repo更新提示“Failed to connect to boringssl.googlesource.com port 443: Connection timed out”的解决方案
[6] Ubuntu配置JAVA环境
[7] Failed to build verilator · Issue #72 · nvdla/hw · GitHub
[8] Installation——Verilator 4.221 documentation
[9] How do I compile a c program such that the binary can be run/simulated by an RTL config?
[10] 7.3. Baremetal RISC-V Programs
附录
RISC-V toolchain编译指令
// complie 64-bit file
riscv64-unknown-elf-gcc -o file file.c
// complie 32-bit file
riscv64-unknown-elf-gcc -march=rv32imac -mabi=ilp32 -o file file.c

// pretreatment
riscv64-unknown-elf-gcc -march=rv32imac -mabi=ilp32 -E -o file.i file.c
// compile
riscv64-unknown-elf-gcc -march=rv32imac -mabi=ilp32 -S -o file.s/file.S file.i
// assembler
riscv64-unknown-elf-gcc -march=rv32imac -mabi=ilp32 -c -o file.o file.s/file.S
// link
riscv64-unknown-elf-gcc -march=rv32imac -mabi=ilp32 -o file file.o
// get ELF-file
riscv64-unknown-elf-gcc -march=rv32imac -mabi=ilp32 -o file file.c
// ELF to bin
riscv32-unknown-elf-objcopy -O binary file file.bin
// ELF to HEX
riscv64-unknown-elf-objcopy -O ihex file file.hex
// disassembler ELF to get ASM
riscv64-unknown-elf-objdump -d file.elf > file.asm
Linux查看CPU信息
//查看物理 cpu 数:
cat /proc/cpuinfo| grep "physical id"| sort| uniq| wc -l
//查看每个物理 cpu 中 核心数(core 数):
cat /proc/cpuinfo | grep "cpu cores" | uniq
//查看总的逻辑 cpu 数(processor 数):
cat /proc/cpuinfo| grep "processor"| wc -l
//查看 cpu 型号:
cat /proc/cpuinfo | grep name | cut -f2 -d: | uniq -c
//lscpu 命令可以同时看到上述信息:
lscpu

