OSG入门教学
OSG——场景
- List itemOSG的场景是以树形组织的,最上层为根节点,根节点只能有一个,根节点Node类型,一般使用Group
- 根节点有很多分支,每个分支可以再有分支,每个分支点最上层的节点可以被看作该分支的根节点,用于管理整个分支的状态信息(光照,融合,透明等),为Node类型,一般使用Group;
- 每个分支末端会是一个叶节点,叶结点用于管理绘制体,叶结点为Geode或其继承类(Billboard)
- 可绘制体保存有绘制信息,例如几何体,文字,像素等,绘制体由叶结点管理,必须添加到叶结点才能最终被OSG渲染到窗口显示
1.依赖项配置
//Common.h
#ifndef _COMMON_H_
#define _COMMON_H_

#indef _DEBUG
#pragma comment(lib, "osgd.lib")
#pragma comment(lib, "osgDBd.lib")
#pragma comment(lib, "osgViewerd.lib")
#pragma comment(lib, "OoenThreadsd.lib")
#else
#pragma comment(lib, "osg.lib")
#pragma comment(lib, "osgDB.lib")
#pragma comment(lib, "osgdViewer.lib")
#pragma comment(lib, "OoenThreads.lib")
#endif

#endif
2.超级指针
有一个引用指向该资源,该资源就不应该被释放。所以,大多数的 OSG 对象都有一个内部的计数器用来计算有多少个指针指向它。当没有指针指向该资源(同样,可以称做对象)时,它的计数器会变为 0,当计算器为 0 时就可以放掉对象。幸运的是,我们程序员不需要手工的来维护这些引用计数:这就是超级指针为什么存在的原因。在 OSG 当中超级指针被一个称为 osg::ref_ptr<>的类模版来实现。无论在什么时候,只要该对象被引用,则在 osg::ref_ptr<>当中的计数器会自动增加, 通过这种方式实现了资源的自动管理,当不需要使用它时,它会在不久后释放,在申请它时会自动分配空间。
int main(){
	osg::ref_ptr<osgViewer::Viewer> viewer = new osgViewer::Viewer;
	osg::ref_ptr<osg::Node> node = new osg::Node;
	node = osgDB::readNodeFile("glider.osg");
	viewer->setSceneData(node);
	return viewer->run();
}
3.响应事件
之前通过主函数main进行视图管理(osgViewer),利用osgDB进行模型读写,将读写的模型放在结点指针中,再将结点指针放在视图中,最后运行视图(run)从而达到显示模型的目的;
现在增加一个事件管理(osgGA),基于事件的小应用(EventHandler);
1.运行glider模型

2.点击‘h’按键,显示文字,如下图

#include此时运行项目,点击h后会出现文字信息,但却只有几行,这是因为osg在帮助事件的类中设置了相应显示文字的行数,可根据需要更改,这里
4.我们模拟一个事件类,响应单击h
//模拟一个事件类,相应单击h
class PrintName : public osgGA::GUIEventHandler
{
public:
	virtual void getUsage(osg::ApplicationUsage& usage) const {
		usage.addKeyboardMouseBinding("lk", "Hello!");//显示文字的最后一行内容
	}
};

viewer->addEventHandler(new osgViewer::HelpHandler);  //显示帮助文档的事件
viewer->addEventHandler(new PrintName);//显示我们新建的事件类
还有事件类如下:
	viewer->addEventHandler(new osgViewer::StatsHandler);
	viewer->addEventHandler(new osgViewer::WindowSizeHandler);
	viewer->addEventHandler(new osgViewer::ScreenCaptureHandler);
5.定时器的使用
//申请一个定时器类
	osg::Timer  * timer = new osg::Timer;
	osg::Timer_t start_time = 0;
	osg::Timer_t end_time = 0;

	//得到一个tick值为多少second
	std::cout << timer->getSecondsPerTick() << std::endl;

	start_time = timer->tick();
	//读取模型
	node = osgDB::readNodeFile("glider.osg");
	end_time = timer->tick();

	std::cout << "读取模型时间为: " << timer->delta_s(start_time, end_time) << std::endl;
注意,在申请定时器类时,不能使用超级指针:
osg::ref_ptr<osg::Timer> timer = new osg::Timer; //错误示范,有些类不支持超级指针
第二种计算读取模型时间的方法:
	start_time = timer->tick();
	timer->setStartTick();
	//读取模型
	node = osgDB::readNodeFile("glider.osg");
	std::cout << "方法一读取模型时间为:" <<timer->time_s()<<std::endl;
	end_time = timer->tick();

	std::cout << "方法二读取模型时间为: " << timer->delta_s(start_time, end_time) << std::endl;
并且预计方法一时间比方法二短一点,因为方法二多执行了几条语句,所以这样可以计算出中间语句的执行时间。如果在计算程序效率时,可以根据此方法查询是哪条语句耗时太多,从而进行优化或者将其功能删掉。
方法三:利用viewer自带的elapsedTime()函数得出start_time和end_time
float start_time = 0;
float end_time = 0;

start_time = viewer=>elapsedTime();
node = osgDB::readNodeFile("cow.osg");
end_time = viewer->elapsedTime();

std::cout<<"方法三读取模型时间为: "<<end_time-start_time<<std::endl;
6.操作器
//操作器的头文件
#include其中加了个counts变量,因为一帧一帧查看会因为模型静止等原因而与实际帧速不相符,所以我们每三帧取一次值,保证准确性
7.基本图元
这是绘制自带的长方体,对其大小进行设置,在贴一些纹理,达到所需效果
#include接下来自行绘制图形,建立四个点,逆时针相连,得出一个长方形,在为其设置颜色,线宽,以及透明度
/创建简单图元
osg::ref_ptr<osg::Node> CreateSimple() {
	osg::ref_ptr<osg::Geode> geode = new osg::Geode;
	osg::ref_ptr<osg::Geometry> geom = new osg::Geometry;

	//申请一些顶点
	osg::ref_ptr<osg::Vec3Array> coords = new osg::Vec3Array;

	//申请一些颜色
	osg::ref_ptr<osg::Vec4Array> colors = new osg::Vec4Array;

	//申请法向量
	osg::ref_ptr<osg::Vec3Array> norms = new osg::Vec3Array;

	//申请线宽
	osg::ref_ptr<osg::LineWidth> width = new osg::LineWidth;

	geode->addDrawable(geom.get());

	//打开透明度
	geode->getOrCreateStateSet()->setMode(GL_BLEND, osg::StateAttribute::ON);

	//设置线宽
	width->setWidth(15.0);
	geode->getOrCreateStateSet()->setAttributeAndModes(width.get(), osg::StateAttribute::ON);

	//设置顶点
	geom->setVertexArray(coords.get());

	//设置顶点的关联方式
	geom->addPrimitiveSet(new osg::DrawArrays(osg::PrimitiveSet::Mode::LINE_LOOP, 0, 4));
	//绘制四边形,共四个顶点

	//设置顶点颜色
	geom->setColorArray(colors.get());
	geom->setColorBinding(osg::Geometry::AttributeBinding::BIND_PER_VERTEX); //设置绑定方式

	//设置法向量
	geom->setNormalArray(norms.get());
	geom->setNormalBinding(osg::Geometry::AttributeBinding::BIND_PER_VERTEX);

	//设置顶点;逆时针绘制,x,y,z
	coords->push_back(osg::Vec3(-10.0, 5.0,-10.0));//左下点
	coords->push_back(osg::Vec3(10.0, 5.0, -10.0));  //右下点
	coords->push_back(osg::Vec3(10.0, 5.0, 10.0)); //右上点
	coords->push_back(osg::Vec3(-10.0, 5.0, 10.0));  //左上点

	//颜色
	colors->push_back(osg::Vec4f(1.0, 0.0, 0.0, 0.5));
	colors->push_back(osg::Vec4f(0.0, 1.0, 0.0, 0.5));
	colors->push_back(osg::Vec4f(0.0, 0.0, 1.0, 0.5));
	colors->push_back(osg::Vec4f(1.0, 1.0, 0.0, 0.5));

	//压入一个法向量
	norms->push_back(osg::Vec3(0.0, -1.0, 0.0));


	return geode;
}

int main() {
	osg::ref_ptr<osgViewer::Viewer> viewer = new osgViewer::Viewer;

	//为了突出四边形透明度,加一个参照物“滑翔机”
	osg::ref_ptr<osg::Group> group = new osg::Group;

	group->addChild(osgDB::readNodeFile("glider.osg"));
	group->addChild(CreateSimple());

	viewer->setSceneData(group.get());

	return viewer->run();

}
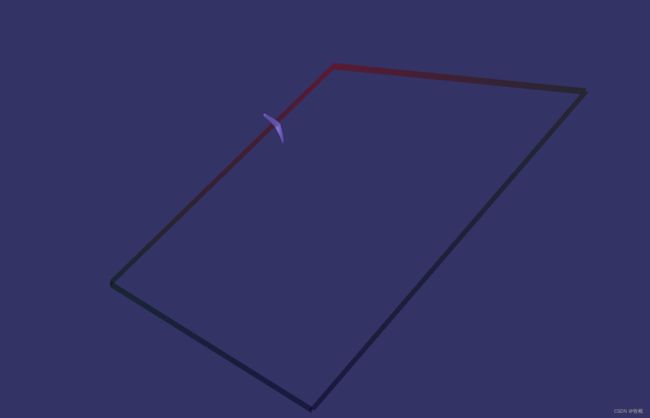
注意:因为设置了线宽,所以透明度并不明显,将线宽去掉,透明度更为明显,而且为了突出透明效果,加一个滑翔机模型辅助,注意渲染顺序,先加滑翔机,后加长方形。如果顺序颠倒,则滑翔机会覆盖长方形,无法得到透明效果。
8.矩阵操作(Matrix Operation)
8.1 矩阵平移
#include8.2 矩阵旋转(动态)
#include此时便会出现问题,运行后会发现,设置旋转的小飞机在“原点”围绕z轴旋转,旋转没有问题,但位置却不对,因为上一步已经将该飞机平移至(-1.5, 0.0, 1.5),此时平移效果没有了。
原因: 旋转的Callback会刷掉同级的其他变换矩阵(具体不详细解释,因为内部原因我也不明白emmm,简单理解就是覆盖了其他同级的矩阵,因此上面的平移矩阵无效了);同级的意思是:对类对象max(代码中定义的对象)进行的操作,有代码可知,我们对max进行了三个操作:1.加载图元小飞机;2.平移;3.旋转Callback;所以Callback覆盖了“同级”的平移矩阵;
解决代码如下:
sg::ref_ptr<osg::Node> MatrixOperation() {
	osg::ref_ptr<osg::Group> group = new osg::Group;  //提供展示多个图元的组
	osg::ref_ptr<osg::MatrixTransform> max = new osg::MatrixTransform;  //定义一个可供平移的图元对象
	osg::ref_ptr<osg::Node> node = osgDB::readNodeFile("glider.osg");
	osg::ref_ptr<osg::MatrixTransform> max2 = new osg::MatrixTransform;

	max2->addChild(osgDB::readNodeFile("glider.osg"));  //该图元为小飞机
	max2->setMatrix(osg::Matrix::translate(-1.5, 0.0, 1.5));  //向左平移五个单位
	max->setUpdateCallback(new osg::AnimationPathCallback(
		osg::Vec3(0.0, 0.0, 0.0), osg::Z_AXIS, 1.0));
	max->addChild(max2.get());

	group->addChild(node);
	group->addChild(max);
	return group;
}
将加载图元和平移操作放在一个对象B,旋转操作放在对象A,对象A中加入对象B,使得平移和旋转操作不在“同一级”(对象A【根结点】下有两个节点:旋转节点+对象B节点;对象B节点下有两个节点:加载图元+平移。因此不再同一层);
下面主要是对一个模型进行平移修改,然后将结果保存为新的模型;
void ExportANode() {
	osg::ref_ptr<osg::Node> node = osgDB::readNodeFile("cow.osg");
	osg::ref_ptr<osg::MatrixTransform> max = new osg::MatrixTransform;

	max->addChild(node);
	max->setMatrix(osg::Matrix::translate(50.0, 0.0, 0.0));

	osgDB::ReaderWriter::WriteResult result =
		osgDB::Registry::instance()->writeNode(*max.get(), "TrCow.osg",
			osgDB::Registry::instance()->getOptions());
	if (result.success()) {
		osg::notify(osg::NOTICE) << "Write Node Success" << std::endl;
	}
}