Java零基础——SpringSecurity篇
1.认证授权的基础概念
1.1 什么是认证(登录)
进入移动互联网时代,大家每天都在刷手机,常用的软件有微信、支付宝、头条等,下边拿微信来举例子说明认证相关的基本概念,在初次使用微信前需要注册成为微信用户,然后输入账号和密码即可登录微信,输入账号和密码登录微信的过程就是认证。
系统为什么要认证?
http://127.0.0.1:8080/getAllUser
http://127.0.0.1:8080/addUser
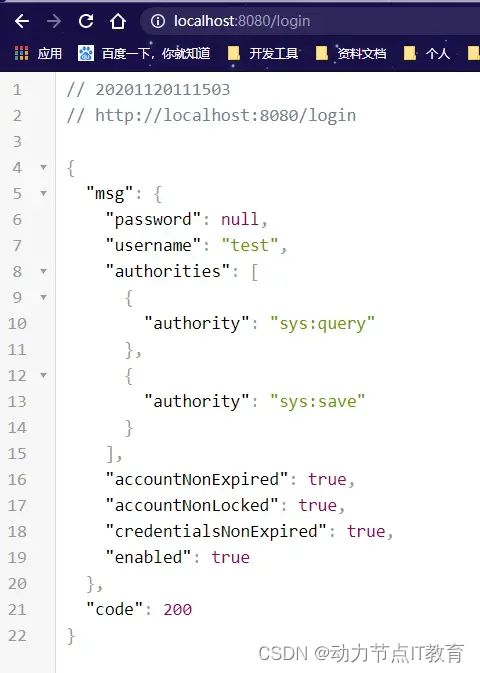
http://127.0.0.1:8080/updateUser
http://127.0.0.1:8080/deleteUser
认证是为了保护系统的隐私数据与资源,用户的身份合法方可访问该系统的资源。
认证 :用户认证就是判断一个用户的身份是否合法的过程,用户去访问系统资源(url接口)时系统要求验证用户的身份信息,身份合法方可继续访问,不合法则拒绝访问。常见的用户身份认证方式有:用户名密码登录,二维码登录,手机短信登录,指纹认证等方式。
1.2 什么是会话
HttpSession
SqlSession
用户认证通过后,为了避免用户的每次操作都进行认证可将用户的信息保证在会话中。会话就是系统为了保持当前用户的登录状态所提供的机制,常见的有基于session方式、基于token方式等。
1.2.1 基于session的认证方式
它的交互流程是,用户认证成功后,在服务端生成用户相关的数据保存在session(当前会话)中,发给客户端的sesssion_id 存放到 cookie 中,这样用户客户端请求时带上 session_id 就可以验证服务器端是否存在 session 数据,以此完成用户的合法校验,当用户退出系统或session过期销毁时,客户端的session_id也就无效了
1.2.2 基于token方式认证方式
它的交互流程是,用户认证成功后,服务端生成一个token发给客户端,客户端可以放到 cookie 或 localStorage等存储中,每次请求时带上 token,服务端收到token通过验证后即可确认用户身份。Redis 存的用户信息 共享session (分布式中)
基于session的认证方式由Servlet规范定制,服务端要存储session信息需要占用内存资源,客户端需要支持cookie;基于token的方式则一般不需要服务端存储token,并且不限制客户端的存储方式。如今移动互联网时代更多类型的客户端需要接入系统,系统多是采用前后端分离的架构进行实现,所以基于token的方式更适合。
1.3 什么是授权 (给用户颁发权限)
还拿微信来举例子,微信登录成功后用户即可使用微信的功能,比如,发红包、发朋友圈、添加好友等,没有绑定银行卡的用户是无法发送红包的,绑定银行卡的用户才可以发红包,发红包功能、发朋友圈功能都是微信的资源即功能资源,用户拥有发红包功能的权限才可以正常使用发送红包功能,拥有发朋友圈功能的权限才可以使用发朋友圈功能,这个根据用户的权限来控制用户使用资源的过程就是授权。 鉴权(判断用户是否有这个权限)
java应用中什么叫资源 url就是资源 (API接口就是资源)
http://127.0.0.1:8080/user/getUserById?id=10
1.3.1 为什么要授权?(控制资源(url)被访问)
认证是为了保证用户身份的合法性,授权则是为了更细粒度的对隐私数据进行划分,授权是在认证通过后发生的,控制不同的用户能够访问不同的资源。
授权: 授权是用户认证通过根据用户的权限来控制用户访问资源的过程,拥有资源的访问权限则正常访问,没有权限则拒绝访问。
200
302
400
403
404
1.4 授权的数据模型(RBAC)
如何进行授权即如何对用户访问资源进行控制,首先需要学习授权相关的数据模型。
授权可简单理解为Who对What(which)进行How操作,包括如下:
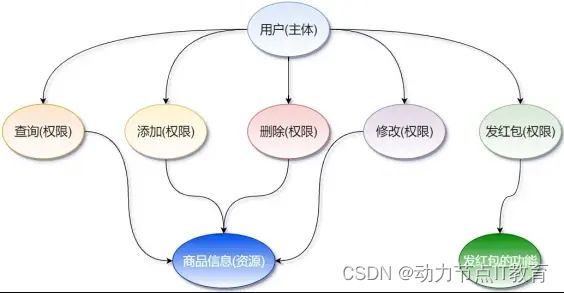
Who,即主体(Subject),主体一般是指用户,也可以是程序,需要访问系统中的资源。 What,即资源(Resource),如系统菜单、页面、按钮、代码方法、系统商品信息、系统订单信息等。系统菜单、页面、按钮、代码方法都属于系统功能资源,对于web系统每个功能资源通常对应一个URL;系统商品信息、系统订单信息都属于实体资源(数据资源),实体资源由资源类型和资源实例组成,比如商品信息为资源类型,商品编号 为001的商品为资源实例。
How,权限/许可(Permission),规定了用户对资源的操作许可,权限离开资源没有意义,如用户查询权限、用户添加权限、某个代码方法的调用权限、编号为001的用户的修改权限等,通过权限可知用户对哪些资源都有哪些操作可。
主体、资源、权限相关的数据模型如下:
主体(用户id、账号、密码、…)
资源(资源id、资源名称、访问地址、…)
权限(权限id、权限标识、权限名称、资源id、…)
角色(角色id、角色名称、…)
角色和权限关系(角色 id、权限id、…)
主体(用户)和角色关系(用户id、角色id、…)
通常企业开发中将资源和权限表合并为一张权限表,如下:
资源(资源id、资源名称、访问地址、…)
权限(权限id、权限标识、权限名称、资源id、…)
合并为:
权限(权限id、权限标识、权限名称、资源名称、资源访问地址、…)
1.5 RBAC
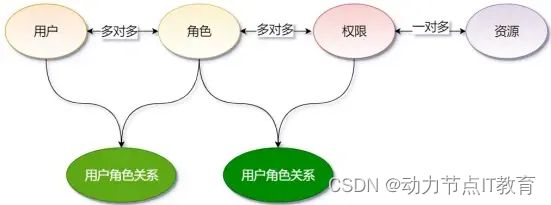
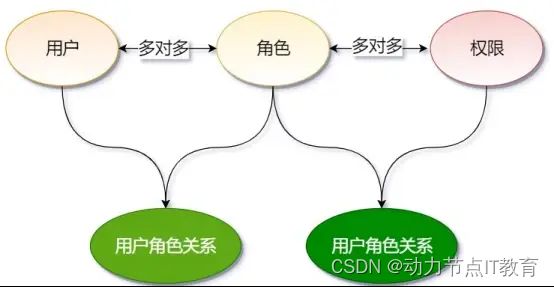
用户,角色,权限 本质:就是把权限打包给角色,分配给用户
RBAC一般指基于角色的访问控制 权限 五张表 (最少五张表)
基于角色的访问控制(RBAC)是实施面向企业安全策略的一种有效的访问控制方式。
1.5.1 基于角色的访问控制
RBAC基于角色的访问控制(Role-Based Access Control)是按角色进行授权,比如:主体的角色为总经理可以查询企业运营报表,查询员工工资信息等
根据上图中的判断逻辑,授权代码可表示如下:
if(主体.hasRole(“总经理角色id”)){
查询工资
}
如果上图中查询工资所需要的角色变化为总经理和部门经理,此时就需要修改判断逻辑为“判断用户的角色是否是总经理或部门经理”,修改代码如下:
if(主体.hasRole(“总经理角色id”) || 主体.hasRole(“部门经理角色id”)){
查询工资
}
根据上边的例子发现,当需要修改角色的权限时就需要修改授权的相关代码,系统可扩展性差。
1.5.2 基于资源的访问控制
RBAC基于资源的访问控制(Resource-Based Access Control)是按资源(或权限)进行授权,比如:用户必须具有查询工资权限才可以查询员工工资信息等,如下的判断
if(主体.hasPermission(“查询工资”) ){
查询工资
}
优点:系统设计时定义好查询工资的权限标识,即使查询工资所需要的角色变化为总经理和部门经理也不需要修改授权代码,系统可扩展性强。
2.Spring Security 简介
官网: https://spring.io/projects/spring-security
中文文档: https://www.springcloud.cc/spring-security.html
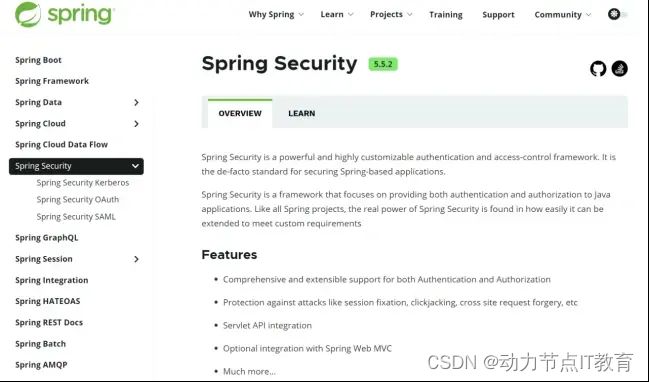
2.1 什么是SpringSecurity
Spring Security是一个能够为基于Spring的企业应用系统提供声明式(注解)的安全访问控制解决方案的安全框架。它提供了一组可以在Spring应用上下文中配置的Bean,充分利用了Spring IoC,DI(控制反转Inversion of Control ,DI:Dependency Injection 依赖注入)和AOP(面向切面编程)功能,为应用系统提供声明式的安全访问控制功能,减少了为企业系统安全控制编写大量重复代码的工作。
以上解释来源于百度百科。可以一句话来概括,SpringSecurity 是一个安全框架。
3.Spring Security入门体验
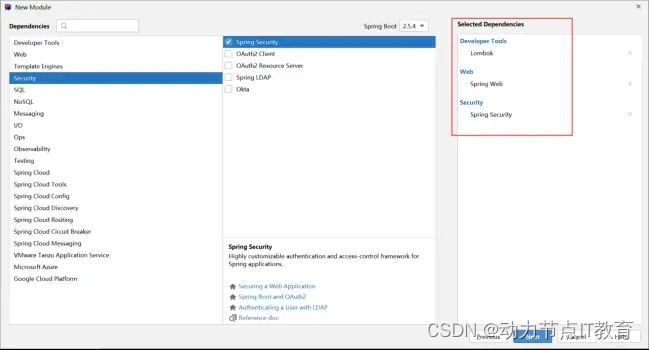
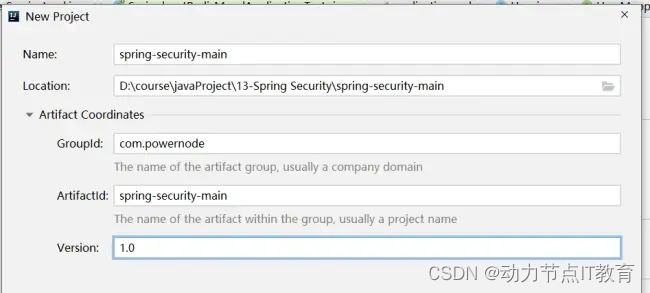
3.1 创建父项目spring-security-main
把下面的项目都放在这个项目里面,方便展示和学习
3.3 pom.xml
<?xml version="1.0" encoding="UTF-8"?>
<project xmlns="http://maven.apache.org/POM/4.0.0" xmlns:xsi="http://www.w3.org/2001/XMLSchema-instance"
         xsi:schemaLocation="http://maven.apache.org/POM/4.0.0 https://maven.apache.org/xsd/maven-4.0.0.xsd">
    <modelVersion>4.0.0</modelVersion>
    <parent>
        <groupId>org.springframework.boot</groupId>
        <artifactId>spring-boot-starter-parent</artifactId>
        <version>2.5.7</version>
        <relativePath/> <!-- lookup parent from repository -->
    </parent>
    <groupId>com.bjpowernode</groupId>
    <artifactId>01-security-hello</artifactId>
    <version>0.0.1-SNAPSHOT</version>
    <name>security-hello</name>
    <description>Demo project for Spring Boot</description>
    <properties>
        <java.version>1.8</java.version>
    </properties>
    <dependencies>
        <dependency>
            <groupId>org.springframework.boot</groupId>
            <artifactId>spring-boot-starter-security</artifactId>
        </dependency>
        <dependency>
            <groupId>org.springframework.boot</groupId>
            <artifactId>spring-boot-starter-web</artifactId>
        </dependency>

        <dependency>
            <groupId>org.projectlombok</groupId>
            <artifactId>lombok</artifactId>
            <optional>true</optional>
        </dependency>
        <dependency>
            <groupId>org.springframework.boot</groupId>
            <artifactId>spring-boot-starter-test</artifactId>
            <scope>test</scope>
        </dependency>
        <dependency>
            <groupId>org.springframework.security</groupId>
            <artifactId>spring-security-test</artifactId>
            <scope>test</scope>
        </dependency>
    </dependencies>

    <build>
        <plugins>
            <plugin>
                <groupId>org.springframework.boot</groupId>
                <artifactId>spring-boot-maven-plugin</artifactId>
                <configuration>
                    <excludes>
                        <exclude>
                            <groupId>org.projectlombok</groupId>
                            <artifactId>lombok</artifactId>
                        </exclude>
                    </excludes>
                </configuration>
            </plugin>
        </plugins>
    </build>
</project>
3.4 启动类
@SpringBootApplication
@EnableWebSecurity // 启用security 在5.X版本之后可以不用加,默认就是开启的
public class SecurityHelloApplication {

    public static void main(String[] args) {
        SpringApplication.run(SecurityHelloApplication.class, args);
    }

}
3.5 创建HelloController
@RestController
public class HelloController {

    @GetMapping("hello")
    public String hello() {
        return "hello security";
    }
}
3.6 启动测试访问
http://127.0.0.1:8080/hello
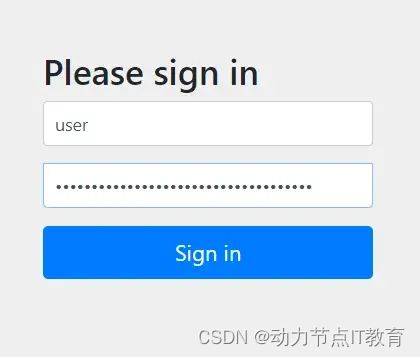
发现我们无法访问hello这个请求,这是因为spring Security默认拦截了所有请求
3.7 测试退出
访问: http://localhost:8080/logout


3.8 自定义密码登录(yml配置文件方式)
spring:
security:
user:
name: admin #默认使用的用户名
password: 123456 #默认使用的密码
3.9 重启使用admin和123456登录即可
3.10 总结
从上面的体验来说,是不是感觉很简单,但是别急。后面的东西还是有点难度的,如下:
l 如何读取数据库的用户名和密码
l 如何对密码加密
l 如何使用数据库的角色和权限
l 如何配置方法级别的权限访问
l 如何自定义登陆页面
l 如何集成redis把登陆信息放到Redis
l 如何集成验证码
l ……………………
4.Spring Security配置多用户认证
4.1 概述
认证就是登陆,我们现在没有连接数据库,那么我们可以模拟下用户名和密码
4.2 创建认证的配置类WebSecurityConfig
@Configuration
public class WebSecurityConfig extends WebSecurityConfigurerAdapter {

    /**
     * 配置用户信息,模拟内存用户数据
     *
     * @param auth
     * @throws Exception
     */
    @Override
    protected void configure(AuthenticationManagerBuilder auth) throws Exception {
        // 在内存中配置两个用户
        auth.inMemoryAuthentication()
                .withUser("cxs")
                .password("123")
                .roles("ADMIN")
                .and()
                .withUser("test")
                .password("123")
                .roles("TEST");
    }
}
4.3 启动测试
我们只要添加了安全配置类,那么我们在yml里面的配置就失效了
这个是因为spring Sercurity强制要使用密码加密,当然我们也可以不加密,但是官方要求是不管你是否加密,都必须配置一个类似Shiro的凭证匹配器
4.4 修改WebSecurityConfig添加加密器
@Configuration
public class WebSecurityConfig extends WebSecurityConfigurerAdapter {

    /**
     * 配置用户信息,模拟内存用户数据
     *
     * @param auth
     * @throws Exception
     */
    @Override
    protected void configure(AuthenticationManagerBuilder auth) throws Exception {
        // 在内存中配置两个用户
        auth.inMemoryAuthentication()
                .withUser("cxs")
                .password(passwordEncoder().encode("123"))
                .roles("ADMIN")
                .and()
                .withUser("test")
                .password(passwordEncoder().encode("123"))
                .roles("TEST");
    }

    /*
     * 从 Spring5 开始,强制要求密码要加密
     * 如果非不想加密,可以使用一个过期的 PasswordEncoder 的实例 NoOpPasswordEncoder,
     * 但是不建议这么做,毕竟不安全。
     *
     * @return
     */
    @Bean
    public PasswordEncoder passwordEncoder() {
        return new BCryptPasswordEncoder();
    }
}
4.5 重启测试
两个用户都可以登录成功了
4.6 测试加密和解密
我们对123字符串加密三次,然后匹配三次,看看效果
public class TestPasswordEncoder {

    public static void main(String[] args) {
        BCryptPasswordEncoder passwordEncoder = new BCryptPasswordEncoder();
        String encode1 = passwordEncoder.encode("123");
        System.out.println(encode1);
        String encode2 = passwordEncoder.encode("123");
        System.out.println(encode2);
        String encode3 = passwordEncoder.encode("123");
        System.out.println(encode3);
        // 查看加密后是否匹配
        System.out.println(passwordEncoder.matches("123", encode1));
        System.out.println(passwordEncoder.matches("123", encode2));
        System.out.println(passwordEncoder.matches("123", encode3));
    }
}
查看控制台发现特点是:相同的字符串加密之后的结果都不一样,但是比较的时候是一样的
4.7 如何获取当前登录用户的信息(两种方式)【重点】
我们添加获取当前用户信息的Controller
/**
 * 获取当前用户信息,直接在参数中注入Principal对象
 * 此对象是登录后自动写入UsernamePasswordAuthenticationToken类中
 *
 * @param principal
 * @return
 */
@GetMapping("userInfo")
public Principal getUserInfo(Principal principal) {
    return principal;
}

/**
 * SecurityContextHolder.getContext()获取安全上下文对象
 * 就是那个保存在 ThreadLocal 里面的安全上下文对象
 * 总是不为null(如果不存在,则创建一个authentication属性为null的empty安全上下文对象)
 * 获取当前认证了的 principal(当事人),或者 request token (令牌)
 * 如果没有认证,会是 null,该例子是认证之后的情况
 */
@GetMapping("userInfo2")
public Object getUserInfo2() {
    Authentication authentication = SecurityContextHolder.getContext().getAuthentication();
    return authentication;
}
测试访问
http://localhost:8080/userInfo
http://localhost:8080/userInfo2
5.Spring Security用户,角色,权限拦截配置
5.1 角色和权限的配置,修改WebSecurityConfig类
@Configuration
public class WebSecurityConfig extends WebSecurityConfigurerAdapter {

    /**
     * 配置用户信息,模拟内存用户数据
     *
     * @param auth
     * @throws Exception
     */
    @Override
    protected void configure(AuthenticationManagerBuilder auth) throws Exception {
        // 在内存中配置几个用户
        auth.inMemoryAuthentication()
                .withUser("cxs")
                .password(passwordEncoder().encode("123"))
                .roles("ADMIN")
                .authorities("sys:save", "sys:del", "sys:update", "sys:query") // 给cxs用户添加四个权限
                .and()
                .withUser("test")
                .password(passwordEncoder().encode("123"))
                .roles("TEST")
                .authorities("sys:save", "sys:query") // 给test这个用户加两个权限
                .and().withUser("admin")
                .password(passwordEncoder().encode("123"))
                .roles("ADMIN");  // 给admin这个用户一个ADMIN的角色,如果角色和权限都给了,那么角色就失效了
    }


    /**
     * 配置http请求验证等
     *
     * @param http
     * @throws Exception
     */
    @Override
    protected void configure(HttpSecurity http) throws Exception {
        // 注释掉他自己的方法 走我们自己的
        // super.configure(http);
        // 给一个表单登陆 就是我们的登录页面,登录成功或者失败后走我们的url
        http.formLogin().successForwardUrl("/welcome").failureForwardUrl("/fail");
        // 匹配哪些url,需要哪些权限才可以访问 当然我们也可以使用链式编程的方式
        http.authorizeRequests()
                .antMatchers("/query").hasAnyAuthority("sys:query")
                .antMatchers("/save").hasAnyAuthority("sys:save")
                .antMatchers("/del").hasAnyAuthority("sys:del")
                .antMatchers("/update").hasAnyAuthority("sys:update")
                .antMatchers("/admin/**").hasRole("ADMIN")
                .anyRequest().authenticated(); // 其他所有的请求都需要登录才能进行
    }


    /*
     * 从 Spring5 开始,强制要求密码要加密
     * 如果非不想加密,可以使用一个过期的 PasswordEncoder 的实例 NoOpPasswordEncoder,
     * 但是不建议这么做,毕竟不安全。
     *
     * @return
     */
    @Bean
    public PasswordEncoder passwordEncoder() {
        return new BCryptPasswordEncoder();
    }
}
5.2 添加几个Controller接口
/**
 * 登录成功后的欢迎页面
 *
 * @return
 */
@PostMapping("welcome")
public String welcome() {
    return "我是登录成功后的欢迎页面welcome";
}

@GetMapping("save")
public String save() {
    return "我是save页面";
}

@GetMapping("del")
public String del() {
    return "我是del页面";
}

@GetMapping("update")
public String update() {
    return "我是update页面";
}

@GetMapping("query")
public String query() {
    return "我是query页面";
}

@GetMapping("admin/hello")
public String admin() {
    return "我是只有admin角色才可以访问的";
}
5.3 启动测试
使用cxs/123登录后 这几个接口都可以访问
使用test/123登录后,访问/update和/del会报错跳到403页面
使用admin/123登录后,只能访问/admin/hello,访问其他接口会跳到403页面
5.4 我们添加一个403.html,让他报错后跳到我们自己的页面
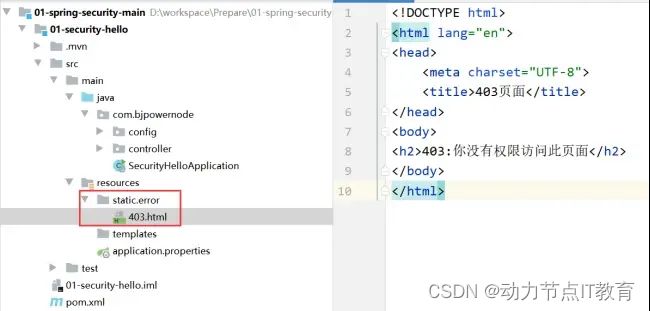
<!DOCTYPE html>
<html lang="en">
<head>
    <meta charset="UTF-8">
    <title>403页面</title>
</head>
<body>
<h2>403:你没有权限访问此页面</h2>
</body>
</html>
6.Spring Security方法级别的授权(鉴权)
我们使用方法级别的授权后,只需要在controller对应的方法上添加注解即可了,不需要再webSecurityConfig中配置匹配的url和权限了,这样就爽多了
6.1 相关注解说明
@PreAuthorize 在方法调用前进行权限检查
@PostAuthorize 在方法调用后进行权限检查
上面的两个注解如果要使用的话必须加上
@EnableGlobalMethodSecurity(prePostEnabled = true)
如果只使用PreAuthorize 就只用开启prePostEnabled = true
6.3 注释掉WebSecurityConfig配置url和权限的代码
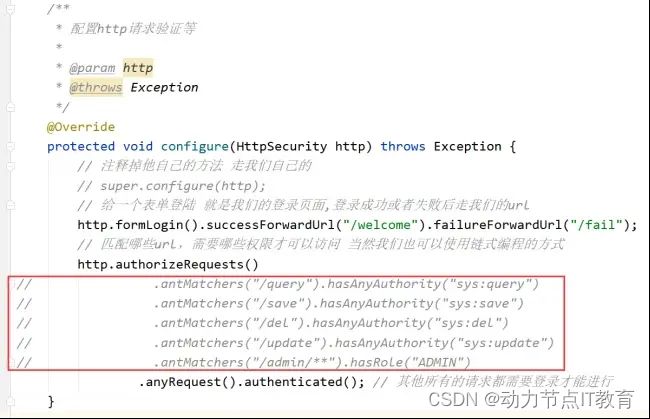
6.4 修改controller,给方法添加注解
不加注解的,都可以访问,加了注解的,要有对应权限才可以访问哦
@GetMapping("save")
@PreAuthorize("hasAuthority('sys:save')")
public String save() {
    return "我是save页面";
}

@GetMapping("del")
@PreAuthorize("hasAuthority('sys:del')")
public String del() {
    return "我是del页面";
}

@GetMapping("update")
@PreAuthorize("hasAuthority('sys:update')")
public String update() {
    return "我是update页面";
}

@GetMapping("query")
@PreAuthorize("hasAuthority('sys:query')")
public String query() {
    return "我是query页面";
}
6.5 重启测试即可
7.Spring Security返回JSON(前后端分离)
在上面的例子中,我们返回的是403页面,但是在开发中,如RestAPI风格的数据,是不能返回一个页面,而应该是给一个json
7.1 创建Result
package com.powernode.common;

import lombok.AllArgsConstructor;
import lombok.Data;
import lombok.NoArgsConstructor;

@Data
@AllArgsConstructor
@NoArgsConstructor
public class Result {

    private Integer code;
    private String msg;
    private Object data;

    public Result(Integer code, String msg) {
        this.code = code;
        this.msg = msg;
    }
}
7.2 创建登陆成功的处理器AppAuthenticationSuccessHandler
package com.powernode.handler;

import com.fasterxml.jackson.databind.ObjectMapper;
import com.powernode.common.Result;
import org.springframework.security.core.Authentication;
import org.springframework.security.web.authentication.AuthenticationSuccessHandler;
import org.springframework.stereotype.Component;

import javax.servlet.ServletException;
import javax.servlet.http.HttpServletRequest;
import javax.servlet.http.HttpServletResponse;
import java.io.IOException;
import java.io.PrintWriter;

/**
 * 登陆成功的处理器
 * 要求返回JSON
 */
@Component
public class AppAuthenticationSuccessHandler implements AuthenticationSuccessHandler {

    //声明一个把对象转成JSON的对象
    private ObjectMapper objectMapper=new ObjectMapper();

    /**
     *
     * @param request  当前的请求对象
     * @param response  当前的响应对象
     * @param authentication  认证成功之后的身份对象
     * @throws IOException
     * @throws ServletException
     */
    @Override
    public void onAuthenticationSuccess(HttpServletRequest request, HttpServletResponse response, Authentication authentication) throws IOException, ServletException {
        System.out.println("登陆成功");
        //设置响应编码
        response.setCharacterEncoding("UTF-8");
        response.setContentType("text/html;charset=utf-8");
        //返回JSON出去
        Result result=new Result(200,"登陆成功",authentication);
        //把result转成JSON
        String json = objectMapper.writeValueAsString(result);
        //响应出去
        PrintWriter out = response.getWriter();
        out.write(json);
        out.flush();
    }
}
7.3 创建登陆失败处理器AppAuthenticationFailureHandler
package com.powernode.handler;

import com.fasterxml.jackson.databind.ObjectMapper;
import com.powernode.common.Result;
import org.springframework.security.authentication.*;
import org.springframework.security.core.AuthenticationException;
import org.springframework.security.core.userdetails.UsernameNotFoundException;
import org.springframework.security.web.authentication.AuthenticationFailureHandler;
import org.springframework.stereotype.Component;

import javax.servlet.ServletException;
import javax.servlet.http.HttpServletRequest;
import javax.servlet.http.HttpServletResponse;
import java.io.IOException;
import java.io.PrintWriter;

/**
 * 登陆失败的处理器
 */
@Component
public class AppAuthenticationFailureHandler implements AuthenticationFailureHandler {

    //声明一个把对象转成JSON的对象
    private ObjectMapper objectMapper=new ObjectMapper();


    /**
     * @param request 当前的请求对象
     * @param response 当前的响应对象
     * @param exception 失败的原因的异常
     * @throws IOException
     * @throws ServletException
     */
    @Override
    public void onAuthenticationFailure(HttpServletRequest request, HttpServletResponse response, AuthenticationException exception) throws IOException, ServletException {
        System.err.println("登陆失败");
        //设置响应编码
        response.setCharacterEncoding("UTF-8");
        response.setContentType("text/html;charset=utf-8");
        //返回JSON出去
        Result result=new Result(-1,"登陆失败");
        if(exception instanceof BadCredentialsException){
            result.setData("密码不正确");
        }else if(exception instanceof DisabledException){
            result.setData("账号被禁用");
        }else if(exception instanceof UsernameNotFoundException){
            result.setData("用户名不存在");
        }else if(exception instanceof CredentialsExpiredException){
            result.setData("密码已过期");
        }else if(exception instanceof AccountExpiredException){
            result.setData("账号已过期");
        }else if(exception instanceof LockedException){
            result.setData("账号被锁定");
        }else{
            result.setData("未知异常");
        }
        //把result转成JSON
        String json = objectMapper.writeValueAsString(result);
        //响应出去
        PrintWriter out = response.getWriter();
        out.write(json);
        out.flush();
    }
}
7.4 创建无权限处理器AppAccessDeniedHandler
package com.powernode.handler;

import com.fasterxml.jackson.databind.ObjectMapper;
import com.powernode.common.Result;
import org.springframework.security.access.AccessDeniedException;
import org.springframework.security.web.access.AccessDeniedHandler;
import org.springframework.stereotype.Component;

import javax.servlet.ServletException;
import javax.servlet.http.HttpServletRequest;
import javax.servlet.http.HttpServletResponse;
import java.io.IOException;
import java.io.PrintWriter;

/**
 * 无权限的处理器
 */
@Component
public class AppAccessDeniedHandler implements AccessDeniedHandler {

    //声明一个把对象转成JSON的对象
    private ObjectMapper objectMapper=new ObjectMapper();

    @Override
    public void handle(HttpServletRequest request, HttpServletResponse response, AccessDeniedException accessDeniedException) throws IOException, ServletException {
        //设置响应编码
        response.setCharacterEncoding("UTF-8");
        response.setContentType("text/html;charset=utf-8");
        //返回JSON出去
        Result result=new Result(-1,"您没有权限访问");
        //把result转成JSON
        String json = objectMapper.writeValueAsString(result);
        //响应出去
        PrintWriter out = response.getWriter();
        out.write(json);
        out.flush();
    }
}
7.5 创建登出处理器AppLogoutSuccessHandler
package com.powernode.handler;

import com.fasterxml.jackson.databind.ObjectMapper;
import com.powernode.common.Result;
import org.springframework.security.core.Authentication;
import org.springframework.security.web.authentication.logout.LogoutSuccessHandler;
import org.springframework.stereotype.Component;

import javax.servlet.ServletException;
import javax.servlet.http.HttpServletRequest;
import javax.servlet.http.HttpServletResponse;
import java.io.IOException;
import java.io.PrintWriter;

/**
 * 退出成功的处理器
 */
@Component
public class AppLogoutSuccessHandler implements LogoutSuccessHandler {

    //声明一个把对象转成JSON的对象
    private ObjectMapper objectMapper=new ObjectMapper();

    /**
     *
     * @param request
     * @param response
     * @param authentication 当前退出的用户对象
     * @throws IOException
     * @throws ServletException
     */
    @Override
    public void onLogoutSuccess(HttpServletRequest request, HttpServletResponse response, Authentication authentication) throws IOException, ServletException {
        System.out.println("退出成功");
        //设置响应编码
        response.setCharacterEncoding("UTF-8");
        response.setContentType("text/html;charset=utf-8");
        //返回JSON出去
        Result result=new Result(200,"退出成功");
        //把result转成JSON
        String json = objectMapper.writeValueAsString(result);
        //响应出去
        PrintWriter out = response.getWriter();
        out.write(json);
        out.flush();
    }
}
7.6 修改WebSecurityConfig出现拒接访问走自己的处理器
package com.powernode.config;

import com.powernode.handler.AppAccessDeniedHandler;
import com.powernode.handler.AppAuthenticationFailureHandler;
import com.powernode.handler.AppAuthenticationSuccessHandler;
import com.powernode.handler.AppLogoutSuccessHandler;
import org.springframework.beans.factory.annotation.Autowired;
import org.springframework.context.annotation.Bean;
import org.springframework.context.annotation.Configuration;
import org.springframework.security.config.annotation.authentication.builders.AuthenticationManagerBuilder;
import org.springframework.security.config.annotation.method.configuration.EnableGlobalMethodSecurity;
import org.springframework.security.config.annotation.web.builders.HttpSecurity;
import org.springframework.security.config.annotation.web.configuration.WebSecurityConfigurerAdapter;
import org.springframework.security.crypto.bcrypt.BCryptPasswordEncoder;
import org.springframework.security.crypto.password.NoOpPasswordEncoder;
import org.springframework.security.crypto.password.PasswordEncoder;

@Configuration //变成配置类
@EnableGlobalMethodSecurity(prePostEnabled = true)
public class WebSecurityConfig extends WebSecurityConfigurerAdapter {

    // 注入登陆成功的处理器
    @Autowired
    private AppAuthenticationSuccessHandler successHandler;

    // 注入登陆失败的处理器
    @Autowired
    private AppAuthenticationFailureHandler failureHandler;

    // 注入没有权限的处理器
    @Autowired
    private AppAccessDeniedHandler accessDeniedHandler;

    //  注入退出成功的处理器
    @Autowired
    private AppLogoutSuccessHandler logoutSuccessHandler;

    /**
     * 在内存里面配置自己的多个用户和多个密码及权限
     *
     * @param auth
     * @throws Exception
     */
    @Override
    protected void configure(AuthenticationManagerBuilder auth) throws Exception {
        auth.inMemoryAuthentication()
                .withUser("admin")//模拟数据库的用户名
                .password("$2a$10$2ab0KehEwlC2Rxh0n26LIO6HW49R67WyflJx3Q0s8kdzhoaicOe7C")//模拟数据库的密码
//                .roles("user:query","user:add","user:update","user:delete")//模拟数据库的权限 在使用时会默认上ROLE_
                .authorities("user:query", "user:add", "user:update")//在roles和authorities同时配置时,谁后配置谁生效
                .and()
                .withUser("leige")
                .password("$2a$10$2ab0KehEwlC2Rxh0n26LIO6HW49R67WyflJx3Q0s8kdzhoaicOe7C")
//                .roles("user:query","user:add")
                .authorities("user:query")
                .and()
                .withUser("test")
                .password("$2a$10$2ab0KehEwlC2Rxh0n26LIO6HW49R67WyflJx3Q0s8kdzhoaicOe7C")
                .authorities("user:update")
                .and()
                .withUser("emp")
                .password("$2a$10$2ab0KehEwlC2Rxh0n26LIO6HW49R67WyflJx3Q0s8kdzhoaicOe7C")
                .roles("EMP");
    }


    /**
     * Security的http请求配置
     *
     * @param http
     * @throws Exception
     */
    @Override
    protected void configure(HttpSecurity http) throws Exception {

        //配置没有权限的处理器
        http.exceptionHandling().accessDeniedHandler(accessDeniedHandler);

//        super.configure(http);
        //设置登陆方式
        http.formLogin()//使用用户名和密码的登陆方式
//                .successForwardUrl("/welcome")//默认使用的POST
//                .failureForwardUrl("/fail");
                .successHandler(successHandler)//把自己创的登陆成功的处理器交给springSecurity
                .failureHandler(failureHandler)//把自己创的登陆失败的处理器交给springSecurity
        ;
        //配置退出的地址
        http.logout()
//                .logoutSuccessUrl("/logoutSuccess")
                    .logoutSuccessHandler(logoutSuccessHandler)
        ;
        //配置路径拦截 的url的匹配规则
        http.authorizeRequests()
                //当用户访问/user/query这个路径地,要判断用户有没有user:query这个权限
//                .antMatchers("/user/query").hasAuthority("user:query")
//                .antMatchers("/user/add").hasAuthority("user:add")
//                .antMatchers("/user/update").hasAuthority("user:update")
//                .antMatchers("/user/delete").hasAuthority("user:delete")
//                .antMatchers("/user/export").hasAuthority("user:export")
//                .antMatchers("/user/admin").hasRole("EMP")
                //任何路径要求必须认证之后才能访问
                .anyRequest().authenticated();
    }

    /**
     * 解决IllegalArgumentException There is no PasswordEncoder mapped for the id "null"
     *
     * @return
     */
    @Bean
    public PasswordEncoder passwordEncoder() {
//        return NoOpPasswordEncoder.getInstance(); //不对密码加密
        return new BCryptPasswordEncoder();
    }

    public static void main(String[] args) {
        BCryptPasswordEncoder passwordEncoder = new BCryptPasswordEncoder();
        String encode1 = passwordEncoder.encode("123456");
        String encode2 = passwordEncoder.encode("123456");
        String encode3 = passwordEncoder.encode("123456");
        System.out.println("encode1 = " + encode1);
        System.out.println("encode2 = " + encode2);
        System.out.println("encode3 = " + encode3);

        BCryptPasswordEncoder passwordEncoder2 = new BCryptPasswordEncoder();
        System.out.println(passwordEncoder2.matches("123456", "$2a$10$GogfClhB7IISX5.dwKpid.dW15eeetOjkjAlJlEakpmoyrQQ1iNny"));
        System.out.println(passwordEncoder2.matches("123456", "$2a$10$ozHsHJAzeiL48HtICvPwOOEsdkBVyU7T9b6JRWJQgx5d2hK57F0Qm"));
        System.out.println(passwordEncoder2.matches("123456", "$2a$10$HLQAA9qS3618xTswpNizMeJK2E2UP4xiD1sdJTPgwE0w.eaqFJdLe"));
    }
}
8.【源码分析】Spring Security认证授权总揽
目的:怎么自定义登录
权限的控制 人家已经写的很好了
8.1 结构总揽
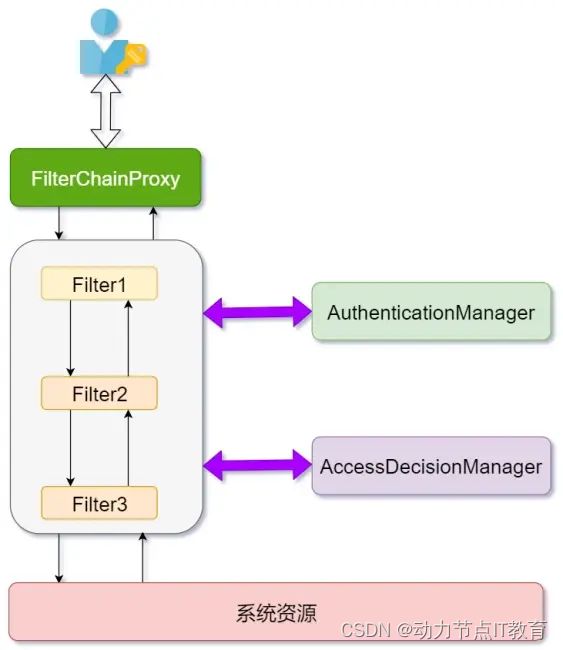
Spring Security所解决的问题就是安全访问控制,而安全访问控制功能其实就是对所有进入系统的请求进行拦截,校验每个请求是否能够访问它所期望的资源。根据前边知识的学习,可以通过Filter或AOP等技术来实现,SpringSecurity对Web资源的保护是靠Filter实现的,所以从这个Filter来入手,逐步深入Spring Security原理。当初始化Spring Security时,会创建一个名为 SpringSecurityFilterChain 的Servlet过滤器,类型为org.springframework.security.web.FilterChainProxy,它实现了javax.servlet.Filter,因此外部的请求会经过此类,下图是Spring Security过虑器链结构图:
8.2 上图说明
FilterChainProxy 是一个代理,真正起作用的是FilterChainProxy中SecurityFilterChain所包含的各个Filter,同时这些Filter作为Bean被Spring管理,它们是Spring Security核心,各有各的职责,但他们并不直接处理用户的认证,也不直接处理用户的授权,而是把它们交给了认证管理器(AuthenticationManager)和决策管理器(AccessDecisionManager)进行处理
spring Security功能的实现主要是由一系列过滤器链相互配合完成。

8.3 过滤器链中主要的几个过滤器及其作用
8.3.1 SecurityContextPersistenceFilter
这个Filter是整个拦截过程的入口和出口(也就是第一个和最后一个拦截器),会在请求开始时从配置好的 SecurityContextRepository 中获取 SecurityContext,然后把它设置给SecurityContextHolder。在请求完成后将 SecurityContextHolder 持有的 SecurityContext 再保存到配置好的 SecurityContextRepository,同时清除 securityContextHolder 所持有的 SecurityContext;
8.3.2 UsernamePasswordAuthenticationFilter
用于处理来自表单提交的认证。该表单必须提供对应的用户名和密码,其内部还有登录成功或失败后进行处理的 AuthenticationSuccessHandler 和AuthenticationFailureHandler,这些都可以根据需求做相关改变;
8.3.3 FilterSecurityInterceptor
是用于保护web资源的,使用AccessDecisionManager对当前用户进行授权访问;
8.3.4 ExceptionTranslationFilter
能够捕获来自 FilterChain 所有的异常,并进行处理。但是它只会处理两类异常:AuthenticationException 和 AccessDeniedException,其它的异常它会继续抛出。
9.【源码分析】Spring Security认证工作流程【重点】
SecurityContextPersistenceFilter
UsernamePasswordAuthenticationFilter (attemptAuthentication)
ProviderManager(authenticate)
DaoAuthenticationProvider (retrieveUser)
AbstractUserDetailsAuthenticationProvider(authenticate)
9.2 流程图分析
-
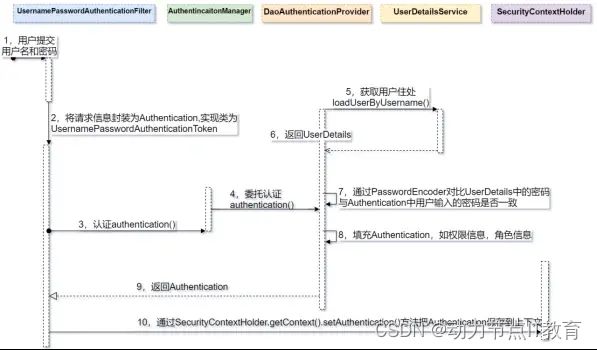
用户提交用户名、密码被SecurityFilterChain中的 UsernamePasswordAuthenticationFilter 过滤器获取到,封装为请求Authentication,通常情况下是UsernamePasswordAuthenticationToken这个实现类。
-
然后过滤器将Authentication提交至认证管理器(AuthenticationManager)进行认证
-
认证成功后, AuthenticationManager 身份管理器返回一个被填充满了信息的(包括上面提到的权限信息,身份信息,细节信息,但密码通常会被移除) Authentication 实例。
-
SecurityContextHolder 安全上下文容器将第3步填充了信息的 Authentication ,通过SecurityContextHolder.getContext().setAuthentication(…)方法,设置到其中。可以看出AuthenticationManager接口(认证管理器)是认证相关的核心接口,也是发起认证的出发点,它的实现类为ProviderManager。而Spring Security支持多种认证方式,因此ProviderManager维护着一个List 列表,存放多种认证方式,最终实际的认证工作是由AuthenticationProvider完成的。咱们知道web表单的对应的AuthenticationProvider实现类为DaoAuthenticationProvider,它的内部又维护着一个UserDetailsService负责UserDetails的获取。最终AuthenticationProvider将UserDetails填充至Authentication
9.3 断点调试及源码分析
看上图打断点调试
9.4 结果总结
9.4.1 AuthenticationProvider
通过前面的Spring Security认证流程我们得知,认证管理器(AuthenticationManager)委托AuthenticationProvider完成认证工作。
AuthenticationProvider是一个接口,定义如下:
public interface AuthenticationProvider {

 /**

  * 认证

  */

 Authentication authenticate(Authentication authentication)

   throws AuthenticationException;


 /**

  * 判断认证方式

  */

 boolean supports(Class<?> authentication);

}
authenticate()方法定义了认证的实现过程,它的参数是一个Authentication,里面包含了登录用户所提交的用户、密码等。而返回值也是一个Authentication,这个Authentication则是在认证成功后,将用户的权限及其他信息重新组装后生成。
Spring Security中维护着一个 List 列表,存放多种认证方式,不同的认证方式使用不同的AuthenticationProvider。如使用用户名密码登录时,使用AuthenticationProvider1,短信登录时使用AuthenticationProvider2等等这样的例子很多。
每个AuthenticationProvider需要实现supports()方法来表明自己支持的认证方式,如我们使用表单方式认证,在提交请求时Spring Security会生成UsernamePasswordAuthenticationToken,它是一个Authentication,里面封装着用户提交的用户名、密码信息。而对应的,哪个AuthenticationProvider来处理它?
我们在DaoAuthenticationProvider的基类AbstractUserDetailsAuthenticationProvider发现以下代码:
public boolean supports(Class authentication) {
return UsernamePasswordAuthenticationToken.class.isAssignableFrom(authentication);
}
也就是说当web表单提交用户名密码时,Spring Security由DaoAuthenticationProvider处理。
最后,我们来看一下 Authentication(认证信息)的结构,它是一个接口,我们之前提到的
UsernamePasswordAuthenticationToken就是它的实现之一:
public interface Authentication extends Principal, Serializable {
Collection getAuthorities();

Object getCredentials();

Object getDetails();

Object getPrincipal();

boolean isAuthenticated();

void setAuthenticated(boolean var1) throws IllegalArgumentException;
}
(1)Authentication是spring security包中的接口,直接继承自Principal类,而Principal是位于 java.security
包中的。它是表示着一个抽象主体身份,任何主体都有一个名称,因此包含一个getName()方法。
(2)getAuthorities(),权限信息列表,默认是GrantedAuthority接口的一些实现类,通常是代表权限信息的一系
列字符串。
(3)getCredentials(),凭证信息,用户输入的密码字符串,在认证过后通常会被移除,用于保障安全。
(4)getDetails(),细节信息,web应用中的实现接口通常为 WebAuthenticationDetails,它记录了访问者的ip地
址和sessionId的值。
(5)getPrincipal(),身份信息,大部分情况下返回的是UserDetails接口的实现类,UserDetails代表用户的详细
信息,那从Authentication中取出来的UserDetails就是当前登录用户信息,它也是框架中的常用接口之一。
9.4.2 UserDetailsService【重点】[自定义查询数据库]
9.4.2.1 认识UserDetailsService
现在咱们现在知道DaoAuthenticationProvider处理了web表单的认证逻辑,认证成功后既得到一个Authentication(UsernamePasswordAuthenticationToken实现),里面包含了身份信息(Principal)。这个身份信息就是一个 Object ,大多数情况下它可以被强转为UserDetails对象。
DaoAuthenticationProvider中包含了一个UserDetailsService实例,它负责根据用户名提取用户信息UserDetails(包含密码),而后DaoAuthenticationProvider会去对比UserDetailsService提取的用户密码与用户提交的密码是否匹配作为认证成功的关键依据,因此可以通过将自定义的 UserDetailsService 公开为spring bean来定义自定义身份验证。
public interface UserDetailsService {
UserDetails loadUserByUsername(String username) throws UsernameNotFoundException;
}
很多人把 DaoAuthenticationProvider和UserDetailsService的职责搞混淆,其实UserDetailsService只负责从特定的地方(通常是数据库)加载用户信息,仅此而已。而DaoAuthenticationProvider的职责更大,它完成完整的认证流程,同时会把UserDetails填充至Authentication。
上面一直提到UserDetails是用户信息,咱们看一下它的真面目:
public interface UserDetails extends Serializable {

    Collection<? extends GrantedAuthority> getAuthorities();

    String getPassword();

    String getUsername();

    boolean isAccountNonExpired();

    boolean isAccountNonLocked();

    boolean isCredentialsNonExpired();

    boolean isEnabled();

}
它和Authentication接口很类似,比如它们都拥有username,authorities。Authentication的getCredentials()与UserDetails中的getPassword()需要被区分对待,前者是用户提交的密码凭证,后者是用户实际存储的密码,认证其实就是对这两者的比对。Authentication中的getAuthorities()实际是由UserDetails的getAuthorities()传递而形成的。还记得Authentication接口中的getDetails()方法吗?其中的UserDetails用户详细信息便是经过了AuthenticationProvider认证之后被填充的。
通过实现UserDetailsService和UserDetails,我们可以完成对用户信息获取方式以及用户信息字段的扩展。
Spring Security提供的InMemoryUserDetailsManager(内存认证),JdbcUserDetailsManager(jdbc认证)就是
UserDetailsService的实现类,主要区别无非就是从内存还是从数据库加载用户。
9.4.2.2 测试
自定义UserDetailsService
@Service

public class SpringDataUserDetailsService implements UserDetailsService {

    @Override

    public UserDetails loadUserByUsername(String username) throws UsernameNotFoundException {

        //登录账号

        System.out.println("username="+username);

        //根据账号去数据库查询...

        //这里暂时使用静态数据

        UserDetails userDetails =

User.withUsername(username).password("123456").authorities("hello:query").build();

        return userDetails;

    }

}
重启工程,请求认证,SpringDataUserDetailsService的loadUserByUsername方法被调用 ,查询用户信息。
10.【源码分析】Spring Security授权工作流程[了解]
10.1 授权流程图
通过快速上手我们知道,Spring Security可以通过 http.authorizeRequests() 对web请求进行授权保护。SpringSecurity使用标准Filter建立了对web请求的拦截,最终实现对资源的授权访问。
10.2 授权流程分析
10.2.1 拦截请求
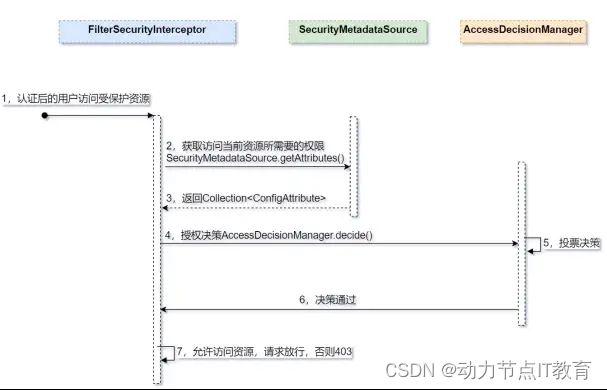
已认证用户访问受保护的web资源将被SecurityFilterChain中的 FilterSecurityInterceptor 的子类拦截。
10.2.2 获取资源访问策略
FilterSecurityInterceptor会从 SecurityMetadataSource 的子类DefaultFilterInvocationSecurityMetadataSource 获取要访问当前资源所需要的权限Collection 。
SecurityMetadataSource其实就是读取访问策略的抽象,而读取的内容,其实就是我们配置的访问规则, 读取访问策略如:

10.2.3 最后
FilterSecurityInterceptor会调用 AccessDecisionManager 进行授权决策,若决策通过,则允许访问资源,否则将禁止访问。
AccessDecisionManager(访问决策管理器)的核心接口如下:
	public interface AccessDecisionManager {

	 // ~ Methods

	 // ========================================================================================================


	 /**

	  * 通过传递的参数来决定用户是否有访问对应受保护资源的权限

	  *

	  * @param authentication the caller invoking the method (not null)

	  * @param object the secured object being called

	  * @param configAttributes the configuration attributes associated with the secured

	  * object being invoked

	  */

	 void decide(Authentication authentication, Object object,

	   Collection<ConfigAttribute> configAttributes) throws AccessDeniedException,

	   InsufficientAuthenticationException;

	}
这里着重说明一下decide的参数:
authentication:要访问资源的访问者的身份
object:要访问的受保护资源,web请求对应FilterInvocation
configAttributes:是受保护资源的访问策略,通过SecurityMetadataSource获取。
decide接口就是用来鉴定当前用户是否有访问对应受保护资源的权限。
10.3 授权决策分析
AccessDecisionManager采用投票的方式来确定是否能够访问受保护资源。
AccessDecisionManager中包含的一系列AccessDecisionVoter将会被用来对Authentication是否有权访问受保护对象进行投票,AccessDecisionManager根据投票结果,做出最终决策。
AccessDecisionVoter是一个接口,其中定义有三个方法,具体结构如下所示。
public interface AccessDecisionVoter {
int ACCESS_GRANTED = 1;

int ACCESS_ABSTAIN = 0;

int ACCESS_DENIED = ‐1;

boolean supports(ConfigAttribute var1);

boolean supports(Class var1);

int vote(Authentication var1, S var2, Collection var3);
}
vote()方法的返回结果会是AccessDecisionVoter中定义的三个常量之一。ACCESS_GRANTED表示同意,ACCESS_DENIED表示拒绝,ACCESS_ABSTAIN表示弃权。如果一个AccessDecisionVoter不能判定当前Authentication是否拥有访问对应受保护对象的权限,则其vote()方法的返回值应当为弃权ACCESS_ABSTAIN。
Spring Security内置了三个基于投票的AccessDecisionManager实现类如下,它们分别是AffirmativeBased、ConsensusBased和UnanimousBased,。
10.3.1 AffirmativeBased的逻辑是:(一票通过)
(1)只要有AccessDecisionVoter的投票为ACCESS_GRANTED则同意用户进行访问;
(2)如果全部弃权也表示通过;
(3)如果没有一个人投赞成票,但是有人投反对票,则将抛出AccessDeniedException。
Spring security默认使用的是AffirmativeBased。
10.3.2 ConsensusBased的逻辑是:(多数派)
(1)如果赞成票多于反对票则表示通过。
(2)反过来,如果反对票多于赞成票则将抛出AccessDeniedException。
(3)如果赞成票与反对票相同且不等于0,并且属性allowIfEqualGrantedDeniedDecisions的值为true,则表示通过,否则将抛出异常AccessDeniedException。参数allowIfEqualGrantedDeniedDecisions的值默认为true。
(4)如果所有的AccessDecisionVoter都弃权了,则将视参数allowIfAllAbstainDecisions的值而定,如果该值为true则表示通过,否则将抛出异常AccessDeniedException。参数allowIfAllAbstainDecisions的值默认为false。
10.3.3 UnanimousBased的逻辑具体是:
UnanimousBased的逻辑与另外两种实现有点不一样,另外两种会一次性把受保护对象的配置属性全部传递给AccessDecisionVoter进行投票,而UnanimousBased会一次只传递一个ConfigAttribute给AccessDecisionVoter进行投票。这也就意味着如果我们的AccessDecisionVoter的逻辑是只要传递进来的
ConfigAttribute中有一个能够匹配则投赞成票,但是放到UnanimousBased中其投票结果就不一定是赞成了。
UnanimousBased的逻辑具体来说是这样的:
(1)如果受保护对象配置的某一个ConfigAttribute被任意的AccessDecisionVoter反对了,则将抛出AccessDeniedException。
(2)如果没有反对票,但是有赞成票,则表示通过。
(3)如果全部弃权了,则将视参数allowIfAllAbstainDecisions的值而定,true则通过,false则抛出AccessDeniedException。
Spring Security也内置一些投票者实现类如RoleVoter、AuthenticatedVoter和WebExpressionVoter等,可以自行查阅资料进行学习。
总结:认证和鉴权都是过滤器链 ,认证是重点关注
UserDetailsService接口 loadUserByUsername() 我们可以实现这个接口 集成数据库
11.Spring Security集成Thymeleaf详解
Springsecurity+mysql完成认证和授权
1,自定义访问数据库UserDetailsService接口 loadUserByUsername()
2,自定义登陆页面
3,能不能自定义登陆的请求地址呢 /默认为/login
4,能不能自定义登出的地址呢 默认为/logout
5,能不能自定义表单的名字 默认为username password
/*

 Navicat Premium Data Transfer


 Source Server         : 本机

 Source Server Type    : MySQL

 Source Server Version : 50724

 Source Host           : localhost:3306

 Source Schema         : security_study


 Target Server Type    : MySQL

 Target Server Version : 50724

 File Encoding         : 65001


 Date: 06/07/2022 10:35:30

*/


SET NAMES utf8mb4;

SET FOREIGN_KEY_CHECKS = 0;


-- ----------------------------

-- Table structure for sys_menu

-- ----------------------------

DROP TABLE IF EXISTS `sys_menu`;

CREATE TABLE `sys_menu`  (

  `id` int(11) NOT NULL AUTO_INCREMENT COMMENT '编号',

  `pid` int(11) NULL DEFAULT NULL COMMENT '父级编号',

  `name` varchar(255) CHARACTER SET utf8 COLLATE utf8_general_ci NULL DEFAULT NULL COMMENT '名称',

  `code` varchar(255) CHARACTER SET utf8 COLLATE utf8_general_ci NULL DEFAULT NULL COMMENT '权限编码',

  `type` int(11) NULL DEFAULT NULL COMMENT '0代表菜单1权限',

  PRIMARY KEY (`id`) USING BTREE

) ENGINE = InnoDB AUTO_INCREMENT = 6 CHARACTER SET = utf8 COLLATE = utf8_general_ci ROW_FORMAT = Dynamic;


-- ----------------------------

-- Records of sys_menu

-- ----------------------------

INSERT INTO `sys_menu` VALUES (1, 0, '用户管理', NULL, 0);

INSERT INTO `sys_menu` VALUES (2, 1, '用户查询', 'user:query', 1);

INSERT INTO `sys_menu` VALUES (3, 1, '用户添加', 'user:add', 1);

INSERT INTO `sys_menu` VALUES (4, 1, '用户修改', 'user:update', 1);

INSERT INTO `sys_menu` VALUES (5, 1, '用户删除', 'user:delete', 1);

INSERT INTO `sys_menu` VALUES (6, 1, '导出用户', 'user:export', 1);


-- ----------------------------

-- Table structure for sys_role

-- ----------------------------

DROP TABLE IF EXISTS `sys_role`;

CREATE TABLE `sys_role`  (

  `id` int(11) NOT NULL AUTO_INCREMENT COMMENT '角色ID',

  `rolename` varchar(255) CHARACTER SET utf8 COLLATE utf8_general_ci NULL DEFAULT NULL COMMENT '角色名称',

  PRIMARY KEY (`id`) USING BTREE

) ENGINE = InnoDB AUTO_INCREMENT = 4 CHARACTER SET = utf8 COLLATE = utf8_general_ci ROW_FORMAT = Dynamic;


-- ----------------------------

-- Records of sys_role

-- ----------------------------

INSERT INTO `sys_role` VALUES (1, 'ADMIN');

INSERT INTO `sys_role` VALUES (2, 'CEO');

INSERT INTO `sys_role` VALUES (3, 'BA');


-- ----------------------------

-- Table structure for sys_role_menu

-- ----------------------------

DROP TABLE IF EXISTS `sys_role_menu`;

CREATE TABLE `sys_role_menu`  (

  `rid` int(11) NOT NULL COMMENT '角色表的编号',

  `mid` int(11) NOT NULL COMMENT '菜单表的编号',

  PRIMARY KEY (`mid`, `rid`) USING BTREE

) ENGINE = InnoDB CHARACTER SET = utf8 COLLATE = utf8_general_ci ROW_FORMAT = Dynamic;


-- ----------------------------

-- Records of sys_role_menu

-- ----------------------------

INSERT INTO `sys_role_menu` VALUES (1, 1);

INSERT INTO `sys_role_menu` VALUES (2, 1);

INSERT INTO `sys_role_menu` VALUES (3, 1);

INSERT INTO `sys_role_menu` VALUES (1, 2);

INSERT INTO `sys_role_menu` VALUES (2, 2);

INSERT INTO `sys_role_menu` VALUES (3, 2);

INSERT INTO `sys_role_menu` VALUES (1, 3);

INSERT INTO `sys_role_menu` VALUES (2, 3);

INSERT INTO `sys_role_menu` VALUES (1, 4);

INSERT INTO `sys_role_menu` VALUES (2, 4);

INSERT INTO `sys_role_menu` VALUES (1, 5);

INSERT INTO `sys_role_menu` VALUES (2, 5);

INSERT INTO `sys_role_menu` VALUES (1, 6);

INSERT INTO `sys_role_menu` VALUES (3, 6);


-- ----------------------------

-- Table structure for sys_role_user

-- ----------------------------

DROP TABLE IF EXISTS `sys_role_user`;

CREATE TABLE `sys_role_user`  (

  `uid` int(11) NOT NULL COMMENT '用户编号',

  `rid` int(11) NOT NULL COMMENT '角色编号',

  PRIMARY KEY (`uid`, `rid`) USING BTREE

) ENGINE = InnoDB CHARACTER SET = utf8 COLLATE = utf8_general_ci ROW_FORMAT = Dynamic;


-- ----------------------------

-- Records of sys_role_user

-- ----------------------------

INSERT INTO `sys_role_user` VALUES (1, 1);

INSERT INTO `sys_role_user` VALUES (2, 2);

INSERT INTO `sys_role_user` VALUES (3, 3);


-- ----------------------------

-- Table structure for sys_user

-- ----------------------------

DROP TABLE IF EXISTS `sys_user`;

CREATE TABLE `sys_user`  (

  `user_id` int(11) NOT NULL AUTO_INCREMENT COMMENT '编号',

  `username` varchar(255) CHARACTER SET utf8 COLLATE utf8_general_ci NULL DEFAULT NULL COMMENT '登陆名',

  `password` varchar(255) CHARACTER SET utf8 COLLATE utf8_general_ci NULL DEFAULT NULL COMMENT '密码',

  `sex` varchar(255) CHARACTER SET utf8 COLLATE utf8_general_ci NULL DEFAULT NULL COMMENT '性别',

  `address` varchar(255) CHARACTER SET utf8 COLLATE utf8_general_ci NULL DEFAULT NULL COMMENT '地址',

  `enabled` int(11) NULL DEFAULT 1 COMMENT '是否启动账户0禁用 1启用',

  `account_no_expired` int(11) NULL DEFAULT 1 COMMENT '账户是否没有过期0已过期 1 正常',

  `credentials_no_expired` int(11) NULL DEFAULT 1 COMMENT '密码是否没有过期0已过期 1 正常',

  `account_no_locked` int(11) NULL DEFAULT 1 COMMENT '账户是否没有锁定0已锁定 1 正常',

  PRIMARY KEY (`user_id`) USING BTREE

) ENGINE = InnoDB AUTO_INCREMENT = 4 CHARACTER SET = utf8 COLLATE = utf8_general_ci ROW_FORMAT = Dynamic;


-- ----------------------------

-- Records of sys_user

-- ----------------------------

INSERT INTO `sys_user` VALUES (1, 'zhangsan', '$2a$10$2ab0KehEwlC2Rxh0n26LIO6HW49R67WyflJx3Q0s8kdzhoaicOe7C', '男', '武汉', 1, 1, 1, 1);

INSERT INTO `sys_user` VALUES (2, 'lisi', '$2a$10$2ab0KehEwlC2Rxh0n26LIO6HW49R67WyflJx3Q0s8kdzhoaicOe7C', '女', '北京', 1, 1, 1, 1);

INSERT INTO `sys_user` VALUES (3, 'wangwu', '$2a$10$2ab0KehEwlC2Rxh0n26LIO6HW49R67WyflJx3Q0s8kdzhoaicOe7C', '女', '成都', 1, 1, 1, 1);


SET FOREIGN_KEY_CHECKS = 1;


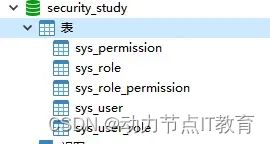
zhangsan---->

user:query

user:save

user:update

user:delete

user:export

lisi---->


user:query

user:save

user:update

user:delete

wangwu---->

user:query

user:export
11.3 pom.xml
<?xml version="1.0" encoding="UTF-8"?>
<project xmlns="http://maven.apache.org/POM/4.0.0" xmlns:xsi="http://www.w3.org/2001/XMLSchema-instance"
         xsi:schemaLocation="http://maven.apache.org/POM/4.0.0 https://maven.apache.org/xsd/maven-4.0.0.xsd">
    <modelVersion>4.0.0</modelVersion>
    <parent>
        <groupId>org.springframework.boot</groupId>
        <artifactId>spring-boot-starter-parent</artifactId>
        <version>2.5.7</version>
        <relativePath/> <!-- lookup parent from repository -->
    </parent>
    <groupId>com.bjpowernode</groupId>
    <artifactId>02-security-thymeleaf</artifactId>
    <version>0.0.1-SNAPSHOT</version>
    <name>security-thymeleaf</name>
    <description>Demo project for Spring Boot</description>
    <properties>
        <java.version>1.8</java.version>
    </properties>
    <dependencies>
        <dependency>
            <groupId>org.springframework.boot</groupId>
            <artifactId>spring-boot-starter-security</artifactId>
        </dependency>
        <dependency>
            <groupId>org.springframework.boot</groupId>
            <artifactId>spring-boot-starter-thymeleaf</artifactId>
        </dependency>
        <dependency>
            <groupId>org.springframework.boot</groupId>
            <artifactId>spring-boot-starter-web</artifactId>
        </dependency>
        <dependency>
            <groupId>org.mybatis.spring.boot</groupId>
            <artifactId>mybatis-spring-boot-starter</artifactId>
            <version>2.2.0</version>
        </dependency>
        <dependency>
            <groupId>org.thymeleaf.extras</groupId>
            <artifactId>thymeleaf-extras-springsecurity5</artifactId>
        </dependency>

        <dependency>
            <groupId>mysql</groupId>
            <artifactId>mysql-connector-java</artifactId>
            <scope>runtime</scope>
        </dependency>
        <dependency>
            <groupId>org.projectlombok</groupId>
            <artifactId>lombok</artifactId>
            <optional>true</optional>
        </dependency>
        <dependency>
            <groupId>org.springframework.boot</groupId>
            <artifactId>spring-boot-starter-test</artifactId>
            <scope>test</scope>
        </dependency>
        <dependency>
            <groupId>org.springframework.security</groupId>
            <artifactId>spring-security-test</artifactId>
            <scope>test</scope>
        </dependency>
    </dependencies>

    <build>
        <plugins>
            <plugin>
                <groupId>org.springframework.boot</groupId>
                <artifactId>spring-boot-maven-plugin</artifactId>
                <configuration>
                    <excludes>
                        <exclude>
                            <groupId>org.projectlombok</groupId>
                            <artifactId>lombok</artifactId>
                        </exclude>
                    </excludes>
                </configuration>
            </plugin>
        </plugins>
    </build>
</project>
11.4 application.yml
server:
    port: 8080
spring:
    datasource:
        driver-class-name: com.mysql.cj.jdbc.Driver
        url: jdbc:mysql://127.0.0.1:3306/security_study?useUnicode=true&characterEncoding=UTF-8&serverTimezone=UTC
        username: root
        password: root
    thymeleaf:
        cache: false
mybatis:
    mapper-locations: classpath:mapper/*.xml
    configuration:
        log-impl: org.apache.ibatis.logging.stdout.StdOutImpl
11.5 修改启动类
@SpringBootApplication
@MapperScan(basePackages = {"com.bjpowernode.mapper"})
public class SecurityThymeleafApplication {

    public static void main(String[] args) {
        SpringApplication.run(SecurityThymeleafApplication.class, args);
    }
}
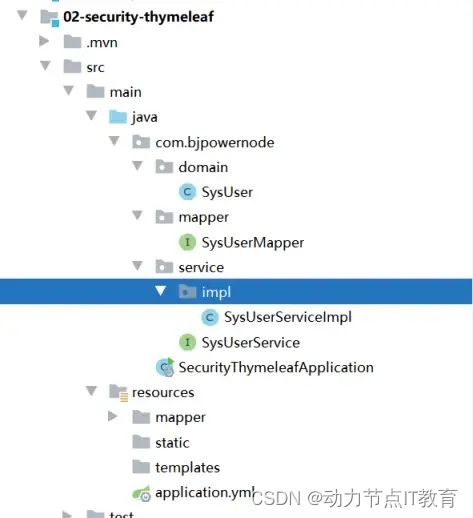
11.7 修改SysUser【重点】
因为我们要走自定义登录方法,方法需要返回UserDetails,所以我们就这么来
package com.powernode.domain;

import lombok.AllArgsConstructor;
import lombok.Data;
import lombok.NoArgsConstructor;
import org.springframework.security.core.GrantedAuthority;
import org.springframework.security.core.authority.SimpleGrantedAuthority;
import org.springframework.security.core.userdetails.UserDetails;

import java.util.ArrayList;
import java.util.Collection;
import java.util.List;

@Data
@AllArgsConstructor
@NoArgsConstructor
public class SysUser implements UserDetails {
    /**
    * 编号
    */
    private Integer userId;

    /**
    * 登陆名
    */
    private String username;

    /**
    * 密码
    */
    private String password;

    /**
    * 性别
    */
    private String sex;

    /**
    * 地址
    */
    private String address;

    /**
    * 是否启动账户0禁用 1启用
    */
    private Integer enabled;

    /**
    * 账户是否没有过期0已过期 1 正常
    */
    private Integer accountNoExpired;

    /**
    * 密码是否没有过期0已过期 1 正常
    */
    private Integer credentialsNoExpired;

    /**
    * 账户是否没有锁定0已锁定 1 正常
    */
    private Integer accountNoLocked;

    //声明一个存放权限的集合
    private List<SimpleGrantedAuthority> permissions=new ArrayList<>();

    /**
     * 获取权限
     * @return
     */
    @Override
    public Collection<? extends GrantedAuthority> getAuthorities() {
        return permissions;
    }

    @Override
    public boolean isAccountNonExpired() {
        return this.accountNoExpired.equals(1);
    }

    @Override
    public boolean isAccountNonLocked() {
        return this.accountNoLocked.equals(1);
    }

    @Override
    public boolean isCredentialsNonExpired() {
        return this.credentialsNoExpired.equals(1);
    }

    @Override
    public boolean isEnabled() {
        return this.enabled.equals(1);
    }
}
11.8 创建AppUserDetailsServiceImpl【重点】
package com.powernode.service.impl;

import com.powernode.domain.SysUser;
import com.powernode.mapper.SysUserMapper;
import org.springframework.security.core.authority.SimpleGrantedAuthority;
import org.springframework.security.core.userdetails.User;
import org.springframework.security.core.userdetails.UserDetails;
import org.springframework.security.core.userdetails.UserDetailsService;
import org.springframework.security.core.userdetails.UsernameNotFoundException;
import org.springframework.stereotype.Component;

import javax.annotation.Resource;
import java.util.ArrayList;
import java.util.Collection;
import java.util.List;

@Component
public class AppUserDetailsServiceImpl implements UserDetailsService {

    @Resource
    private SysUserMapper userMapper;

    @Override
    public UserDetails loadUserByUsername(String username) throws UsernameNotFoundException {
        //根据用户名到数据库里面查询用户对象
        SysUser sysUser=this.userMapper.queryUserByUsername(username);
        //模拟数据库查询 如果数据库没有这个用户名,就抛UsernameNotFoundException
        if(sysUser==null){
            throw new UsernameNotFoundException("用户名不存在");
        }
        //根据用户ID查询用户已拥有的权限
        List<String> permission=this.userMapper.queryPermissionByUserId(sysUser.getUserId());
        List<SimpleGrantedAuthority> authorities=new ArrayList<>();
        for (String per : permission) {
            authorities.add(new SimpleGrantedAuthority(per));
        }
        //把权限放到sysUser
        sysUser.setPermissions(authorities);
        return sysUser;

    }
}
11.9 修改SysUserMapper
/**
 * 根据用户名到数据库里面查询用户对象
 *
 * @param username
 * @return
 */
SysUser queryUserByUsername(@Param("username") String username);

/**
 * 根据用户ID查询用户已拥有的权限
 *
 * @param userId
 * @return
 */
List<String> queryPermissionByUserId(@Param("userId") Integer userId);
11.10 修改SysUserMapper.xml文件(sql)
<!--  根据用户名到数据库里面查询用户对象-->
<select id="queryUserByUsername" resultMap="BaseResultMap">
    select
    <include refid="Base_Column_List">
    </include>
    from sys_user
    where username = #{username}
</select>
<!--根据用户ID查询用户已拥有的权限-->
<select id="queryPermissionByUserId" resultType="java.lang.String">
    select distinct t1.code
    from sys_menu t1
                 inner join sys_role_menu t2
                 inner join sys_role_user t3
            on (t1.id = t2.mid and t2.rid = t3.rid)
    where t3.uid = #{userId}
      and t1.type = 1
</select>
11.11 创建WebSecurityConfig配置类【重点】
package com.powernode.config;

import com.powernode.service.impl.AppUserDetailsServiceImpl;
import org.springframework.beans.factory.annotation.Autowired;
import org.springframework.context.annotation.Bean;
import org.springframework.context.annotation.Configuration;
import org.springframework.security.config.annotation.authentication.builders.AuthenticationManagerBuilder;
import org.springframework.security.config.annotation.method.configuration.EnableGlobalMethodSecurity;
import org.springframework.security.config.annotation.web.builders.HttpSecurity;
import org.springframework.security.config.annotation.web.builders.WebSecurity;
import org.springframework.security.config.annotation.web.configuration.WebSecurityConfigurerAdapter;
import org.springframework.security.crypto.bcrypt.BCryptPasswordEncoder;
import org.springframework.security.crypto.password.PasswordEncoder;

@Configuration //变成配置类
@EnableGlobalMethodSecurity(prePostEnabled = true)
public class WebSecurityConfig extends WebSecurityConfigurerAdapter {
    //  注入自定义 UserDetailsService的实现类
    @Autowired
    private AppUserDetailsServiceImpl userDetailsService;

    /**
     * 在内存里面配置自己的多个用户和多个密码及权限
     *
     * @param auth
     * @throws Exception
     */
    @Override
    protected void configure(AuthenticationManagerBuilder auth) throws Exception {
        //使用自定义的UserDetailsService来模拟数据库的查询
        auth.userDetailsService(userDetailsService);
    }


    /**
     * Security的http请求配置
     *
     * @param http
     * @throws Exception
     */
    @Override
    protected void configure(HttpSecurity http) throws Exception {
        //设置登陆方式
        http.formLogin()//使用用户名和密码的登陆方式
            .usernameParameter("uname") //页面表单的用户名的name
            .passwordParameter("pwd")//页面表单的密码的name
            .loginPage("/index/toLogin") //自己定义登陆页面的地址
            .loginProcessingUrl("/login/doLogin")//配置登陆的url
            .successForwardUrl("/index/toIndex") //登陆成功跳转的页面
            .failureForwardUrl("/index/toLogin")//登陆失败跳转的页面
            .permitAll()
        ;
        //配置退出方式
        http.logout()
                .logoutUrl("/logout")
                .logoutSuccessUrl("/index/toLogin")
                .permitAll();
        //配置路径拦截 的url的匹配规则
        http.authorizeRequests()
                //放行去登陆的页面
                .mvcMatchers("/index/toIndex","/index.html").anonymous()
                //任何路径要求必须认证之后才能访问
                .anyRequest().authenticated();
        // 禁用csrf跨站请求攻击  后面可以使用postman工具测试
        http.csrf().disable();
    }

    /**
     * 资源服务匹配放行【静态资源文件】
     *
     * @param web
     * @throws Exception
     */
    @Override
    public void configure(WebSecurity web) throws Exception {
        web.ignoring().mvcMatchers("/resources/**");
    }

    /**
     * 解决IllegalArgumentException There is no PasswordEncoder mapped for the id "null"
     * @return
     */
    @Bean
    public PasswordEncoder passwordEncoder() {
//        return NoOpPasswordEncoder.getInstance(); //不对密码加密
        return new BCryptPasswordEncoder();
    }
}
11.12 创建RouterController
package com.powernode.controller;

import org.springframework.stereotype.Controller;
import org.springframework.web.bind.annotation.RequestMapping;
import org.springframework.web.bind.annotation.RestController;

@Controller
@RequestMapping("index")
public class RouterController {
    /**
     * 跳转到登陆页面
     */
    @RequestMapping("toLogin")
    public String toLogin(){
        return "login";
    }

    /**
     * 返回登陆失败
     */
    @RequestMapping("toIndex")
    public String toIndex(){
        return "main";
    }
}
11.13 创建UserController
package com.powernode.controller;

import org.springframework.security.access.prepost.PreAuthorize;
import org.springframework.web.bind.annotation.RequestMapping;
import org.springframework.web.bind.annotation.RestController;

@Controller
@RequestMapping("user")
public class UserController {

    /**
     * 查询
     */
    @PreAuthorize(value = "hasAuthority('user:query')")//使用AOP的方式在访问这个方法之前判断有没有user:query权限
    @RequestMapping("query")
    public String query(){
        return "user/query";
    }
    /**
     * 添加
     */
    @PreAuthorize(value = "hasAuthority('user:add')")
    @RequestMapping("add")
    public String add(){
        return "user/add";
    }
    /**
     * 修改
     */
    @PreAuthorize(value = "hasAuthority('user:update')")
    @RequestMapping("update")
    public String update(){
        return "user/update";
    }
    /**
     * 删除
     */
    @PreAuthorize(value = "hasAuthority('user:delete')")
    @RequestMapping("delete")
    public String delete(){
        return "user/delete";
    }
    /**
     * 导出
     */
    @PreAuthorize(value = "hasAuthority('user:export')")
    @RequestMapping("export")
    public String export(){
        return "user/export";
    }

}
11.14 创建页面
11.14.1 在tempaltes下面创建main.html和login.html
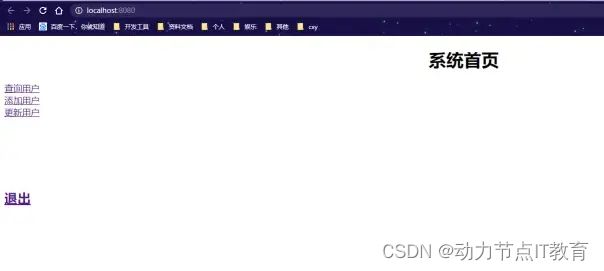
创建main.html
<!DOCTYPE html>
<html lang="en">
<head>
    <meta charset="UTF-8">
    <title>系统首页</title>
</head>
<body>
<h1 align="center">系统首页</h1>
<a href="/user/query">查询用户</a>
<br>
<a href="/user/add">添加用户</a>
<br>
<a href="/user/update">更新用户</a>
<br>
<a href="/user/delete">删除用户</a>
<br>
<a href="/user/export">导出用户</a>
<br>
<br><br><br>
<h2><a href="/logout">退出</a></h2>
<br>
</body>
</html>
创建login.html
<!DOCTYPE html>
<html>
<head>
    <meta charset="UTF-8">
    <title>用户登陆</title>
</head>
<body>
<h2>登录页面</h2>
<form action="/login/doLogin" method="post">
    <table>
        <tr>
            <td>用户名:</td>
            <td><input type="text" name="uname" value="zhangsan"></td>
        </tr>
        <tr>
            <td>密码:</td>
            <td><input type="password" name="pwd"></td>
        </tr>
        <tr>
            <td colspan="2">
                <button type="submit">登录</button>
            </td>
        </tr>
    </table>
</form>
</body>
11.14.2 在tempaltes/user下面创建页面
创建export.html
<!DOCTYPE html>
<html lang="en">
<head>
    <meta charset="UTF-8">
    <title>系统首页-用户管理</title>
</head>
<body>
<h1 align="center">系统首页-用户管理-导出</h1>
<a href="/index/toIndex">返回</a>
<br>
</body>
</html>
创建query.html

<!DOCTYPE html>
<html lang="en">
<head>
    <meta charset="UTF-8">
    <title>系统首页-用户管理</title>
</head>
<body>
<h1 align="center">系统首页-用户管理-查询</h1>
<a href="/index/toIndex">返回</a>
<br>
</body>
</html>
创建add.html
<!DOCTYPE html>
<html lang="en">
<head>
    <meta charset="UTF-8">
    <title>系统首页-用户管理</title>
</head>
<body>
<h1 align="center">系统首页-用户管理-新增</h1>
<a href="/index/toIndex">返回</a>
<br>
</body>
</html>
创建update.html
<!DOCTYPE html>
<html lang="en">
<head>
    <meta charset="UTF-8">
    <title>系统首页-用户管理</title>
</head>
<body>
<h1 align="center">系统首页-用户管理-更新</h1>
<a href="/index/toIndex">返回</a>
<br>
</body>
</html>
创建delete.html
<!DOCTYPE html>
<html lang="en">
<head>
    <meta charset="UTF-8">
    <title>系统首页-用户管理</title>
</head>
<body>
<h1 align="center">系统首页-用户管理-删除</h1>
<a href="/index/toIndex">返回</a>
<br>
</body>
</html>
11.14.3 在static/error下面创建页面
创建403.html
<!doctype html>
<html lang="en">
<head>
    <meta charset="UTF-8">
    <title>403</title>
</head>
<body>
<h2>403:你没有权限访问此页面</h2>
<a href="/index/toIndex">去首页</a>
</body>
</html>
11.15 启动测试即可
11.16 当用户没有某权限时,页面不展示该按钮
上一讲里面我们创建的项目里面是当用户点击页面上的链接请求到后台之后没有权限会跳转到403,那么如果用户没有权限,对应的按钮就不显示出来,这样岂不是更好吗
我们接着上一个项目来改造
引入下面的依赖
<dependency>
            <groupId>org.thymeleaf.extras</groupId>
            <artifactId>thymeleaf-extras-springsecurity5</artifactId>
        </dependency>
修改index.html即可
<!DOCTYPE html>
<html lang="en" xmlns:th="http://www.thymeleaf.org"
      xmlns:sec="http://www.thymeleaf.org/extras/spring-security">
<head>
    <meta charset="UTF-8">
    <title>系统首页</title>
</head>
<body>
<h1 align="center">系统首页</h1>
<a href="/query" sec:authorize="hasAuthority('user:query')" >查询用户</a>
<br>
<a href="/add" sec:authorize="hasAuthority('user:save')" >添加用户</a>
<br>
<a href="/update" sec:authorize="hasAuthority('user:update')" >更新用户</a>
<br>
<a href="/delete" sec:authorize="hasAuthority('user:delete')" >删除用户</a>
<br>
<a href="/export" sec:authorize="hasAuthority('user:export')" >导出用户</a>
<br>
<br><br><br>
<h2><a href="/logout">退出</a></h2>
<br>
</body>
</html>
12.Spring Security集成Thymeleaf图片验证码
以前因为我们自己写登陆的方法可以在自己的登陆方法里面去接收页面传过来的code再和session里面正确的code进行比较
12.1 概述
上一讲里面我们集成了Thymeleaf实现在页面链接的动态判断是否显示,那么在实际开发中,我们会遇到有验证码的功能,那么如何处理呢?
我们接着上一个项目来改造
12.2 原理、存在问题、解决思路
我们知道Spring Security是通过过滤器链来完成了,所以它的解决方案是创建一个过滤器放到Security的过滤器链中,在自定义的过滤器中比较验证码
12.3 添加依赖(生成验证码)
<!--引入hutool-->
<dependency>
    <groupId>cn.hutool</groupId>
    <artifactId>hutool-all</artifactId>
    <version>5.3.9</version>
</dependency>
12.4 添加一个获取验证码的接口
/**
 * 获得验证码的方法
 *
 * @param request
 * @param response
 * @return
 */
@GetMapping("code/image")
public void code(HttpServletRequest request, HttpServletResponse response) throws IOException {
    // 创建一个验证码  长,宽,字符数,干扰元素个数
    CircleCaptcha circleCaptcha = CaptchaUtil.createCircleCaptcha(200, 100, 2, 20);
    // 放在session里面
    request.getSession().setAttribute("SESSION_KEY_IMAGE_CODE", circleCaptcha);
    // 用流写出去
    ImageIO.write(circleCaptcha.getImage(), "JPEG", response.getOutputStream());
}
12.5 创建验证码过滤器ValidateCodeFilter【重点】
package com.powernode.filter;


import org.springframework.stereotype.Component;
import org.springframework.util.StringUtils;
import org.springframework.web.filter.OncePerRequestFilter;

import javax.servlet.FilterChain;
import javax.servlet.ServletException;
import javax.servlet.http.HttpServletRequest;
import javax.servlet.http.HttpServletResponse;
import java.io.IOException;

/**
 * 自己定义的比较验证码的过滤器
 */
@Component
public class ValidateCodeFilter extends OncePerRequestFilter {
    @Override
    protected void doFilterInternal(HttpServletRequest request, HttpServletResponse response, FilterChain filterChain) throws ServletException, IOException {
        //得到请求地址
        String requestURI = request.getRequestURI();
        System.out.println("requestURI = " + requestURI);
        if (requestURI.equals("/login/doLogin")){
            //说明当前请求为登陆
            //1,得到登陆时用户输入的验证码
            String code=request.getParameter("code");
            //2,得到session里面正确的验证码
            String realCode = request.getSession().getAttribute("code").toString();
            if(StringUtils.hasText(code)){
                if(realCode.equalsIgnoreCase(code)){
                    //说明验证码正确  直接放行
                    request.getSession().removeAttribute("errorMsg");
                    filterChain.doFilter(request,response);
                }else{
                    //说明验证码不正确,返回登陆页面
                    request.getSession().setAttribute("errorMsg","验证码不正确");
                    response.sendRedirect("/login/toLogin");
                }
            }else{
                //用户没有输出验证码重定向到登陆页面
                request.getSession().setAttribute("errorMsg","验证码不能为空");
                response.sendRedirect("/login/toLogin");
            }
        }else{
            //说明不是登陆 直接放行到下一个过滤器
            filterChain.doFilter(request,response);
        }
    }
}
12.6 修改WebSecurityConfig【重点】
/**
 * 把验证码拦截器注入进来
 */
@Autowired
private ValidateCodeFilter validateCodeFilter;

/**
 * 配置http请求的方式和自定义登录登出地址等
 *
 * @param http
 * @throws Exception
 */
@Override
protected void configure(HttpSecurity http) throws Exception {
    // 配置登录之前添加一个验证码的过滤器
    http.addFilterBefore(validateCodeFilter, UsernamePasswordAuthenticationFilter.class);
    http.formLogin()
            .loginPage("/login/toLogin") // 自定义登录的页面路径
            .loginProcessingUrl("/login/doLogin") // 登录的url,要和前端对应,这个接口我们不需要写,底层实现了
            .usernameParameter("username")
            .passwordParameter("password")
            .successForwardUrl("/index") // 登录成功后走自己的url
            .permitAll();
    http.logout()  // 自带的登出url是/logout 注意前端对应就可以了
            .logoutSuccessUrl("/login/toLogin")  // 登出以后去登录页面
            .permitAll();
    // 禁用csrf跨站请求攻击
    http.csrf().disable();
    // 所有的请求都需要登录才能访问
    http.authorizeRequests()
            .antMatchers("/code/image")  // 放行验证码的路径
            .permitAll()
            .anyRequest().authenticated();
}
12.7 修改login.html
<!DOCTYPE html>
<html xmlns:th="http://www.thymeleaf.org">
<head>
    <meta charset="UTF-8">
    <title>用户登陆</title>
</head>
<body>
<h2>登录页面</h2>
<!--${param.error}这个如果有值,就显示帐号或密码错误-->
<h4 th:if="${param.error}" style="color: #FF0000;">帐号或密码错误,请重新输入</h4>
<form action="/login/doLogin" method="post">
    <table>
        <tr>
            <td>用户名:</td>
            <td><input type="text" name="username" value="zhangsan"></td>
        </tr>
        <tr>
            <td>密码:</td>
            <td><input type="password" name="password"></td>
        </tr>
        <tr>
            <td>验证码:</td>
            <td><input type="text" name="code"> <img src="/code/image" style="height:33px;cursor:pointer;" onclick="this.src=this.src">
                <span th:text="${error}" style="color: #FF0000;" ></span>
            </td>
        </tr>
        <tr>
            <td colspan="2">
                <button type="submit">登录</button>
            </td>
        </tr>
    </table>
</form>
</body>
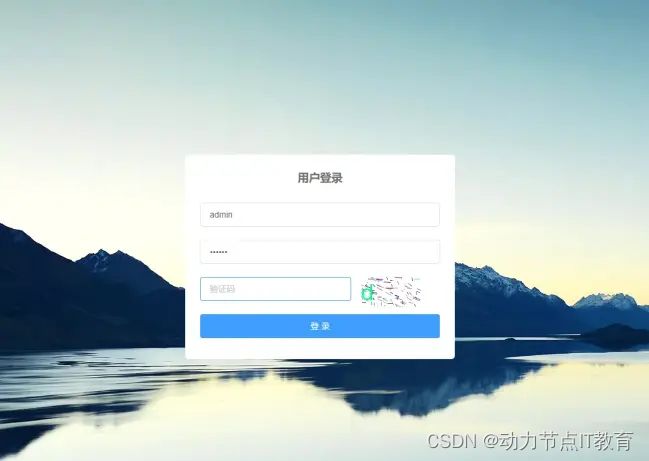
12.8 测试登录即可
13.Spring Security集成Thymeleaf+ajax的验证码处理
13.1 创建项目
继续上一个项目的修改
13.2 加入依赖
不用动
13.3 创建Result
package com.powernode.common;

import lombok.AllArgsConstructor;
import lombok.Data;
import lombok.NoArgsConstructor;

@Data
@AllArgsConstructor
@NoArgsConstructor
public class Result {

    private Integer code;
    private String msg;
    private Object data;

    public Result(Integer code, String msg) {
        this.code = code;
        this.msg = msg;
    }
}
13.4 创建四个处理器
13.4.1 创建登陆成功的处理器AppAuthenticationSuccessHandler
package com.powernode.handler;

import com.fasterxml.jackson.databind.ObjectMapper;
import com.powernode.common.Result;
import org.springframework.security.core.Authentication;
import org.springframework.security.web.authentication.AuthenticationSuccessHandler;
import org.springframework.stereotype.Component;

import javax.servlet.ServletException;
import javax.servlet.http.HttpServletRequest;
import javax.servlet.http.HttpServletResponse;
import java.io.IOException;
import java.io.PrintWriter;

/**
 * 登陆成功的处理器
 * 要求返回JSON
 */
@Component
public class AppAuthenticationSuccessHandler implements AuthenticationSuccessHandler {

    //声明一个把对象转成JSON的对象
    private ObjectMapper objectMapper=new ObjectMapper();

    /**
     *
     * @param request  当前的请求对象
     * @param response  当前的响应对象
     * @param authentication  认证成功之后的身份对象
     * @throws IOException
     * @throws ServletException
     */
    @Override
    public void onAuthenticationSuccess(HttpServletRequest request, HttpServletResponse response, Authentication authentication) throws IOException, ServletException {
        System.out.println("登陆成功");
        //设置响应编码
        response.setCharacterEncoding("UTF-8");
        response.setContentType("text/html;charset=utf-8");
        //返回JSON出去
        Result result=new Result(200,"登陆成功",authentication);
        //把result转成JSON
        String json = objectMapper.writeValueAsString(result);
        //响应出去
        PrintWriter out = response.getWriter();
        out.write(json);
        out.flush();
    }
}
13.4.2 创建登陆失败处理器AppAuthenticationFailureHandler
package com.powernode.handler;

import com.fasterxml.jackson.databind.ObjectMapper;
import com.powernode.common.Result;
import org.springframework.security.authentication.*;
import org.springframework.security.core.AuthenticationException;
import org.springframework.security.core.userdetails.UsernameNotFoundException;
import org.springframework.security.web.authentication.AuthenticationFailureHandler;
import org.springframework.stereotype.Component;

import javax.servlet.ServletException;
import javax.servlet.http.HttpServletRequest;
import javax.servlet.http.HttpServletResponse;
import java.io.IOException;
import java.io.PrintWriter;

/**
 * 登陆失败的处理器
 */
@Component
public class AppAuthenticationFailureHandler implements AuthenticationFailureHandler {

    //声明一个把对象转成JSON的对象
    private ObjectMapper objectMapper=new ObjectMapper();


    /**
     * @param request 当前的请求对象
     * @param response 当前的响应对象
     * @param exception 失败的原因的异常
     * @throws IOException
     * @throws ServletException
     */
    @Override
    public void onAuthenticationFailure(HttpServletRequest request, HttpServletResponse response, AuthenticationException exception) throws IOException, ServletException {
        System.err.println("登陆失败");
        //设置响应编码
        response.setCharacterEncoding("UTF-8");
        response.setContentType("text/html;charset=utf-8");
        //返回JSON出去
        Result result=new Result(-1,"登陆失败");
        if(exception instanceof BadCredentialsException){
            result.setData("密码不正确");
        }else if(exception instanceof DisabledException){
            result.setData("账号被禁用");
        }else if(exception instanceof UsernameNotFoundException){
            result.setData("用户名不存在");
        }else if(exception instanceof CredentialsExpiredException){
            result.setData("密码已过期");
        }else if(exception instanceof AccountExpiredException){
            result.setData("账号已过期");
        }else if(exception instanceof LockedException){
            result.setData("账号被锁定");
        }else{
            result.setData("未知异常");
        }
        //把result转成JSON
        String json = objectMapper.writeValueAsString(result);
        //响应出去
        PrintWriter out = response.getWriter();
        out.write(json);
        out.flush();
    }
}
13.4.3 创建无权限处理器AppAccessDeniedHandler
package com.powernode.handler;

import com.fasterxml.jackson.databind.ObjectMapper;
import com.powernode.common.Result;
import org.springframework.security.access.AccessDeniedException;
import org.springframework.security.web.access.AccessDeniedHandler;
import org.springframework.stereotype.Component;

import javax.servlet.ServletException;
import javax.servlet.http.HttpServletRequest;
import javax.servlet.http.HttpServletResponse;
import java.io.IOException;
import java.io.PrintWriter;

/**
 * 无权限的处理器
 */
@Component
public class AppAccessDeniedHandler implements AccessDeniedHandler {

    //声明一个把对象转成JSON的对象
    private ObjectMapper objectMapper=new ObjectMapper();

    @Override
    public void handle(HttpServletRequest request, HttpServletResponse response, AccessDeniedException accessDeniedException) throws IOException, ServletException {
        //设置响应编码
        response.setCharacterEncoding("UTF-8");
        response.setContentType("text/html;charset=utf-8");
        //返回JSON出去
        Result result=new Result(-1,"您没有权限访问");
        //把result转成JSON
        String json = objectMapper.writeValueAsString(result);
        //响应出去
        PrintWriter out = response.getWriter();
        out.write(json);
        out.flush();
    }
}
13.4.4 创建登出处理器AppLogoutSuccessHandler
package com.powernode.handler;

import com.fasterxml.jackson.databind.ObjectMapper;
import com.powernode.common.Result;
import org.springframework.security.core.Authentication;
import org.springframework.security.web.authentication.logout.LogoutSuccessHandler;
import org.springframework.stereotype.Component;

import javax.servlet.ServletException;
import javax.servlet.http.HttpServletRequest;
import javax.servlet.http.HttpServletResponse;
import java.io.IOException;
import java.io.PrintWriter;

/**
 * 退出成功的处理器
 */
@Component
public class AppLogoutSuccessHandler implements LogoutSuccessHandler {

    //声明一个把对象转成JSON的对象
    private ObjectMapper objectMapper=new ObjectMapper();

    /**
     *
     * @param request
     * @param response
     * @param authentication 当前退出的用户对象
     * @throws IOException
     * @throws ServletException
     */
    @Override
    public void onLogoutSuccess(HttpServletRequest request, HttpServletResponse response, Authentication authentication) throws IOException, ServletException {
        System.out.println("退出成功");
        //设置响应编码
        response.setCharacterEncoding("UTF-8");
        response.setContentType("text/html;charset=utf-8");
        //返回JSON出去
        Result result=new Result(200,"退出成功");
        //把result转成JSON
        String json = objectMapper.writeValueAsString(result);
        //响应出去
        PrintWriter out = response.getWriter();
        out.write(json);
        out.flush();
    }
}
13.5 修改ValidateCodeFilter处理验证码
package com.powernode.filter;

import cn.hutool.captcha.LineCaptcha;
import com.fasterxml.jackson.databind.ObjectMapper;
import com.powernode.common.Result;
import org.springframework.beans.factory.annotation.Autowired;
import org.springframework.stereotype.Component;
import org.springframework.web.filter.OncePerRequestFilter;

import javax.servlet.Filter;
import javax.servlet.FilterChain;
import javax.servlet.ServletException;
import javax.servlet.http.HttpServletRequest;
import javax.servlet.http.HttpServletResponse;
import javax.servlet.http.HttpSession;
import java.io.IOException;
import java.io.PrintWriter;

/**
 * 验证验证码的过滤器
 */
@Component
public class ValidateCodeFilter  extends OncePerRequestFilter {

    //声明一个转JSON的对象
    @Autowired
    private ObjectMapper objectMapper;
    /**
     *
     * @param request 请求对象
     * @param response  响应对象
     * @param filterChain 过滤器链路
     * @throws ServletException
     * @throws IOException
     */
    @Override
    protected void doFilterInternal(HttpServletRequest request, HttpServletResponse response, FilterChain filterChain) throws ServletException, IOException {
        //处理编码问题
        request.setCharacterEncoding("UTF-8");
        response.setCharacterEncoding("UTF-8");
        response.setContentType("text/html;charset=utf-8");
        //得到当前用户的请求地址
        String requestURI = request.getRequestURI();
        System.out.println("requestURI = " + requestURI);
        if(requestURI.equals("/login/doLogin")){ //说明是登陆请求
            //得到正确的验证码(session)
            HttpSession session = request.getSession();
            LineCaptcha lineCaptcha= (LineCaptcha) session.getAttribute("SESSION_KEY_IMAGE_CODE");
            //得到用户输入的验证码
            String code = request.getParameter("code");
            //比较验证码
            boolean verify = lineCaptcha.verify(code);
            if(!verify){//说明验证码输入不正确
                //返回JSON出去
                Result result=new Result(-1,"验证码不正确");
                PrintWriter writer = response.getWriter();
                writer.write(objectMapper.writeValueAsString(result));
                writer.flush();
                return; //阻止方法向下执行
            }
        }
        //放行
        filterChain.doFilter(request,response);
    }
}
13.6 创建WebSecurityConfig配置
package com.powernode.config;

import com.powernode.filter.ValidateCodeFilter;
import com.powernode.handler.AppAccessDeniedHandler;
import com.powernode.handler.AppAuthenticationFailureHandler;
import com.powernode.handler.AppAuthenticationSuccessHandler;
import com.powernode.service.impl.UserDetailsServiceImpl;
import org.springframework.context.annotation.Bean;
import org.springframework.context.annotation.Configuration;
import org.springframework.security.config.annotation.authentication.builders.AuthenticationManagerBuilder;
import org.springframework.security.config.annotation.method.configuration.EnableMethodSecurity;
import org.springframework.security.config.annotation.web.builders.HttpSecurity;
import org.springframework.security.config.annotation.web.builders.WebSecurity;
import org.springframework.security.config.annotation.web.configuration.WebSecurityConfigurerAdapter;
import org.springframework.security.crypto.bcrypt.BCryptPasswordEncoder;
import org.springframework.security.crypto.password.PasswordEncoder;
import org.springframework.security.web.authentication.UsernamePasswordAuthenticationFilter;

import javax.annotation.Resource;

@Configuration
@EnableMethodSecurity(prePostEnabled = true)
public class WebSecurityConfig  extends WebSecurityConfigurerAdapter {


    /**
     * 注入自己的查询数据库的对象
     */
    @Resource
    private UserDetailsServiceImpl userDetailsService;


    /**
     * 注入登陆验证码的过滤器
     */
    @Resource
    private ValidateCodeFilter validateCodeFilter;

    //登陆成功的处理器
    @Resource
    private AppAuthenticationSuccessHandler successHandler;
    //登陆失败的处理器
    @Resource
    private AppAuthenticationFailureHandler failureHandler;
    //没有权限的处理器
    @Resource
    private AppAccessDeniedHandler accessDeniedHandler;

    /**
     * 注入自定义的userDetailsService
     * @param auth
     * @throws Exception
     */
    @Override
    protected void configure(AuthenticationManagerBuilder auth) throws Exception {
        auth.userDetailsService(userDetailsService);
    }

    @Override
    protected void configure(HttpSecurity http) throws Exception {
        //把validateCodeFilter 添加到UsernamePasswordAuthFilter之前
        http.addFilterBefore(validateCodeFilter, UsernamePasswordAuthenticationFilter.class);
        //添加自定义的没有权限的处理器
        http.exceptionHandling().accessDeniedHandler(accessDeniedHandler);
        //表单相关
        http.formLogin()
//                .successForwardUrl("/index")//登陆成功之后跳转到首页
                .successHandler(successHandler)//注入登陆成功的处理器
                .failureHandler(failureHandler)//注入登陆失败的处理器
                .loginPage("/login/toLogin")//登陆自定义的登陆页面的位置
                .usernameParameter("uname")//用户名表单的name属性值
                .passwordParameter("pwd")//密码表单的name属性值
                .loginProcessingUrl("/login/doLogin")//登陆表单提交的地址
                .permitAll();//除了上面的配置的地址不用登陆就可以访问,其它地址必须登陆才能访问

        //用户退出的配置
        http.logout()
                .logoutSuccessUrl("/login/toLogin")//退出成功的页面
                .logoutUrl("/login/logout")//退出的请求地址
                .permitAll();//除了上面的配置的地址不用登陆就可以访问,其它地址必须登陆才能访问
        //禁用跨站请求伪造
        http.csrf().disable();
        // 所有的请求都需要登录才能访问
        http.authorizeRequests()
                .antMatchers("/code/image")// 放行验证码的路径
                .permitAll()
                .anyRequest().authenticated();
    }

    /**
     * 向IOC容器里面放一个密码匹配器
     * @return
     */
    @Bean
    public PasswordEncoder passwordEncoder(){
        return new BCryptPasswordEncoder();
    }

    /**
     * 配置静态资源的放行
     * @param web
     * @throws Exception
     */
    @Override
    public void configure(WebSecurity web) throws Exception {
        web.ignoring().mvcMatchers("/resources/**");
    }
}
13.8 修改templates/login.html
<!DOCTYPE html>
<html lang="en">
<head>
    <meta charset="UTF-8">
    <title>后台登录页面</title>
    <!--引入element-ui-->
    <link rel="stylesheet" href="/resources/element-ui/lib/theme-chalk/index.css">
    <!--引入vue-->
    <script type="text/javascript" src="/resources/js/vue.js"></script>
    <script type="text/javascript" src="/resources/element-ui/lib/index.js"></script>
    <!--引入axios-->
    <script type="text/javascript" src="/resources/js/axios.min.js"></script>
    <style>
        body {
            display: flex;
            justify-content: center;
            align-items: center;
            height: 100%;
            background-image: url("/resources/images/bg.jpg");
        }

        .login {
            margin-top: 300px;
        }

        .title {
            margin: 0px auto 30px auto;
            text-align: center;
            color: #707070;
        }

        .login-form {
            border-radius: 6px;
            background: #ffffff;
            width: 400px;
            padding: 25px 25px 5px 25px;
        }
        .login-code {
            width: 33%;
            height: 38px;
            float: right;
        }
        img {
            cursor: pointer;
            vertical-align: middle;
        }
    </style>
</head>
<body>
<div class="login" id="app">
    <el-form ref="loginForm" :model="loginForm" :rules="loginRules" class="login-form" autocomplete="on"
             label-position="left">
        <div class="title-container">
            <h3 class="title">用户登录</h3>
        </div>
        <el-form-item prop="loginname">
            <el-input
                    v-model="loginForm.uname"
                    type="text"
                    ref="uname"
                    auto-complete="off"
                    tabindex="1"
                    placeholder="账号"
            >
            </el-input>
        </el-form-item>

        <el-form-item prop="pwd">
            <el-input
                    v-model="loginForm.pwd"
                    :key="passwordType"
                    :type="passwordType"
                    tabindex="2"
                    ref="password"
                    auto-complete="off"
                    placeholder="密码"
                    @keyup.enter.native="handleLogin"
            >
            </el-input>
        </el-form-item>
        <el-form-item prop="pwd">
            <el-input
                    v-model="loginForm.code"
                    tabindex="3"
                    auto-complete="off"
                    placeholder="验证码"
                    style="width: 63%"
                    @keyup.enter.native="handleLogin"
            >
            </el-input>
            <div class="login-code">
                <img :src="codeUrl" @click="getCode" class="login-code-img"/>
            </div>
        </el-form-item>
        <el-button :loading="loading" type="primary" style="width:100%;margin-bottom:30px;"
                   @click.native.prevent="handleLogin">
            <span v-if="!loading">登 录</span>
            <span v-else>登 录 中...</span>
        </el-button>
    </el-form>
</div>
<script>
    new Vue({
        el: '#app',
        data: {
            codeUrl:"/code/getCode",
            loginForm: {
                uname: 'admin',
                pwd: '123456',
            },
            loginRules: {
                uname: [
                    {required: true, trigger: "blur", message: "请输入您的账号"}
                ],
                pwd: [
                    {required: true, trigger: "blur", message: "请输入您的密码"}
                ],
                captcha: [{required: true, trigger: "change", message: "请输入验证码"}]
            },
            passwordType: 'password',
            loading: false,
        },
        methods: {
            //得到验证码
            getCode(e){
                this.codeUrl=this.codeUrl+"?"+new Date()
            },
            handleLogin() {
                this.$refs.loginForm.validate(valid => {
                    if (valid) {
                        axios({
                            url: "/login/doLogin",
                            method: "POST",
                            params: this.loginForm
                        }).then((result) => {
                            let code = result.data.code;
                            if (code == 200) {
                                this.$message({
                                    message: "恭喜你,登录成功",
                                    type: "success"
                                });
                                //登录成功之后延时半秒跳转到系统首页
                                setTimeout(function () {
                                    this.loading = false
                                    window.location.href = "/index/toIndex"
                                }, 500)
                            }else {
                                this.$message({
                                    message: result.data.msg,
                                    type: "error"
                                });
                                this.getCode()
                                this.loading = false
                            }
                        }).catch(function (error) {
                            this.loading = false
                        });
                    }
                })
            }
        }
    })
</script>
</body>
</html>
14.【掌握】JWT概述
14.1 概述
14.1.1 什么是JWT
Json web token (JWT), 是为了在网络应用环境间传递声明而执行的一种基于JSON的开放标准((RFC 7519).该token被设计为紧凑且安全的,特别适用于分布式站点的单点登录(SSO)场景。JWT的声明一般被用来在身份提供者和服务提供者间传递被认证的用户身份信息,以便于从资源服务器获取资源,也可以增加一些额外的其它业务逻辑所必须的声明信息,该token也可直接被用于认证,也可被加密【可解析的】。
官网: https://jwt.io/
14.1.2 跨域认证问题
互联网服务离不开用户认证。一般流程是下面这样。
l 用户向服务器发送用户名和密码。
l 服务器验证通过后,在当前对话(session)里面保存相关数据,比如用户角色、登录时间等等。
l 服务器向用户返回一个 jsession_id,写入用户的 Cookie。
l 用户随后的每一次请求,都会通过 Cookie,将 session_id 传回服务器。
l 服务器收到 session_id,找到前期保存的数据,由此得知用户的身份。
这种模式的问题在于,扩展性(scaling)不好。单机当然没有问题,如果是服务器集群,或者是跨域的服务导向架构,就要求 session 数据共享,每台服务器都能够读取 session。
举例来说,A 网站和 B 网站是同一家公司的关联服务。现在要求,用户只要在其中一个网站登录,再访问另一个网站就会自动登录,请问怎么实现?
一种解决方案是 session 数据持久化,写入数据库或别的持久层。各种服务收到请求后,都向持久层请求数据。这种方案的优点是架构清晰,缺点是工程量比较大。另外,持久层万一挂了,就会单点失败。
另一种方案是服务器索性不保存 session 数据了,所有数据都保存在客户端,每次请求都发回服务器。JWT 就是这种方案的一个代表。 服务器不存数据,客户端存,服务器解析就行了
14.2 JWT 的原理
JWT 的原理是,服务器认证成功以后,生成一个 JSON 对象,发回给用户,就像下面这样。
{
“姓名”: “张三”,
“角色”: “管理员”,
“到期时间”: “2018年7月1日0点0分”
}
以后,用户与服务端通信的时候,都要发回这个 JSON 对象。服务器完全只靠这个对象认定用户身份。为了防止用户篡改数据,服务器在生成这个对象的时候,会加上签名(详见后文)。
服务器就不保存任何 session 数据了,也就是说,服务器变成无状态了,从而比较容易实现扩展。
14.3 JWT 的数据结构
实际的 JWT 大概就像下面这样。

它是一个很长的字符串,中间用点(.)分隔成三个部分。注意,JWT 内部是没有换行的,这里只是为了便于展示,将它写成了几行。
JWT 的三个部分依次如下。
面试问题: jwt知道吗?谈谈你的理解(由浅入深的聊)
Ø Header(头部)
Ø Payload(负载)
Ø Signature(签名)
写成一行,就是下面的样子。
下面依次介绍这三个部分。
14.3.1 Header
Header 部分是一个 JSON 对象,描述 JWT 的元数据,通常是下面的样子。
{
“alg”: “HS256”,
“typ”: “JWT”
}
上面代码中,alg属性表示签名的算法(algorithm),默认是 HMAC SHA256(写成 HS256);typ属性表示这个令牌(token)的类型(type),JWT 令牌统一写为JWT。
最后,将上面的 JSON 对象使用 Base64URL 算法转成字符串。
14.3.2 Payload
Payload 部分也是一个 JSON 对象,用来存放实际需要传递的数据。JWT 规定了7个官方字段,供选用。
iss (issuer):签发人
exp (expiration time):过期时间
sub (subject):主题
aud (audience):受众
nbf (Not Before):生效时间
iat (Issued At):签发时间
jti (JWT ID):编号
除了官方字段,你还可以在这个部分定义私有字段,下面就是一个例子。
{
“sub”: “1234567890”,
“name”: “John Doe”,
“admin”: true
}
注意,JWT 默认是不加密的,任何人都可以读到,所以不要把秘密信息(密码,手机号等)放在这个部分。
这个 JSON 对象也要使用 Base64URL 算法转成字符串。
14.3.3 Signature(保证数据安全性的)
Signature 部分是对前两部分的签名,防止数据篡改。
首先,需要指定一个密钥(secret)。这个密钥只有服务器才知道,不能泄露给用户。然后,使用 Header 里面指定的签名算法(默认是 HMAC SHA256),按照下面的公式产生签名。
HMACSHA256(
base64UrlEncode(header) + “.” +
base64UrlEncode(payload),
secret)
算出签名以后,把 Header、Payload、Signature 三个部分拼成一个字符串,每个部分之间用"点"(.)分隔,就可以返回给用户。
14.3.4 Base64URL(转码)
前面提到,Header 和 Payload 串型化的算法是 Base64URL。这个算法跟 Base64 算法基本类似,但有一些小的不同。
JWT 作为一个令牌(token),有些场合可能会放到 URL(比如 api.example.com/?token=xxx)。Base64 有三个字符+、/和=,在 URL 里面有特殊含义,所以要被替换掉:=被省略、+替换成-,/替换成_ 。这就是 Base64URL 算法。
14.4 JWT 的使用方式【重点】
客户端收到服务器返回的 JWT,可以储存在 Cookie 里面,也可以储存在 localStorage。
此后,客户端每次与服务器通信,都要带上这个 JWT。你可以把它放在 Cookie 里面自动发送,但是这样不能跨域,所以更好的做法是放在 HTTP 请求的头信息Authorization字段里面。
Authorization: Bearer jwt
另一种做法是,跨域的时候,JWT 就放在 POST 请求的数据体里面。
14.5 JWT 的几个特点
JWT 默认是不加密,但也是可以加密的。生成原始 Token 以后,可以用密钥再加密一次。
JWT 不加密的情况下,不能将秘密数据写入 JWT。
JWT 不仅可以用于认证,也可以用于交换信息。有效使用 JWT,可以降低服务器查询数据库的次数。
JWT 的最大缺点是,由于服务器不保存 session 状态,因此无法在使用过程中废止某个 token,或者更改 token 的权限。也就是说,一旦 JWT 签发了,在到期之前就会始终有效,除非服务器部署额外的逻辑(JWT的登出问题)。就是因为服务端无状态了
正常情况下 修改了密码后就会跳转到登录页面 :修改成功后清空浏览器保存的token了
后端怎么玩? 因为服务端不保留token 我用之前的token 还是可以继续访问的
从有状态(后端也会存一个)的变成无状态的了
我们就要把它从无状态再变成有状态了
JWT 本身包含了认证信息,一旦泄露,任何人都可以获得该令牌的所有权限。为了减少盗用,JWT 的有效期应该设置得比较短。对于一些比较重要的权限,使用时应该再次对用户进行认证。
为了减少盗用,JWT 不应该使用 HTTP 80 协议明码传输,要使用 HTTPS 443 协议传输。
我们颁发一个令牌 用户名称 用户的权限信息 这个令牌2个小时有效
Jwt只要能解析 就认为你是可用的 做不了 登出 后端不存储用户信息了 后端无状态了
