Spring Bean的生命周期各阶段详解附源码
目录
- Bean的生命周期
- Bean定义阶段
- Bean实例化阶段
- Bean属性注入阶段
- Bean初始化阶段
- Bean销毁阶段
Bean的生命周期
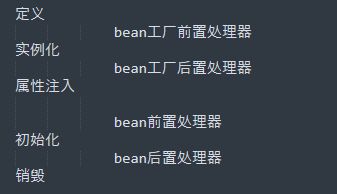
bean的生命周期,我们都知道大致是分为:bean定义,bean的实例化,bean的属性注入,bean的初始化以及bean的销毁这几个过程
然而在bean创建和初始化的过程会有很多自定义的钩子,我们可以去实现继承,对bean做自定义的操做。下面看各个阶段的详解。

Bean定义阶段
bean定义阶段,也叫bean声明,这个不是很重要,甚至都不算bean的生命周期,但是它是bean的起始,我们熟知的就是通过配置xml文件,在spring的配置文件中通过< bean >标签来声明,或者是通过boot中的注解方式来声明
一个会在启动的时候读取xml文件,由DefaultBeanDefinitionDocumentReader(这个其实不重要,就是读取配置文件并解析的)进行解析文件,根据bean标签中配置的包名给定义成BeanDefinitions注册到singletonObjects缓存池中,等待getBean的时候进行初始化再缓存到IOC容器中
另一个注解的方式,是再启动时会通过它的@CompontScan注解来进行扫包,获取对应类上注解标明的bean,然后将其的类信息封装成BeanDefinitions注册到singletonObjects缓存池中
Bean实例化阶段
bean实例化阶段会通过反射的方式来构建bean实例
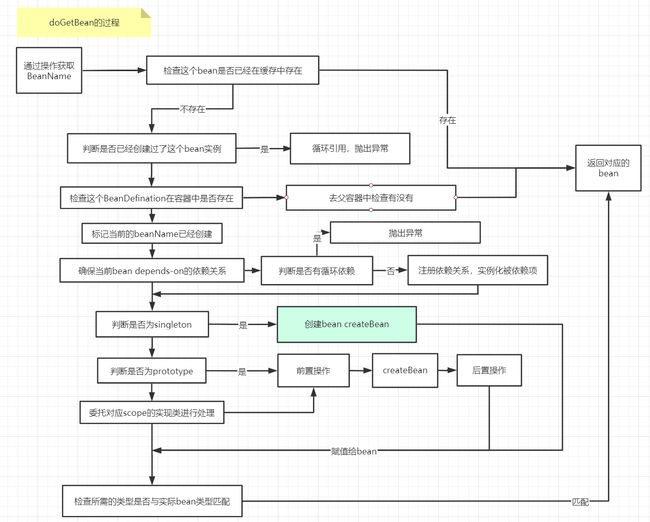
创建bean的过程,其逻辑流程图如下所示;因为我们调用的getBean方法,其内部是调用的doGetBean

这个是创建bean 的源码部分
//省略许多异常处理的部分
@Override
protected Object createBean(String beanName, RootBeanDefinition mbd, @Nullable Object[] args)
throws BeanCreationException {//初始化阶段的args == null
RootBeanDefinition mbdToUse = mbd;
// 确保 BeanDefinition 中的 Class 被加载
Class<?> resolvedClass = resolveBeanClass(mbd, beanName);
if (resolvedClass != null && !mbd.hasBeanClass() && mbd.getBeanClassName() != null) {
mbdToUse = new RootBeanDefinition(mbd);
mbdToUse.setBeanClass(resolvedClass);
}
// 准备方法覆写它来自于 bean 定义中的 主要还是通过doCreateBean来实现,所以继续进入doCreateBean方法,Bean的实例化+初始化都在这一步中完成。
doCreateBean方法进去比较长,这里也不方便把所有代码直接放上来,只把它存在三个重要关键方法给一一列举
createBeanInstance 创建实例
这个是第一个
protected BeanWrapper createBeanInstance(String beanName, RootBeanDefinition mbd, @Nullable Object[] args) {
    //确保已经加载了这个class
    Class<?> beanClass = resolveBeanClass(mbd, beanName);
    //校验这个类的访问权限
    if (beanClass != null && !Modifier.isPublic(beanClass.getModifiers()) && !mbd.isNonPublicAccessAllowed()) {
        throw new BeanCreationException();
    }
	//spring5.0 返回创建bean实例的回调
    Supplier<?> instanceSupplier = mbd.getInstanceSupplier();
    if (instanceSupplier != null) {
        return obtainFromSupplier(instanceSupplier, beanName);
    }
    if (mbd.getFactoryMethodName() != null) {
        //采用工厂方法实例化
        return instantiateUsingFactoryMethod(beanName, mbd, args);
    }
    // 如果是第二次创建 如prototype bean,这种情况下,我们可以从第一次创建知道,采用无参构造函数,还是构造函数依赖注入 来完成实例化
    boolean resolved = false;
    boolean autowireNecessary = false;
    if (args == null) {
        synchronized (mbd.constructorArgumentLock) {
            if (mbd.resolvedConstructorOrFactoryMethod != null) {
                resolved = true;
                autowireNecessary = mbd.constructorArgumentsResolved;
            }
        }
    }
    if (resolved) {
        if (autowireNecessary) {
            //构造函数注入
            return autowireConstructor(beanName, mbd, null, null);
        }
        else {
            //无参构造函数
            return instantiateBean(beanName, mbd);
            //重点这个,下面做了解释说明
        }
    }

    // 判断是否采用有参构造函数
    Constructor<?>[] ctors = determineConstructorsFromBeanPostProcessors(beanClass, beanName);
    if (ctors != null || mbd.getResolvedAutowireMode() == AUTOWIRE_CONSTRUCTOR ||
        mbd.hasConstructorArgumentValues() || !ObjectUtils.isEmpty(args)) {
        //args!=null 的构造函数注入(有参)
        return autowireConstructor(beanName, mbd, ctors, args);
    }

    // Preferred constructors for default construction?
    ctors = mbd.getPreferredConstructors();
    if (ctors != null) {
        //判断是否采用首选的构造函数
        return autowireConstructor(beanName, mbd, ctors, null);
    }

    // 调用无参构造函数
    return instantiateBean(beanName, mbd);
}
以无参构造函数为例,实例化的过程在SimpleInstantiationStrategy中。
最后通过反射的方式进行的实例化,就是上面代码的无参构造
public Object instantiate(RootBeanDefinition bd, @Nullable String beanName, BeanFactory owner) {
    // 如果不存在方法覆写,就是用java的反射进行实例化, 否则使用CGLIB
    if (!bd.hasMethodOverrides()) {
        Constructor<?> constructorToUse;
        synchronized (bd.constructorArgumentLock) {
            constructorToUse = (Constructor<?>) bd.resolvedConstructorOrFactoryMethod;
            if (constructorToUse == null) {
                final Class<?> clazz = bd.getBeanClass();
                if (clazz.isInterface()) {
                    throw new BeanInstantiationException(clazz, "Specified class is an interface");
                }
                try {
                    if (System.getSecurityManager() != null) {
                        constructorToUse = AccessController.doPrivileged(
                            (PrivilegedExceptionAction<Constructor<?>>) clazz::getDeclaredConstructor);
                    }
                    else {
                        constructorToUse = clazz.getDeclaredConstructor();
                    }
                    bd.resolvedConstructorOrFactoryMethod = constructorToUse;
                }
                catch (Throwable ex) {
                    throw new BeanInstantiationException(clazz, "No default constructor found", ex);
                }
            }
        }
        //利用构造方法进行实例化
        return BeanUtils.instantiateClass(constructorToUse);
    }
    else {
        // 存在方法覆写的情况,需要利用CGLIB来完成实例化,需要依赖于CGLIB生成子类
        return instantiateWithMethodInjection(bd, beanName, owner);
    }
}
Bean属性注入阶段
populateBean 填充属性,这个方法是前面说doCreateBean的三个方法之一
这个是第二个
protected void populateBean(String beanName, RootBeanDefinition mbd, @Nullable BeanWrapper bw) {
    if (bw == null) {
        if (mbd.hasPropertyValues()) {//this.propertyValues bean实例的所有属性
            throw new BeanCreationException(
                mbd.getResourceDescription(), beanName, "Cannot apply property values to null instance");
        }
        else {
            // Skip property population phase for null instance.
            return;
        }
    }
    //在设置属性之前,给所有InstantiationAwareBeanPostProcessor机会修改bean的状态
    // 【此时bean的状态 = 已经通过工厂方法或者构造方法实例化,在属性赋值之前】。例如,可以使用支持字段注入的样式。InstantiationAwareBeanPostProcessor
    if (!mbd.isSynthetic() && hasInstantiationAwareBeanPostProcessors()) {
        for (InstantiationAwareBeanPostProcessor bp : getBeanPostProcessorCache().instantiationAware) {
            if (!bp.postProcessAfterInstantiation(bw.getWrappedInstance(), beanName)) {
                return;
            }
        }
    }

    PropertyValues pvs = (mbd.hasPropertyValues() ? mbd.getPropertyValues() : null);//获取PropertyValue对象

    int resolvedAutowireMode = mbd.getResolvedAutowireMode();
    if (resolvedAutowireMode == AUTOWIRE_BY_NAME || resolvedAutowireMode == AUTOWIRE_BY_TYPE) {//获取Autowire的模式  or 通过名字, or 通过类型
        MutablePropertyValues newPvs = new MutablePropertyValues(pvs);
        // 通过名字找到所有属性值,如果是 bean 依赖,先初始化依赖的 bean。记录依赖关系
        if (resolvedAutowireMode == AUTOWIRE_BY_NAME) {
            autowireByName(beanName, mbd, bw, newPvs);
        }
        // 通过类型装配 记录依赖关系
        if (resolvedAutowireMode == AUTOWIRE_BY_TYPE) {
            autowireByType(beanName, mbd, bw, newPvs);
        }
        pvs = newPvs;
    }
	//...省略
    //设置bean实例的属性值
    if (pvs != null) {
        applyPropertyValues(beanName, mbd, bw, pvs);
    }
}
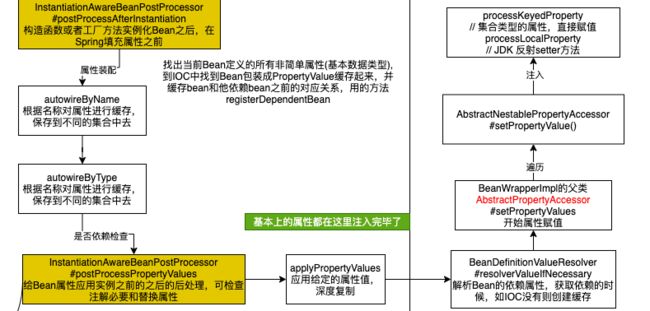
由populateBean方法向下的流程图如下所示
Bean初始化阶段
initializeBean 回调方法
这个是第三个,属性注入完成,处理各种回调,如BeanNameAware、BeanClassLoaderAware、BeanFactoryAware等
protected Object initializeBean(String beanName, Object bean, @Nullable RootBeanDefinition mbd) {//
    if (System.getSecurityManager() != null) {
        AccessController.doPrivileged((PrivilegedAction<Object>) () -> {
            invokeAwareMethods(beanName, bean);
            return null;
        }, getAccessControlContext());
    }
    else {
        invokeAwareMethods(beanName, bean);//如果bean实现了BeanNameAware、BeanClassLoaderAware、BeanFactoryAware接口, 回调
    }

    Object wrappedBean = bean;
    if (mbd == null || !mbd.isSynthetic()) {
        wrappedBean = applyBeanPostProcessorsBeforeInitialization(wrappedBean, beanName);//BeanPostProcessor 的 postProcessBeforeInitialization 回调
    }

    try {
        invokeInitMethods(beanName, wrappedBean, mbd);//处理bean中定义的init-method或 bean实现了InitializingBean ,调用afterPropertiesSet() 方法
    }
    catch (Throwable ex) {
        throw new BeanCreationException(
            (mbd != null ? mbd.getResourceDescription() : null),
            beanName, "Invocation of init method failed", ex);
    }
    if (mbd == null || !mbd.isSynthetic()) {
        wrappedBean = applyBeanPostProcessorsAfterInitialization(wrappedBean, beanName);//BeanPostProcessor 的 postProcessAfterInitialization 回调
    }

    return wrappedBean;
}
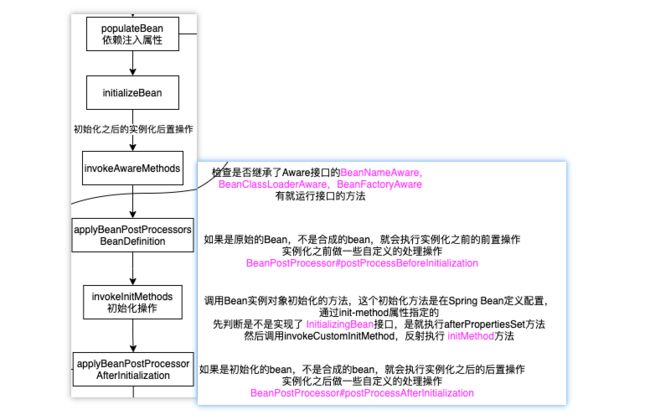
在继populateBean属性注入之后也就是初始化过程,流程如下所示

Bean销毁阶段
在DisposableBeanAdapter.java类中,它的destroy方法中
@Override
public void destroy() {
    //CommonAnnotationBeanPostProcessorc 处理@preDetroy
    if (!CollectionUtils.isEmpty(this.beanPostProcessors)) {
        for (DestructionAwareBeanPostProcessor processor : this.beanPostProcessors) {
            processor.postProcessBeforeDestruction(this.bean, this.beanName);
        }
    }

    if (this.invokeDisposableBean) {DisposableBean的destroy方法
        ((DisposableBean) this.bean).destroy();
        }
    }

    if (this.destroyMethod != null) {//destroy-method方法
        invokeCustomDestroyMethod(this.destroyMethod);
    }
    else if (this.destroyMethodName != null) {
        Method methodToInvoke = determineDestroyMethod(this.destroyMethodName);
        if (methodToInvoke != null) {
            invokeCustomDestroyMethod(ClassUtils.getInterfaceMethodIfPossible(methodToInvoke));
        }
    }
}
如有遗漏之处望多多包涵,后续继续补充完善,感谢您的阅览!
