写 SVG 动画必看!SVG系列文章2-常见标签
1、坐标定位
对于所有元素,SVG 使用的坐标系统或者说网格系统,和 Canvas 用的差不多(所有计算机绘图都差不多)。这种坐标系统是:以页面的左上角为 (0,0) 坐标点,坐标以像素为单位,x 轴正方向是向右,y 轴正方向是向下。
<svg width="200" height="200" viewBox="0 0 100 100">…svg>
-
定义的画布尺寸是 200*200px
-
viewBox 代表画布上可以显示的区域:从 (0,0) 点开始,100 宽 100 高的区域。这个 100、100 的区域,会放到 200*200 的画布上显示。于是就形成了放大两倍的效果。
如果设置成
100 100 100 100代表做左上角初始点为 100-100,并且让100*100显示到200*200的画布上,默认就放大两倍
2、基本形状
2.1 rect 矩形
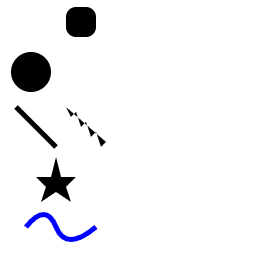
<rect x="60" y="10" rx="10" ry="10" width="30" height="30"/>
rx、ry 表示圆角的半径,默认为 0
2.2 circle 圆形
<circle cx="25" cy="75" r="20"/>
cx、cy 代表圆心的 x、y 位置,r 代表半径
2.3 Line 线条
<line x1="10" x2="50" y1="110" y2="150" stroke="black" stroke-width="5"/>
x1、y1 代表起点 x、y 的位置;x2、y2 代表终点 x、y 的位置;stroke 和 stroke-width 分别代表边框颜色和宽度
2.4 Polyline 折线
<polyline points="60, 110 65, 120 70, 115 75, 130 80, 125 85, 140 90, 135 95, 150 100, 145"/>
points:点集数列。每个数字用空白、逗号、终止命令符或者换行符分隔开。每个点必须包含 2 个数字,一个是 x 坐标,一个是 y 坐标。所以点列表 (0,0), (1,1) 和 (2,2) 可以写成这样:“0 0, 1 1, 2 2”。
2.5 polygon 多边形
<polygon points="50, 160 55, 180 70, 180 60, 190 65, 205 50, 195 35, 205 40, 190 30, 180 45, 180"/>
points:点集数列。每个数字用空白符、逗号、终止命令或者换行符分隔开。每个点必须包含 2 个数字,一个是 x 坐标,一个是 y 坐标。所以点列表 (0,0), (1,1) 和 (2,2) 可以写成这样:“0 0, 1 1, 2 2”。路径绘制完后闭合图形,所以最终的直线将从位置 (2,2) 连接到位置 (0,0)。
2.6 path 路径
你可以用 path 元素绘制矩形(直角矩形或者圆角矩形)、圆形、椭圆、折线形、多边形,以及一些其他的形状,例如贝塞尔曲线、2 次曲线等曲线。因为 path 很强大也很复杂,请阅读 Paths 章节以了解更多信息
<path d="M20,230 Q40,205 50,230 T90,230" fill="none" stroke="blue" stroke-width="5"/>
d:一个点集数列以及其他关于如何绘制路径的信息
3、填充和边框
可以使用几种方法来着色(包括指定对象的属性)使用内联 CSS 样式、内嵌 CSS 样式,或者使用外部 CSS 样式文件。大多数的 web 网站的 SVG 使用的是内联样式 CSS,对于这些方法都有优缺点。
3.1 Fill 和 Stroke 属性
 <rect x="10" y="10" width="100" height="100"
       stroke="blue" stroke-width="20" stroke-linecap="butt" stroke-opacity="0.8"
       fill="purple" fill-opacity="0.5" />
-
fill:设置对象内部的颜色
-
stroke:设置绘制对象的线条的颜色
-
stroke-width:定义了描边的宽度
-
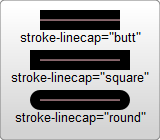
stroke-linecap:控制边框终点的形状
butt用直边结束线段,它是常规做法,线段边界 90 度垂直于描边的方向、贯穿它的终点。square的效果差不多,但是会稍微超出实际路径的范围,超出的大小由stroke-width控制。round表示边框的终点是圆角,圆角的半径也是由stroke-width控制的。
<svg width="160" height="140" xmlns="http://www.w3.org/2000/svg" version="1.1">
  <line x1="40" x2="120" y1="20" y2="20" stroke="black" stroke-width="20" stroke-linecap="butt"/>
  <line x1="40" x2="120" y1="60" y2="60" stroke="black" stroke-width="20" stroke-linecap="square"/>
  <line x1="40" x2="120" y1="100" y2="100" stroke="black" stroke-width="20" stroke-linecap="round"/>
svg>
-
xxx-opacity:控制透明度
-
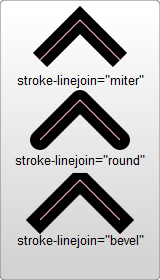
stroke-linejoin:用来控制两条描边线段之间,用什么方式连接
<svg width="160" height="280" xmlns="http://www.w3.org/2000/svg" version="1.1">
  <polyline points="40 60 80 20 120 60" stroke="black" stroke-width="20"
      stroke-linecap="butt" fill="none" stroke-linejoin="miter"/>

  <polyline points="40 140 80 100 120 140" stroke="black" stroke-width="20"
      stroke-linecap="round" fill="none" stroke-linejoin="round"/>

  <polyline points="40 220 80 180 120 220" stroke="black" stroke-width="20"
      stroke-linecap="square" fill="none" stroke-linejoin="bevel"/>
svg>
-
stroke-dasharray:将虚线类型应用在描边上
<svg width="200" height="150" xmlns="http://www.w3.org/2000/svg" version="1.1">
  <path d="M 10 75 Q 50 10 100 75 T 190 75" stroke="black"
    stroke-linecap="round" stroke-dasharray="5,10,5" fill="none"/>
  <path d="M 10 75 L 190 75" stroke="red"
    stroke-linecap="round" stroke-width="1" stroke-dasharray="5,5" fill="none"/>
svg>
stroke-dasharray属性的参数,是一组用逗号分割的数字组成的数列。注意,和path不一样,这里的数字必须用逗号分割(空格会被忽略)。每一组数字,第一个用来表示填色区域的长度,第二个用来表示非填色区域的长度。所以在上面的例子里,第二个路径会先做 5 个像素单位的填色,紧接着是 5 个空白单位,然后又是 5 个单位的填色。如果你想要更复杂的虚线模式,你可以定义更多的数字。第一个例子指定了 3 个数字,这种情况下,数字会循环两次,形成一个偶数的虚线模式(奇数个循环两次变偶数个)。所以该路径首先渲染 5 个填色单位,10 个空白单位,5 个填色单位,然后回头以这 3 个数字做一次循环,但是这次是创建 5 个空白单位,10 个填色单位,5 个空白单位。通过这两次循环得到偶数模式,并将这个偶数模式不断重复。
另外还有一些关于填充和边框的属性,包括 fill-rule,用于定义如何给图形重叠的区域上色;stroke-miterlimit,定义什么情况下绘制或不绘制边框连接的 miter 效果;还有 stroke-dashoffset,定义虚线开始的位置。
3.2 使用 CSS
-
CSS 可以利用 style 属性插入到元素的行间:
<rect x="10" height="180" y="10" width="180" style="stroke: black; fill: red;"/> -
或者,它可以被移到你所包含的一个特殊的样式部分。不过,我们不会像 HTML 那样把这样的部分塞进
部分,而是把它包含在一个叫做defs的区域。defs表示定义,这里面可以定义一些不会在 SVG 图形中出现、但是可以被其他元素使用的元素:<svg width="200" height="200" xmlns="http://www.w3.org/2000/svg" version="1.1"> <defs> <style> #MyRect { stroke: black; fill: red; } ]]>style> defs> <rect x="10" height="180" y="10" width="180" id="MyRect"/> svg>一些可以在 HTML 里使用的 CSS,在 svg 里可能无法正常工作,比如
before和after伪类 -
你也可以定义一个外部的样式表引入使用:
<svg width="200" height="150" xmlns="http://www.w3.org/2000/svg" version="1.1">
  <rect height="10" width="10" id="MyRect"/>
svg>
/* css */ #MyRect { fill: red; stroke: black; }
4、渐变
4.1 线性渐变
线性渐变沿着直线改变颜色,要插入一个线性渐变,你需要在 SVG 文件的 defs 元素 内部,创建一个linearGradient 节点:
<svg width="120" height="240" version="1.1" xmlns="http://www.w3.org/2000/svg">
  <defs>
      <linearGradient id="Gradient1">
        <stop class="stop1" offset="0%"/>
        <stop class="stop2" offset="50%"/>
        <stop class="stop3" offset="100%"/>
      linearGradient>
      <linearGradient id="Gradient2" x1="0" x2="0" y1="0" y2="1">
        <stop offset="0%" stop-color="red"/>
        <stop offset="50%" stop-color="black" stop-opacity="0"/>
        <stop offset="100%" stop-color="blue"/>
      linearGradient>
      <style type="text/css">
        #rect1 { fill: url(#Gradient1); }
        .stop1 { stop-color: red; }
        .stop2 { stop-color: black; stop-opacity: 0; }
        .stop3 { stop-color: blue; }
      style>
  defs>
  <rect id="rect1" x="10" y="10" rx="15" ry="15" width="100" height="100"/>
  <rect x="10" y="120" rx="15" ry="15" width="100" height="100" fill="url(#Gradient2)"/>
svg>
你也可以指定属性 stop-opacity 来设置某个位置的半透明度(同样,对于 FF3 你也可以设置 rgba 值):
<stop offset="100%" stop-color="yellow" stop-opacity="0.5"/>
x1、x2、y1 和 y2,这些属性定义了渐变路线走向:
<linearGradient id="Gradient2" x1="0" x2="0" y1="0" y2="1">
4.2 径向渐变
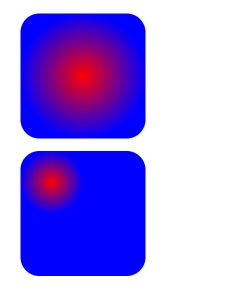
径向渐变与线性渐变相似,只是它是从一个点开始发散绘制渐变。创建径向渐变需要在文档的defs中添加一个 radialGradient 元素:
<svg width="120" height="240" version="1.1" xmlns="http://www.w3.org/2000/svg">
  <defs>
      <radialGradient id="RadialGradient1">
        <stop offset="0%" stop-color="red"/>
        <stop offset="100%" stop-color="blue"/>
      radialGradient>
      <radialGradient id="RadialGradient2" cx="0.25" cy="0.25" r="0.25">
        <stop offset="0%" stop-color="red"/>
        <stop offset="100%" stop-color="blue"/>
      radialGradient>
  defs>
  <rect x="10" y="10" rx="15" ry="15" width="100" height="100" fill="url(#RadialGradient1)"/>
  <rect x="10" y="120" rx="15" ry="15" width="100" height="100" fill="url(#RadialGradient2)"/>

svg>
5、文本
5.1 基础使用
<text x="10" y="10">Hello World!text>
下列每个属性可以被设置为一个 SVG 属性或者成为一个 CSS 声明:font-family、font-style、font-weight、font-variant、font-stretch、font-size、font-size-adjust、kerning、letter-spacing、word-spacing 和 text-decoration。
5.2 tspan 元素
该元素用来标记大块文本的子部分,它必须是一个 text 元素或别的 tspan 元素的子元素。一个典型的用法是把句子中的一个词变成粗体红色:
<text>
  <tspan font-weight="bold" fill="red">This is bold and redtspan>
text>
tspan 元素有以下的自定义属性:
- x:为容器设置一个新绝对
x坐标。它覆盖了默认的当前的文本位置。这个属性可以包含一个数列,它们将一个一个地应用到tspan元素内的每一个字符上。 - dx:从当前位置,用一个水平偏移开始绘制文本。这里,你可以提供一个值数列,可以应用到连续的字体,因此每次累积一个偏移。此外还有属性 y 和属性 dy 作垂直转换。
- rotate:把所有的字符旋转一个角度。如果是一个数列,则使每个字符旋转分别旋转到那个值,剩下的字符根据最后一个值旋转。
- textLength:这是一个很模糊的属性,给出字符串的计算长度。它意味着如果它自己的度量文字和长度不满足这个提供的值,则允许渲染引擎精细调整字型的位置。
5.3 textPath 元素
<path id="my_path" d="M 20,20 C 40,40 80,40 100,20" fill="transparent" />
<text>
    <textPath xmlns:xlink="http://www.w3.org/1999/xlink" xlink:href="#my_path">
        This text follows a curve.
    textPath>
text>
该元素利用它的 xlink:href 属性取得一个任意路径,把字符对齐到路径,于是字体会环绕路径、顺着路径走:
6、image 元素
SVG 的 image 元素允许在一个 SVG 对象内部呈现光栅图像:
DOCTYPE svg PUBLIC "-//W3C//DTD SVG 1.1//EN"
  "http://www.w3.org/Graphics/SVG/1.1/DTD/svg11.dtd">
<svg width="5cm" height="4cm" version="1.1"
     xmlns="http://www.w3.org/2000/svg" xmlns:xlink="http://www.w3.org/1999/xlink">
  <image href="firefox.jpg" x="0" y="0" height="50px" width="50px"  preserveAspectRatio="none meet"/>
svg>
- 如果你没有设置 x 属性或 y 属性,它们自动被设置为 0。
- 如果你没有设置 height 属性或 width 属性,它们自动被设置为 0。
- 如果 width 属性或 height 等于 0,将不会呈现这个图像。
- 注意:图片宽高比默认锁定,如果需要修改,需要添加 preserveAspectRatio 属性进行设置
preserveAspectRatio:表示是否强制进行统一缩放,可以设置两个参数的列表
-
align:属性值表示是否强制统一缩放,当 SVG 的 viewbox 属性与视图属性宽高比不一致时使用,可选属性查看官方文档
-
none :不会进行强制统一缩放,如果需要,会缩放指定元素的图形内容,使元素的边界完全匹配视图矩形。
(注意:如果
none,则 -
xMinYMin、xMidYMin、xMaxYMin 、xMinYMid 、xMidYMid 、xMaxYMid 、xMinYMax 、xMidYMax 、xMaxYMax
-
-
meetOrSlice
- meet (默认值) :如果图形的宽高比和视图窗口不匹配,则某些视图将会超出 viewbox 范围(即 SVG 的 viewbox 视图将会比可视窗口小)
- slice:如果 SVG 的 viewbox 宽高比与可视区域不匹配,则 viewbox 的某些区域将会延伸到视图窗口外部(即 SVG 的 viewbox 将会比可视窗口大)
7、其余标签
7.1 g 元素
方便控制整组的元素进行样式设置或者动画设置,相当于一个容器:
    <svg style="display: inline-block;width: 100%;background-image:url(bg.jpg);background-size: 100%,100%;background-repeat: no-repeat;" version="1.1" viewBox="0 0 640 800" xmlns="http://www.w3.org/2000/svg">
            <g opacity="0">
                文字代码(略)
            g>
            <g style="transform: translate(140px, 580px);">
                爆竹矢量代码(略)
            g>
            <g style="transform: translate(120px, 560px);opacity: 0;">
                愿望牌矢量代码(略)
            g>
    svg>
7.2 svg
在 svg 标签中是允许嵌入 svg 标签的,方便做多次动画展开:
注意:当 svg 嵌套 svg 时,内置的 svg 设置宽高或者背景图无法生效,宽高由内置内容决定
       <svg width="300" height="180" x="0" y="1806">
            <g>
                <g>
                    <image href="./imgs/二次滚动长图.jpg" x="0" y="1029" width="300" preserveAspectRatio="none meet">
                        <animate attributeName="y" from="1029" to="-100%" begin="0s" dur="200s"
                            repeatCount="indefinite" />
                    image>
                    <image href="./imgs/动效粒子.gif" x="0" y="1029" width="300" preserveAspectRatio="none meet" />
                g>
                <image href="./imgs/二次展开1图.png" x="0" y="180" width="300" preserveAspectRatio="none meet" />
                <image href="./imgs/二次展开标题.gif" x="0" y="931" width="300" preserveAspectRatio="none meet" />
                <image href="./imgs/末尾图片.png" x="0" y="1329" width="300" preserveAspectRatio="none meet" />
            g>

            <animate attributeName="height" from="180" to="1653" dur="3s" begin="click" repeatCount="1" fill="freeze"
                restart="never" />
            <rect x="0" y="0" width="300" height="180" fill="#fff" />
            <image href="./imgs/向下滑动.png" x="0" y="0" width="300" preserveAspectRatio="none meet" />
        svg>
共四章,有需要可催更,网上制作 svg 动画的资源比较少,本章参考:官方文档入门


