扩散模型学习(三)
文章目录
- 一、Stable Diffusion使用
- 二、管线的组成部分
-
- 1. 可变分自编码器(VAE)
- 2. 分词器(Tokenizer)和文本编码器(Text Encoder)
- 3. UNet
- 4. 调度器(Scheduler)
- 5. 采样循环
- 三、其他管线
-
- 1.Img2Img
- 2. In-Painting
- 3. Depth2Image
一、Stable Diffusion使用
首先安装必要的库,transformers库需要通过源码安装
!pip install -Uq diffusers ftfy accelerate

# Installing transformers from source for now since we need the latest version for Depth2Img:
!pip install -Uq git+https://github.com/huggingface/transformers
import torch
import requests
from PIL import Image
from io import BytesIO
from matplotlib import pyplot as plt

# We'll be exploring a number of pipelines today!
from diffusers import (
    StableDiffusionPipeline,
    StableDiffusionImg2ImgPipeline,
    StableDiffusionInpaintPipeline,
    StableDiffusionDepth2ImgPipeline
    )

# We'll use a couple of demo images later in the notebook
def download_image(url):
    response = requests.get(url)
    return Image.open(BytesIO(response.content)).convert("RGB")

# Download images for inpainting example
img_url = "https://raw.githubusercontent.com/CompVis/latent-diffusion/main/data/inpainting_examples/overture-creations-5sI6fQgYIuo.png"
mask_url = "https://raw.githubusercontent.com/CompVis/latent-diffusion/main/data/inpainting_examples/overture-creations-5sI6fQgYIuo_mask.png"

init_image = download_image(img_url).resize((512, 512))
mask_image = download_image(mask_url).resize((512, 512))

# Set device
device = (
    "mps"
    if torch.backends.mps.is_available()
    else "cuda"
    if torch.cuda.is_available()
    else "cpu"
)
加载管线并使用
# Load the pipeline
model_id = "stabilityai/stable-diffusion-2-1-base"
pipe = StableDiffusionPipeline.from_pretrained(model_id).to(device)

# Set up a generator for reproducibility
generator = torch.Generator(device=device).manual_seed(42)

# Run the pipeline, showing some of the available arguments
pipe_output = pipe(
    prompt="Palette knife painting of an autumn cityscape", # What to generate
    negative_prompt="Oversaturated, blurry, low quality", # What NOT to generate
    height=480, width=640,     # Specify the image size
    guidance_scale=8,          # How strongly to follow the prompt
    num_inference_steps=35,    # How many steps to take
    generator=generator        # Fixed random seed
)

# View the resulting image:
pipe_output.images[0]
二、管线的组成部分
1. 可变分自编码器(VAE)
可变分自编码器(VAE)是一种模型,它可以将输入编码成一种被压缩过的表示形式,再把这个“隐式的”表示形式解码成某种接近输入的输出。当我们使用 Stable Diffusion 生成图片时,我们先在VAE的“隐空间”应用扩散过程生成隐编码,然后在结尾对它们解码来查看结果图片。

使用VAE把输入图片编码成隐式的表示形式,再对它解码:
# Create some fake data (a random image, range (-1, 1))
images = torch.rand(1, 3, 512, 512).to(device) * 2 - 1
print("Input images shape:", images.shape)

# Encode to latent space
with torch.no_grad():
  latents = 0.18215 * pipe.vae.encode(images).latent_dist.mean
print("Encoded latents shape:", latents.shape)

# Decode again
with torch.no_grad():
  decoded_images = pipe.vae.decode(latents / 0.18215).sample
print("Decoded images shape:", decoded_images.shape)
2. 分词器(Tokenizer)和文本编码器(Text Encoder)
文本编码器的作用是将输入的字符串(文本提示)转化成数值表示形式。
文本首先要被管线中的分词器(tokenizer)转换成一系列的分词(token)。这些分词然后就被送入文本编码器模型中 —— 文本编码器是一个transformer模型,最初被训练作为CLIP的文本编码器。

我们这里通过对一个文字提示进行编码。首先,我们手动进行分词,并将它输入到文本编码器中,再使用管线的 _encode_prompt 方法,观察一下完成的过程,这包括补全或截断分词串的长度,使得分词串的长度等于最大长度 77 。
# Tokenizing and encoding an example prompt manualy:

# Tokenize
input_ids = pipe.tokenizer(["A painting of a flooble"])['input_ids']
print("Input ID -> decoded token")
for input_id in input_ids[0]:
  print(f"{input_id} -> {pipe.tokenizer.decode(input_id)}")

# Feed through CLIP text encoder
input_ids = torch.tensor(input_ids).to(device)
with torch.no_grad():
  text_embeddings = pipe.text_encoder(input_ids)['last_hidden_state']
print("Text embeddings shape:", text_embeddings.shape)
3. UNet
UNet 模型接收一个带噪的输入,并预测噪声。这里的输入是图片的隐式表示形式(latent representation)。此外,除了把用于暗示带噪程度的timestep输入进 UNet 作为条件外,这里模型也把文字提示(prompt)的文本嵌入(text embeddings)作为了额外输入。

# Dummy inputs:
timestep = pipe.scheduler.timesteps[0]
latents = torch.randn(1, 4, 64, 64).to(device)
text_embeddings = torch.randn(1, 77, 1024).to(device)

# Model prediction:
with torch.no_grad():
  unet_output = pipe.unet(latents, timestep, text_embeddings).sample
print('UNet output shape:', unet_output.shape) # Same shape as the input latents
4. 调度器(Scheduler)
调度器保存了如何加噪的计划安排,管理着如何基于模型的预测更新带噪样本。默认的调度器是 PNDMScheduler 调度器,但你也可以用其它的(比如 LMSDiscreteScheduler 调度器),只要它们用相同的配置初始化。
from diffusers import LMSDiscreteScheduler

# Replace the scheduler
pipe.scheduler = LMSDiscreteScheduler.from_config(pipe.scheduler.config)

# Print the config
print('Scheduler config:', pipe.scheduler)

# Generate an image with this new scheduler
pipe(prompt="Palette knife painting of an winter cityscape", height=480, width=480,
     generator=torch.Generator(device=device).manual_seed(42)).images[0]
5. 采样循环
合并以上几个步骤可以得到
guidance_scale = 8 #@param
num_inference_steps=30 #@param
prompt = "Beautiful picture of a wave breaking" #@param
negative_prompt = "zoomed in, blurry, oversaturated, warped" #@param

# Encode the prompt
text_embeddings = pipe._encode_prompt(prompt, device, 1, True, negative_prompt)

# Create our random starting point
latents = torch.randn((1, 4, 64, 64), device=device, generator=generator)
latents *= pipe.scheduler.init_noise_sigma

# Prepare the scheduler
pipe.scheduler.set_timesteps(num_inference_steps, device=device)

# Loop through the sampling timesteps
for i, t in enumerate(pipe.scheduler.timesteps):

  # expand the latents if we are doing classifier free guidance
  latent_model_input = torch.cat([latents] * 2)

  # Apply any scaling required by the scheduler
  latent_model_input = pipe.scheduler.scale_model_input(latent_model_input, t)

  # predict the noise residual with the unet
  with torch.no_grad():
    noise_pred = pipe.unet(latent_model_input, t, encoder_hidden_states=text_embeddings).sample

  # perform guidance
  noise_pred_uncond, noise_pred_text = noise_pred.chunk(2)
  noise_pred = noise_pred_uncond + guidance_scale * (noise_pred_text - noise_pred_uncond)

  # compute the previous noisy sample x_t -> x_t-1
  latents = pipe.scheduler.step(noise_pred, t, latents).prev_sample

# Decode the resulting latents into an image
with torch.no_grad():
  image = pipe.decode_latents(latents.detach())

# View
pipe.numpy_to_pil(image)[0]
输出是

三、其他管线
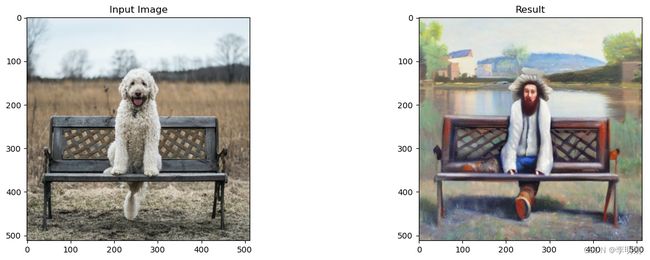
1.Img2Img
Img2Img 这个管线首先将一张已有的图片进行编码,编码成一系列的隐变量,然后在这些隐变量上随机加噪声,以这些作为起始点。
# Loading an Img2Img pipeline
model_id = "stabilityai/stable-diffusion-2-1-base"
img2img_pipe = StableDiffusionImg2ImgPipeline.from_pretrained(model_id).to(device)

# Apply Img2Img
result_image = img2img_pipe(
    prompt="An oil painting of a man on a bench",
    image = init_image, # The starting image
    strength = 0.6, # 0 for no change, 1.0 for max strength
).images[0]

# View the result
fig, axs = plt.subplots(1, 2, figsize=(12, 5))
axs[0].imshow(init_image);axs[0].set_title('Input Image')
axs[1].imshow(result_image);axs[1].set_title('Result');

2. In-Painting
In-Painting的 Stable Diffusion 模型接收一个掩模(mask)作为额外条件性输入。这个掩模图片需要和输入图片尺寸一致,白色区域表示要被替换的部分,黑色区域表示要保留的部分。

# Load the inpainting pipeline (requires a suitable inpainting model)
pipe = StableDiffusionInpaintPipeline.from_pretrained("runwayml/stable-diffusion-inpainting")
pipe = pipe.to(device)

# Inpaint with a prompt for what we want the result to look like
prompt = "A small robot, high resolution, sitting on a park bench"
image = pipe(prompt=prompt, image=init_image, mask_image=mask_image).images[0]

# View the result
fig, axs = plt.subplots(1, 3, figsize=(16, 5))
axs[0].imshow(init_image);axs[0].set_title('Input Image')
axs[1].imshow(mask_image);axs[1].set_title('Mask')
axs[2].imshow(image);axs[2].set_title('Result');

3. Depth2Image
Depth2Image这个模型需要输入额外的深度信息作为生成条件。相关管线使用了一个深度预测模型来预测出一个深度图,然后这个深度图会被输入微调过的 UNet 中用以生成图片。
# Load the Depth2Img pipeline (requires a suitable model)
pipe = StableDiffusionDepth2ImgPipeline.from_pretrained("stabilityai/stable-diffusion-2-depth")
pipe = pipe.to(device)

# Inpaint with a prompt for what we want the result to look like
prompt = "An oil painting of a man on a bench"
image = pipe(prompt=prompt, image=init_image).images[0]

# View the result
fig, axs = plt.subplots(1, 2, figsize=(16, 5))
axs[0].imshow(init_image);axs[0].set_title('Input Image')
axs[1].imshow(image);axs[1].set_title('Result');