pytest系列(四) --yaml详解及接口项目实战
声明:参考B站视频,自学成长记录
https://www.bilibili.com/video/BV1u5411A7Um?p=14
yaml文件
什么是yaml
yaml是一种数据格式,常用于全局配置文件 或 接口测试用例中
语法规则
1、区分大小写
2、使用缩进表示层级。不能使用tab键缩进,只能用空格
3、缩进没有空格数量限制,只要前面对齐即可
4、# 表示注释
数据组成
列表、字典、列表嵌套字典
# ['张三','李四']
# 列表 --> yaml
- 张三
- 李四
# {'user':'123456','passwd':'123456'}
# 字典 --> yaml
user: test1
passwd: 123456
# [{'user':'123456','passwd':'123456'},{'user':'111111'}]
# 列表包含字典 --> yaml
- user: test1
  passwd: 123456
- user: 111111
配置yaml
1、安装PyYAML插件
2、创建conf.yaml
在conf目录下创建conf.yaml文件
- 张三
- 李四
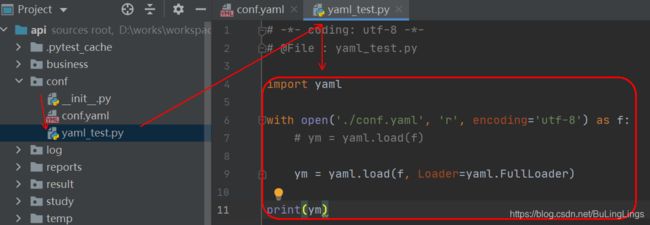
3、创建yaml_test.py
在conf目录下继续创建 yaml_test.py 文件
# -*- coding: utf-8 -*-
# @File : yaml_test.py

import yaml

with open('./conf.yaml', 'r', encoding='utf-8') as f:
    # ym = yaml.load(f)

    ym = yaml.load(f, Loader=yaml.FullLoader)

print(ym)
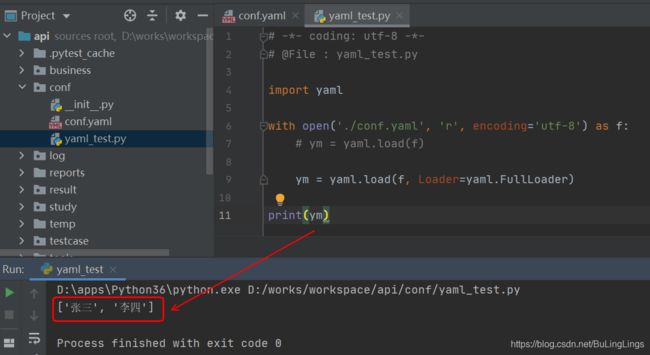
4、测试yaml读取
成功读取conf.yaml里面的内容, 并转成了 [‘张三’, ‘李四’]
接口项目实战
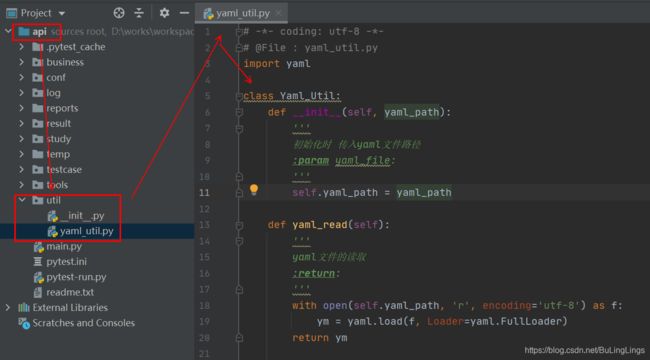
1、yaml二次封装
接口项目根目录下
1、创建util包
2、再创建yaml_util.py
3、参考下图,将图下脚本复制到yaml_util.py文件中
# -*- coding: utf-8 -*-
# @File : yaml_util.py
import yaml

class Yaml_Util:
    def __init__(self, yaml_path):
        '''
        初始化时 传入yaml文件路径
        :param yaml_file:
        '''
        self.yaml_path = yaml_path

    def yaml_read(self):
        '''
        yaml文件的读取
        :return:
        '''
        with open(self.yaml_path, 'r', encoding='utf-8') as f:
            ym = yaml.load(f, Loader=yaml.FullLoader)
        return ym
2、flask接口部署
1、使用pycharm创建一个新的flask项目
2、安装flask插件 - flask, 参考上面安装PyYAML插件 操作
3、编写flask脚本 - login.py
# -*- coding: utf-8 -*-
# @File : login.py

from flask import Flask, jsonify, request

app = Flask(__name__)


def check_user(name, passwd):
    if not name:
        # 用户名为空 返回 -1
        return {'status': '-1'}
    if not passwd:
        # 密码为空 返回 -2
        return {'status': '-2'}
    if name == 'zhangsan' and passwd == '123456':
        # 校验成功返回 1
        return {'status': '1'}
    else:
        # 校验失败 返回 0
        return {'status': '0'}


@app.route('/login')
def login():
    args = request.args
    name = args.get('name')
    passwd = args.get('passwd')
    res = check_user(name, passwd)
    print(res)
    return jsonify(res)


if __name__ == '__main__':
    app.run(debug=True)
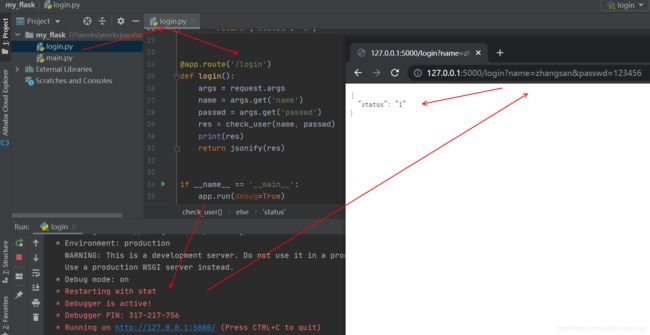
4、启动flask, 并打开浏览器输入以下地址测试下
http://127.0.0.1:5000/login?name=zhangsan&passwd=123456
3、接口用例编写
切回到接口项目的pycharm
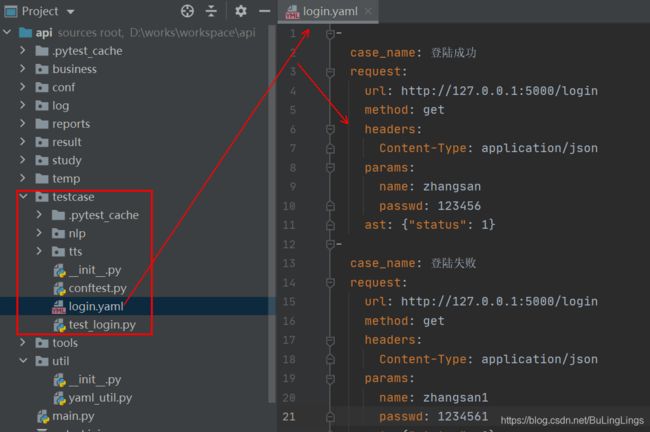
创建 testcase/login.yaml
参考下图,将图下脚本复制到 login.yaml 中
-
  case_name: 登陆成功
  request:
    url: http://127.0.0.1:5000/login
    method: get
    headers:
      Content-Type: application/json
    params:
      name: zhangsan
      passwd: 123456
    ast: {"status": 1}
-
  case_name: 登陆失败
  request:
    url: http://127.0.0.1:5000/login
    method: get
    headers:
      Content-Type: application/json
    params:
      name: zhangsan1
      passwd: 1234561
    ast: {"status": 0}

-
  case_name: 用户名为空
  request:
    url: http://127.0.0.1:5000/login
    method: get
    headers:
      Content-Type: application/json
    params:
      passwd: 123456
    ast: {"status": -1}

-
  case_name: 密码为空
  request:
    url: http://127.0.0.1:5000/login
    method: get
    headers:
      Content-Type: application/json
    params:
      name: zhangsan
    ast: {"status": -2}
4、接口请求实现
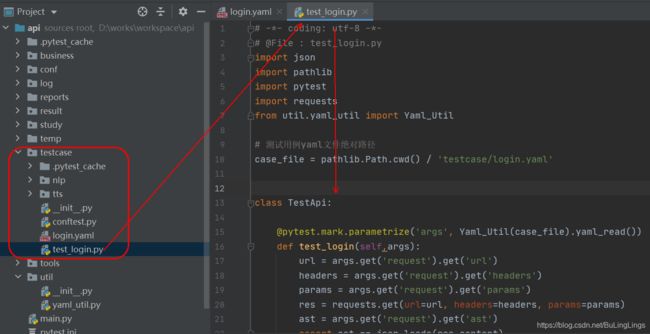
创建testcase/login.py
结合 pytest.mark.parametrize() 实现数据驱动
login.py参考复制内容
# -*- coding: utf-8 -*-
# @File : test_login.py
import json
import pathlib
import pytest
import requests
from util.yaml_util import Yaml_Util

# 测试用例yaml文件绝对路径
case_file = pathlib.Path.cwd() / 'testcase/login.yaml'


class TestApi:

    @pytest.mark.parametrize('args', Yaml_Util(case_file).yaml_read())
    def test_login(self,args):
        url = args.get('request').get('url')
        headers = args.get('request').get('headers')
        params = args.get('request').get('params')
        res = requests.get(url=url, headers=headers, params=params)
        ast = args.get('request').get('ast')
        assert ast == json.loads(res.content)
5、执行并查看结果
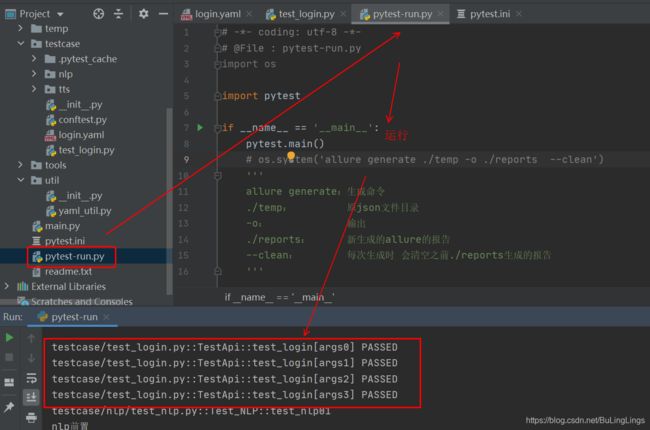
核对pytest.ini参数
运行pytest-run.py
[pytest]
addopts = -vs --alluredir ./temp
python_files =  test_*.py  *_test.py
python_classes = Test*
python_functions = test_*
testpaths = ./testcase
markers =
    smoke
    uat
pytest-run.py参考复制内容
# -*- coding: utf-8 -*-
# @File : pytest-run.py
import os

import pytest

if __name__ == '__main__':
    pytest.main()
    # os.system('allure generate ./temp -o ./reports  --clean')
    '''
    allure generate:生成命令
    ./temp:         原json文件目录
    -o:             输出
    ./reports:      新生成的allure的报告
    --clean:        每次生成时 会清空之前./reports生成的报告
    '''


