锁与原子操作CAS的底层实现
前言
对于服务器而言,锁发生的场景主要是在多线程或多进程,多任务的操作系统中,避免不了会共享一些资源,就会出现线程a,线程b或者进程a,进程b同时操作同一资源(临界区)的问题会产生无法预料的现象,副作用。所以需要加锁或者对数据进行原子操作。
1、锁的分类
- posix api锁:互斥锁、自旋锁,读写锁。
- 分布式锁:乐观锁、悲观锁等,目前不总结,等后面再分布式技术(redis,mysql,nginx等集群中)总结吧。
- 原子操作:当然除了上面的锁能解决这种问题,原子操作也能解决,注意是无锁的。
2、原子操作:不会被线程调度机制打断的操作
定义:如果这个操作所处的层(layer)的更高层不能发现其内部实现与结构,那么这个操作是一个原子(atomic)操作。原子操作可以是一个步骤,也可以是多个操作步骤,但是其顺序不可以被打乱,也不可以被切割而只执行其中的一部分。将整个操作视作一个整体是原子性的核心特征。
2.1 对于gcc、g++编译器来讲,它们提供了一组API来做原子操作:
type __sync_fetch_and_add ( type * ptr , type value , ...)type __sync_fetch_and_sub ( type * ptr , type value , ...)type __sync_fetch_and_or ( type * ptr , type value , ...)type __sync_fetch_and_and ( type * ptr , type value , ...)type __sync_fetch_and_xor ( type * ptr , type value , ...)type __sync_fetch_and_nand ( type * ptr , type value , ...)bool __sync_bool_compare_and_swap ( type * ptr , type oldval type newval , ...)type __sync_val_compare_and_swap ( type * ptr , type oldval type newval , ...)type __sync_lock_test_and_set ( type * ptr , type value , ...)void __sync_lock_release ( type * ptr , ...)
2.2 c++11有相关的接口:std::atomic
详细文档见:https://en.cppreference.com/w/cpp/atomic
3、CAS (compare and swap):比较和交换,是原子操作的一种,可用于在多线程编程中实现不被打断的数据交换操作,从而避免多线程同时改写某一数据时由于执行顺序不确定性以及中断的不可预知性产生的数据不一致问题。 该操作通过将内存中的值与指定数据进行比较,当数值一样时将内存中的数据替换为新的值。
bool CAS ( int * pAddr , int nExpected , int nNew )atomically {if ( * pAddr == nExpected ){* pAddr = nNew ;return true ;}elsereturn false ;}
4、锁的经典问题
程序中定义一个全局变量idx,然后开10个线程对这个全局变量idx++操作100万次(线程func执行情况1),主线程统计idx的大小;按照一般的理解执行完后,idx应该是1000万?
#include
#include
#include
#include

#define THREAD_SIZE		10

pthread_mutex_t mutex;        //互斥锁
pthread_spinlock_t spinlock;  //自旋锁

//mul_port_client_epoll.c
#define TIME_SUB_MS(tv1, tv2)  ((tv1.tv_sec - tv2.tv_sec) * 1000 + (tv1.tv_usec - tv2.tv_usec) / 1000)

//汇编代码 addl(加)sub(减)
int inc(int *value, int add) {
	int old;
	__asm__ volatile (
		"lock; xaddl %2, %1;"	// xaddl加法: 第二个参数加到第一个参数那里并把值存储到第一个参数
		: "=a" (old)
		: "m" (*value), "a" (add)
		: "cc", "memory"
	);
	return old;
}

// 10 * 100000
void *func (void *arg) {
	int *pcount = (int *)arg;
	int i = 0;
	while (i ++ < 1000000) {

#if 0    //情况1
		(*pcount)++;

#elif 0	//情况2 加互斥锁 	766us
		pthread_mutex_lock(&mutex);
		(*pcount)++;
		pthread_mutex_unlock(&mutex);

#elif 0	//情况3 加自旋锁	1854us
		pthread_spin_lock(&spinlock);
		(*pcount)++;
		pthread_spin_unlock(&spinlock);


#else	//情况4 原子操作函数封装 228us
		inc(pcount, 1);
#endif

        //知识拓展:sleep(0)的意思是你的线程暂时放弃cpu,也就是释放一些未用的时间片给其他线程或进程使用,就相当于一个让位动作

		//usleep(1);
	}
}

int main() {
	pthread_t threadid[THREAD_SIZE] = {0};

	pthread_mutex_init(&mutex, NULL);
	pthread_spin_init(&spinlock, PTHREAD_PROCESS_SHARED);

	struct timeval tv_start;
	gettimeofday(&tv_start, NULL);

	int i = 0;
	int idx = 0;
	for (i = 0;i < THREAD_SIZE;i ++) {
		pthread_create(&threadid[i], NULL, func, &idx);
	}
#if 0    //线程资源回收
	for (i = 0;i < THREAD_SIZE;i ++) {
		pthread_join(threadid[i], NULL); //阻塞等待线程退出
	}

#endif
	struct timeval tv_end;
	gettimeofday(&tv_end, NULL);
	int time_used = TIME_SUB_MS(tv_end, tv_start);
	printf("time_used: %d\n", time_used);

#if 1
	// 100w
	for (i = 0;i < 100;i ++) {
		printf("count --> %d\n", count);
		sleep(1);
	}
#endif
}
结果:程序执行一段时间后;idx就会进入一个稳态,无法达到1000万。
 图 1
图 1
4.1 原因:对于idx++在底层汇编会生成三条汇编指令;
 图2
图2
【idx】:内存中的idx值;%eax:cup寄存器值
三条指令:将内存中的idx的值,拷贝到cpu寄存器eax;然后将eax寄存器加1;最后将cup寄存器eax中的值拷贝到内存idx中来即可;
多线程多进程环境下操作idx值流程:
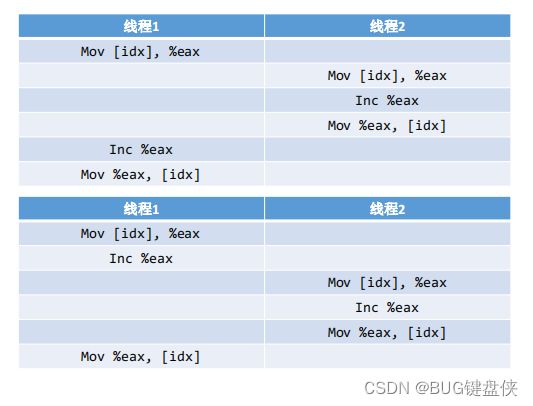
如下图:大部分情况下如图3操作的,但是也有一些情况下如图4操作;
 图3 理想情况图
  图4
图4
图4的情形是因为两个线程同时操作可能出现的情况,产生这种现象的原因主要是由于线程切换导致。
4.2 对于线程切换是否消耗性能资源?
看似只有mov指令操作,实际上还有fd,文件系统相关属性,内存(虚拟内存)消耗比较大,全部要重新计算;正是因为线程切换消耗性能比较大,所以才产生了协程,专门用来解决线程切换的问题的。
4.3 解决问题的思路
- 互斥锁(mutex_lock);//线程函数func执行情况2
- 自旋锁(spin_lock);//线程函数func执行情况3
- 读写锁;
- 原子操作;//线程函数func执行情况4
4.4 读写锁接口补充:
// 1 定义自旋锁
pthread_rwlock_t rwlock;

//2 初始化读写锁
pthread_rwlock_init(&rwlock, NULL);

// 3 加锁
pthread_rwlock_wrlock(&rwlock);
pthread_rwlock_unlock(&rwlock);

// 3 读加锁
pthread_rwlock_rdlock(&rwlock);
pthread_rwlock_unlock(&rwlock);
使用场景写只能一个线程(同一时刻);读可多个线程(同一时刻)
对于互斥锁,互斥尝试锁,自旋锁,读写锁都是将汇编的三条指令加锁结合在一起,同一时刻只能让一个线程执行。
4.5 互斥锁与自旋锁的区别
- 互斥锁加锁失败后,线程释放CPU,给其他线程;
- 自旋锁加锁失败后,线程会忙等待,直到它拿到锁;
5、shmem
共享内存是一种最为高效的进程间通信方式。因为进程可以直接读写内存,不需要任何数据的拷贝。为了在多个进程间交换信息,内核专门留出了一块内存区。这段内存区可以由需要访问的进程将其映射到自己的私有地址空间。因此,进程就可以直接读写这一内存区而不需要进行数据的拷贝,从而大大提高了效率。
共享内存并未提供同步机制,也就是说,在第一个进程结束对共享内存的写操作之前,并无自动机制可以阻止第二个进程开始对它进行读取。所以我们通常需要用其他的机制来同步对共享内存的访问,如互斥锁和信号量等。
- DMA(Direct Memory Access,直接存储器访问),是磁盘与内存之间的一种传输方式。
- mmap:映射(DMA)零拷贝(CPU不参与),大文件读写使用mmap()相比read(),write()性能更优,减少了cpu参与步骤。
//文件名为affinity.c
#include
#include
#include
#include

int main() {
	int fd = open("./affinity.c", O_RDWR);
	//read(); write()

	unsigned char *addr = (unsigned char *)mmap(NULL, 4096, PROT_READ|PROT_WRITE, MAP_SHARED, fd, 0);
	printf("affinity: %s\n", addr);
	int i = 0;
	for (i = 0;i < 20;i ++) {	//往affinity.c文件写入A-T
		*(addr+i) = 'A' + i;
	}
}
6、CPU亲缘性
- CPU 软亲缘性:Linux 内核进程调度器天生就具有被称为 CPU 软亲缘性(soft affinity) 的特性,这意味着进程通常不会在处理器之间频繁迁移。这种状态正是我们希望的,因为进程迁移的频率小就意味着产生的负载小。但不代表不会进行小范围的迁移。
- CPU 硬亲缘性:是指通过Linux提供的相关CPU亲缘性设置接口,显示的指定某个进程固定的某个处理器上运行。本文所提到的CPU亲缘性主要是指硬亲缘性。
6.1 使用CPU亲缘性的好处
目前主流的服务器配置都是SMP架构,在SMP的环境下,每个CPU本身自己会有缓存,缓存着进程使用的信息,而进程可能会被kernel调度到其他CPU上(即所谓的core migration),如此,CPU cache命中率就低了。设置CPU亲缘性,程序就会一直在指定的cpu运行,防止进程在多SMP的环境下的core migration,从而避免因切换带来的CPU的L1/L2 cache失效。从而进一步提高应用程序的性能。
6.2 Linux CPU亲缘性的使用
我们有两种办法指定程序运行的CPU亲缘性。
- 通过Linux提供的taskset工具指定进程运行的CPU。
- 方式二,glibc本身也为我们提供了这样的接口,接下来的内容主要为大家讲解如何通过编程的方式设置进程的CPU亲缘性。
6.3 glibc相关接口
#include
void CPU_ZERO(cpu_set_t *set);
void CPU_CLR(int cpu, cpu_set_t *set);
void CPU_SET(int cpu, cpu_set_t *set);
int CPU_ISSET(int cpu, cpu_set_t *set);

int sched_getaffinity(pid_t pid, unsigned int cpusetsize, cpu_set_t *mask);
int sched_setaffinity(pid_t pid, unsigned int cpusetsize, cpu_set_t *mask);


//其中的cpu_set_t结构体的具体定义:
/*/usr/include/bits/sched.h*/
# define __CPU_SETSIZE  1024
# define __NCPUBITS (8 * sizeof (__cpu_mask))

/* Type for array elements in 'cpu_set'.  */
typedef unsigned long int __cpu_mask;
typedef struct
{
    __cpu_mask __bits[__CPU_SETSIZE / __NCPUBITS];
} cpu_set_t;
可以看到其用每一bit位表示一个cpu的状态,最多可以表示1024个cpu的亲缘状态,这在目前来说足够用了。
6.4 glibc使用范例
#include
#include
#include
#include

// nginx.conf --> set affinity 0000 0000
void process_affinity(int num) {

	pid_t self_id = syscall(__NR_gettid);
	//fd_set
	cpu_set_t mask;
	CPU_ZERO(&mask);
	CPU_SET(self_id % num, &mask);
	sched_setaffinity(self_id, sizeof(mask), &mask);
	while(1) usleep(1);
}


int main() {
	int num = sysconf(_SC_NPROCESSORS_CONF);	//获取cpu数量
	printf("num: %d\n", num);

	int i = 0;
	pid_t pid = 0;
	for (i = 0;i < num/2;i ++) {
		pid = fork();
		if (pid <= 0) {
			break;
		}
	}

	if (pid == 0) {
		process_affinity(num);
	}

	printf("affinity.c: %d\n", pid);
	while(1) usleep(1);
} 