uniapp的uni-im 即时通信使用教程【用户与商家对话、聊天 / 最新 / 最全 / 带源码 / 教程】
目录
-
- 使用场景
-
- 用户图片
- 商家图片
- 官方文档
-
- 官方文档地址
- 插件地址
- 项目创建uniCloud开发环境
-
- 申请开发环境
- 申请完后
- 概括
- 开始使用
- 步骤1
-
- App.vue
- 步骤2
- 找到软件登录图片
-
- 找到软件登录接口
- 登录源码如下
- 步骤3
-
- 找到软件注册图片
- 注册源码如下
- 步骤4
-
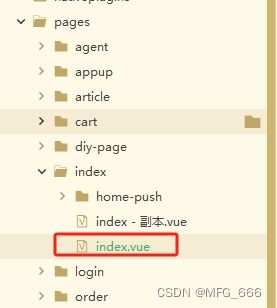
- 找到index.vue首页
-
- 图片
- index.vue源码如下
- 角标图片
- 步骤5
-
- 使用页面detail.vue
-
- 图片
- 源码如下
- 步骤6
-
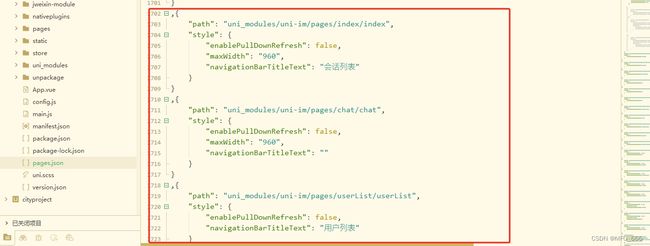
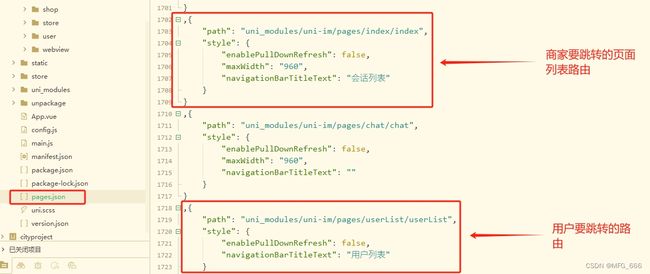
- pages.json图片
- 步骤7
- 最后
使用场景
用户图片


商家图片

下载完插件,
自动配置插件的路由,也就是想要的商家列表页面,和用户列表页面
官方文档
官方文档地址
文档要看仔细,一会要用!!!
uniapp官方:https://doc.dcloud.net.cn/uniCloud/uni-im.html
插件地址
插件地址:https://ext.dcloud.net.cn/plugin?name=uni-im
项目创建uniCloud开发环境
申请开发环境
注意:我这个项目是申请的阿里云的开发环境,要用HBuilder X的账号申请,阿里云开发环境,这个申请过程不是我弄的,后端账号给的我。
申请完后
1.登录HBuilder X刚才申请的账号
2.点击项目根目录,最外层的文件,在HBuilder X里面,左击,创建开发环境uniCloud,找到申请的阿里云,这就关联到自己HBuilder X账号申请的阿里云环境
图片:

概括
1.首先,这个过程,即时通信也有登录,注册过程,这个两个过程
必须软件的账号登录和注册同时的,也就是说,登录和注册,都要调用即时通信注册接口!
2.在首页挂在登录方法
3.使用页面跳转即可
开始使用
步骤1
App.vue
引入文件
<script>
	//1. 导入统一身份信息管理模块
	import uniIdPagesInit from '@/uni_modules/uni-id-pages/init.js';
	//2. 导入uniIm的Utils工具类
	import uniImUtils from '@/uni_modules/uni-im/common/utils.js';
	export default {
		onLaunch: function() {
			//3. 初始化uni身份信息管理模块
			uniIdPagesInit();
			//4. 初始化uniIm
			uniImUtils.init();
		},
		onShow: function() {
			//3. 初始化uni身份信息管理模块
			uniIdPagesInit();
			//4. 初始化uniIm
			uniImUtils.init();
		},
	};
</script>
步骤2
找到软件登录图片

找到软件登录接口
软件登录接口,调用即时通信登录接口
登录源码如下
<template>
	<view class="">
		<view class="" @click="formSubmit">
			登录
		view>
	view>
template>

<script>
	export default{
		methods:{
			/*登录方法*/
			formSubmit() {
				this.disLogin = true
				let self = this;
				let formdata = {
					mobile: self.formData.mobile,
				}
				let url = '';

				uni.showLoading({
					title: '正在提交'
				});
				self._post(
					url,
					formdata,
					result => {
						uni.setStorageSync('token', result.data.token);
						uni.setStorageSync('user_id', result.data.user_id);
						// 调用即时通信注册接口
						self.registerUniIm(result.data.token);
					},
					false,
					() => {
						uni.hideLoading();
						self.disLogin = false
					}
				);
			},
			// 调用即时通信注册接口,后端要,参数传好,和后端协调
			registerUniIm(token) {
				let self = this;
				let userInfo = uni.getSystemInfoSync();
				self._post('user.useruniim/uniImLogin', {
					token:token,
					uniPlatform:userInfo.uniPlatform,
					appId:userInfo.appId,
					deviceId:userInfo.deviceId
				}, function(res) {
					console.log(res);
				});
			},
		}
	}
script>
步骤3
找到软件注册图片
同样,也要调用即时通信注册接口!!
我这个是验证码登录,你的要是注册也要调用即时通信接口

注册源码如下
<template>
	<view class="">
		<view class="" @click="formSubmit">
			注册
		view>
	view>
template>

<script>
	export default{
		methods:{
			/*注册方法*/
			formSubmit() {
				this.disLogin = true
				let self = this;
				let formdata = {
					mobile: self.formData.mobile,
				}
				let url = '';

				uni.showLoading({
					title: '正在提交'
				});
				self._post(
					url,
					formdata,
					result => {
						uni.setStorageSync('token', result.data.token);
						uni.setStorageSync('user_id', result.data.user_id);
						// 调用即时通信注册接口
						self.registerUniIm(result.data.token);
					},
					false,
					() => {
						uni.hideLoading();
						self.disLogin = false
					}
				);
			},
			// 调用即时通信注册接口,后端要,参数传好,和后端协调
			registerUniIm(token) {
				let self = this;
				let userInfo = uni.getSystemInfoSync();
				self._post('user.useruniim/uniImLogin', {
					token:token,
					uniPlatform:userInfo.uniPlatform,
					appId:userInfo.appId,
					deviceId:userInfo.deviceId
				}, function(res) {
					console.log(res);
				});
			},
		}
	}
script>
步骤4
找到index.vue首页
图片

index.vue源码如下
<template>

template>

<script>
	// 要记得引入哦~
	// 引入2下面
	import uniImUtils from '@/uni_modules/uni-im/common/utils.js';
	//引入2	uniImMethods
	import uniIm from '@/uni_modules/uni-im/lib/main.js';

	export default {

		onShow() {
			// this.getTabBarLinks(); // 底部导航注定义的函数释掉
			// 当前时间,毫秒时间戳
			var timestamp = (new Date()).valueOf(); // 1604297892942

			// console.log(timestamp,'毫秒时间戳');

			// 获取过期时间	毫秒时间戳
			let tokenExpiredUnIm = uni.getStorageSync("tokenExpiredUnIm")

			let newTime = tokenExpiredUnIm - timestamp;

			if (!tokenExpiredUnIm && newTime < 3600000) {
				// 在首页	调用即时通信	登录接口
				this.loginUniIm();
			}
			// console.log(newTime, '新时间');


			// 下面看自己需求加不加。都可以
			let unreadCount = uniIm.conversation.unreadCount();
			console.log(unreadCount,'获取未读总数量')
			// 下面是给底部tabar加角标消息数量
			uni.setStorageSync("unreadCount",unreadCount)
			if (unreadCount > 0) {
				uni.setTabBarBadge({
					index: 2,
					// text: String(unreadCount),
					text: unreadCount,
				});
			} else {
				uni.removeTabBarBadge({
					index: 2
				});
			}

		},

		methods: {
			// 在首页	调用即时通信	登录接口
			loginUniIm() {
				let self = this;
				let userInfo = uni.getSystemInfoSync();
				self._post('user.useruniim/uniImRegister', {
					uniPlatform: userInfo.uniPlatform,
					appId: userInfo.appId,
					deviceId: userInfo.deviceId
				}, async function(res) {
					console.log(res.data.newToken);
					let uniIdToken = res.data.newToken;
					await uniImUtils.login(uniIdToken)

					// console.log(uniIdToken.tokenExpired, '打印');
					// 获取过期时间		毫秒时间戳
					uni.setStorageSync("tokenExpiredUnIm", uniIdToken.tokenExpired)
				});
			},
		}
	};
script>
角标图片
步骤5
使用页面detail.vue
图片
用户联系商家按钮

源码如下
<template>
	<view class="content">
		<view class="btns-wrap-lft-btn btns-wrap-lft-btn1" @click="goSiXin">
			<text>私信联系text>
		view>
	view>
template>
<script>
	//引入uniImMethods
	import uniIm from '@/uni_modules/uni-im/lib/main.js';
	export default {
		methods: {
			data() {
				return {
					store_im_id: ''
				}
			},
			onLoad() {
				this.getData();
			},
			methods: {
				/*获取数据*/
				getData() {
					let self = this;
					let product_id = self.product_id;
					uni.showLoading({
						title: '加载中'
					});
					self._get(
						'product.product/detail', {
							product_id: product_id,
							url: self.url,
							visitcode: self.getVisitcode()
						},
						function(res) {
							// console.log(res.data.store_im_id);
							// 后端返回	对应的用户id
							self.store_im_id = res.data.store_im_id;
						}
					);
				},
				goSiXin() {
					// 文档有下面这个方法,路由下载插件就自动配置好了!!!
					// uni.navigateTo({
					// 	url:'/uni_modules/uni-im/pages/chat/chat?user_id=' + 对应的用户id
					// })

					let store_im_id = this.store_im_id;
					uni.navigateTo({
						url: '/uni_modules/uni-im/pages/chat/chat?user_id=' + store_im_id
					})
				},
			}
		}
	};
script>
步骤6
pages.json图片
步骤7
大功告成啦,哪里如果有遗漏,大家可以在评论区进行补充,感谢大家,这么久的陪伴!!!
最后
感觉文章好的话记得点个心心和关注和收藏,有错的地方麻烦指正一下,如果需要转载,请标明出处,多谢!!!