Linux——基于Linux的MySQL安装和基本使用(day17)
目录
一、前言
1.1 目标
1.2 数据库基础概述
1.3 常见数据库
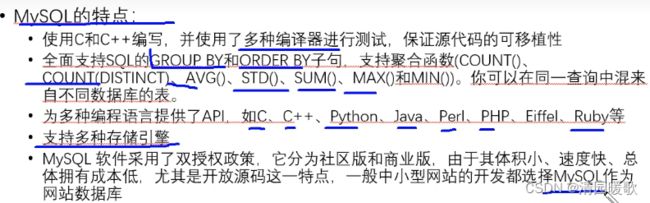
1.4 MySQL
1.5 ubuntu下MySQL安装步骤和简单操作
1.5.1 MySQL安装步骤
1.5.2 安装后的首先操作
二、数据库和数据表管理
2.1 数据库管理
2.2 数据表管理
2.2.1 数据表设计
2.2.2 创建表
2.2.3 修改表
2.2.4 删除表
四、简单查询与数据操作
4.1 查询
4.2 插入
4.3 修改和删除
五、备份和恢复数据库
六、练习
七、安装小结
7.1 更换国内镜像源
7.2 安装完成修改密码
7.3 连接mysql
一、前言
1.1 目标

1.2 数据库基础概述


1.3 常见数据库

1.4 MySQL


安装MySQL时,会自动安装客户端和依赖项

1.5 ubuntu下MySQL安装步骤和简单操作
1.5.1 MySQL安装步骤

以下代码都是在命令行中一行一行的执行:
su root
cp /etc/apt/sources.list /etc/apt/sources.list/backup
vim /etc/apt/sources.list

删除其中 def 的镜像源,更换为:
deb http://mirrors.aliyun.com/ubuntu/ focal main restricted
deb http://mirrors.aliyun.com/ubuntu/ focal-updates main restricted
deb http://mirrors.aliyun.com/ubuntu/ focal universe
deb http://mirrors.aliyun.com/ubuntu/ focal-updates universe
deb http://mirrors.aliyun.com/ubuntu/ focal multiverse
deb http://mirrors.aliyun.com/ubuntu/ focal-updates multiverse
deb http://mirrors.aliyun.com/ubuntu/ focal-backports main restricted universe multiverse
deb http://mirrors.aliyun.com/ubuntu/ focal-security main restricted
deb http://mirrors.aliyun.com/ubuntu/ focal-security universe
deb http://mirrors.aliyun.com/ubuntu/ focal-security multiverse

:wq!强制保存退出

cat /etc/apt/sources.list    # 查看发现已经更改成功
apt update                   # 更新一下
apt-get install mysql-server # 安装mysql
y                            # 会有询问,输入 y 继续
                             # 客户端会自动安装
service mysql status         # 检查是否安装成功

出现这个说明安装成功 ,按:wq可以退出
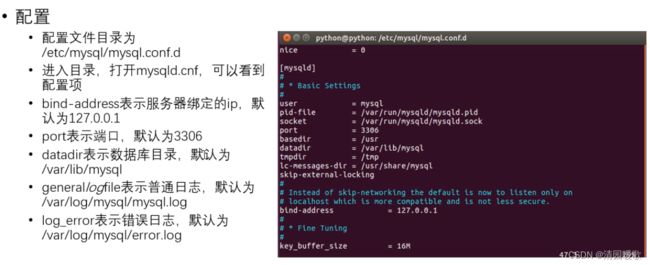
cat /etc/mysql/mysql.conf.d/mysqld.cnf # 查看mysql配置文件信息
user		= mysql                                  # 当前mysql用户
# pid-file	= /var/run/mysqld/mysqld.pid
# socket	= /var/run/mysqld/mysqld.sock            # 以socket,可以负载
# port		= 3306                                   # 端口号
# datadir	= /var/lib/mysql                         # 数据库存放的位置


# If MySQL is running as a replication slave, this should be
# changed. Ref https://dev.mysql.com/doc/refman/8.0/en/server-system-variables.html#sysvar_tmpdir
# tmpdir		= /tmp
#
# Instead of skip-networking the default is now to listen only on
# localhost which is more compatible and is not less secure.
bind-address		= 127.0.0.1                      # 现在绑定的地址,就是本机目录,允许远程
                                                     # 访问的话要注销,现在是允许本机访问
mysqlx-bind-address	= 127.0.0.1
1.5.2 安装后的首先操作
进入mysql,安装完首先要做的:1.修改密码;2.允许远程访问
mysql                          # 直接输入 mysql 进入数据库

------------------------- 1.修改密码 ----------------------------

use mysql                      # 使用数据库
select user,host from user;    # 查询 user 对应的 host 的服务从 user 这个表里去查
update user set authentication_string='111111' where user='root';
                               # 更改设置用户 root 的密码为111111
flush privileges               # 提交一下,让他生效

------------------------ 2.允许远程访问 --------------------------
update user set host='%' where user='root' and host='localhost' LIMIT 1;
                               # %:表示允许用户 root 允许所有主机访问
                               # LIMIT 1:表示只修改限制1行
                               # 加上LIMIT 1,只要找到了对应的一条记录,就不会继续向下扫描了,
                               # 效率会大大提高
                               # and host='localhost' LIMIT 1 这后面这里不加也可以
以上操作如下两张图所示:


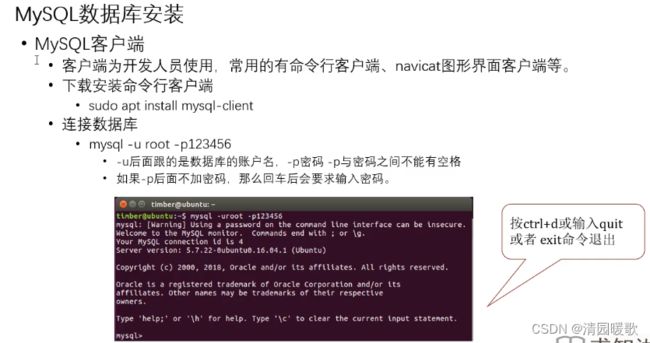
输入mysql -uroot -p尝试进入,也可以mysql -uroot -p111111;-p不输入密码下面也会要求输入
-u后面接用户名,-p后面接密码

如图,说明已经进入mysql
注意:mysql语句要加分号 ;
二、数据库和数据表管理
2.1 数据库管理


--------------- 上图代码的意思 ----------------
show database;    # 展示数据库
use mysql;        # 使用mysql
select version();# 查看版本
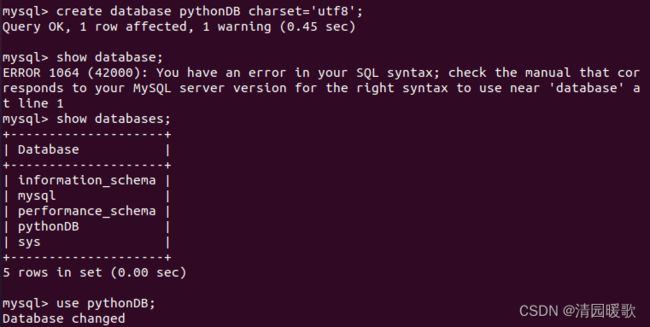

create database pythonDB charset='utf8'; # 创建数据库pythonDB
show databases; # 展示已有数据库
use pythonDB; # 切换到数据库pythonDB
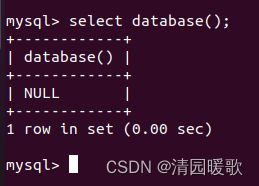
select database(); # 查看当前使用的数据库
drop database pythonDB; # 删除数据库pythonDB
show databases; # 展示已有数据库
select database(); # 查看当前使用的数据库2.2 数据表管理
2.2.1 数据表设计
(1)ER图
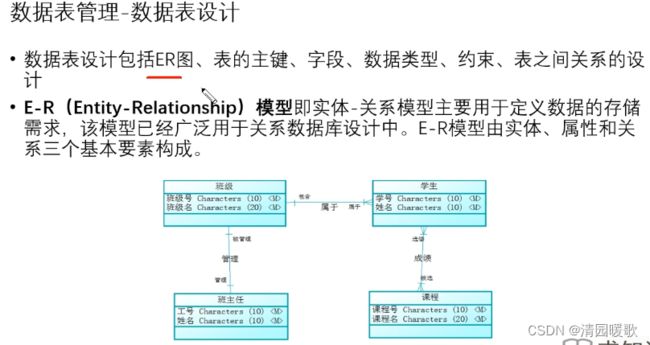
(2)主键(Primary Key)

(3)实体关系和外键

(4)约束

2.2.2 创建表


先创建一个新数据库
create database stuDB charset='utf8';
create table student(                   # 创建一个表 student
id int auto_increment primary key not null comment '主键',
                                        # 创建一个自动递增的主键id,约束:不能为空,注释:主键
name varchar(10) not null comment '学生姓名',
                                        # 创建可变字符串类型name字段,长度10
sex bit(1) default 0 comment '性别',     # 创建bit即char类型sex,约束默认值为0
address varchar(50) comment '地址'       # 创建字符串类型address,长度为50
);

show tables;                             # 查看已有的表
show create table student;               # 查看是不是刚才创建的
显示结果如下图,说明是刚才创建的
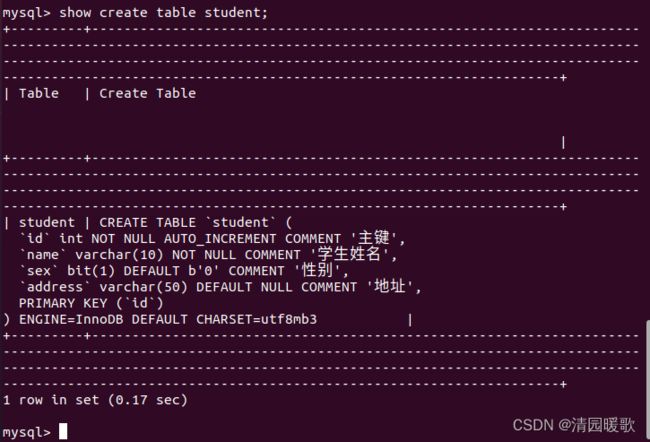
show tables;
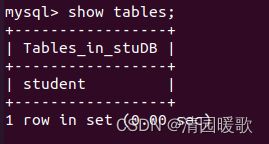
Tables_in_stuDB 应该是一个说明:是stuDB数据库下的表(怀疑)
2.2.3 修改表


desc student;                               # 查看表的结构
alter table student add hobby varchar(100); # 给表student添加字段hobby类型为字符串,长度100
alter table student drop hobby;             # 删除字段hobby
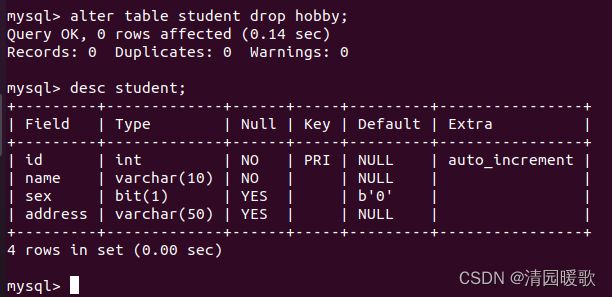
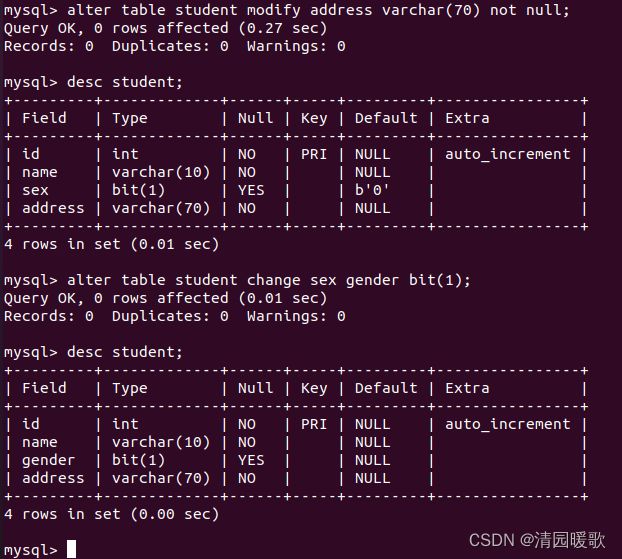
alter table student modify address varchar(70) not null; # 修改address长度为70,非空
desc student;
alter table student change sex gender bit(1); # 改变sex字段名为gender,需要重新指定类型
2.2.4 删除表


drop table student;三、Navicat for MySQL连接数据库
systemctl status mysql
mysql -u root -p
查看mysql服务状态

这样说明正常启用,确定服务没有问题
因为Navicat for MySQL 安装在windows下,所以要连接Ubuntu的mysql 需要连接ip,不能直接localhost本机连接
如果连接失败,进入该路径 /etc/mysql/mysql.conf.d 查看mysql.conf.d,可以将bind-address = 127.0.0.1语句(只允许本机访问)注释掉,允许所有访问
然后重启mysql服务:sudo service mysql restart
博主这里是在bind-address = 127.0.0.1语句下一行多出一行mysqlx-bind-address = 127.0.0.1 然后就可以直接连接了
但并不理解mysqlx-bind-address = 127.0.0.1 该语句的意思,如果有大佬懂的话,希望可以解答一下
但出现了 1251- Client does not support authentication protocol requested by server... 的问题,这里参考了Mysql 解决1251- Client does not support authentication protocol requested by server...的问题_上帝代言人的博客-CSDN博客_1251-client does not support
这位博主的解决方案,select host,user,plugin,authentication_string from mysql.user; 查看信息后发现,root确实是'%',所以输入 ALTER USER 'root'@'%' IDENTIFIED WITH mysql_native_password BY '123456' ,更新user为root,host为% 的密码为123456
解决
双击打开进入,右键新建数据表:(MySQL的)utf8是utf8mb3的别名,在MySQL中,实际只有utf8mb4和utf8mb3。至于uft8,在 V8.0 还是指代的utf8mb3,未来的会变为uft8mb4
右键新建表,一般id设置主键,显示设计表保存后为一个表
查询时右键,新建查询,输入select * from student; 运行可查看所有内容
四、简单查询与数据操作
4.1 查询


4.2 插入

insert into student values(0,'刘德华',45); # id自动递增的也要给0占位

insert into student(name)values('周华健'); # 前提是要允许为null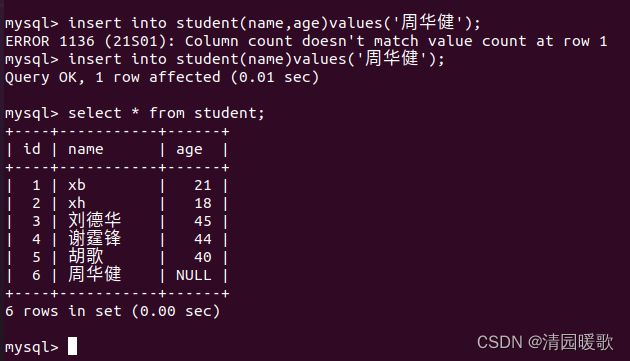

insert into student values(0,'谢霆锋',44),(0,'胡歌',40)
4.3 修改和删除
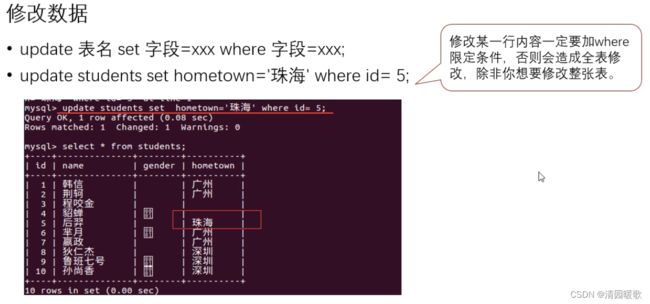
update student set name='王菲' where id=6;
# 不加 where id=6 则会全部修改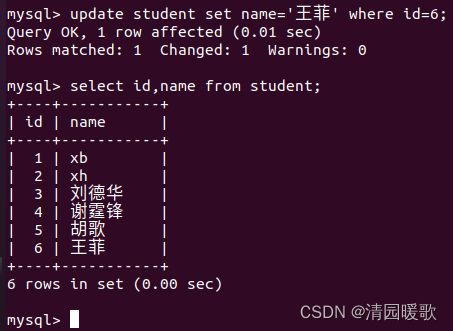
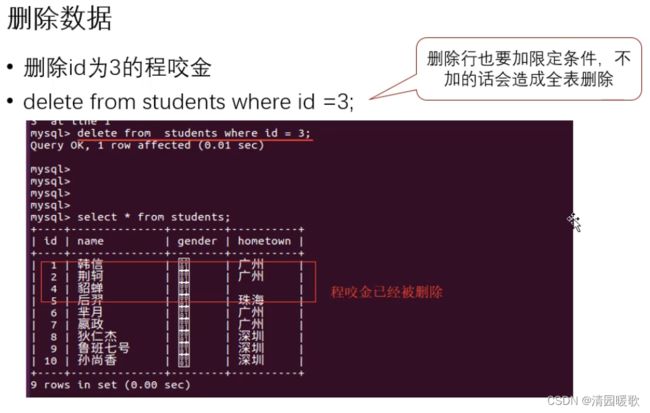

delete from student where id=2;
# 不加where id=2 也会全部删除
navicat for mysql的语句和命令行的命令一样,只不过最好一行一行的运行
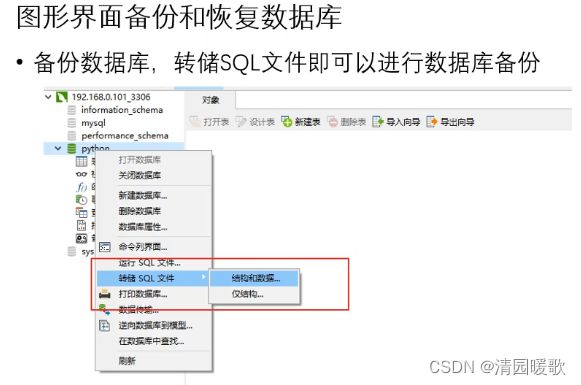
五、备份和恢复数据库

ysqldump -uroot -p stuDB > TestBackFile.sql  # 备份stuDB数据库为TestBackFile.sql
mysqldump -uroot -p stuDB student > studentFile.sql   # 指定备份表
# 都是备份到当前路径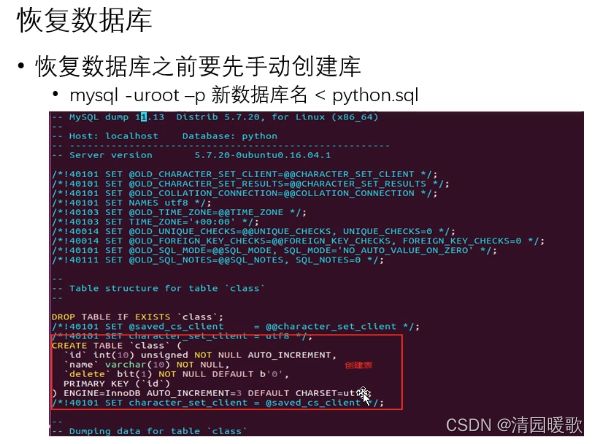
mysql -uroot -p huifuDB < TestBackFile.sql # 恢复六、练习


desc student:查看表的结构
select * from student:查看表的内容
七、安装小结
7.1 更换国内镜像源
ubuntu 20.04 LTS 更换阿里云源
第一步:先备份下原始源:
sudo cp /etc/apt/source.list /etc/apt/source.list.backup
第二步:修改文件
vim /etc/apt/source.list
清除原有的,替换以下源
复制代码
deb http://mirrors.aliyun.com/ubuntu/ focal main restricted
deb http://mirrors.aliyun.com/ubuntu/ focal-updates main restricted
deb http://mirrors.aliyun.com/ubuntu/ focal universe
deb http://mirrors.aliyun.com/ubuntu/ focal-updates universe
deb http://mirrors.aliyun.com/ubuntu/ focal multiverse
deb http://mirrors.aliyun.com/ubuntu/ focal-updates multiverse
deb http://mirrors.aliyun.com/ubuntu/ focal-backports main restricted universe multiverse
deb http://mirrors.aliyun.com/ubuntu/ focal-security main restricted
deb http://mirrors.aliyun.com/ubuntu/ focal-security universe
deb http://mirrors.aliyun.com/ubuntu/ focal-security multiverse
复制代码
保存下,即可执行更新
sudo apt update
sudo apt upgrade
7.2 安装完成修改密码
安装完毕首先修改密码
# 命令安装
sudo apt-get update
sudo apt-get install -y mysql-server
# 进入mysql命令行
mysql -udebian-sys-maint -p
# 输入/etc/mysql/debian.cnf中的password
# 修改密码
use mysql;
update user set authentication_string='123456' where user='root';
FLUSH PRIVILEGES;
ubuntu系统mysql8忘记root密码修改
1 停止mysql服务
service mysqld start
2 增加参数运行 skip-grant-tables参数为忽略用户验证
mysqld --skip-grant-tables --user=mysql
3 打开另一个终端,mysql -uroot可以登录到mysql数据库
4 在mysql终端中切换包含用户信息的名称为mysql的数据库
use mysql;
5 运行更新用户密码的sql语句,mysql 5.7.20版本中用户密码字段为authentication_string
更新root用户密码为空的sql
update user set authentication_string='' where user='root';
更新root用户密码为复杂字符串的sql,mysql会检查如果密码简单不能通过
update user set authentication_string=password('Abc@123') where user='root';
6 关闭mysqld进程,使用ps aux | grep mysqld找到进程id,然后使用kill -9 id关闭mysqld进程
7 使用系统服务启动mysql服务器
service mysqld start
再次使用mysql命令,使用修改的密码可以登录
7.3 连接mysql
navicat for mysql 连接不上msyql服务的原因排除
1:确保mysql的数据库服务正确启动
2:输入的用户名和密码是否正确
3:数据是否开启远程连接【默认安装mysql数据完成后 只允许本地连接】
注意:对mysql配置文件更改完毕之后,一定要重启mysql服务 否则的话是不生效的