使用GPU利用ffmpeg-在Pyhton代码中实现视频转码到MP4格式的过程记录【失败告终-原因是显示型号太老不支持】
01-安装Nvida的显卡驱动和CUDA
参考文章 https://blog.csdn.net/wenhao_ir/article/details/125253533 进行安装。
02-下载ffmpeg的可执行文件
下载ffmpeg的Windows可执行文件,下载页面:
https://www.gyan.dev/ffmpeg/builds/#release-builds
我在2023-12-08日下载的版本为:ffmpeg-6.1-essentials_build,百度网盘下载链接:
https://pan.baidu.com/s/1FsDGVD-IEHukxhl57PWV-A?pwd=b64u
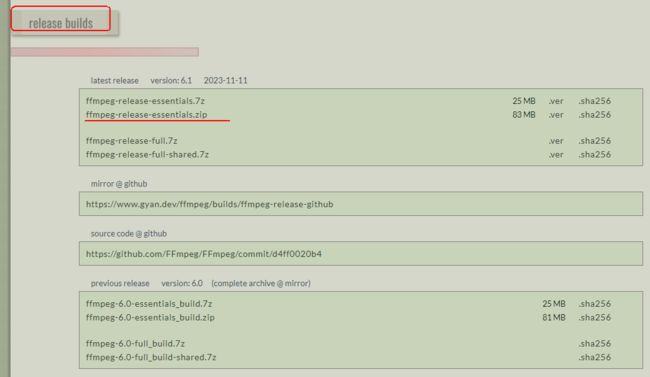
下是各个版本的一些说明:
-
Release Essentials:
- 包含 FFmpeg 的核心功能,适用于大多数用例。
-
Release Full:
- 包含 FFmpeg 的完整功能,适用于更多高级用例。
-
Release Full Shared:
- 与 “Release Full” 相似,但是使用了共享的依赖库。
-
Git Master (Nightly):
- 是从 FFmpeg 的 Git 仓库构建的最新版本,通常是每日构建。
- 适合那些希望获取最新功能和改进的用户。
根据你的需求,如果你只是需要基本功能,可以选择 “Release Essentials”。如果你需要更多的功能或者是一个更完整的版本,可以选择 “Release Full”。如果你希望获取最新的功能和改进,并能够接受潜在的不稳定性,可以选择 “Git Master (Nightly)”。
下载完成后在D:\Program Files\下建立文件夹ffmpeg-6.1-bin,然后把下载得到的包解压,把bin目录里的文件复制到刚建的文件夹ffmpeg-6.1-bin中:

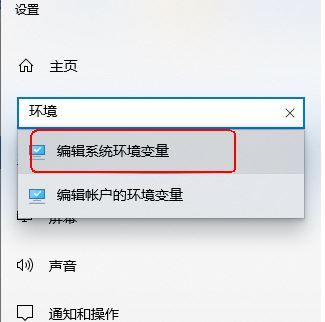
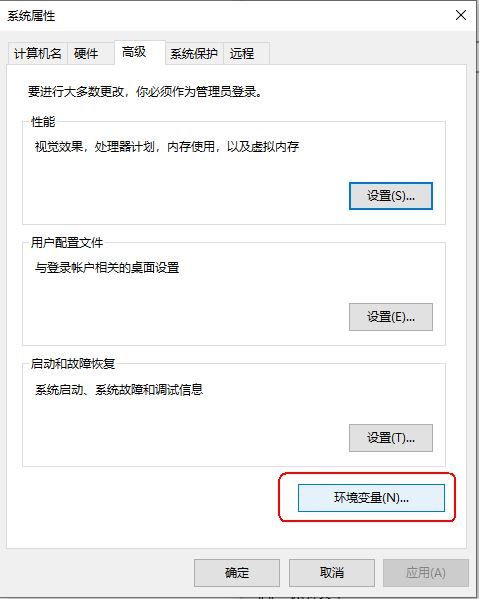
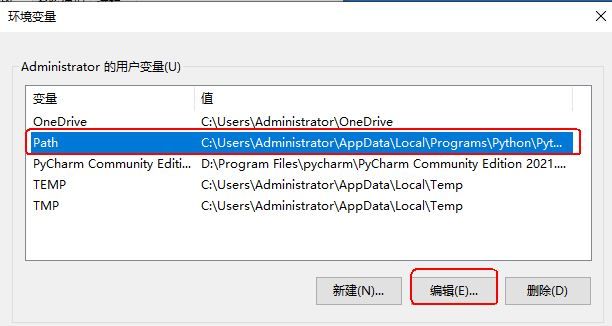
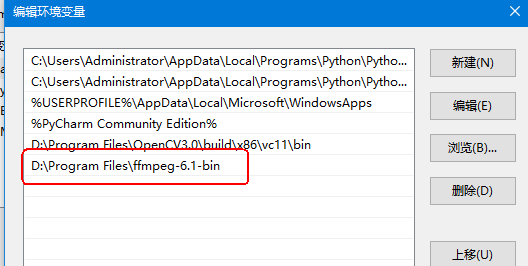
04-为ffmpeg设置环境变量
D:\Program Files\ffmpeg-6.1-bin
05-测试环境变量是否生效,同时查看ffmpeg是否读取到系统的CUDA
CMD命令行中输入下面的命令:
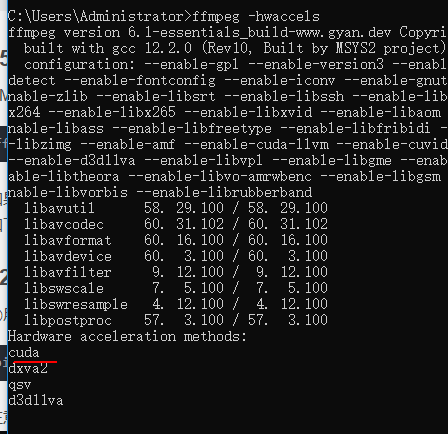
ffmpeg -hwaccels
如果你的系统已正确配置,并且存在 NVIDIA GPU 加速支持,你应该能够在输出的“Hardware acceleration methods:”中看到 cuda 一词。如下图所示:
C:\Users\Administrator>ffmpeg -hwaccels
ffmpeg version 6.1-essentials_build-www.gyan.dev Copyright (c) 2000-2023 the FFmpeg developers
  built with gcc 12.2.0 (Rev10, Built by MSYS2 project)
  configuration: --enable-gpl --enable-version3 --enable-static --pkg-config=pkgconf --disable-w32threads --disable-autodetect --enable-fontconfig --enable-iconv --enable-gnutls --enable-libxml2 --enable-gmp --enable-bzlib --enable-lzma --enable-zlib --enable-libsrt --enable-libssh --enable-libzmq --enable-avisynth --enable-sdl2 --enable-libwebp --enable-libx264 --enable-libx265 --enable-libxvid --enable-libaom --enable-libopenjpeg --enable-libvpx --enable-mediafoundation --enable-libass --enable-libfreetype --enable-libfribidi --enable-libharfbuzz --enable-libvidstab --enable-libvmaf --enable-libzimg --enable-amf --enable-cuda-llvm --enable-cuvid --enable-ffnvcodec --enable-nvdec --enable-nvenc --enable-dxva2 --enable-d3d11va --enable-libvpl --enable-libgme --enable-libopenmpt --enable-libopencore-amrwb --enable-libmp3lame --enable-libtheora --enable-libvo-amrwbenc --enable-libgsm --enable-libopencore-amrnb --enable-libopus --enable-libspeex --enable-libvorbis --enable-librubberband
  libavutil      58. 29.100 / 58. 29.100
  libavcodec     60. 31.102 / 60. 31.102
  libavformat    60. 16.100 / 60. 16.100
  libavdevice    60.  3.100 / 60.  3.100
  libavfilter     9. 12.100 /  9. 12.100
  libswscale      7.  5.100 /  7.  5.100
  libswresample   4. 12.100 /  4. 12.100
  libpostproc    57.  3.100 / 57.  3.100
Hardware acceleration methods:
cuda
dxva2
qsv
d3d11va
06-Python安装ffmpeg-python包和imageio[ffmpeg]包
①用下面的命令安装ffmpeg-python
pip install -i https://mirrors.aliyun.com/pypi/simple ffmpeg-python
②用下面的命令安装和imageio[ffmpeg]【本篇博文后续的代码中其实并没有用到这个库,所以可以不用安装】
pip install -i https://mirrors.aliyun.com/pypi/simple imageio[ffmpeg]
注意:安装前关闭代理。
imageio[ffmpeg]是Python的图像和视频I/O库imageio的一个扩展,它添加了对FFmpeg的支持。imageio是一个用于读写图像和视频文件的库,而ffmpeg是一个多媒体处理工具,支持许多不同的音频和视频编解码器。
具体来说,imageio[ffmpeg]允许你使用imageio库读写支持的各种格式的图像和视频文件,并且通过使用FFmpeg,它还能够处理一些其他常见的多媒体格式。

07-测试能否进行转码
07-1-不使用GPU进行转码的代码(软件编码)
import ffmpeg

input_file = "E:\\Download\\001-sea.mp4"
output_file = "E:\\VideoOutput\\001-sea-720-output.mp4"

# 使用 ffmpeg-python 进行视频转码
ffmpeg.input(input_file, hwaccel='nvdec').output(
    output_file,
    vcodec='h264',  # 使用软件编码器
    acodec='copy',  # 音频部分原样复制
    vf='scale=-2:720',  # 视频高度限制为720p
    strict='experimental'
).run(overwrite_output=True)
运行效果如下:
C:\Users\Administrator\AppData\Local\Programs\Python\Python39\python.exe E:\Python_project\P_001\A-TEMP\P-0001.py
ffmpeg version 6.1-essentials_build-www.gyan.dev Copyright (c) 2000-2023 the FFmpeg developers
  built with gcc 12.2.0 (Rev10, Built by MSYS2 project)
  configuration: --enable-gpl --enable-version3 --enable-static --pkg-config=pkgconf --disable-w32threads --disable-autodetect --enable-fontconfig --enable-iconv --enable-gnutls --enable-libxml2 --enable-gmp --enable-bzlib --enable-lzma --enable-zlib --enable-libsrt --enable-libssh --enable-libzmq --enable-avisynth --enable-sdl2 --enable-libwebp --enable-libx264 --enable-libx265 --enable-libxvid --enable-libaom --enable-libopenjpeg --enable-libvpx --enable-mediafoundation --enable-libass --enable-libfreetype --enable-libfribidi --enable-libharfbuzz --enable-libvidstab --enable-libvmaf --enable-libzimg --enable-amf --enable-cuda-llvm --enable-cuvid --enable-ffnvcodec --enable-nvdec --enable-nvenc --enable-dxva2 --enable-d3d11va --enable-libvpl --enable-libgme --enable-libopenmpt --enable-libopencore-amrwb --enable-libmp3lame --enable-libtheora --enable-libvo-amrwbenc --enable-libgsm --enable-libopencore-amrnb --enable-libopus --enable-libspeex --enable-libvorbis --enable-librubberband
  libavutil      58. 29.100 / 58. 29.100
  libavcodec     60. 31.102 / 60. 31.102
  libavformat    60. 16.100 / 60. 16.100
  libavdevice    60.  3.100 / 60.  3.100
  libavfilter     9. 12.100 /  9. 12.100
  libswscale      7.  5.100 /  7.  5.100
  libswresample   4. 12.100 /  4. 12.100
  libpostproc    57.  3.100 / 57.  3.100
Input #0, mov,mp4,m4a,3gp,3g2,mj2, from 'E:\Download\001-sea.mp4':
  Metadata:
    major_brand     : mp42
    minor_version   : 0
    compatible_brands: isomavc1mp42
    creation_time   : 2010-07-18T09:04:26.000000Z
  Duration: 00:03:18.07, start: 0.000000, bitrate: 20261 kb/s
  Stream #0:0[0x1](und): Audio: aac (LC) (mp4a / 0x6134706D), 48000 Hz, stereo, fltp, 125 kb/s (default)
    Metadata:
      creation_time   : 2010-07-18T09:04:26.000000Z
      handler_name    : (C) 2007 Google Inc. v08.13.2007.
      vendor_id       : [0][0][0][0]
  Stream #0:1[0x2](und): Video: h264 (High) (avc1 / 0x31637661), yuv420p(progressive), 4096x2304 [SAR 1:1 DAR 16:9], 20133 kb/s, 23.98 fps, 23.98 tbr, 24k tbn (default)
    Metadata:
      creation_time   : 2010-07-18T09:04:26.000000Z
      handler_name    : (C) 2007 Google Inc. v08.13.2007.
      vendor_id       : [0][0][0][0]
Stream mapping:
  Stream #0:1 -> #0:0 (h264 (native) -> h264 (libx264))
  Stream #0:0 -> #0:1 (copy)
Press [q] to stop, [?] for help
[libx264 @ 0000011d54f90f80] using SAR=1/1
[libx264 @ 0000011d54f90f80] using cpu capabilities: MMX2 SSE2Fast SSSE3 SSE4.2 AVX FMA3 BMI2 AVX2
[libx264 @ 0000011d54f90f80] profile High, level 3.1, 4:2:0, 8-bit
[libx264 @ 0000011d54f90f80] 264 - core 164 r3161 a354f11 - H.264/MPEG-4 AVC codec - Copyleft 2003-2023 - http://www.videolan.org/x264.html - options: cabac=1 ref=3 deblock=1:0:0 analyse=0x3:0x113 me=hex subme=7 psy=1 psy_rd=1.00:0.00 mixed_ref=1 me_range=16 chroma_me=1 trellis=1 8x8dct=1 cqm=0 deadzone=21,11 fast_pskip=1 chroma_qp_offset=-2 threads=9 lookahead_threads=1 sliced_threads=0 nr=0 decimate=1 interlaced=0 bluray_compat=0 constrained_intra=0 bframes=3 b_pyramid=2 b_adapt=1 b_bias=0 direct=1 weightb=1 open_gop=0 weightp=2 keyint=250 keyint_min=23 scenecut=40 intra_refresh=0 rc_lookahead=40 rc=crf mbtree=1 crf=23.0 qcomp=0.60 qpmin=0 qpmax=69 qpstep=4 ip_ratio=1.40 aq=1:1.00
Output #0, mp4, to 'E:\VideoOutput\001-sea-720-output.mp4':
  Metadata:
    major_brand     : mp42
    minor_version   : 0
    compatible_brands: isomavc1mp42
    encoder         : Lavf60.16.100
  Stream #0:0(und): Video: h264 (avc1 / 0x31637661), nv12(tv, progressive), 1280x720 [SAR 1:1 DAR 16:9], q=2-31, 23.98 fps, 24k tbn (default)
    Metadata:
      creation_time   : 2010-07-18T09:04:26.000000Z
      handler_name    : (C) 2007 Google Inc. v08.13.2007.
      vendor_id       : [0][0][0][0]
      encoder         : Lavc60.31.102 libx264
    Side data:
      cpb: bitrate max/min/avg: 0/0/0 buffer size: 0 vbv_delay: N/A
  Stream #0:1(und): Audio: aac (LC) (mp4a / 0x6134706D), 48000 Hz, stereo, fltp, 125 kb/s (default)
    Metadata:
      creation_time   : 2010-07-18T09:04:26.000000Z
      handler_name    : (C) 2007 Google Inc. v08.13.2007.
      vendor_id       : [0][0][0][0]
[out#0/mp4 @ 0000011d54d7b800] video:40779kB audio:3029kB subtitle:0kB other streams:0kB global headers:0kB muxing overhead: 0.304698%
frame= 4749 fps= 64 q=-1.0 Lsize=   43941kB time=00:03:17.94 bitrate=1818.5kbits/s speed=2.69x
[libx264 @ 0000011d54f90f80] frame I:42    Avg QP:19.36  size: 42681
[libx264 @ 0000011d54f90f80] frame P:1389  Avg QP:22.32  size: 15847
[libx264 @ 0000011d54f90f80] frame B:3318  Avg QP:23.60  size:  5410
[libx264 @ 0000011d54f90f80] consecutive B-frames:  6.2%  1.2%  1.8% 90.7%
[libx264 @ 0000011d54f90f80] mb I  I16..4: 23.2% 66.8% 10.0%
[libx264 @ 0000011d54f90f80] mb P  I16..4:  7.0% 18.0%  1.2%  P16..4: 35.4%  9.8%  3.8%  0.0%  0.0%    skip:24.8%
[libx264 @ 0000011d54f90f80] mb B  I16..4:  0.9%  1.4%  0.1%  B16..8: 32.0%  4.5%  0.5%  direct: 3.8%  skip:56.8%  L0:44.7% L1:49.4% BI: 5.8%
[libx264 @ 0000011d54f90f80] 8x8 transform intra:66.8% inter:87.2%
[libx264 @ 0000011d54f90f80] coded y,uvDC,uvAC intra: 42.5% 74.2% 26.7% inter: 13.5% 22.6% 1.1%
[libx264 @ 0000011d54f90f80] i16 v,h,dc,p: 19% 27%  4% 49%
[libx264 @ 0000011d54f90f80] i8 v,h,dc,ddl,ddr,vr,hd,vl,hu: 15% 21% 19%  5%  9%  7% 10%  6%  7%
[libx264 @ 0000011d54f90f80] i4 v,h,dc,ddl,ddr,vr,hd,vl,hu: 22% 26% 13%  5% 10%  7%  9%  5%  4%
[libx264 @ 0000011d54f90f80] i8c dc,h,v,p: 47% 25% 15% 13%
[libx264 @ 0000011d54f90f80] Weighted P-Frames: Y:16.7% UV:4.5%
[libx264 @ 0000011d54f90f80] ref P L0: 53.9% 13.3% 19.4% 12.2%  1.3%
[libx264 @ 0000011d54f90f80] ref B L0: 88.5%  8.1%  3.4%
[libx264 @ 0000011d54f90f80] ref B L1: 96.6%  3.4%
[libx264 @ 0000011d54f90f80] kb/s:1686.52

Process finished with exit code 0
从上面的代码中我们可以看出,运行是成功了的。
07-2-使用GPU进行硬件加速的代码
用下面的代码进行测试:
import ffmpeg

input_file = "E:\\Download\\001-sea.mp4"
output_file = "E:\\VideoOutput\\001-sea-720-output.mp4"

# 使用 ffmpeg-python 进行视频转码
ffmpeg.input(input_file, hwaccel='nvdec').output(
    output_file,
    vcodec='h264_nvenc',  # 使用NVIDA进行h264解码
    acodec='copy',  # 音频原样复制
    vf='scale=-2:720',   # 高度限制为720P
    strict='experimental'
).run(
结果报错:
ffmpeg version 6.1-essentials_build-www.gyan.dev Copyright (c) 2000-2023 the FFmpeg developers
  built with gcc 12.2.0 (Rev10, Built by MSYS2 project)
  configuration: --enable-gpl --enable-version3 --enable-static --pkg-config=pkgconf --disable-w32threads --disable-autodetect --enable-fontconfig --enable-iconv --enable-gnutls --enable-libxml2 --enable-gmp --enable-bzlib --enable-lzma --enable-zlib --enable-libsrt --enable-libssh --enable-libzmq --enable-avisynth --enable-sdl2 --enable-libwebp --enable-libx264 --enable-libx265 --enable-libxvid --enable-libaom --enable-libopenjpeg --enable-libvpx --enable-mediafoundation --enable-libass --enable-libfreetype --enable-libfribidi --enable-libharfbuzz --enable-libvidstab --enable-libvmaf --enable-libzimg --enable-amf --enable-cuda-llvm --enable-cuvid --enable-ffnvcodec --enable-nvdec --enable-nvenc --enable-dxva2 --enable-d3d11va --enable-libvpl --enable-libgme --enable-libopenmpt --enable-libopencore-amrwb --enable-libmp3lame --enable-libtheora --enable-libvo-amrwbenc --enable-libgsm --enable-libopencore-amrnb --enable-libopus --enable-libspeex --enable-libvorbis --enable-librubberband
  libavutil      58. 29.100 / 58. 29.100
  libavcodec     60. 31.102 / 60. 31.102
  libavformat    60. 16.100 / 60. 16.100
  libavdevice    60.  3.100 / 60.  3.100
  libavfilter     9. 12.100 /  9. 12.100
  libswscale      7.  5.100 /  7.  5.100
  libswresample   4. 12.100 /  4. 12.100
  libpostproc    57.  3.100 / 57.  3.100
Input #0, mov,mp4,m4a,3gp,3g2,mj2, from 'E:\Download\001-sea.mp4':
  Metadata:
    major_brand     : mp42
    minor_version   : 0
    compatible_brands: isomavc1mp42
    creation_time   : 2010-07-18T09:04:26.000000Z
  Duration: 00:03:18.07, start: 0.000000, bitrate: 20261 kb/s
  Stream #0:0[0x1](und): Audio: aac (LC) (mp4a / 0x6134706D), 48000 Hz, stereo, fltp, 125 kb/s (default)
    Metadata:
      creation_time   : 2010-07-18T09:04:26.000000Z
      handler_name    : (C) 2007 Google Inc. v08.13.2007.
      vendor_id       : [0][0][0][0]
  Stream #0:1[0x2](und): Video: h264 (High) (avc1 / 0x31637661), yuv420p(progressive), 4096x2304 [SAR 1:1 DAR 16:9], 20133 kb/s, 23.98 fps, 23.98 tbr, 24k tbn (default)
    Metadata:
      creation_time   : 2010-07-18T09:04:26.000000Z
      handler_name    : (C) 2007 Google Inc. v08.13.2007.
      vendor_id       : [0][0][0][0]
Stream mapping:
  Stream #0:1 -> #0:0 (h264 (native) -> h264 (h264_nvenc))
  Stream #0:0 -> #0:1 (copy)
Press [q] to stop, [?] for help
[h264_nvenc @ 000002abad990f80] Cannot load nvEncodeAPI64.dll
[h264_nvenc @ 000002abad990f80] The minimum required Nvidia driver for nvenc is (unknown) or newer
[vost#0:0/h264_nvenc @ 000002abad990cc0] Error while opening encoder - maybe incorrect parameters such as bit_rate, rate, width or height.
Error while filtering: Operation not permitted
[out#0/mp4 @ 000002abad77b7c0] Nothing was written into output file, because at least one of its streams received no packets.
frame=    0 fps=0.0 q=0.0 Lsize=       0kB time=00:00:00.49 bitrate=   0.0kbits/s speed=3.08x
Conversion failed!
Traceback (most recent call last):
  File "E:\Python_project\P_001\A-TEMP\P-0001.py", line 7, in <module>
    ffmpeg.input(input_file, hwaccel='nvdec').output(
  File "C:\Users\Administrator\AppData\Local\Programs\Python\Python39\lib\site-packages\ffmpeg\_run.py", line 325, in run
    raise Error('ffmpeg', out, err)
ffmpeg._run.Error: ffmpeg error (see stderr output for detail)
从上面的报错来看,错误的原因在于“Cannot load nvEncodeAPI64.dll”,网上查了下原因,大概率是显卡版本太老而造成驱动程序中没有这个DLL文件造成的。

我在另一台今年购买的笔记本上测试就一点问题没有。
