ubuntu18使用preseed文件定制ISO镜像实现自动化安装
需求
通常在安装ubuntu操作系统时,需要手工去选择安装过程中出现的问题,如地区、网络、分区等的设置。但是当需要大批量安装操作系统时,手工的方式就会很繁琐,效率低下,因此就有了自动化安装的需求。
ubuntu提供的方案是通过设置preseed文件对上述问题直接设置答案或者直接跳过的方式实现全自动化安装(注:官方下载的ubuntu-18.04.5-server-amd64.iso安装时如无特殊情况就是自动安装的,是因为内置了preseed文件)
本次制作主要解决的问题:
- 1、多网卡自动选择
- 2、多硬盘自动选择
- 3、自定义shell脚本执行
- 4、grub自动选择安装
- 其他配置不做特殊说明,属于常规内容
看下preseed文件所在iso中的位置

这是对iso镜像中包含的内容

除了custom.seed,其他均是自带的
注:本次安装是通过添加preseed文件后重新构建iso镜像(也就是通过CD的方式)实现自动化安装系统
环境
1、服务器一台(虚拟机),可联网
2、操作系统: ubuntu-18.04.5-server-amd64
3、iso镜像:ubuntu-18.04.5-server-amd64.iso
4、vmware-15.5
5、制作系统架构:amd64(下一步制作arm)
实现
定制过程说明
1、将ISO中内容复制出来
2、创建 custom.seed 文件,名称自定
3、修改 isolinux.cfg,让其识别自定义的preseed文件
4、修改 grub.cfg,让其识别自定义的preseed文件
5、apt离线源制作及shell脚本编写
6、制作ISO,使用的工具为mkisofs
具体实现
1、拷贝ubuntu-18.04.5-server-amd64.iso镜像至服务器任意路径,本文全部以 /home/hy 目录为准
2、挂载拷贝iso文件
mkdir /home/hy/mnt  # 用于挂载iso镜像
mkdir /home/hy/livecd  # 将iso内容拷贝到这里
mount ubuntu-18.04.5-server-amd64.iso /home/hy/mnt # 挂载之后可以看到mnt内有文件了
cp -rT /home/hy/mnt/ /home/hy/livecd  # 拷贝出来到livecd目录内,便于后边修改
3、编辑custom.seed文件 重点
vim /home/hy/livecd/preseed/custom.seed
涉及内容如下:
# Language:
d-i     debian-installer/locale     string en_US.UTF-8
# Keyboard selection.
d-i     console-setup/ask_detect     boolean false
d-i     console-setup/layoutcode     string us

# Suggest LVM by default.
d-i     partman-auto/init_automatically_partition       string some_device_lvm
d-i     partman-auto/init_automatically_partition       seen false
# 多硬盘情况下,这里设置选择 /dev/sda,即第一个硬盘
d-i     partman-auto/disk	string /dev/sda
# 可供设置参数有lvm、regular(常规)、crypto(加密)
d-i     partman-auto/method     string lvm
d-i     partman-lvm/confirm     boolean true
d-i     partman/choose_partition     select finish
d-i     partman-lvm/confirm_nooverwrite     boolean true
d-i     partman-auto-lvm/guided_size     string max
# 可选参数,atomic(所有文件在一个分区)、home、multi
d-i     partman-auto/choose_recipe     select atomic
# 下述配置使得partman无需确认即可自动分区
d-i     partman-partitioning/confirm_write_new_label     boolean true
d-i     partman/choose_partition     select finish
d-i     partman/confirm     boolean true
d-i     partman/confirm_nooverwrite     boolean true

# Install the Ubuntu Server seed.
tasksel tasksel/force-tasks     string server
# Only install basic language packs. Let tasksel ask about tasks.
d-i     pkgsel/language-pack-patterns   string
# No language support packages.
d-i     pkgsel/install-language-support boolean false
# Only ask the UTC question if there are other operating systems installed.
d-i     clock-setup/utc boolean true
d-i     time/zone string Asia/Shanghai
# Verbose output and no boot splash screen.
d-i     debian-installer/quiet  boolean false
d-i     debian-installer/splash boolean false
# Wait for two seconds in grub
d-i     grub-installer/timeout  string 2

# netcfg will choose an interface that has link if possible. This makes it
# skip displaying a list if there is more than one interface.
# 多网卡时自动选择
d-i netcfg/choose_interface select auto

# Any hostname and domain names assigned from dhcp take precedence over
# values set here. However, setting the values still prevents the questions
# from being shown, even if values come from dhcp.
d-i netcfg/get_hostname string com-aarch64
d-i netcfg/get_domain string com-aarch64

# If you want to force a hostname, regardless of what either the DHCP
# server returns or what the reverse DNS entry for the IP is, uncomment
# and adjust the following line.
d-i netcfg/hostname string com-aarch64

## Individual additional packages to install
d-i     tasksel/first       multiselect openssh-server
# 这里预装了openssh-server和vim
d-i     pkgsel/include     string openssh-server vim

## set root password
d-i passwd/root-login boolean true
d-i passwd/root-password password abcd@1234
d-i passwd/root-password-again password abcd@1234
d-i user-setup/allow-password-weak boolean true
## creat user
d-i passwd/make-user boolean false

# Start ufw automatically?
ufw     ufw/enable      boolean false

# Open-SSH Server
openssh-server  openssh-server/permit-root-login        boolean true
openssh-server  openssh-server/password-authentication  boolean true

### Mirror settings
# If you select ftp, the mirror/country string does not need to be set.
# d-i mirror/protocol string ftp
# d-i mirror/country string manual
# d-i mirror/http/hostname string archive.ubuntu.com
# d-i mirror/http/directory string /ubuntu
d-i mirror/http/proxy string

# Policy for applying updates. May be "none" (no automatic updates),
# "unattended-upgrades" (install security updates automatically), or
# "landscape" (manage system with Landscape).
d-i pkgsel/update-policy select none

# grub在x86架构时设置,自动选择
# This is fairly safe to set, it makes grub install automatically to the MBR
# if no other operating system is detected on the machine.
d-i grub-installer/only_debian boolean true
# Due notably to potential USB sticks, the location of the MBR can not be
# determined safely in general, so this needs to be specified:
d-i grub-installer/bootdev  string /dev/sda


# Avoid that last message about the install being complete.
d-i finish-install/reboot_in_progress note

# This is how to make the installer shutdown when finished, but not
# reboot into the installed system.
d-i debian-installer/exit/poweroff  boolean true

# run script,最后执行一些脚本用于自动安装软件
d-i preseed/late_command string cp /cdrom/custom/install_software.sh /target/opt/;cp /cdrom/custom/offline-packages.tar.gz /target/opt;chroot /target chmod +x /opt/install_software.sh;chroot /target bash /opt/install_software.sh
每个配置项的含义需要看注释及 https://help.ubuntu.com/lts/installation-guide/example-preseed.txt 中的解释,没办法都是英文,还是要去啃的。
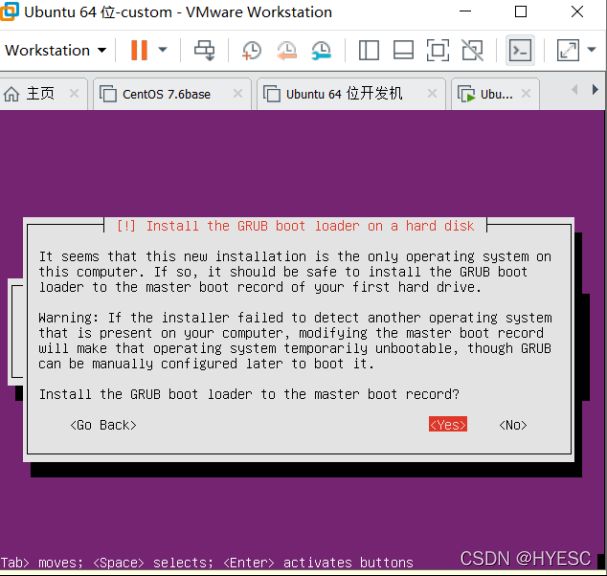
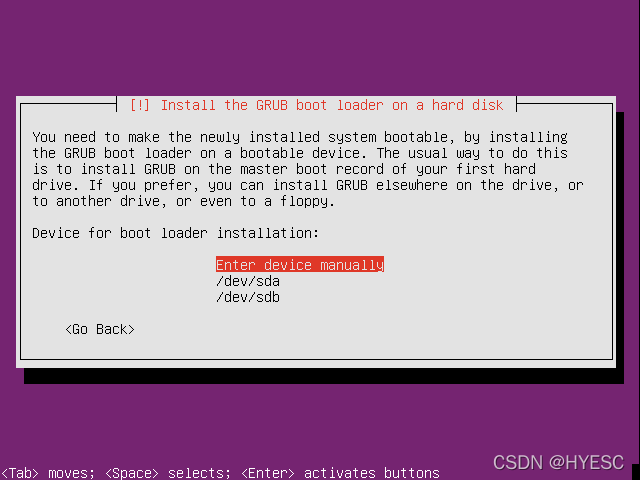
特别说明,如果是x86架构时,会遇到GRUB的问题,如下图所示:
install the grub boot loader on a hard disk
install the GRUB boot loader to the master boot record?
install the grub boot loader on a hard disk
Device for boot loader installation:
d-i grub-installer/only_debian boolean true
d-i grub-installer/bootdev  string /dev/sda
配置文件中最后一行有两个文件:install_software.sh和offline-packages.tar.gz
其中offline-packages.tar.gz是要安装的软件的apt离线源,具体创建过程见 ubuntu apt-get离线源制作
install_software.sh则是安装软件的脚本,具体内容如下,这里仅仅作为演示说明一些问题而用:
# 创建离线apt本地源
function create_offline_repo(){
    tar -xvf /opt/offline-packages.tar.gz -C /opt
    cp /etc/apt/sources.list /etc/apt/sources.list.bak
    for repo in $(ls /etc/apt/sources.list.d/*.list);
    do
        mv /etc/apt/sources.list.d/${repo} /etc/apt/sources.list.d/${repo}.bak
    done

    echo "deb  [trusted=yes]  file:///opt/offline-packages archives/" > /etc/apt/sources.list
    unset DEBCONF_REDIR
    unset DEBCONF_FRONTEND
    unset DEBIAN_HAS_FRONTEND
    unset DEBIAN_FRONTEND
    apt-get clean all
    apt-get update
}
# 安装软件
function install_apt(){
    echo "base env"
    apt install -y chrony wget logrotate crudini git chrony
    apt install -y python-dev python3 python3-pip python3-dev python3-selinux

    echo "docker"
    apt install -y bridge-utils docker.io  python3-cffi build-essential libssl-dev libffi-dev docker-compose
    apt install -y apt-transport-https ca-certificates gnupg-agent memcached
}
create_offline_repo
install_apt
放出代码的重点在于以下四行:
    unset DEBCONF_REDIR
    unset DEBCONF_FRONTEND
    unset DEBIAN_HAS_FRONTEND
    unset DEBIAN_FRONTEND
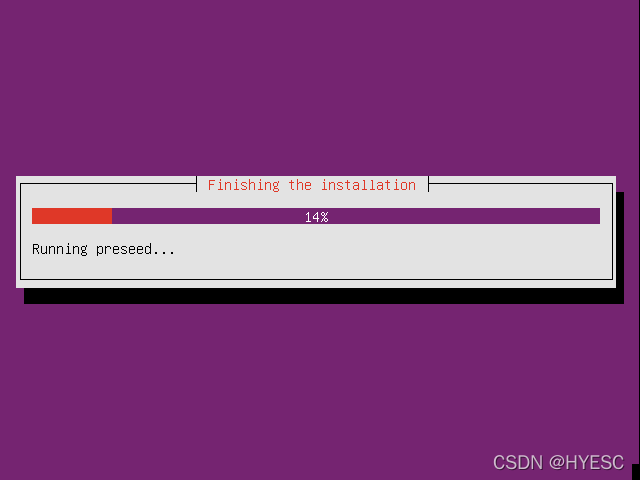
如果不在apt安装软件之前取消以上环境变量,会导致安装时卡死在如下界面,如果是正常的会在此处安装自定义的软件,需要等待片刻就会继续安装:

Finishing the installation Running preseed...
4、编辑grub.cfg文件
cd /home/hy/livecd/boot/grub
vim grub.cfg
改为如下内容
if loadfont /boot/grub/font.pf2 ; then
	set gfxmode=auto
	insmod efi_gop
	insmod efi_uga
	insmod gfxterm
	terminal_output gfxterm
fi

set menu_color_normal=white/black
set menu_color_highlight=black/light-gray

set timeout=30
menuentry "Install Ubuntu-custom Server" {
	set gfxpayload=keep
	linux	/install/vmlinuz  file=/cdrom/preseed/custom.seed quiet ---
	initrd	/install/initrd.gz
}
menuentry "Check disc for defects" {
        set gfxpayload=keep
        linux   /install/vmlinuz  MENU=/bin/cdrom-checker-menu quiet ---
        initrd  /install/initrd.gz
}
menuentry "Rescue a broken system" {
        set gfxpayload=keep
        linux   /install/vmlinuz  rescue/enable=true ---
        initrd  /install/initrd.gz
}
注意将file改为自己的路径
4、编辑isolinux.cfg文件
cd /home/hy/livecd/isolinux
vim isoliunx.cfg
# D-I config version 2.0
# search path for the c32 support libraries (libcom32, libutil etc.)
path
include menu.cfg
default vesamenu.c32
prompt 0
timeout 300
ui gfxboot bootlogo
label autoinstall
menu label autoinstall - auto install customcd
kernel /install/vmlinuz
append initrd=/install/initrd.gz file=/cdrom/preseed/custom.seed boot=install debian-installer/locale=en_US.UTF-8 console-setup/ask_detect=false keyboard-configuration/layoutcode=us automatic-ubiquity quiet splash --
主要就是添加了一个label,在安装时主页展示可选项时会显示这里定义的label
5、制作iso镜像
mkisofs -U -r -v -T -J -joliet-long -V "Custom CD" \
        -volset "Custom CD" \
        -A "Custom CD" -b isolinux/isolinux.bin \
        -c isolinux/boot.cat -no-emul-boot \
        -boot-load-size 4 -boot-info-table \
        -eltorito-alt-boot -iso-level 3 -allow-limited-size \
        -e boot/grub/efi.img -no-emul-boot \
        -o ./custom.iso ./livecd/
注:不要试图使用windows的UltralSO来制作,会失败
参考链接
本次安装是从零开始的,操作前完全不知道何为preseed,因此走了很多弯路,收获也颇丰。
这种资料国内互联网上真的不多,写的也是一言难尽,不清不楚。所有问题的解决方案多数都是参考官方的文档来解决的,这里只将有价值的链接放在这里供大家参考
1、InstallCDCustomization
2、Create Preseed Installation File
3、附录 B. 使用预置自动进行安装
4、Ubuntu ISO定制
5、example-preseed.txt 这是配置preseed文件的关键参考内容
6、ubuntu preseed无人应答安装
about
欢迎关注我的博客

