单接口测试及数据驱动
以登录为例:
登录接口封装:
# 接口对象层:接口对象的封装调用
# 接口信息
# 验证码:http://kdtx-test.itheima.net/api/captchaImage
# 方法:get

# 登录: http://kdtx-test.itheima.net/api/login
# 方法:Post
# 请求数据:
# 请求头: Content-Type: application/json
# 请求体:("username":"admin","password":"HM_2023_test","code":"2","uuid":"验证码接口返回数据")


# 接口封装时,重点是依据接口文档封装接口信息,需要使用的测试数据是从测试用例传递的、接口方法被调用时需要返回对应的响应结果

# 导包
import requests

# 创建接口类
class LoginAPI:
    # 初始化
    def __init__(self):
        # 指定url信息
        self.url_verify = "http://kdtx-test.itheima.net/api/captchaImage"
        self.url_login = "http://kdtx-test.itheima.net/api/login"

    # 验证码
    def get_verify_code(self):
        return requests.get(url=self.url_verify)

    # 登录
    def login(self, test_data):
        return requests.post(url=self.url_login, json=test_data)
测试脚本:
# 导包
from api.login import LoginAPI


# 创建测试类
class TestLoginAPI:
    # 初始化
    uuid = None

    # 前置处理    setup()函数主要是进行测试前的初始化工作,比如:在接口测试前面做一些前置的参数赋值,数据库操作等等。
    def setup(self):
        # 实例化接口类
        self.login_api = LoginAPI()
        # 获取验证码
        response = self.login_api.get_verify_code()
        print(response.json())
        # 提取验证码接口返回的uuid参数值
        TestLoginAPI.uuid = response.json().get("uuid")
        print(TestLoginAPI)

    # 后置处理   teardown()函数是测试后的清除工作,比如:参数还原或销毁,数据库的还原恢复等
    def teardown(self):
        pass

    # 登陆成功
    def test01_success(self):
        login_data={
            "username": "admin",
            "password": "HM_2023_test",
            "code": "2",
            "uuid": TestLoginAPI.uuid
        }
        response = self.login_api.login(test_data=login_data)
        # 断言响应状态码为200
        assert 200 == response.status_code
        # 断言响应数据中包含“成功”
        assert '成功' in response.text
        # 断言响应json数据中的code值
        assert 200 == response.json().get("code")

    # 登陆失败(用户名为空)
    def test02_without_uername(self):
        login_data = {
            "username": "",
            "password": "HM_2023_test",
            "code": "2",
            "uuid": TestLoginAPI.uuid
        }
        response = self.login_api.login(test_data=login_data)
        # 断言响应状态码为200
        assert 200 == response.status_code    # 相等断言
        # 断言响应数据中包含“错误”
        assert '错误' in response.text    # 包含断言
        # 断言响应json数据中的code值
        assert 500 == response.json().get("code")

    # 登陆失败(未注册用户)
    def test03_username_no_exist(self):
        login_data = {
            "username": "qazwsx",
            "password": "HM_2023_test",
            "code": "2",
            "uuid": TestLoginAPI.uuid
        }
        response = self.login_api.login(test_data=login_data)
        # 断言响应状态码为200
        assert 200 == response.status_code
        # 断言响应数据中包含“错误”
        assert '错误' in response.text
        # 断言响应json数据中的code值
        assert 500 == response.json().get("code")
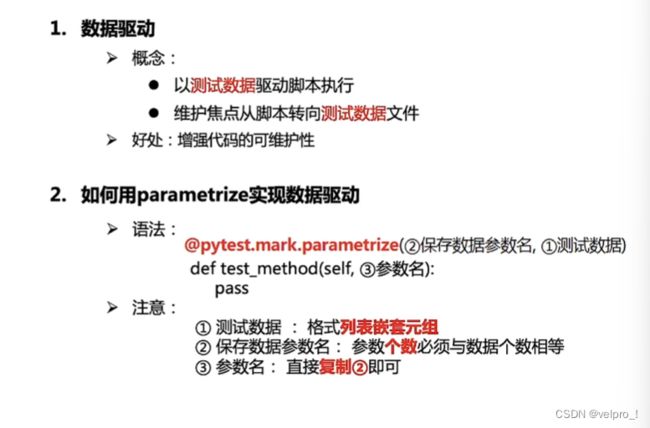
当测试用例过多或需要修改测试数据时,此方法可维护性就比较差,那么就需要使用数据驱动
数据驱动 : 以测试数据驱动脚本执行,维护焦点从脚本转向测试数据的一种自动化
测试设计模式。实现测试数据与测试代码分开管理。
需要引入pytest:import pytest
数据驱动代码:
# 导包
from api.login import LoginAPI
import pytest
import json


# 测试数据   --------- 需要放在json文件中
# test_data = {
#     ("admin", "HM_2023_test", 200, "成功", 200),
#     ("", "HM_2023_test", 200, "错误", 500),
#     ("qazwsx", "HM_2023_test", 200, "错误", 500)
# }

# 读取json数据文件
def build_data(json_file):
    # 定义空列表
    test_data = []

    # 打开json文件
    with open(json_file, "r", encoding="UTF-8") as f:
        # 加载json文件数据
        json_data = json.load(f)

        # 循环遍历测试数据
        for case_data in json_data:
            # 转换数据格式[{},{}] ==> [(),()]
            username = case_data.get("username")
            password = case_data.get("password")
            status = case_data.get("status")
            message = case_data.get("message")
            code = case_data.get("code")
            test_data.append((username, password, status, message, code))

    # 返回处理后的测试数据
    return test_data


# 创建测试类
class TestLoginAPI:
    # 初始化
    uuid = None

    # 前置处理    setup()函数主要是进行测试前的初始化工作,比如:在接口测试前面做一些前置的参数赋值,数据库操作等等。
    def setup(self):
        # 实例化接口类
        self.login_api = LoginAPI()
        # 获取验证码
        response = self.login_api.get_verify_code()
        print(response.json())
        # 提取验证码接口返回的uuid参数值
        TestLoginAPI.uuid = response.json().get("uuid")
        print(TestLoginAPI)

    # 后置处理   teardown()函数是测试后的清除工作,比如:参数还原或销毁,数据库的还原恢复等
    def teardown(self):
        pass

    # 登陆成功
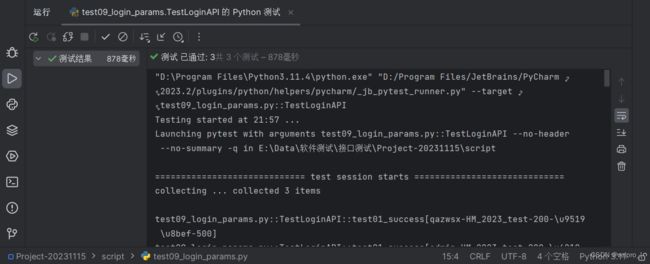
    # @pytest.mark.parametrize("username,password,status,message,code", test_data)
    @pytest.mark.parametrize("username,password,status,message,code", build_data(json_file="../data/login.json"))
    def test01_success(self, username, password, status, message, code):
        login_data = {
            "username": username,
            "password": password,
            "code": "2",
            "uuid": TestLoginAPI.uuid
        }
        response = self.login_api.login(test_data=login_data)
        # 断言响应状态码为200
        assert status == response.status_code
        # 断言响应数据中包含“成功”
        assert message in response.text
        # 断言响应json数据中的code值
        assert code == response.json().get("code")
json文件:
[
  {
    "username": "admin",
    "password": "HM_2023_test",
    "status": 200,
    "message": "成功",
    "code": 200
  },
  {
    "username": "",
    "password": "HM_2023_test",
    "status": 200,
    "message": "错误",
    "code": 500
  },
  {
    "username": "qazwsx",
    "password": "HM_2023_test",
    "status": 200,
    "message": "错误",
    "code": 500
  }
]
断言正确结果:
有参数时:
接口封装:
# 课程模块接口封装:核心在于依据接口文档实现接口信息封装、重点关注接口如何被调用
# URL:http://kdtx-test.itheima.net/api/clues/course
# 方法:Post
# 请求数据:
# 请求头:{"Content-Type":"application/json","Authorization":"xxx"}
# 请求体:{"name": "测试开发提升课01","subject": "6","price": 899,"applicablePerson": "2","info": "测试开发提升课01"}


# 导包
import requests


# 创建接口类
class CourseAPI:
    # 初始化
    def __init__(self):
        self.url_add_course = "http://kdtx-test.itheima.net/api/clues/course"
        # 参数在后面拼接
        self.url_select_course="http://kdtx-test.itheima.net/api/clues/course/list"

    # 课程添加
    def add_course(self, test_data, token):
        return requests.post(url=self.url_add_course, json=test_data, headers={"Authorization": token})

    # 查询课程列表
    def select_course(self,test_data,token):
        return requests.get(url=self.url_select_course + f"/{test_data}",headers={"Authorization": token})
脚本:
# 导包
from api.course import CourseAPI
from api.login import LoginAPI


# 创建测试类
class TestAddCourse:
    # 初始化
    TOKEN = None

    # 前置处理
    def setup(self):
        # 初始化接口类
        self.login_api = LoginAPI()
        self.course_api = CourseAPI()
        # 登录成功
        # 获取验证码
        res_v = self.login_api.get_verify_code()
        # 登录
        login_data = {
            "username": "admin",
            "password": "HM_2023_test",
            "code": "2",
            "uuid": res_v.json().get("uuid")
        }
        res_l = self.login_api.login(test_data=login_data)
        TestAddCourse.TOKEN = res_l.json().get("token")
        print(TestAddCourse.TOKEN)

    # 查询存在的课程 --------- 参数拼接
    def test01_select_success(self):
        response = self.course_api.select_course(test_data="?name=测试开发提升课01", token=TestAddCourse.TOKEN)
        # print(response.json())
        # 断言
        assert 200 == response.status_code  # 响应状态码
        assert "成功" in response.text  # msg指定文字
        assert 200 == response.json().get("code")  # json返回数据中的code值

    # 查询失败(用户未登录)   --------- 参数拼接
    def test02_selectt_fail(self):
        response = self.course_api.select_course(test_data="?subject=6", token="xxx")
        # print(response.json())
        # 断言
        assert 200 == response.status_code  # 响应状态码
        assert "失败" in response.text  # msg指定文字
        assert 401 == response.json().get("code")  # json返回数据中的code值


