图灵日记之链表
链表
- 概念和结构
- 接口实现(仅供参考)
-
- SList.h
- SList.cpp
- main.cpp(测试)
- 接口函数讲解
-
- BuySLTNode函数
- PushFront函数
- PushTail函数
- 打印Print函数
- PopBack函数
- PopFront函数
- 查找函数
- 修改函数
- 任意插入函数
- 任意删除函数
- 析构函数
概念和结构
概念:链表是一种物理存储结构上非连续,非顺序的存储结构,数据元素的逻辑顺序是通过链表中的指针链接次序实现的
接口实现(仅供参考)
接口实现无非是增删改查,并进行部分的细分功能:尾插,头插,头删等等
SList.h
#pragma once
#include SList.cpp
#include "SList.h"
void SLTNode::BuySLTNode(SLTNode*& newnode, Element val)
{
	newnode = (SLTNode*)malloc(sizeof(SLTNode));
	newnode->_next = nullptr;
	newnode->_e = val;
}

void SLTNode::PushFront(Element val, SLTNode*& head)
{
	SLTNode* newnode;
	this->BuySLTNode(newnode, val);
	newnode->_next = head;
	head = newnode;
}

void SLTNode::PushTail(Element val, SLTNode*& head)
{
	SLTNode* newnode;
	this->BuySLTNode(newnode, val);
	if (head == nullptr)
	{
		head = newnode;
		return;
	}
	SLTNode* tem = head;
	while (tem->_next != nullptr)
	{
		tem = tem->_next;
	}
	tem->_next = newnode;
}

void SLTNode::Print()
{
	if (this != nullptr)
	{
		SLTNode* tem = this;
		while (tem != nullptr)
		{
			cout << tem->_e << " ";
			tem = tem->_next;
		}
		cout << endl;
	}
}

void SLTNode::PopBack(SLTNode*& head)
{
	if (this == nullptr) return;
	if (this->_next == nullptr)
	{
		free(this);
		head = nullptr;
	}
	else
	{
		SLTNode* tem = this;
		while (tem->_next->_next!=nullptr)
		{
			tem = tem->_next;
		}
		free(tem->_next);
		tem->_next = nullptr;
	}
}

void SLTNode::PopFront(SLTNode*& head)
{
	if (head == nullptr) return;
	SLTNode* tem = head;
	head = head->_next;
	free(tem);
	tem = nullptr;
}

SLTNode*& SLTNode::Find(Element val)
{
	SLTNode* p = this;
	while (p != nullptr)
	{
		if (p->_e == val)
			return p;
		p = p->_next;
	}
	p = nullptr;
	return p;
}

void SLTNode::Revise(SLTNode*& p, Element val)
{
	if (p != nullptr)
		p->_e = val;
}

void SLTNode::Insert(Element val, SLTNode* pos, SLTNode*& a)
{
	SLTNode* node;
	pos->BuySLTNode(node, val);
	if (pos == a)
	{
		node->_next = a;
		a = node;
		return;
	}
	SLTNode* p = a;
	while (p->_next != pos)
	{
		p = p->_next;
	}
	node->_next = p->_next;
	p->_next = node;
}

void SLTNode::Erase(SLTNode*& a, SLTNode*& pos)
{
	if (pos == a)
	{
		a = a->_next;
		return;
	}
	while (a->_next != pos)
		a = a->_next;
	a->_next = pos->_next;
}

SLTNode::~SLTNode()
{
	if (this != nullptr)
	{
		SLTNode* tem1 = this;
		while (tem1)
		{
			SLTNode* tem2 = tem1->_next;
			free(tem1);
			tem1 = tem2;
		}
	}
}
main.cpp(测试)
#include"SList.h"

void TestSList1()
{
	SLTNode* a = nullptr;
	//a->PushTail(1,a);
	//a->PushTail(2,a);
	//a->PushTail(3,a);
	//a->PushTail(4,a);
	//a->PushTail(5,a);
	a->PushFront(5, a);
	a->PushFront(6, a);
	a->PushFront(7, a);
	a->PushFront(8, a);
	a->PushFront(9, a);
	a->Insert(20, a->Find(9), a);
	a->Erase(a, a->Find(9));
	//a->PopFront(a);
	//a->PopFront(a);
	//a->PopFront(a);

	//a->PopBack(a);
	//a->PopBack(a);
	//a->PopBack(a);
	//a->PopBack(a);
	//a->PopBack(a);
	//a->PopBack(a);
	//a->PopBack(a);
	//a->PopBack(a);
	//a->PopBack(a);
	//a->PopBack(a);
	//a->PopBack(a);

	a->Print();
}


int main()
{
	TestSList1();

	return 0;
}
接口函数讲解
BuySLTNode函数
这个函数功能单纯就是创建节点,并给节点赋值
注意是c嘎嘎的语言,形参采用引用传值,引用就是这玩意&,此处不是取地址的意思,
可以康康博主的c++入门
void SLTNode::BuySLTNode(SLTNode*& newnode, Element val)
{
	newnode = (SLTNode*)malloc(sizeof(SLTNode));
	newnode->_next = nullptr;
	newnode->_e = val;
}
PushFront函数
头插法:
单链表中,对一个节点进行操作时,要对这个节点的地址也就是指针进行保存,因为单链表的操作是无法回头的,他只有后继节点,只能找到后面的节点,前面的节点信息没有存储,当你要对链表的一个节点进行操作时,就要站在这个节点的前一个节点来操作
void SLTNode::PushFront(Element val, SLTNode*& head)
{
	SLTNode* newnode;
	this->BuySLTNode(newnode, val);
	newnode->_next = head;
	head = newnode;
}
PushTail函数
尾插法:
你要尾插你就要用另一个指针来遍历这条链表,因为头节点也就是第一个节点是链表开始,不能改变,一旦你用头节点来遍历,我们提过单链表一去不复返,那么之前的节点我们是无法找到的,那么链表也就废了
我们此处用tem来充当导向标,他初始化值为头结点的地址,开始遍历链表
我们前文提过,当你要对链表的一个节点进行操作时,就要站在这个节点的前一个节点来操作,那么我们对最后一个节点进行操作时就要站在最后一个节点的前一个位置来进行操作
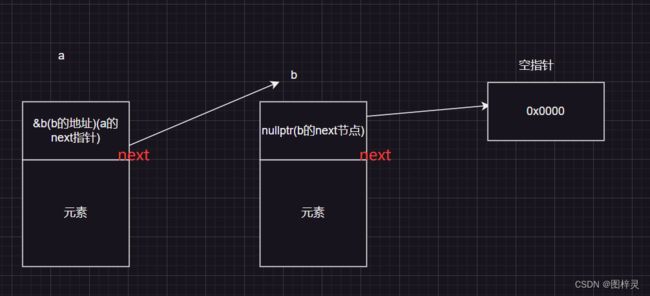
比如说a的类(与结构体类似)有b的类的地址可以指向b,b的地址是空指针,就是尾节点,我们要站在a节点的位置来进行尾插
void SLTNode::PushTail(Element val, SLTNode*& head)
{
	SLTNode* newnode;
	this->BuySLTNode(newnode, val);
	if (head == nullptr)
	{
		head = newnode;
		return;
	}
	SLTNode* tem = head;
	while (tem->_next != nullptr)
	{
		tem = tem->_next;
	}
	tem->_next = newnode;
}
尾插法因为我们提到过要先找到前一个节点才能进行,所以头结点要分出来考虑
打印Print函数
打印就是把链表遍历一遍
void SLTNode::Print()
{
	if (this != nullptr)
	{
		SLTNode* tem = this;
		while (tem != nullptr)
		{
			cout << tem->_e << " ";
			tem = tem->_next;
		}
		cout << endl;
	}
}
PopBack函数
用来尾删,与尾插类似,要考虑头结点的情况
大家在学习链表时候一定要知道指针代表的含义是什么
void SLTNode::PopBack(SLTNode*& head)
{
	if (this == nullptr) return;
	if (this->_next == nullptr)
	{
		free(this);
		head = nullptr;
	}
	else
	{
		SLTNode* tem = this;
		while (tem->_next->_next!=nullptr)
		{
			tem = tem->_next;
		}
		free(tem->_next);
		tem->_next = nullptr;
	}
}
非头结点的遍历中,要清楚你要站的位置

希望大家可以好好理解结构体的指针
PopFront函数
头删法
void SLTNode::PopFront(SLTNode*& head)
{
	if (head == nullptr) return;
	SLTNode* tem = head;
	head = head->_next;
	free(tem);
	tem = nullptr;
}
查找函数
思路就是遍历单链表,在遍历过程找到要查询元素的第一个节点位置,然后返回节点的指针
SLTNode*& SLTNode::Find(Element val)
{
	SLTNode* p = this;
	while (p != nullptr)
	{
		if (p->_e == val)
			return p;
		p = p->_next;
	}
	p = nullptr;
	return p;
}
修改函数
通过查找函数得到节点位置的地址,然后修改节点的元素
void SLTNode::Revise(SLTNode*& p, Element val)
{
	if (p != nullptr)
		p->_e = val;
}
任意插入函数
比如1 2 3 4中你要在3的位置插入6,就是1 2 6 3 4
先通过查找函数找到3的节点,插入操作依旧要站在前一个位置来进行,仿照尾删的思路:站在尾节点前面来改变后面),同理此处就是站在3节点前面插入6
void SLTNode::Insert(Element val, SLTNode* pos, SLTNode*& a)
{
	SLTNode* node;
	pos->BuySLTNode(node, val);
	if (pos == a)
	{
		node->_next = a;
		a = node;
		return;
	}
	SLTNode* p = a;
	while (p->_next != pos)
	{
		p = p->_next;
	}
	node->_next = p->_next;
	p->_next = node;
任意删除函数
void SLTNode::Erase(SLTNode*& a, SLTNode*& pos)
{
	if (pos == a)
	{
		a = a->_next;
		return;
	}
	while (a->_next != pos)
		a = a->_next;
	a->_next = pos->_next;
}
亘古不变的思路:要删除某节点,就要站在节点前面来操作,头结点特殊考虑
析构函数
在C++中,确保在对象生命周期结束后释放动态分配的内存是至关重要的.如果在使用new分配内存后不进行对应的delete,就可能导致内存泄漏,因为这部分内存是在堆上动态分配的,不会像栈上的局部变量那样在函数退出时自动释放.
SLTNode::~SLTNode()
{
	if (this != nullptr)
	{
		SLTNode* tem1 = this;
		while (tem1)
		{
			SLTNode* tem2 = tem1->_next;
			free(tem1);
			tem1 = tem2;
		}
	}
}
