使用vue init webpack <项目名称>建立项目,安装babel-polyfill(npm i babel-polyfill -S)
目录调整
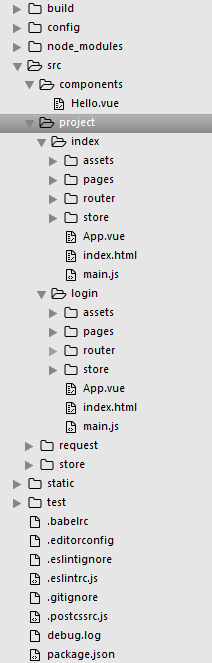
image
目录结构说明:
- 新建目录project,在这个目录下一个文件夹为一个项目,文件夹名称为项目名称,即一个文件夹为一个页面入口。如:index,login两个入口
- 将根目录中的index.html移入src/project/index/下,main.js、App.vue两个文件移入src/project/index/下
- 创建request目录,向服务端接口请求的业务都放到这个目录下,所有入口公用
- 目录components,各入口公共的模块放到这个目录下
- 目录store,放全局状态,如用户token,当前用户信息等
- project/index/建立目录:assets、pages、router、store,这些目录是各项目自理的业务、页面、模块、状态等
- 将project/index/下的目录和文件复制到project/login/目录下,多加一个入口就建一个目录,复制这些目录和文件到新入口
开始配置多入口
- build/webpack.base.conf.js
module.exports = {
  entry: {
    index: ['babel-polyfill', './src/project/index/main.js'],
    login: ['babel-polyfill', './src/project/login/main.js']
  },
  ... // 省略没有变化的代码
}
- build/webpack.dev.conf.js
原:
module.exports = merge(baseWebpackConfig, {
    ...
    // https://github.com/ampedandwired/html-webpack-plugin
    new HtmlWebpackPlugin({
      filename: 'index.html',
      template: 'index.html',
      inject: true
    }),
    new FriendlyErrorsPlugin()
  ]
})
改成:
module.exports = merge(baseWebpackConfig, {
    ...
    // https://github.com/ampedandwired/html-webpack-plugin
    new HtmlWebpackPlugin({
      filename: 'index.html',
      template: './src/project/index/index.html',
      inject: true,
      chunks: ['index']
    }),
    new HtmlWebpackPlugin({
      filename: 'login.html',
      template: './src/project/login/index.html',
      inject: true,
      chunks: ['login']
    }),
    new FriendlyErrorsPlugin()
  ]
})
- build/webpack.prod.conf.js
原:
var webpackConfig = merge(baseWebpackConfig, {
  ...
  plugins: [
    ...
    // see https://github.com/ampedandwired/html-webpack-plugin
    new HtmlWebpackPlugin({
      filename: process.env.NODE_ENV === 'testing'
        ? 'index.html'
        : config.build.index,
      template: 'index.html',
      inject: true,
      minify: {
        removeComments: true,
        collapseWhitespace: true,
        removeAttributeQuotes: true
        // more options:
        // https://github.com/kangax/html-minifier#options-quick-reference
      },
      // necessary to consistently work with multiple chunks via CommonsChunkPlugin
      chunksSortMode: 'dependency'
    }),
    // split vendor js into its own file
    ...
  ]
  ...
})
改成:
var webpackConfig = merge(baseWebpackConfig, {
  ...
  plugins: [
    ...
    // see https://github.com/ampedandwired/html-webpack-plugin
    new HtmlWebpackPlugin({
      filename: process.env.NODE_ENV === 'testing'
        ? 'index.html'
        : config.build.index,
      template: './src/project/index/index.html',
      inject: true,
      minify: {
        removeComments: true,
        collapseWhitespace: true,
        removeAttributeQuotes: true
      },
      chunksSortMode: 'dependency',
      chunks: ['manifest','vendor','index']
    }),
    new HtmlWebpackPlugin({
      filename: process.env.NODE_ENV === 'testing'
        ? 'login.html'
        : config.build.login,
      template: './src/project/login/index.html',
      inject: true,
      minify: {
        removeComments: true,
        collapseWhitespace: true,
        removeAttributeQuotes: true
      },
      chunksSortMode: 'dependency',
      chunks: ['manifest','vendor','login']
    }),
    // split vendor js into its own file
    ...
  ]
  ...
})
- config/index.js
原:
module.exports = {
  build: {
    env: require('./prod.env'),
    index: path.resolve(__dirname, '../dist/index.html'),
    assetsRoot: path.resolve(__dirname, '../dist'),
    assetsSubDirectory: 'static',
    assetsPublicPath: '/',
    productionSourceMap: true,
    // Gzip off by default as many popular static hosts such as
    // Surge or Netlify already gzip all static assets for you.
    // Before setting to `true`, make sure to:
    // npm install --save-dev compression-webpack-plugin
    productionGzip: false,
    productionGzipExtensions: ['js', 'css'],
    // Run the build command with an extra argument to
    // View the bundle analyzer report after build finishes:
    // `npm run build --report`
    // Set to `true` or `false` to always turn it on or off
    bundleAnalyzerReport: process.env.npm_config_report
  },
  dev: {
    env: require('./dev.env'),
    port: 3000,
    autoOpenBrowser: false,
    assetsSubDirectory: 'static',
    assetsPublicPath: '/',
    proxyTable: {},
    // CSS Sourcemaps off by default because relative paths are "buggy"
    // with this option, according to the CSS-Loader README
    // (https://github.com/webpack/css-loader#sourcemaps)
    // In our experience, they generally work as expected,
    // just be aware of this issue when enabling this option.
    cssSourceMap: false
  }
}
改成:
module.exports = {
  build: {
    env: require('./prod.env'),
    index: path.resolve(__dirname, '../dist/index.html'),
    login: path.resolve(__dirname, '../dist/login.html'),
    assetsRoot: path.resolve(__dirname, '../dist'),
    assetsSubDirectory: 'static',
    assetsPublicPath: '/',
    productionSourceMap: true,
    // Gzip off by default as many popular static hosts such as
    // Surge or Netlify already gzip all static assets for you.
    // Before setting to `true`, make sure to:
    // npm install --save-dev compression-webpack-plugin
    productionGzip: false,
    productionGzipExtensions: ['js', 'css'],
    // Run the build command with an extra argument to
    // View the bundle analyzer report after build finishes:
    // `npm run build --report`
    // Set to `true` or `false` to always turn it on or off
    bundleAnalyzerReport: process.env.npm_config_report
  },
  dev: {
    env: require('./dev.env'),
    port: 3000,
    autoOpenBrowser: false,
    assetsSubDirectory: 'static',
    assetsPublicPath: '/',
    proxyTable: {},
    // CSS Sourcemaps off by default because relative paths are "buggy"
    // with this option, according to the CSS-Loader README
    // (https://github.com/webpack/css-loader#sourcemaps)
    // In our experience, they generally work as expected,
    // just be aware of this issue when enabling this option.
    cssSourceMap: false
  }
}
配置完成,开始试验
- npm run dev启动项目
- 因为两个项目中的文件是复制的,内容一样,为了区分。
index/App.vue文件中加入index
login/App.vue文件中加入login
- 访问localhost:3000
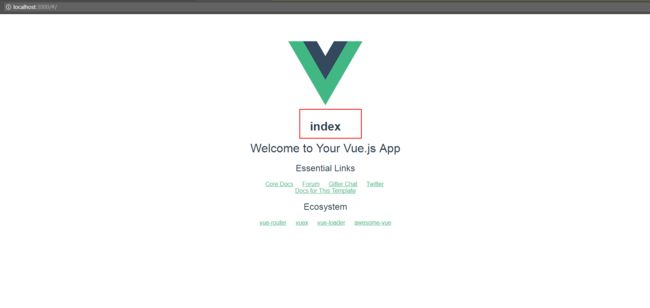
image
- 访问localhost:3000/login.html
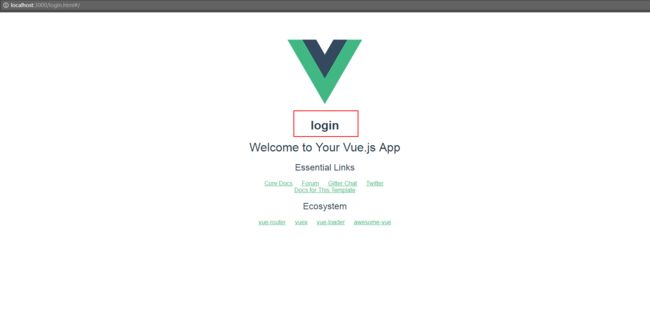
image
确认已经通过不同的入口进入不同的页面(子项目),根据各自子项目业务分别开发。
补充
- 为了方便项目中路径的访问,为项目增加别名
build/webpack.base.conf.js文件修改
module.exports = {
  ...
  resolve: {
    extensions: ['.js', '.vue', '.json'],
    alias: {
      'vue$': 'vue/dist/vue.esm.js',
      '@': resolve('src'),
      // 增加以下两行
      'index': resolve('src/project/index'),
      'login': resolve('src/project/login')
    }
  },
}
作者:碧波之心
链接:https://www.jianshu.com/p/49124deb4e14
来源:
著作权归作者所有,任何形式的转载都请联系作者获得授权并注明出处。