lvs负载均衡
lvs负载均衡群集
群集
特点:由多台主机构成,都干同一件事,对外显示一个整体
企业集群分类
- 负载均衡群集
- 高可用群集
- 高性能运算群集
负载均衡群集(LB)
负载均衡的作用
- 提高应用系统的响应能力
- 可以处理更多的访问请求,减少延迟
- 获得高并发、高负载的整体性能
负载均衡的结构(HA)
- 第一层,负载调度器
- 第二层,服务器池
- 第三层,共享存储
高可用群集(HPC)
提高应用系统的可靠性、尽可能减少中断的时间,确保服务的连续性,达到高可用的容错效果
高性能运算群集
通过云计算或分布计算获取高性能的CPU、内存等资源,来提高整体运算能力
modprobe ip_vs #加载模块
cat /proc/net/ip_vs #查看模块版本
lvs三种工作模式
- nat模式,地址转换
- IP隧道,IP Tunnel,简称TUN模式
- 直连路由,简称DR模式
DR数据流向
1、客户通过VIP将访问请求发送到调度器(源IP为客户端IP,目的IP为VIP)发送到调度器
2、调度器通过调度算法选择分发请求的节点服务器,并重新封装数据报文(将源mac改为调度器的MAC地址,目的MAC地址改为节点服务器的MAC地址)再通过交换机转发给节点服务器
3、节点服务器收到请求报文后,确认目的MAC和目的IP无误后解包并送达到应用层进行处理
4、节点服务器要返回响应报文前,会先重新封装报文(源IP为VIP,目的IP为客户端IP),再将响应报文通过10接口传送给物理网卡然后直接发送给客户端
lvs的负载调度算法
轮询
加权轮询
最少连接
加权最少连接
lvs的调度和管理ipvsadm
ipvsadm
-A 添加虚拟服务器
-D 删除整个虚拟服务器
-s 指定负载调度算法
-d 删除某一个节点
-t 指定VIP地址TCP端口
-r 指定RIP地址TCP端口
-m 表示使用nat群集模式
-g 使用DR模式
-i 使用TUN模式
-w 设置权重
-p 保持长连接60秒
-l 列表查看lvs虚拟服务器,默认查看所有
-n 以数字形式显示地址,端口等,
LVS-NAT模式配置过程

nfs 106
web 102 101
调度器 104

106
关闭防火墙
[root@localhost ~]# yum -y install rpcbind nfs-utils
[root@localhost ~]# cd /opt
[root@localhost opt]# mkdir test1 test2
[root@localhost opt]# echo 'this is test1 web page!' >test1/test.html
[root@localhost opt]# echo 'this is test2 web page!' >test2/test.html
[root@localhost opt]# vim /etc/exports
/opt/test1 192.168.65.0/24 (rw,sync,no_root_squash)
/opt/test2 192.168.65.0/24 (rw,sync,no_root_squash)

[root@localhost opt]# systemctl start rpcbind.service
[root@localhost opt]# systemctl start nfs
[root@localhost opt]# showmount -e
Export list for localhost.localdomain:
/opt/test2 (everyone)
/opt/test1 (everyone)

101
[root@www ~]#yum -y install httpd
[root@www ~]#vim /etc/httpd/conf/httpd.conf
ServerName www.test.com:80#修改主机名
KeepAlive off #关闭长连接,在最后一行加入
[root@www ~]#mount 192.168.65.106:/opt/test1 /var/www/html
[root@www ~]#df -Th
文件系统                  类型      容量  已用  可用 已用% 挂载点
/dev/mapper/centos-root   xfs        38G  5.6G   32G   15% /
devtmpfs                  devtmpfs  1.6G     0  1.6G    0% /dev
tmpfs                     tmpfs     1.6G     0  1.6G    0% /dev/shm
tmpfs                     tmpfs     1.6G  9.1M  1.6G    1% /run
tmpfs                     tmpfs     1.6G     0  1.6G    0% /sys/fs/cgroup
/dev/sda1                 xfs      1014M  179M  836M   18% /boot
/dev/mapper/centos-home   xfs        19G   33M   19G    1% /home
tmpfs                     tmpfs     326M   12K  326M    1% /run/user/42
tmpfs                     tmpfs     326M     0  326M    0% /run/user/0
192.168.65.106:/opt/test1 nfs4       38G  3.8G   34G   10% /var/www/html
[root@www ~]#systemctl start httpd.service
    x25 (CCITT X.25)
[root@www ~]#netstat -lnpt | grep 80
tcp6       0      0 :::80                   :::*                 LISTEN      4796/httpd

102
[root@localhost ~]#cd /etc/yum.repos.d/
[root@localhost yum.repos.d]#vim nginx.repo
[nginx]
name=nginx repo
baseurl=http://nginx.org/packages/centos/$releasever/$basearch/
gpgcheck=1
enabled=1
gpgkey=https://nginx.org/keys/nginx_signing.key
module_hotfixes=true

[root@localhost ~]#yum -y install nginx
[root@localhost yum.repos.d]#cd /usr/share/nginx/html
[root@localhost html]#ls
50x.html  index.html
[root@localhost html]#mv * /opt
[root@localhost html]#cd /opt
[root@localhost opt]#ls
50x.html              index.html                   rh

[root@localhost opt]#mount 192.168.65.106:/opt/test2 /usr/share/nginx/html
[root@localhost opt]#df -hT
文件系统                  类型      容量  已用  可用 已用% 挂载点
/dev/mapper/centos-root   xfs        38G  4.3G   34G   12% /
devtmpfs                  devtmpfs  1.5G     0  1.5G    0% /dev
tmpfs                     tmpfs     1.5G     0  1.5G    0% /dev/shm
tmpfs                     tmpfs     1.5G  9.1M  1.5G    1% /run
tmpfs                     tmpfs     1.5G     0  1.5G    0% /sys/fs/cgroup
/dev/mapper/centos-home   xfs        19G   33M   19G    1% /home
/dev/sda1                 xfs      1014M  179M  836M   18% /boot
tmpfs                     tmpfs     302M   12K  302M    1% /run/user/42
tmpfs                     tmpfs     302M     0  302M    0% /run/user/0
192.168.65.106:/opt/test2 nfs4       38G  3.8G   34G   10% /usr/share/nginx/html
[root@localhost opt]#cd /usr/share/nginx/html
[root@localhost html]#mv /opt/*.html .
[root@localhost html]#ls
50x.html  index.html  test.html
[root@localhost html]#systemctl start nginx
104
[root@localhost yum.repos.d]# yum -y install ipvsadm #安装ipvsadm 管理工具
添加一块网卡重启
[root@localhost ~]# ifconfig
ens33: flags=4163  mtu 1500
        inet 192.168.65.104  netmask 255.255.255.0  broadcast 192.168.65.255
        inet6 fe80::1468:e3ee:f1c7:7128  prefixlen 64  scopeid 0x20
        ether 00:0c:29:73:1c:5f  txqueuelen 1000  (Ethernet)
        RX packets 488  bytes 72686 (70.9 KiB)
        RX errors 0  dropped 0  overruns 0  frame 0
        TX packets 168  bytes 27262 (26.6 KiB)
        TX errors 0  dropped 0 overruns 0  carrier 0  collisions 0

ens36: flags=4163  mtu 1500
        inet6 fe80::e67a:e7f3:fe88:4de2  prefixlen 64  scopeid 0x20
        ether 00:0c:29:73:1c:69  txqueuelen 1000  (Ethernet)
        RX packets 4  bytes 240 (240.0 B)
        RX errors 0  dropped 0  overruns 0  frame 0
        TX packets 25  bytes 4326 (4.2 KiB)
        TX errors 0  dropped 0 overruns 0  carrier 0  collisions 0

lo: flags=73  mtu 65536
        inet 127.0.0.1  netmask 255.0.0.0
        inet6 ::1  prefixlen 128  scopeid 0x10
        loop  txqueuelen 1  (Local Loopback)
        RX packets 68  bytes 5916 (5.7 KiB)
        RX errors 0  dropped 0  overruns 0  frame 0
        TX packets 68  bytes 5916 (5.7 KiB)
        TX errors 0  dropped 0 overruns 0  carrier 0  collisions 0

virbr0: flags=4099  mtu 1500
        inet 192.168.122.1  netmask 255.255.255.0  broadcast 192.168.122.255
        ether 52:54:00:d2:63:f3  txqueuelen 1000  (Ethernet)
        RX packets 0  bytes 0 (0.0 B)
        RX errors 0  dropped 0  overruns 0  frame 0
        TX packets 0  bytes 0 (0.0 B)
        TX errors 0  dropped 0 overruns 0  carrier 0  collisions 0

[root@localhost ~]# cd /etc/sysconfig/network-scripts/
[root@localhost network-scripts]# cp ifcfg-ens33 ifcfg-ens36
[root@localhost network-scripts]# vim ifcfg-ens36
TYPE=Ethernet
PROXY_METHOD=none
BROWSER_ONLY=no
BOOTPROTO=static
DEFROUTE=yes
IPV4_FAILURE_FATAL=no
IPV6INIT=yes
IPV6_AUTOCONF=yes
IPV6_DEFROUTE=yes
IPV6_FAILURE_FATAL=no
IPV6_ADDR_GEN_MODE=stable-privacy
NAME=ens36
DEVICE=ens36
ONBOOT=yes
IPADDR=12.0.0.10
NETMASK=255.255.255.0

[root@localhost network-scripts]# vim ifcfg-ens33
TYPE=Ethernet
PROXY_METHOD=none
BROWSER_ONLY=no
BOOTPROTO=static
DEFROUTE=yes
IPV4_FAILURE_FATAL=no
IPV6INIT=yes
IPV6_AUTOCONF=yes
IPV6_DEFROUTE=yes
IPV6_FAILURE_FATAL=no
IPV6_ADDR_GEN_MODE=stable-privacy
NAME=ens33
UUID=28634140-2cd6-48f1-bf8b-2116025cbcf9
DEVICE=ens33
ONBOOT=yes
IPADDR=192.168.65.104
NETMASK=255.255.255.0
#GATEWAY=192.168.65.2
#DNS1=8.8.8.8

[root@localhost network-scripts]# systemctl restart network
[root@localhost network-scripts]# ifconfig
ens33: flags=4163  mtu 1500
        inet 192.168.65.104  netmask 255.255.255.0  broadcast 192.168.65.255
        inet6 fe80::1468:e3ee:f1c7:7128  prefixlen 64  scopeid 0x20
        ether 00:0c:29:73:1c:5f  txqueuelen 1000  (Ethernet)
        RX packets 1268  bytes 144292 (140.9 KiB)
        RX errors 0  dropped 0  overruns 0  frame 0
        TX packets 576  bytes 70962 (69.2 KiB)
        TX errors 0  dropped 0 overruns 0  carrier 0  collisions 0

ens36: flags=4163  mtu 1500
        inet 12.0.0.10  netmask 255.255.255.0  broadcast 12.0.0.255
        inet6 fe80::9c0:22b4:e61a:27eb  prefixlen 64  scopeid 0x20
        ether 00:0c:29:73:1c:69  txqueuelen 1000  (Ethernet)
        RX packets 108  bytes 13944 (13.6 KiB)
        RX errors 0  dropped 0  overruns 0  frame 0
        TX packets 89  bytes 13546 (13.2 KiB)
        TX errors 0  dropped 0 overruns 0  carrier 0  collisions 0

[root@localhost network-scripts]# vim /etc/sysctl.conf
[root@localhost network-scripts]# sysctl -p
net.ipv4.ip_forward = 1

修改101和102 网关
[root@www ~]#vim /etc/sysconfig/network-scripts/ifcfg-ens33
GATEWAY=192.168.65.104
[root@www ~]#systemctl restart network

回到104
[root@localhost network-scripts]# iptables -F
[root@localhost network-scripts]# iptables -F -t nat
[root@localhost network-scripts]# iptables -t nat -A POSTROUTING -s 192.168.65.0/24 -o ens36 -j SNAT --to 12.0.0.10
[root@localhost network-scripts]# iptables -nL -t nat
Chain PREROUTING (policy ACCEPT)
target     prot opt source               destination

Chain INPUT (policy ACCEPT)
target     prot opt source               destination

Chain OUTPUT (policy ACCEPT)
target     prot opt source               destination

Chain POSTROUTING (policy ACCEPT)
target     prot opt source               destination
SNAT       all  --  192.168.65.0/24      0.0.0.0/0            to:12.0.0.10

[root@localhost network-scripts]# modprobe ip_vs
[root@localhost network-scripts]# cat /proc/net/ip_vs
IP Virtual Server version 1.2.1 (size=4096)
Prot LocalAddress:Port Scheduler Flags
  -> RemoteAddress:Port Forward Weight ActiveConn InActConn
[root@localhost network-scripts]# for i in $(ls /usr/lib/modules/$(uname -r)/kernel/net/netfilter/ipvs|grep -o "^[^.]*");do echo $i; /sbin/modinfo -F filename $i >/dev/null 2>&1 && /sbin/modprobe $i;done
ip_vs_dh
ip_vs_ftp
ip_vs
ip_vs_lblc
ip_vs_lblcr
ip_vs_lc
ip_vs_nq
ip_vs_pe_sip
ip_vs_rr
ip_vs_sed
ip_vs_sh
ip_vs_wlc
ip_vs_wrr
[root@localhost network-scripts]# ipvsadm-save > /etc/sysconfig/ipvsadm
[root@localhost network-scripts]# systemctl start ipvsadm.service
[root@localhost network-scripts]# ipvsadm -C  #清楚原有策略
[root@localhost network-scripts]# ipvsadm -A -t 12.0.0.10:80 -s rr
[root@localhost network-scripts]# ipvsadm -ln #查看策略
IP Virtual Server version 1.2.1 (size=4096)
Prot LocalAddress:Port Scheduler Flags
  -> RemoteAddress:Port           Forward Weight ActiveConn InActConn
TCP  12.0.0.10:80 rr
[root@localhost network-scripts]# ipvsadm -a -t 12.0.0.10:80 -r 192.168.80.101:80 -m
[root@localhost network-scripts]# ipvsadm -a -t 12.0.0.10:80 -r 192.168.80.102:80 -m
[root@localhost network-scripts]# ipvsadm
IP Virtual Server version 1.2.1 (size=4096)
Prot LocalAddress:Port Scheduler Flags
  -> RemoteAddress:Port           Forward Weight ActiveConn InActConn
TCP  localhost.localdomain:http rr
  -> 192.168.80.101:http          Masq    1      0          0
  -> 192.168.80.102:http          Masq    1      0          0

在一台IP为12.0.0.12的客户机使用浏览器访问 http://12.0.0.1/test.html  不断刷新浏览器测试负载均衡效果
LVS-DR模式配置过程
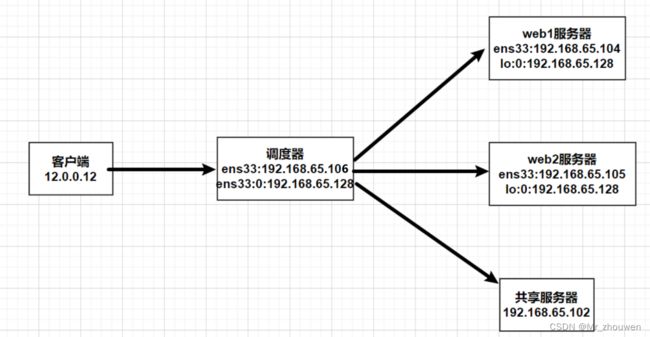
web服务器
192.168.65.104
192.168.65.105
nfs服务器
192.168.65.102
调度器
192.168.65.106
VIP地址192.168.65.128

部署共享服务器
[root@localhost ~]# yum -y install rpcbind nfs-utils
[root@localhost ~]# mkdir /var/www/html
[root@localhost ~]#cd /var/www/html
[root@localhost html]#mkdir web1 web2
[root@localhost html]# echo 'this is web1' >web1/test.html
[root@localhost html]# echo 'this is web2' >web2/test.html
[root@localhost opt]# vim /etc/exports
/opt/test1 192.168.65.0/24 (rw,sync,no_root_squash)
/opt/test2 192.168.65.0/24 (rw,sync,no_root_squash)

[root@localhost opt]# systemctl start rpcbind.service
[root@localhost opt]# systemctl start nfs
[root@localhost ~]#showmount -e
Export list for localhost.localdomain:
/var/www/html/web2 192.168.65.0/24
/var/www/html/web1 192.168.65.0/24

web服务器
104
[root@localhost ~]#yum -y install nginx   #用自己的nginx.repo安装
[root@localhost ~]# cd /usr/share/nginx/html/
[root@localhost html]# mv * /opt
[root@localhost html]# vim /etc/fstab
192.168.65.102:/var/www/html/web1 /usr/share/nginx/html nfs defaults,_netdev 0 0
[root@localhost html]# cd /opt
[root@localhost opt]# mv *.html /usr/share/nginx/html/
[root@localhost opt]# mount -a
[root@localhost opt]# cd /usr/share/nginx/html/
[root@localhost html]# ls
50x.html  index.html  test.html
[root@localhost html]# cat test.html
 this is web1
[root@localhost html]# systemctl start nginx

105
[root@localhost ~]#yum -y install nginx   #用自己的nginx.repo安装
[root@localhost ~]# cd /usr/share/nginx/html/
[root@localhost html]# mv * /opt
[root@localhost html]# vim /etc/fstab
192.168.65.102:/var/www/html/web2 /usr/share/nginx/html nfs defaults,_netdev 0 0
[root@localhost html]# cd /opt
[root@localhost opt]# mv *.html /usr/share/nginx/html/
[root@localhost opt]# mount -a
[root@localhost opt]# cd /usr/share/nginx/html/
[root@localhost html]# ls
50x.html  index.html  test.html
[root@localhost html]# cat test.html
 this is web2
[root@localhost html]# systemctl start nginx

两个web服务器同样操作
[root@localhost html]# cd /etc/sysconfig/network-scripts/
[root@localhost network-scripts]# vim ifcfg-ens33
TYPE=Ethernet
PROXY_METHOD=none
BROWSER_ONLY=no
BOOTPROTO=static
DEFROUTE=yes
IPV4_FAILURE_FATAL=no
IPV6INIT=yes
IPV6_AUTOCONF=yes
IPV6_DEFROUTE=yes
IPV6_FAILURE_FATAL=no
IPV6_ADDR_GEN_MODE=stable-privacy
NAME=ens33
UUID=28634140-2cd6-48f1-bf8b-2116025cbcf9
DEVICE=ens33
ONBOOT=yes
IPADDR=192.168.65.104
NETMASK=255.255.255.0
#GATEWAY=192.168.65.106
#DNS1=8.8.8.8

[root@localhost network-scripts]# systemctl restart network
[root@localhost network-scripts]# vim /etc/sysctl.conf
[root@localhost network-scripts]# sysctl -p
net.ipv4.conf.lo.arp_ignore = 1
net.ipv4.conf.lo.arp_announce = 2
net.ipv4.conf.all.arp_ignore = 1
net.ipv4.conf.all.arp_announce = 2
[root@localhost network-scripts]# ls
ifcfg-ens33  ifdown-isdn      ifup          ifup-plip      ifup-tunnel
ifcfg-lo     ifdown-post      ifup-aliases  ifup-plusb     ifup-wireless
ifdown       ifdown-ppp       ifup-bnep     ifup-post      init.ipv6-global
ifdown-bnep  ifdown-routes    ifup-eth      ifup-ppp       network-functions
ifdown-eth   ifdown-sit       ifup-ib       ifup-routes    network-functions-ipv6
ifdown-ib    ifdown-Team      ifup-ippp     ifup-sit
ifdown-ippp  ifdown-TeamPort  ifup-ipv6     ifup-Team
ifdown-ipv6  ifdown-tunnel    ifup-isdn     ifup-TeamPort
[root@localhost network-scripts]# vim ifcfg-lo:0
DEVICE=lo:0
ONBOOT=yes
IPADDR=192.168.65.128  #VIP地址,随便设
NETMASK=255.255.255.255	#固定的

[root@localhost network-scripts]# ifup lo:0
[root@localhost network-scripts]# ip a
1: lo:  mtu 65536 qdisc noqueue state UNKNOWN qlen 1
    link/loopback 00:00:00:00:00:00 brd 00:00:00:00:00:00
    inet 127.0.0.1/8 scope host lo
       valid_lft forever preferred_lft forever
    inet 192.168.65.128/32 brd 192.168.65.128 scope global lo:0
       valid_lft forever preferred_lft forever
    inet6 ::1/128 scope host
       valid_lft forever preferred_lft forever
2: ens33:  mtu 1500 qdisc pfifo_fast state UP qlen 1000
    link/ether 00:0c:29:38:f8:2e brd ff:ff:ff:ff:ff:ff
    inet 192.168.65.105/24 brd 192.168.65.255 scope global ens33
       valid_lft forever preferred_lft forever
    inet6 fe80::fbdd:bf23:9285:4611/64 scope link
       valid_lft forever preferred_lft forever
3: virbr0:  mtu 1500 qdisc noqueue state DOWN qlen 1000
    link/ether 52:54:00:46:82:bb brd ff:ff:ff:ff:ff:ff
    inet 192.168.122.1/24 brd 192.168.122.255 scope global virbr0
       valid_lft forever preferred_lft forever
4: virbr0-nic:  mtu 1500 qdisc pfifo_fast master virbr0 state DOWN qlen 1000
    link/ether 52:54:00:46:82:bb brd ff:ff:ff:ff:ff:ff
[root@localhost network-scripts]# route add -host 192.168.65.128 dev lo:0
#永久添加路由
#vim /etc/rc.d/rc.local
#route add -host 192.168.65.128 dev lo:0
#chmod +x /etc/rc.d/rc.local
[root@localhost network-scripts]# route -n
Kernel IP routing table
Destination     Gateway         Genmask         Flags Metric Ref    Use Iface
192.168.65.0    0.0.0.0         255.255.255.0   U     100    0        0 ens33
192.168.65.128  0.0.0.0         255.255.255.255 UH    0      0        0 lo
192.168.122.0   0.0.0.0         255.255.255.0   U     0      0        0 virbr0


调度器 106
[root@localhost ~]# systemctl stop firewalld.service
[root@localhost ~]# setenforce 0
[root@localhost ~]# cd /etc/sysconfig/network-scripts/
[root@localhost network-scripts]# vim ifcfg-ens33:0
[root@localhost network-scripts]# ifup ens33:0
[root@localhost network-scripts]# ifconfig
ens33: flags=4163  mtu 1500
        inet 192.168.65.106  netmask 255.255.255.0  broadcast 192.168.65.255
        inet6 fe80::6e6:5516:e3a5:1df5  prefixlen 64  scopeid 0x20
        ether 00:0c:29:f6:41:44  txqueuelen 1000  (Ethernet)
        RX packets 969  bytes 123656 (120.7 KiB)
        RX errors 0  dropped 0  overruns 0  frame 0
        TX packets 614  bytes 94990 (92.7 KiB)
        TX errors 0  dropped 0 overruns 0  carrier 0  collisions 0

ens33:0: flags=4163  mtu 1500
        inet 192.168.65.128  netmask 255.255.255.255  broadcast 192.168.65.128
        ether 00:0c:29:f6:41:44  txqueuelen 1000  (Ethernet)

lo: flags=73  mtu 65536
        inet 127.0.0.1  netmask 255.0.0.0
        inet6 ::1  prefixlen 128  scopeid 0x10
        loop  txqueuelen 1  (Local Loopback)
        RX packets 560  bytes 48664 (47.5 KiB)
        RX errors 0  dropped 0  overruns 0  frame 0
        TX packets 560  bytes 48664 (47.5 KiB)
        TX errors 0  dropped 0 overruns 0  carrier 0  collisions 0

virbr0: flags=4099  mtu 1500
        inet 192.168.122.1  netmask 255.255.255.0  broadcast 192.168.122.255
        ether 52:54:00:62:7b:1b  txqueuelen 1000  (Ethernet)
        RX packets 0  bytes 0 (0.0 B)
        RX errors 0  dropped 0  overruns 0  frame 0
        TX packets 0  bytes 0 (0.0 B)
        TX errors 0  dropped 0 overruns 0  carrier 0  collisions 0

[root@localhost network-scripts]# vim /etc/sysctl.conf
[root@localhost network-scripts]# sysctl -p
net.ipv4.ip_forward = 0
net.ipv4.conf.all.send_redirects = 0
net.ipv4.conf.default.send_redirects = 0
net.ipv4.conf.ens33.send_redirects = 0
[root@localhost network-scripts]#
[root@localhost network-scripts]# yum install -y ipvsadm

  正在安装    : ipvsadm-1.27-8.el7.x86_64                                                    1/1
  验证中      : ipvsadm-1.27-8.el7.x86_64                                                    1/1

已安装:
  ipvsadm.x86_64 0:1.27-8.el7

完毕!
[root@localhost network-scripts]# ipvsadm-save > /etc/sysconfig/ipvsadm
[root@localhost network-scripts]# systemctl start ipvsadm
[root@localhost network-scripts]# modprobe ip_vs
[root@localhost network-scripts]# cat /proc/net/ip_vs
IP Virtual Server version 1.2.1 (size=4096)
Prot LocalAddress:Port Scheduler Flags
  -> RemoteAddress:Port Forward Weight ActiveConn InActConn
[root@localhost network-scripts]# ipvsadm -ln
IP Virtual Server version 1.2.1 (size=4096)
Prot LocalAddress:Port Scheduler Flags
  -> RemoteAddress:Port           Forward Weight ActiveConn InActConn
[root@localhost network-scripts]# ipvsadm -C
[root@localhost network-scripts]# ipvsadm -A -t 192.168.65.128:80 -s rr
[root@localhost network-scripts]# ipvsadm -a -t 192.168.65.128:80 -r 192.168.65.104:80 -g
[root@localhost network-scripts]# ipvsadm -a -t 192.168.65.128:80 -r 192.168.65.105:80 -g
[root@localhost network-scripts]# ipvsadm
IP Virtual Server version 1.2.1 (size=4096)
Prot LocalAddress:Port Scheduler Flags
  -> RemoteAddress:Port           Forward Weight ActiveConn InActConn
TCP  localhost.localdomain:http rr
  -> 192.168.65.104:http          Route   1      0          0
  -> 192.168.65.105:http          Route   1      0          0


在浏览器输入网址http://192.168.65.128/test.html 可以查看网页,不断刷新查看负载均衡效果