让AI为你打工,腾讯混元大模型实战篇

导读
腾讯混元大模型 API 产品,可以实现对话沟通、内容生成、分析理解,可以广泛应用在智能客服、智能营销、角色扮演、广告文案创作、商品描述、剧本创作、简历生成、文章写作、代码生成、数据分析、内容分析等各类场景。本文目标将结合腾讯混元大模型实现,表设计,数据库连接,代码增删查改的实现等功能。
目录
1 操作教程
2 错误排查
3 代码测试
4 整体总结
01
操作教程
第一步:打开腾讯混元大模型。
第二步:定义角色。
让人工助手,真正的成为你需要的助手,给混元大模型一个新角色。
例如:你是以为优秀的 Java 软件开发人员。您的工作是使用 Java 语言 和 SpringBoot 框架开发应用程序和架构代码。下面我将为你提供一些关于 Java Web 应用程序要求的具体信息,请您根据具体信息,给出解决办法。
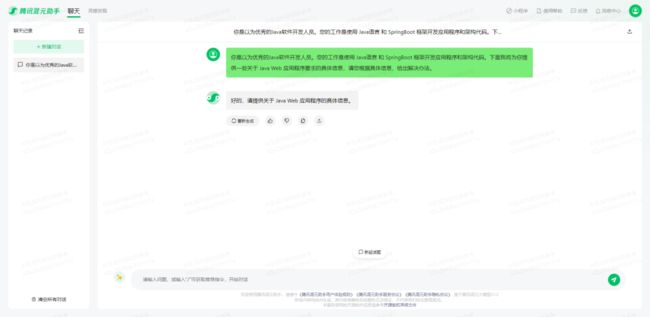
第三步:提出问题。
请我提供一个基于 SpringBoot 的框架,包含 pom.xml 和 yml 文件的配置,需要连接 MySQL 数据库。

混元回答:当然可以! 以下是一个基于 SpringBoot 的框架,包含 pom.xml 和 application.yml 文件的配置,用于连接 MySQL 数据库。
pom.xml
   4.0.0

       org.springframework.boot
       spring-boot-starter-parent
       2.6.1


   com.example
   spring-boot-mysql
   0.0.1-SNAPSHOT
    spring-boot-mysql
   Spring Boot with MySQL

        1.8


           org.springframework.boot
           spring-boot-starter-data-jpa


           org.springframework.boot
           spring-boot-starter-web


           mysql
           mysql-connector-java
           runtime


           org.springframework.boot
           spring-boot-starter-test
           test


               org.springframework.boot
               spring-boot-maven-plugin
application.yml
spring:
  datasource:
    url: jdbc:mysql://localhost:3306/your_database_name?useSSL=false&serverTimezone=UTC
    username: your_database_username
    password: your_database_password
    driver-class-name: com.mysql.cj.jdbc.Driver
  jpa:
    hibernate:
      ddl-auto: update
    properties:
      hibernate:
        dialect: org.hibernate.dialect.MySQL5InnoDBDialect
show-sql: true请将your_database_name、your_database_username和your_database_password替换为您的 MySQL 数据库的实际信息。这个配置将帮助您的 SpringBoot 项目连接到 MySQL 数据库。
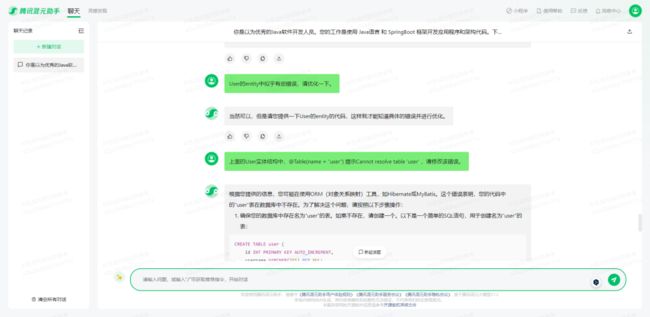
第四步:提出要求。
请帮我基于 MySQL 设计 user 用户表,根据上述的 SpringBoot 框架,采用 MVC 分层的结构,实现 User 表的增删查改操作。

混元回答:首先,我们需要创建一个MySQL数据库表来存储用户信息。以下是一个简单的user表结构:
CREATE TABLE `user` (
  `id` INT(11) NOT NULL AUTO_INCREMENT,
  `username` VARCHAR(50) NOT NULL,
  `password` VARCHAR(255) NOT NULL,
  `email` VARCHAR(255) NOT NULL,
  `created_at` TIMESTAMP NOT NULL DEFAULT CURRENT_TIMESTAMP,
  `updated_at` TIMESTAMP NOT NULL DEFAULT CURRENT_TIMESTAMP ON UPDATE CURRENT_TIMESTAMP,
  PRIMARY KEY (`id`),
  UNIQUE KEY `username_UNIQUE` (`username`),
  UNIQUE KEY `email_UNIQUE` (`email`)
) ENGINE=InnoDB DEFAULT CHARSET=utf8mb4;
接下来,我们将使用 Spring Boot 框架创建一个简单的MVC应用程序。首先,我们需要创建一个实体类User来表示用户:
package com.example.demo.entity;


import javax.persistence.*;
import java.time.LocalDateTime;


@Entity
@Table(name = "user")
public class User {
    @Id
    @GeneratedValue(strategy = GenerationType.IDENTITY)
    private Long id;


    @Column(name = "username", nullable = false, unique = true)
    private String username;


    @Column(name = "password", nullable = false)
    private String password;


    @Column(name = "email", nullable = false, unique = true)
    private String email;


    @Column(name = "created_at", nullable = false, columnDefinition = "TIMESTAMP DEFAULT CURRENT_TIMESTAMP")
    private LocalDateTime createdAt;


    @Column(name = "updated_at", nullable = false, columnDefinition = "TIMESTAMP DEFAULT CURRENT_TIMESTAMP ON UPDATE CURRENT_TIMESTAMP")
    private LocalDateTime updatedAt;


    // Getters and setters
}然后,我们需要创建一个UserRepository接口来处理数据库操作:
package com.example.demo.repository;


import com.example.demo.entity.User;
import org.springframework.data.jpa.repository.JpaRepository;
import org.springframework.stereotype.Repository;


@Repository
public interface UserRepository extends JpaRepository {
} 接下来,我们将创建一个UserService类来处理业务逻辑:
package com.example.demo.service;


import com.example.demo.entity.User;
import com.example.demo.repository.UserRepository;
import org.springframework.beans.factory.annotation.Autowired;
import org.springframework.stereotype.Service;


import java.util.List;
import java.util.Optional;


@Service
public class UserService {
    @Autowired
    private UserRepository userRepository;


    public List getAllUsers() {
        return userRepository.findAll();
    }


    public Optional getUserById(Long id) {
        return userRepository.findById(id);
    }


    public User createUser(User user) {
        return userRepository.save(user);
    }


    public User updateUser(Long id, User user) {
        User existingUser = userRepository.findById(id).orElse(null);
        if (existingUser != null) {
            existingUser.setUsername(user.getUsername());
            existingUser.setPassword(user.getPassword());
            existingUser.setEmail(user.getEmail());
            return userRepository.save(existingUser);
        }
        return null;
    }


    public void deleteUser(Long id) {
        userRepository.deleteById(id);
    }
} 最后,我们需要创建一个UserController类来处理 HTTP 请求:
package com.example.demo.controller;


import com.example.demo.entity.User;
import com.example.demo.service.UserService;
import org.springframework.beans.factory.annotation.Autowired;
import org.springframework.http.ResponseEntity;
import org.springframework.web.bind.annotation.*;


import java.util.List;


@RestController
@RequestMapping("/api/users")
public class UserController {
    @Autowired
    private UserService userService;


    @GetMapping
    public List getAllUsers() {
        return userService.getAllUsers();
    }


    @GetMapping("/{id}")
    public ResponseEntity getUserById(@PathVariable Long id) {
        return userService.getUserById(id).map(ResponseEntity::ok).orElse(ResponseEntity.notFound().build());
    }


    @PostMapping
    public User createUser(@RequestBody User user) {
        return userService.createUser(user);
    }


    @PutMapping("/{id}")
    public ResponseEntity updateUser(@PathVariable Long id, @RequestBody User user) {
        User updatedUser = userService.updateUser(id, user);
        if (updatedUser != null) {
            return ResponseEntity.ok(updatedUser);
        } else {
            return ResponseEntity.notFound().build();
        }
    }


    @DeleteMapping("/{id}")
    public ResponseEntity deleteUser(@PathVariable Long id) {
        userService.deleteUser(id);
        return ResponseEntity.noContent().build();
    }
}
现在,您已经创建了一个基于 MySQL 的用户表,并实现了 User 表的增删查改操作。您可以运行 Spring Boot 应用程序并使用 HTTP 请求来测试这些操作。
至此为止,我们期待混元大模型给出的解决办法结束了。
02
错误排查
发现问题,提出问题。有时候我们在使用过程中,描述问题不准确可能会造成,混元大模型没有准确地定位到问题所在。
示例:
解决办法:
我们启动程序后可能会有些错误提示信息,我们将错误信息作为输入:

混元大模型根据提供的错误信息,给出解决方案;
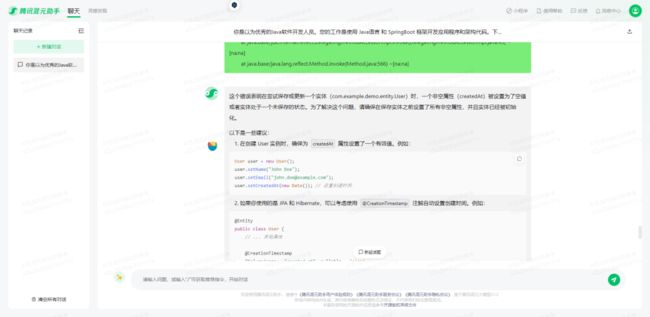
混元回答:这个错误表明在尝试保存或更新一个实体(com.example.demo.entity.User)时,一个非空属性(createdAt)被设置为了空值或者实体处于一个未保存的状态。为了解决这个问题,请确保在保存实体之前设置了所有非空属性,并且实体已经被初始化。
以下是一些建议:
在创建 User 实例时,确保为 createdAt 属性设置了一个有效值。例如:
User user = new User();


user.setName("John Doe");


user.setEmail("[email protected]");


user.setCreatedAt(new Date()); // 设置创建时间
如果你使用的是 JPA 和 Hibernate,可以考虑使用 @CreationTimestamp注解自动设置创建时间。例如:
@Entity


public class User {


    // ... 其他属性


    @CreationTimestamp


    @Column(name = "created\_at", nullable = false)


    private Date createdAt;


    // ... getter 和 setter


}
如果你正在使用 Spring Data JPA,确保在保存实体之前调用 save()方法。例如:
@Service


public class UserService {


    @Autowired


    private UserRepository userRepository;


    public User createUser(User user) {


        // 设置创建时间


        user.setCreatedAt(new Date());


        // 保存实体


        return userRepository.save(user);


    }


}
如果你正在使用 Hibernate 的 Session 对象,确保在调用 persist()方法之前设置了所有必要的属性。例如:
Session session = sessionFactory.openSession();


Transaction transaction = session.beginTransaction();


User user = new User();


user.setName("John Doe");


user.setEmail("[email protected]");


user.setCreatedAt(new Date()); // 设置创建时间


session.persist(user);


transaction.commit();


session.close();
通过确保所有非空属性都有值,并且实体已经被初始化,你应该可以解决这个问题。如果问题仍然存在,请提供更多关于你的实体类和数据访问代码的信息,以便我能更好地帮助你。
我们根据混元大模型给的答案,对程序进行调整,调整内容如下:
修改 User 实体:
package com.example.demo.entity;


import lombok.Data;
import org.hibernate.annotations.CreationTimestamp;


import javax.persistence.*;
import java.time.LocalDateTime;


@Entity
@Data
@Table(name = "user")
public class User {
    @Id
    @GeneratedValue(strategy = GenerationType.IDENTITY)
    private Long id;


    @Column(name = "username", nullable = false, unique = true)
    private String username;


    @Column(name = "password", nullable = false)
    private String password;


    @Column(name = "email", nullable = false, unique = true)
    private String email;


//    @Column(name = "created_at", nullable = false, columnDefinition = "TIMESTAMP DEFAULT CURRENT_TIMESTAMP")
    @CreationTimestamp
    @Column(name = "created_at", nullable = false)
    private LocalDateTime createdAt;


//    @Column(name = "updated_at", nullable = false, columnDefinition = "TIMESTAMP DEFAULT CURRENT_TIMESTAMP ON UPDATE CURRENT_TIMESTAMP")
    @CreationTimestamp
    @Column(name = "updated_at", nullable = false)
    private LocalDateTime updatedAt;


    // Getters and setters
}
03
代码测试
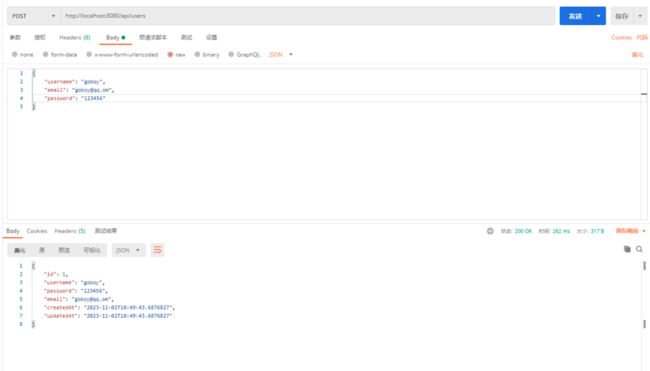
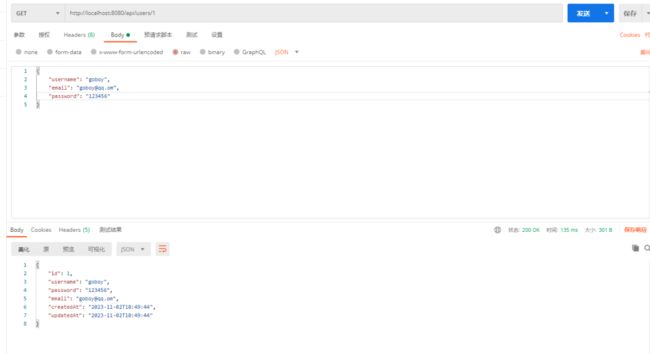
简单的接口测试:


在上诉的过程中,会出现一些代码没有补全的情况,手动补全即可。
增删查改的接口测试结果如下:


04
整体总结
混元大模型是一款非常优秀的大模型,可以提高我们工作效率,同样,我们也要学会使用大模型的正确姿势,对问题的描述也要足够的准确,这样大模型才能更好的为我们解决问题。
迄今为止 AI 工具的出现主要还是为了便利人类,而不是代替人类。加以学习利用,使其成为我们的优秀的工作助手。
-End-
原创作者|GoBoy

你有使用混元大模型摸鱼工作的技巧吗?欢迎评论分享。我们将选取1则最有价值的评论,送出腾讯云开发者社区定制笔记本1个(见下图)。12月7日中午12点开奖。
欢迎加入腾讯云开发者社群,社群专享券、大咖交流圈、第一手活动通知、限量鹅厂周边等你来~

(长按图片立即扫码)