RecyclerView源码分析(一):RecyclerView的三大流程
1、开篇
我们都知道RecyclerView是一个具有缓存机制的列表控件,它会在适当的时机对滑出屏幕的View进行回收和重用,避免创建大量的View,从而达到高性能的目的。作为Android中使用最高频的组件之一,我们非常有必要了解一下它背后的实现原理和使用相关注意事项。通过源码分析它的流程,是了解RecyclerView的重要手段。注意的是阅读源码一定要带着问题去阅读,只关心主流程,不要被淹没在源码的汪洋大海。因为仅仅RecyclerView.java这个文件就有一万三千多行代码,不要试图搞清楚每一样代码的意思和目的。事实上,阅读源码是一个效率相对低下的方式,只是没有更好的方式了,才显得它相尤为重要。
废话不多说,看一下本系列文章要解决的问题: ·
- 既然是个ViewGroup,那少不了要问上一句:它的measure、layout和draw是怎么样的?
- RecyclerView是怎么回收View的?什么时候回收?
- 怎么支持多类型Item的?怎么缓存和查找的呢?
- Item动画过程中notifyXXXChange会不会导致动画的错位?
- Adapter的onRecreateViewHolder和onBindViewHolder两大核心方法是什么时候调用的?
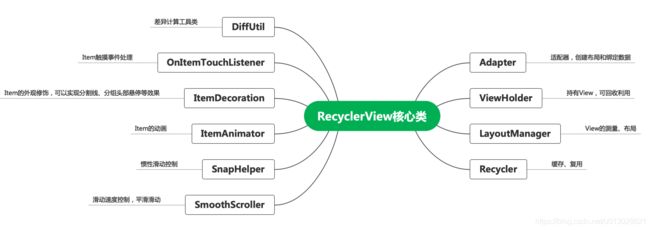
而本篇文章作为这个系列的第一篇,主要解决第一个问题。另外,开始源码分析之前先看一下RecyclerView的核心类:
2、onMeasure流程
先看onMeasure:
protected void onMeasure(int widthSpec, int heightSpec) {

    // mLayout就是LayoutManager对象
    if (mLayout == null) { // 如果没有设置LayoutManager,设定默认宽高
        defaultOnMeasure(widthSpec, heightSpec);
        return;
    }

    // 是否开启自动测量模式,Android提供的LinearLayoutManager、GridLayoutManager和StaggeredLayoutManager默认都开启了自动测量
    if (mLayout.isAutoMeasureEnabled()) {
        final int widthMode = MeasureSpec.getMode(widthSpec);
        final int heightMode = MeasureSpec.getMode(heightSpec);

        /**
         * 此调用应该被视为deprecated,而被defaultOnMeasure方法替代。但后者其实也不能完全替代前者,
         * 因为这回破坏现有的第三方代码。但是所有面向开发者的文档都引导开发者在LayoutManager#isAutoMeasureEnabled()方法返回true的时候不要重写LayoutManager#onMeasure方法。
         * 所以这其实也是调用了defaultOnMeasure方法。
         */
        mLayout.onMeasure(mRecycler, mState, widthSpec, heightSpec);

        final boolean measureSpecModeIsExactly =
                widthMode == MeasureSpec.EXACTLY && heightMode == MeasureSpec.EXACTLY;

        // 当我们已经明确给RecyclerView指定宽高的时候,无需测量,直接返回
        // 当Adapter没有设置的时候也无法测量,直接返回
        if (measureSpecModeIsExactly || mAdapter == null) {
            return;
        }

        // 开始测量第一步
        if (mState.mLayoutStep == State.STEP_START) {
            dispatchLayoutStep1();
        }

        // set dimensions in 2nd step. Pre-layout should happen with old dimensions for
        // consistency
        // 开始测量第二步,预布局
        mLayout.setMeasureSpecs(widthSpec, heightSpec);
        mState.mIsMeasuring = true;
        dispatchLayoutStep2();

        // 获取到了子View的宽高
        mLayout.setMeasuredDimensionFromChildren(widthSpec, heightSpec);


        // 如果RecyclerView没有指定确切的宽高且至少有一个子View也不确定宽高,则需要重新测量
        // 也就是再次执行dispatchLayoutStep2()
        if (mLayout.shouldMeasureTwice()) {
            mLayout.setMeasureSpecs(
                    MeasureSpec.makeMeasureSpec(getMeasuredWidth(), MeasureSpec.EXACTLY),
                    MeasureSpec.makeMeasureSpec(getMeasuredHeight(), MeasureSpec.EXACTLY));
            mState.mIsMeasuring = true;
            dispatchLayoutStep2();
            // 到这里已经可以获取子View的宽高了
            mLayout.setMeasuredDimensionFromChildren(widthSpec, heightSpec);
        }
    } else {
        if (mHasFixedSize) {
            mLayout.onMeasure(mRecycler, mState, widthSpec, heightSpec);
            return;
        }
        // 自定义测量流程开始
        if (mAdapterUpdateDuringMeasure) {  // Adapter在测量过程中更新了
            startInterceptRequestLayout();
            onEnterLayoutOrScroll();
            processAdapterUpdatesAndSetAnimationFlags();
            onExitLayoutOrScroll();

            if (mState.mRunPredictiveAnimations) {
                mState.mInPreLayout = true;
            } else {
                // 完成剩余的更新以提供与布局传递一致的状态
                mAdapterHelper.consumeUpdatesInOnePass();
                mState.mInPreLayout = false;
            }
            mAdapterUpdateDuringMeasure = false;
            stopInterceptRequestLayout(false);
        } else if (mState.mRunPredictiveAnimations) {

            // 如果mAdapterUpdateDuringMeasure是false且mRunPredictiveAnimations是true
            // 这意味着已经调用onMeasure来处理Adapter的更新了
            // 当RecyclerView是LinearLayout的子View且layout_width=MATCH_PARENT,onMeasure会调用两次
            // RecyclerView不能多次调用LayoutManager.onMeasure,因为LayoutManager测量子View的时候getViewForPosition()会崩溃
            setMeasuredDimension(getMeasuredWidth(), getMeasuredHeight());
            return;
        }

        if (mAdapter != null) {
            mState.mItemCount = mAdapter.getItemCount();
        } else {
            mState.mItemCount = 0;
        }
        startInterceptRequestLayout();
        mLayout.onMeasure(mRecycler, mState, widthSpec, heightSpec);
        stopInterceptRequestLayout(false);
        mState.mInPreLayout = false; // 清除标记
    }
}
我对这个方法里面的注释翻译了一些,在一些地方也加入了我自己的理解。这里面氛围了三种情况:
- 没有设置LayoutManager
- LayoutManager开启了自动测量
- LayoutManager没有开启自动测量
2.1 没有设置LayoutManager
没有设置LayoutManager的情况非常简单,就是调用了defaultOnMeasure:
/**
 * An implementation of {@link View#onMeasure(int, int)} to fall back to in various scenarios
 * where this RecyclerView is otherwise lacking better information.
 */
void defaultOnMeasure(int widthSpec, int heightSpec) {
    // calling LayoutManager here is not pretty but that API is already public and it is better
    // than creating another method since this is internal.
    final int width = LayoutManager.chooseSize(widthSpec,
            getPaddingLeft() + getPaddingRight(),
            ViewCompat.getMinimumWidth(this));
    final int height = LayoutManager.chooseSize(heightSpec,
            getPaddingTop() + getPaddingBottom(),
            ViewCompat.getMinimumHeight(this));

    setMeasuredDimension(width, height);
}
这里是根据RecyclerView的padding和minHeight来计算一个默认的宽高。具体怎么计算这里不深究,因为没有设置LayoutManager的情况不是我们最关心的。
2.2 LayoutManager开启了自动测量
这种情况下,首先调用了mLayout.onMeasure,注释中也解释了,其实就是调用的defaultOnMeasure:
public void onMeasure(@NonNull Recycler recycler, @NonNull State state, int widthSpec,
        int heightSpec) {
    mRecyclerView.defaultOnMeasure(widthSpec, heightSpec);
}
紧接着做了一个判断,如果已经指定确定的宽高或者没有设置Adapter,直接返回。
接下来就是非常重要的步骤了,最主要的两个调用是
dispatchLayoutStep1();

dispatchLayoutStep2();
先看dispatchLayoutStep1源码:
/**
 * 布局的第一个步骤,主要操作如下:
 * 处理Adapter的更新
 * 决定哪些动画需要执行
 * 保存当前View的信息
 * 如有必要,进行预布局并保存其信息
 */
private void dispatchLayoutStep1() {
    // 断言,执行此方法的时候必须是处于STEP_START阶段
    mState.assertLayoutStep(State.STEP_START);
    ...
    // 执行完成后,更新当前状态为STEP_LAYOUT
    mState.mLayoutStep = State.STEP_LAYOUT;
}
这里只看注释就好了,关于这些动画啥的,后面专门研究RecyclerView动画的时候再来慢慢看。
再看dispatchLayoutStep2()
/**
 * 布局的第二个步骤,这个方法里我们会进行针对最终的View状态进行实际布局
 * 在必要的情况下,这个方法可能会被多次调用
 */
private void dispatchLayoutStep2() {
    startInterceptRequestLayout();
    onEnterLayoutOrScroll();
    mState.assertLayoutStep(State.STEP_LAYOUT | State.STEP_ANIMATIONS);
    mAdapterHelper.consumeUpdatesInOnePass();
    // 通过Adapter获取Item的数量并存到mState中
    mState.mItemCount = mAdapter.getItemCount();
    mState.mDeletedInvisibleItemCountSincePreviousLayout = 0;

    // 布局子View
    mState.mInPreLayout = false;
    mLayout.onLayoutChildren(mRecycler, mState);

    mState.mStructureChanged = false;
    mPendingSavedState = null;

    // onLayoutChildren may have caused client code to disable item animations; re-check
    mState.mRunSimpleAnimations = mState.mRunSimpleAnimations && mItemAnimator != null;
    // 更新布局的步骤
    mState.mLayoutStep = State.STEP_ANIMATIONS;
    onExitLayoutOrScroll();
    stopInterceptRequestLayout(false);
}
这是实际布局的地方,关键调用是LayoutManager的onLayoutChildren方法。我们知道,Android给我们提供了三个默认的LayoutManager,这里以最简单的LinearLayoutManager为例,看一下它是怎么布局子View的
public void onLayoutChildren(RecyclerView.Recycler recycler, RecyclerView.State state) {
    // 布局算法:
    // 1) 通过遍历子View和其他变量,找一个锚点Item及其坐标
    // 2) 往开始方向从底部到顶部填充Item
    // 3) 往结束方向从顶部到底部填充Item
    // 4) 滚动以满足要求,例如从底部堆叠

    // 其中3和4的顺序可能是相反的

    // 确定布局状态,这部分代码省略
    ...

    final View focused = getFocusedChild();

    // 锚点信息无效了、发生滚动了或者恢复View状态(onRestoreInstanceState被调用)后第一次布局
    // 如果是第一次布局,那么应该会进入这个if分支
    if (!mAnchorInfo.mValid || mPendingScrollPosition != RecyclerView.NO_POSITION
            || mPendingSavedState != null) {
        mAnchorInfo.reset();
        mAnchorInfo.mLayoutFromEnd = mShouldReverseLayout ^ mStackFromEnd;
        // 计算锚点的位置和坐标
        updateAnchorInfoForLayout(recycler, state, mAnchorInfo);
        mAnchorInfo.mValid = true;
    } else if (focused != null && (mOrientationHelper.getDecoratedStart(focused)
                    >= mOrientationHelper.getEndAfterPadding()
            || mOrientationHelper.getDecoratedEnd(focused)
            <= mOrientationHelper.getStartAfterPadding())) {
        // 这种情况发生在锚点是当前获取焦点的View,但是由于某种原因布局变小而被挤出屏幕可视范围外了
        // 比如点击了EditText后软键盘弹起了,而这个EditText被挤出去了
        // 这种情况将会更新锚点坐标,保证这个获取焦点的View的可见性
        // 否则layoutState中的可用空间将会被计算成负数,导致获取焦点的View不能展示
        mAnchorInfo.assignFromViewAndKeepVisibleRect(focused, getPosition(focused));
    }
    if (DEBUG) {
        Log.d(TAG, "Anchor info:" + mAnchorInfo);
    }

    // LinearLayoutManager可能会为“额外”的像素布局Item以考虑滚动目标、缓存或预测动画。
    // 这部分代码省略
    ...

    // 先回收Attached状态下的View
    detachAndScrapAttachedViews(recycler);

    ...

    // 是否从结束方向往开始方向布局
    // 两种情况看起来差不多,所以我们主要看最常用的顺着正方向布局的情况
    if (mAnchorInfo.mLayoutFromEnd) {
        ...
    } else {
        // fill towards end
        updateLayoutStateToFillEnd(mAnchorInfo);
        mLayoutState.mExtraFillSpace = extraForEnd;
        fill(recycler, mLayoutState, state, false);
        endOffset = mLayoutState.mOffset;
        final int lastElement = mLayoutState.mCurrentPosition;
        if (mLayoutState.mAvailable > 0) {
            extraForStart += mLayoutState.mAvailable;
        }
        // fill towards start
        updateLayoutStateToFillStart(mAnchorInfo);
        mLayoutState.mExtraFillSpace = extraForStart;
        mLayoutState.mCurrentPosition += mLayoutState.mItemDirection;
        fill(recycler, mLayoutState, state, false);
        startOffset = mLayoutState.mOffset;

        if (mLayoutState.mAvailable > 0) {
            extraForEnd = mLayoutState.mAvailable;
            // start could not consume all it should. add more items towards end
            updateLayoutStateToFillEnd(lastElement, endOffset);
            mLayoutState.mExtraFillSpace = extraForEnd;
            fill(recycler, mLayoutState, state, false);
            endOffset = mLayoutState.mOffset;
        }
    }

    ...
}
这里面有两个关键调用,分别是detachAndScrapAttachedViews(recycler)和fill(recycler, mLayoutState, state, false)。先来看detachAndScrapAttachedViews
/**
 * 临时回收所有的Attached状态下的子View。这些View会被回收到给定的Recycler对象中。
 * Recycler会优先复用最后回收的View
 */
public void detachAndScrapAttachedViews(@NonNull Recycler recycler) {
    final int childCount = getChildCount();
    for (int i = childCount - 1; i >= 0; i--) {
        final View v = getChildAt(i);
        scrapOrRecycleView(recycler, i, v);
    }
}
关于detachAndScrapAttachedViews方法我们先只看到这里,了解它的作用,后续分析Recycler类以及RecyclerView的回收机制时再展开分析。
接下来看一下fill方法
/**
 * 填充给定的布局。这个方法相对于LinearLayoutManager的其他部分来说逻辑是独立的,稍微改一下的话可以作为公共的帮助类
 * @return 返回填充的像素
 */
int fill(RecyclerView.Recycler recycler, LayoutState layoutState,
        RecyclerView.State state, boolean stopOnFocusable) {
    // max offset we should set is mFastScroll + available
    final int start = layoutState.mAvailable;
    if (layoutState.mScrollingOffset != LayoutState.SCROLLING_OFFSET_NaN) {
        // TODO ugly bug fix. should not happen
        if (layoutState.mAvailable < 0) {
            layoutState.mScrollingOffset += layoutState.mAvailable;
        }
        recycleByLayoutState(recycler, layoutState);
    }
    int remainingSpace = layoutState.mAvailable + layoutState.mExtraFillSpace;
    LayoutChunkResult layoutChunkResult = mLayoutChunkResult;
    while ((layoutState.mInfinite || remainingSpace > 0) && layoutState.hasMore(state)) {
        layoutChunkResult.resetInternal();
        if (RecyclerView.VERBOSE_TRACING) {
            TraceCompat.beginSection("LLM LayoutChunk");
        }
        layoutChunk(recycler, state, layoutState, layoutChunkResult);
        if (RecyclerView.VERBOSE_TRACING) {
            TraceCompat.endSection();
        }
        if (layoutChunkResult.mFinished) {
            break;
        }
        layoutState.mOffset += layoutChunkResult.mConsumed * layoutState.mLayoutDirection;
        /**
            * Consume the available space if:
            * * layoutChunk did not request to be ignored
            * * OR we are laying out scrap children
            * * OR we are not doing pre-layout
            */
        if (!layoutChunkResult.mIgnoreConsumed || layoutState.mScrapList != null
                || !state.isPreLayout()) {
            layoutState.mAvailable -= layoutChunkResult.mConsumed;
            // we keep a separate remaining space because mAvailable is important for recycling
            remainingSpace -= layoutChunkResult.mConsumed;
        }

        if (layoutState.mScrollingOffset != LayoutState.SCROLLING_OFFSET_NaN) {
            layoutState.mScrollingOffset += layoutChunkResult.mConsumed;
            if (layoutState.mAvailable < 0) {
                layoutState.mScrollingOffset += layoutState.mAvailable;
            }
            recycleByLayoutState(recycler, layoutState);
        }
        if (stopOnFocusable && layoutChunkResult.mFocusable) {
            break;
        }
    }
    if (DEBUG) {
        validateChildOrder();
    }
    return start - layoutState.mAvailable;
}

void layoutChunk(RecyclerView.Recycler recycler, RecyclerView.State state,
        LayoutState layoutState, LayoutChunkResult result) {
    // 获取子View
    View view = layoutState.next(recycler);
    if (view == null) {
        if (DEBUG && layoutState.mScrapList == null) {
            throw new RuntimeException("received null view when unexpected");
        }
        // if we are laying out views in scrap, this may return null which means there is
        // no more items to layout.
        result.mFinished = true;
        return;
    }
    RecyclerView.LayoutParams params = (RecyclerView.LayoutParams) view.getLayoutParams();
    // 添加了子View
    if (layoutState.mScrapList == null) {
        if (mShouldReverseLayout == (layoutState.mLayoutDirection
                == LayoutState.LAYOUT_START)) {
            addView(view);
        } else {
            addView(view, 0);
        }
    } else {
        if (mShouldReverseLayout == (layoutState.mLayoutDirection
                == LayoutState.LAYOUT_START)) {
            addDisappearingView(view);
        } else {
            addDisappearingView(view, 0);
        }
    }

    // 测量子View
    measureChildWithMargins(view, 0, 0);

    ...

    // 布局子View
    layoutDecoratedWithMargins(view, left, top, right, bottom);

    ...
}
可以看到,子View的创建、添加、测量和布局都是在layoutChunk中完成的!
2.3 LayoutManager没有开启自动测量
如下代码
protected void onMeasure(int widthSpec, int heightSpec) {

    ...
    if (mLayout.isAutoMeasureEnabled()) {
        ...
    } else {
        if (mHasFixedSize) {
            mLayout.onMeasure(mRecycler, mState, widthSpec, heightSpec);
            return;
        }
        // 自定义测量流程开始
        if (mAdapterUpdateDuringMeasure) {  // Adapter在测量过程中更新了
            startInterceptRequestLayout();
            onEnterLayoutOrScroll();
            processAdapterUpdatesAndSetAnimationFlags();
            onExitLayoutOrScroll();

            if (mState.mRunPredictiveAnimations) {
                mState.mInPreLayout = true;
            } else {
                // 完成剩余的更新以提供与布局传递一致的状态
                mAdapterHelper.consumeUpdatesInOnePass();
                mState.mInPreLayout = false;
            }
            mAdapterUpdateDuringMeasure = false;
            stopInterceptRequestLayout(false);
        } else if (mState.mRunPredictiveAnimations) {

            // 如果mAdapterUpdateDuringMeasure是false且mRunPredictiveAnimations是true
            // 这意味着已经调用onMeasure来处理Adapter的更新了
            // 当RecyclerView是LinearLayout的子View且layout_width=MATCH_PARENT,onMeasure会调用两次
            // RecyclerView不能多次调用LayoutManager.onMeasure,因为LayoutManager测量子View的时候getViewForPosition()会崩溃
            setMeasuredDimension(getMeasuredWidth(), getMeasuredHeight());
            return;
        }

        if (mAdapter != null) {
            mState.mItemCount = mAdapter.getItemCount();
        } else {
            mState.mItemCount = 0;
        }
        startInterceptRequestLayout();
        mLayout.onMeasure(mRecycler, mState, widthSpec, heightSpec);
        stopInterceptRequestLayout(false);
        mState.mInPreLayout = false; // 清除标记
    }
}
LayoutManager没有开启自动测量又分为两种情况,第一种是RecyclerView指定了确切的宽高,那这就不用说了,直接使用指定的宽高就可以了;第二种是没有指定确切的宽高,做了两个判断,分别进行了一些处理,然后关键是调用如下:
startInterceptRequestLayout();
mLayout.onMeasure(mRecycler, mState, widthSpec, heightSpec);
stopInterceptRequestLayout(false);
Android提供的三种现有的LayoutManager默认都是开启了自动布局的,所以这种情况了解一下就可以啦。
3、onLayout流程
看看onLayout方法
protected void onLayout(boolean changed, int l, int t, int r, int b) {
    TraceCompat.beginSection(TRACE_ON_LAYOUT_TAG);
    dispatchLayout();
    TraceCompat.endSection();
    mFirstLayoutComplete = true;
}
这里调用了dispatchLayout(),然后把mFirstLayoutComplete置为true。那我们再来看看dispatchLayout()
void dispatchLayout() {
    // 著名的log打印...
    if (mAdapter == null) {
        Log.e(TAG, "No adapter attached; skipping layout");
        // leave the state in START
        return;
    }
    if (mLayout == null) {
        Log.e(TAG, "No layout manager attached; skipping layout");
        // leave the state in START
        return;
    }

    mState.mIsMeasuring = false;
    // 根据前面的分析,如果调用过dispatchLayoutStep1(),mState.mLayoutStep == State.STEP_START就不会成立
    // 所以只有之前没有调用过,才会进入if分支
    if (mState.mLayoutStep == State.STEP_START) {
        dispatchLayoutStep1();
        mLayout.setExactMeasureSpecsFrom(this);
        dispatchLayoutStep2();
    } else if (mAdapterHelper.hasUpdates() || mLayout.getWidth() != getWidth()
            || mLayout.getHeight() != getHeight()) {
        // 如果有更新过,那就要重新进行第二步
        mLayout.setExactMeasureSpecsFrom(this);
        dispatchLayoutStep2();
    } else {
        // always make sure we sync them (to ensure mode is exact)
        mLayout.setExactMeasureSpecsFrom(this);
    }
    dispatchLayoutStep3();
}
这里根据具体情况判断是否需要调用dispatchLayoutStep1和dispatchLayoutStep2,最后调用了dispatchLayoutStep3。前两个当法我们已经分析过了,看一下dispatchLayoutStep3
/**
 * 布局的最后一个步骤,在这个方法里会保存执行动画的View的信息、触发动画以及执行必要的清理操作
 */
private void dispatchLayoutStep3() {
    ...
    mState.mLayoutStep = State.STEP_START;
    ...
}
这里也只看注释就好了,后续分析动画的时候再具体分析。
4、draw和onDraw
RecyclerView不仅重写了onDraw方法,也重写了draw方法,一起来看看吧
public void draw(Canvas c) {
    super.draw(c);

    final int count = mItemDecorations.size();
    for (int i = 0; i < count; i++) {
        mItemDecorations.get(i).onDrawOver(c, this, mState);
    }
    // TODO If padding is not 0 and clipChildrenToPadding is false, to draw glows properly, we
    // need find children closest to edges. Not sure if it is worth the effort.
    boolean needsInvalidate = false;
    if (mLeftGlow != null && !mLeftGlow.isFinished()) {
        final int restore = c.save();
        final int padding = mClipToPadding ? getPaddingBottom() : 0;
        c.rotate(270);
        c.translate(-getHeight() + padding, 0);
        needsInvalidate = mLeftGlow != null && mLeftGlow.draw(c);
        c.restoreToCount(restore);
    }
    if (mTopGlow != null && !mTopGlow.isFinished()) {
        final int restore = c.save();
        if (mClipToPadding) {
            c.translate(getPaddingLeft(), getPaddingTop());
        }
        needsInvalidate |= mTopGlow != null && mTopGlow.draw(c);
        c.restoreToCount(restore);
    }
    if (mRightGlow != null && !mRightGlow.isFinished()) {
        final int restore = c.save();
        final int width = getWidth();
        final int padding = mClipToPadding ? getPaddingTop() : 0;
        c.rotate(90);
        c.translate(-padding, -width);
        needsInvalidate |= mRightGlow != null && mRightGlow.draw(c);
        c.restoreToCount(restore);
    }
    if (mBottomGlow != null && !mBottomGlow.isFinished()) {
        final int restore = c.save();
        c.rotate(180);
        if (mClipToPadding) {
            c.translate(-getWidth() + getPaddingRight(), -getHeight() + getPaddingBottom());
        } else {
            c.translate(-getWidth(), -getHeight());
        }
        needsInvalidate |= mBottomGlow != null && mBottomGlow.draw(c);
        c.restoreToCount(restore);
    }

    // If some views are animating, ItemDecorators are likely to move/change with them.
    // Invalidate RecyclerView to re-draw decorators. This is still efficient because children's
    // display lists are not invalidated.
    if (!needsInvalidate && mItemAnimator != null && mItemDecorations.size() > 0
            && mItemAnimator.isRunning()) {
        needsInvalidate = true;
    }

    if (needsInvalidate) {
        ViewCompat.postInvalidateOnAnimation(this);
    }
}

public void onDraw(Canvas c) {
    super.onDraw(c);

    final int count = mItemDecorations.size();
    for (int i = 0; i < count; i++) {
        mItemDecorations.get(i).onDraw(c, this, mState);
    }
}
由于super.draw©里面调用了onDraw方法,所以onDraw里的自定义逻辑会先于draw里面的自定义逻辑执行。我们看到,onDraw里面主要是遍历了mItemDecorations,挨个调用它们的onDraw方法;在draw里面又遍历了mItemDecorations,挨个调用它们的onDrawOver方法,然后根据一系列的条件得出一个布尔值needsInvalidate,标记下次动画的时候是否刷新
5、总结
RecyclerView的三大流程概括如下:
-
measure:
- 如果没有设置自动LayoutManager,计算默认宽高即返回
- 如果指定了确切的宽高,使用指定的宽高
- 如果LayoutManager开启了自动布局,执行dispatchLayoutStep1()和dispatchLayoutStep2(),其中dispatchLayoutStep2()可能会重复执行
- 如果LayoutManager没有开启自动布局,那么委托LayoutManager的onMeasure来进行
-
layout:
- 根据布局阶段决定是否需要执行dispatchLayoutStep1和dispatchLayoutStep2
- 执行dispatchLayoutStep3
-
draw:
- 除了正常ViewGroup的draw流程,还先后遍历了mItemDecorations并执行了它们的onDraw和onDrawOver方法
其中测量和布局有三大步骤,分别是dispatchLayoutStep1、dispatchLayoutStep2、dispatchLayoutStep3,其中1和3更多的是与动画或者预布局相关的事情,而子View的创建、测量、布局和添加都在2中。
我们还可以得出结论,RecyclerView的子View的布局不一定是在RecyclerView的onLayout方法中执行。
OK,本文分析到这,下篇继续…