FFMPEG
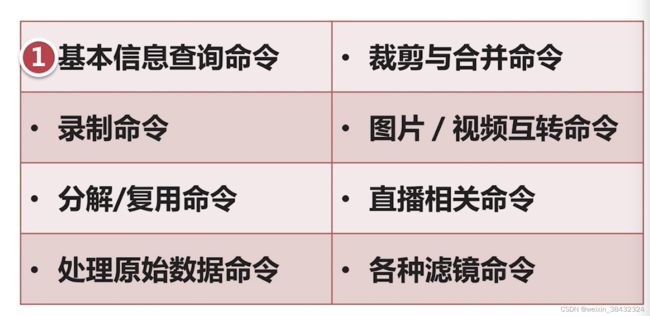
FFmpeg 命令分类
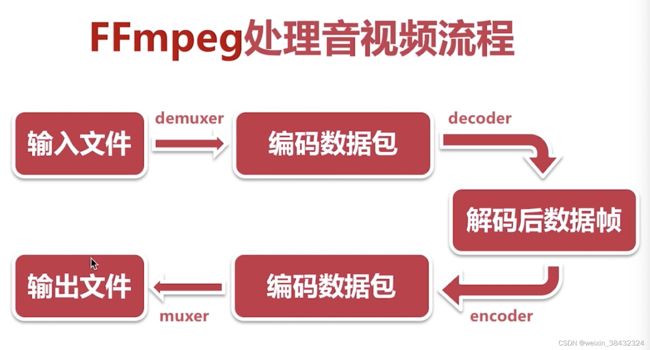
输入文件->编码数据包->解码后数据帧->编码数据包->输出文件
FFmpeg 基本信息查询命令
录制命令
[avfoundation @ 0x7fc192a04200] Overriding selected pixel format to use uyvy422 instead.

[avfoundation @ 0x7fc192a04200] Stream #0: not enough frames to estimate rate; consider increasing probesize

Input #0, avfoundation, from '1':

  Duration: N/A, start: 862681.476000, bitrate: N/A

  Stream #0:0: Video: rawvideo (UYVY / 0x59565955), uyvy422, 4096x2304, 1000k tbr, 1000k tbn
ffmpeg -f avfoundation -i 1 -r 30 out.yuv
-f 指定使用 avfoundation 采集数据
-i 指定从哪采集数据 0 摄像头 1 屏幕录制、
-r 指定帧率
ffplay -video_size 4096x2304 -pixel_format uyvy422 out.yuv
video_size 分辨率 pixel_format 数据格式
查询所有音视频录制的设备
ffmpeg -f avfoundation -list_devices true -i ""
[AVFoundation indev @ 0x7fa21e804680] AVFoundation video devices:
[AVFoundation indev @ 0x7fa21e804680] [0] FaceTime高清摄像头(内建)
[AVFoundation indev @ 0x7fa21e804680] [1] Capture screen 0
[AVFoundation indev @ 0x7fa21e804680] AVFoundation audio devices:
[AVFoundation indev @ 0x7fa21e804680] [0] Built-in Microphone
音频录制
ffmpeg -f avfoundation -i :0 out.wav
ffplay out.wav
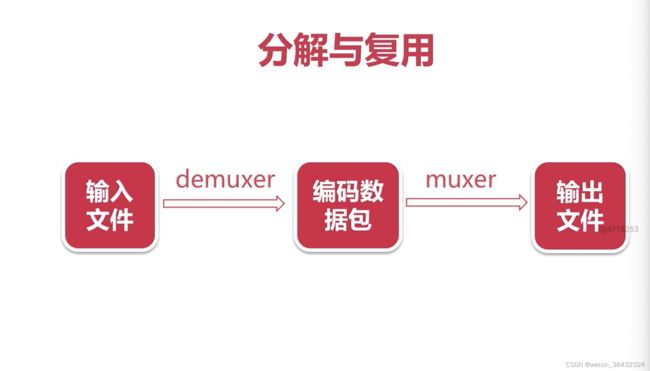
分解与复用
ffmpeg -i 2.头文件与类的声明.mp4 -vcodec copy -acodec copy 02.flv
-i : 输入文件
-vcodec copy 视频编码处理方式
-acodec copy 音频编码处理方式
提取yuv数据
ffmpeg -i 2.头文件与类的声明.mp4 -an -c:v rawvideo -pixel_format yuv420p out.yuv
ffplay -video_size 1920x1080 out.yuv
提取pcm数据
ffmpeg -i 2.头文件与类的声明.mp4 -vn -ar 44100 -ac 2 -f s16le out.pcm
ffplay -ar 44100 -ac 2 -f s16le out.pcm
Fmpeg 滤镜
Decoded Frames ->Filtered Frames ->Encoder data
ffmpeg -i 2.头文件与类的声明.mp4 -vf crop=in_w-200:in_h-200 -c:v libx264 -c:a copy filter02.mp4
-vf 视频滤镜
crop 滤镜名字
in_w-200 宽度减200
in_h-200 高度减200
时间裁剪 (我裁剪 播放不了)
ffmpeg -i 2.头文件与类的声明.mp4 -ss 05:00:00 -t 20 ou. ts
-ss 从哪个时间点开始裁剪 时分秒
-t 时长 裁剪时长 秒
视频拼接
ffmpeg -f concat -i inputs.txt out.flv
inputs.txt 内容为 ‘file filename’ 格式 每一行都是一个文件名
视频分图片
ffmpeg -i in.flv -r 1 -f image2 image-%3d.jpeg
图片合成视频
ffmpeg -i image-%3d.jpeg out.mp4
直播推流
ffmpeg -re -i out.mp4 -c copy -f flv rtmp://servers/live/streameName
-re
直播拉流
ffmpeg -i rtmp://servers/live/streameName -c copy dump.flv
FFmpeg 代码结构
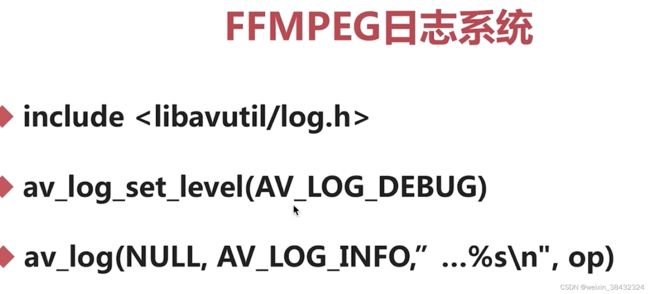
FFmpeg日志系统
多媒体文件的基本概念
多媒体文件其实是个容器
在容器里有很多流(stream\track)
每种流是由不同的编码器编码的
从流中读出的数据称为包
在一个包中包含着一个或者多个帧
几个重要的结构体
AVFormatContext
AVStream
AVPacket
FFmpe操作流数据的基本步骤
解复用->获取流->读数据包->释放资源
打印音视频信息
avdevice_register_all()
avformat_open_input()/avformat_close_input()
av_dump_format(<#AVFormatContext *ic#>, int index, <#const char *url#>, <#int is_output#>)
void get_media_info() {
    AVFormatContext *fmt_context = NULL;
    av_log_set_level(AV_LOG_INFO);
    avdevice_register_all();
    int ret = 0;
    char *path = "/xxx/ffmpeg/audio/cpptest.mp4";
    AVInputFormat *fmt = NULL;

    ret = avformat_open_input(&fmt_context, path, NULL, NULL);

    if (ret < 0) {
        av_log(NULL, AV_LOG_DEBUG, "read media info error %s", av_err2str(ret));
        return;
    }
    // 0 输入 1 输出
    av_dump_format(fmt_context, 0, path, 0);
    avformat_close_input(&fmt_context);
}
获取音频demo
void get_meida_audio() {
    //1.处理一些参数
    char* src = "/Users/king/Desktop/ffmpeg/audio/cpptest.mp4";
    char* dst = "/Users/king/Desktop/ffmpeg/audio/cpptest.aac";;

    av_log_set_level(AV_LOG_DEBUG);
    //2.打开多媒体文件
    int ret = 0;
    AVFormatContext *context = NULL;
    ret = avformat_open_input(&context, src, NULL, NULL);
    if  (ret < 0) {
        av_log(NULL, AV_LOG_DEBUG, "format mmedia = %s\n",av_err2str(ret));
        goto __ERROR;
    }
    //3.从多媒体文件中找到音频流
    int index = 0;
    index = av_find_best_stream(context, AVMEDIA_TYPE_AUDIO, -1, -1, NULL, 0);
    if (index < 0) {
        av_log(NULL, AV_LOG_DEBUG, " stream = %s\n",av_err2str(index));
        goto __ERROR;
    }
    //4.打开目的文件的上下文
    AVFormatContext *o_context = NULL;
    const AVOutputFormat *out_fmt = NULL;
    o_context = avformat_alloc_context();
    if (o_context == NULL) {
        goto __ERROR;
    }
    out_fmt = av_guess_format(NULL, dst, NULL);
    o_context->oformat = out_fmt;
    //5.为目的文件创建一个新的音频流
    AVStream *out_stream = NULL;
    out_stream = avformat_new_stream(o_context, NULL);
    //6.设置输出音频参数
    AVStream *in_stram = NULL;
    in_stram = context->streams[index];
    avcodec_parameters_copy(out_stream->codecpar, in_stram->codecpar);
    //codec_tag 设置成0会根据多媒体文件自动适配编解码器 不适特别了解建议写成0 了解的话可以写成一个固定的值
    out_stream->codecpar->codec_tag = 0;
    /// 绑定
    ret = avio_open2(&o_context->pb, dst, AVIO_FLAG_WRITE, NULL, NULL);
    if (ret < 0) {
        av_log(NULL, AV_LOG_DEBUG, "ret bind = %s\n",av_err2str(ret));
        goto __ERROR;
    }

    //7.写多媒体文件头道目的文件
    ret = avformat_write_header(o_context, NULL);
    if (ret < 0) {
        av_log(NULL, AV_LOG_DEBUG, "ret avformat_write_header = %s\n",av_err2str(ret));
        goto __ERROR;
    }
    //8.从源多媒体文件中读到音频数据到目的文件中
    AVPacket pkt;
    while (av_read_frame(context, &pkt) >= 0) {
        if (pkt.stream_index == index) {
            pkt.pts = av_rescale_q_rnd(pkt.pts, in_stram->time_base, out_stream->time_base, (AV_ROUND_NEAR_INF | AV_ROUND_PASS_MINMAX));
            pkt.dts = pkt.pts;
            pkt.duration = av_rescale_q(pkt.duration, in_stram->time_base, out_stream->time_base);
            pkt.stream_index = 0;
            pkt.pos = -1;
            av_interleaved_write_frame(o_context, &pkt);
            av_packet_unref(&pkt);
        }
    }
    //9.写多媒体文件尾到文件中
    av_write_trailer(o_context);
    //10.将申请的资源释放掉


__ERROR:
    if (context != NULL) {
        avformat_close_input(&context);
        context = NULL;
    }

    if (o_context->pb != NULL) {
        avio_close(o_context->pb);
    }

    if (o_context != NULL) {
        avformat_free_context(o_context);
        o_context = NULL;
    }


}
录制命令
llllffplay命令 - 知乎


