JAVACV实战 十分钟完成一个简易的web端直播功能(含源码)
前言
前些天对接了一个视频监控的功能,主要使用了JAVACV+FFMPEG,趁现在还有印象,忙里偷闲整理一下基本的使用,是记录也是分享。
本文将以一个简易的直播功能为例,介绍一下JAVACV的使用,其流程大概就是获取摄像头视频流->编码为flv视频流->推送成rtmp流到流服务器->页面使用flv.js拉流播放。
本文提及的操作都是比较基本和通用的使用,相比于真实场景的业务开发来说,肯定是比较简陋的,只能算是个demo,如果真的使用到业务开发中的话,还需要考虑视频数据来源的变化、是否需要转码、多客户端访问时的资源释放等问题。
实例展示
这里主要展示实现后的效果,如果对其实现和源码不感兴趣,只是想体验一下的话,看完本节内容就可以直接下载之后拿去玩了(已内置jre,无需JAVA运行环境)。
如果对源码感兴趣的,可以跳过本节,直接往后看~
我将成果实例的展示分为了两部分,其一是基本的摄像头调用,其二是完整的直播实例。
注:为了让非java开发也能使用,内置所有jar包以及jre,所以整个文件比较大,介意勿下。
基本摄像头调用
点击下载基本摄像头调用程序 提取码yyds
完整直播实例
点击下载完整直播实例 提取码yyds
-
点击上面的连接下载压缩包
-
服务端(windows)解压nginx-http-flv.rar,并双击运行nginx.exe
-
修改推流ip为服务端ip,然后点击载入配置并开始按钮
-
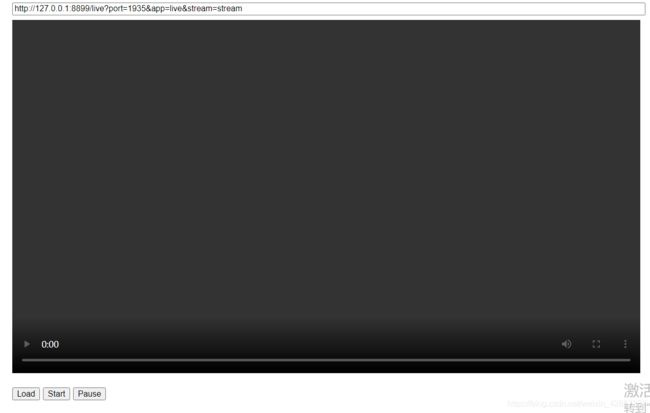
第二个客户端(看直播的人)浏览器输入http://xxx.xxx.xxx.xxx:8899/flv.html,其中xxx…为服务端ip,即可看到如下页面

需要把上面输入框中的127.0.0.1改为服务端的ip,然后点击下方的load+start就可以开始播放了~
注:服务端、第一个客户端、第二个客户端三者可以是同一台电脑,如果是同一台电脑就不需要改任何东西了。假如是多台电脑使用的话,需要保证端口可连通。
具体实现
环境准备
- maven依赖
<dependency>
    <groupId>org.bytedecogroupId>
    <artifactId>javacv-platformartifactId>
    <version>1.4.1version>
dependency>
javacv-platform中已经包括了javacv、opencv、ffmpeg等多个视频处理的jar包,如果觉得太大的话可以自行去除其中的部分依赖。当然,想要完整的功能肯定还是全依赖比较好(完整依赖大概在700M左右),以下是我这次开发简易直播的依赖,里面去除了我未用到的jar包(去除后大概400M左右)。
<dependency>
            <groupId>org.bytedecogroupId>
            <artifactId>javacv-platformartifactId>
            <version>1.4.1version>
            <exclusions>
                <exclusion>
                    <groupId>org.bytedeco.javacpp-presetsgroupId>
                    <artifactId>videoinput-platformartifactId>
                exclusion>
                <exclusion>
                    <groupId>org.bytedeco.javacpp-presetsgroupId>
                    <artifactId>flandmark-platformartifactId>
                exclusion>
                <exclusion>
                    <groupId>org.bytedeco.javacpp-presetsgroupId>
                    <artifactId>artoolkitplus-platformartifactId>
                exclusion>
                <exclusion>
                    <groupId>org.bytedeco.javacpp-presetsgroupId>
                    <artifactId>librealsense-platformartifactId>
                exclusion>
                <exclusion>
                    <groupId>org.bytedeco.javacpp-presetsgroupId>
                    <artifactId>libfreenect2-platformartifactId>
                exclusion>
                <exclusion>
                    <groupId>org.bytedeco.javacpp-presetsgroupId>
                    <artifactId>libfreenect-platformartifactId>
                exclusion>
                <exclusion>
                    <groupId>org.bytedeco.javacpp-presetsgroupId>
                    <artifactId>libdc1394-platformartifactId>
                exclusion>
                <exclusion>
                    <groupId>org.bytedeco.javacpp-presetsgroupId>
                    <artifactId>flycapture-platformartifactId>
                exclusion>
            exclusions>
        dependency>
版本的话,选择1.4.1是因为它的功能相对完善,在够用的前提下体量相对较小,如果求新的话可以使用最新的版本,但是jar包的数量也会多一点点。
- nginx准备
这里使用nginx主要有两个作用:做前端代理、做流服务器,nginx可以做流服务器使用,但不是最优解,感兴趣的可以去了解一下SRS,这里不做扩展。
nginx用作流服务器需要安装nginx-http-flv-module模块,linux比较好安装,网上随便找个教程就行,但是windows的nginx模块安装非常麻烦,需要本地编译nginx的源代码,网上能找到的大多不能用,能用的都需要收费,我会把我用的windows版作为附件上传到本文,有需要可以下载使用。 - flv.js
如果你打算自己做前端,需要去准备一个flv.js,这是b站的HTML 5播放器的内核,网上有开源的代码,如果不想自己去找的话,在我本文附件的nginx的/html/js中也可以找到,当然,在html文件夹里也可以找到我的前端源码flv.html,如果不想自己写前端,就直接拿去用吧。
实现源码
JAVA可视化现在已基本淘汰,就不多说了,直接贴窗体代码,以下是运行时的第一个窗体,也就是配置推流ip和端口的窗体。
package camera;

import javax.swing.*;
import java.awt.event.ActionEvent;
import java.awt.event.ActionListener;
import java.io.IOException;
import java.net.InetSocketAddress;
import java.net.Socket;

public class LiveConfigFrame extends JFrame implements ActionListener{

    JLabel ipLabel;
    JTextField ip;
    JLabel portLabel;
    JTextField port;
    JButton start;

    public LiveConfigFrame(String title) {
        // 设置程序icon,不需要可以删掉
        this.setIconImage(new ImageIcon(LiveConfigFrame.class.getResource("q2.png")).getImage());
        this.setTitle(title);

        JTextArea label = new JTextArea("ip应为nginx运行的电脑/服务器ip," +
                "端口不建议修改,如果一定要修改," +
                "请保证该端口与nginx和前端页面访问端口一致。");
        label.setLineWrap(true);
        label.setEditable(false);
        label.setBounds(0, 160, 280, 100);
        this.port = new JTextField(String.valueOf(CommonConfig.putPort));
        this.port.setBounds(110, 75, 100, 30);
        this.ipLabel = new JLabel("输入推流ip:");
        this.ipLabel.setBounds(35, 20, 115, 30);
        this.portLabel = new JLabel("输入推流端口:");
        this.portLabel.setBounds(20, 75, 115, 30);
        this.start = new JButton("载入配置并开始");
        this.start.setBounds(60, 120, 150, 30);
        this.ip = new JTextField(CommonConfig.putHost);
        this.ip.setBounds(110, 20, 100, 30);

        // 绑定按钮点击事件
        start.addActionListener(this);
        this.add(port);
        this.add(ipLabel);
        this.add(label);
        this.add(portLabel);
        this.add(start);
        this.add(ip);
        this.setSize(300, 255);
        this.setLocationRelativeTo(null);
        this.setLayout(null);
        this.setDefaultCloseOperation(JFrame.EXIT_ON_CLOSE);
        this.setResizable(false);
    }

    @Override
    public void actionPerformed(ActionEvent e) {
        CommonConfig.putHost = ip.getText();
        CommonConfig.putPort = Integer.parseInt(port.getText());
        // 尝试连接,如果目标地址不可达,则不开启直播
        Socket rtmpSocket = new Socket();
        try {
            rtmpSocket.connect(new InetSocketAddress(CommonConfig.putHost, CommonConfig.putPort), 1000);
        } catch (IOException ioException) {
            JOptionPane.showMessageDialog(null, "ip地址或端口不可达,请重新配置", "提醒", JOptionPane.ERROR_MESSAGE);
            return;
        }
        Live.isAction = true;
        this.dispose();
    }

}
然后是显示直播画面的窗体,本来想多讲讲的,但又觉得不如把注释写细一点,直接上代码吧,一切都在注释里!
package camera;

import org.bytedeco.javacpp.avcodec;
import org.bytedeco.javacpp.avutil;
import org.bytedeco.javacv.*;

import javax.swing.*;
import java.util.HashMap;
import java.util.Map;

public class LiveClientFrame extends CanvasFrame {
    private OpenCVFrameGrabber grabber;
    private FFmpegFrameRecorder recorder;
    private final Map<String, String> videoOption;

    public LiveClientFrame(String title) {
        super(title);
        // 设置程序icon,不需要可以删掉
        this.setIconImage(new ImageIcon(LiveConfigFrame.class.getResource("q2.png")).getImage());
        this.setDefaultCloseOperation(JFrame.EXIT_ON_CLOSE);
        this.setVisible(false);

        this.videoOption = new HashMap<>();
        // 降低延迟
        this.videoOption.put("tune", "zerolatency");
        /**
         * 权衡quality(视频质量)和encode speed(编码速度) values(值): *
         * ultrafast(终极快),superfast(超级快), veryfast(非常快), faster(很快), fast(快), *
         * medium(中等), slow(慢), slower(很慢), veryslow(非常慢) *
         * ultrafast(终极快)提供最少的压缩(低编码器CPU)和最大的视频流大小;而veryslow(非常慢)提供最佳的压缩(高编码器CPU)的同时降低视频流的大小
         */
        this.videoOption.put("preset", "ultrafast");
        // 画面质量参数,0~51,建议18~28
        this.videoOption.put("crf", "25");
    }

    public void play() {
        // 视频捕获器,传0表示取默认摄像头,也可以使用本地视频文件路径
        grabber = new OpenCVFrameGrabber(0);
        try {
            // 开始抓取画面
            grabber.start();
            while (true) {
                // 如果当前窗口已关闭,则停止抓取,释放资源
                if (!this.isDisplayable()) {
                    grabber.stop();
                    System.exit(-1);
                }
                // 获取一帧画面
                Frame frame = grabber.grab();
                // 在当前窗体显示
                this.showImage(frame);
                // 获取推送视频流的地址(根据配置)
                String putPath = String.format("rtmp://%s:%s/live/stream", CommonConfig.putHost,
                        CommonConfig.putPort);
                // 开始推送视频流
                this.putStream(putPath, frame);
                // 停顿10ms几乎无感,防止推流太快
                Thread.sleep(10);
            }
        } catch (java.lang.Exception e) {
            e.printStackTrace();
            JOptionPane.showMessageDialog(null, "直播推流出现异常", "提醒", JOptionPane.ERROR_MESSAGE);
        }

    }

    private void putStream(String rtmpUrl, Frame frame) throws FrameRecorder.Exception {
        if (frame == null) {
            return;
        }
        // 只有第一次调用的时候进行初始化设置
        if (recorder == null) {
            // 帧率
            double framerate;
            // 尽量取原视频的帧率,但如果原视频帧率不符合常理,则设置为25.0
            if (grabber.getFrameRate() > 0 && grabber.getFrameRate() < 100) {
                framerate = grabber.getFrameRate();
            } else {
                framerate = 25.0;
            }
            // 初始化推流对象
            recorder = new FFmpegFrameRecorder(rtmpUrl, grabber.getImageWidth(), grabber.getImageHeight(), 0);
            recorder.setInterleaved(true);
            // 视频的一些基本参数设置
            recorder.setVideoOptions(this.videoOption);
            // 设置比特率
            recorder.setVideoBitrate(2500000);
            // h264编/解码器 h264是当前主流的视频编码
            recorder.setVideoCodec(avcodec.AV_CODEC_ID_H264);
            // 封装flv格式
            recorder.setFormat("flv");
            // 像素格式
            recorder.setPixelFormat(avutil.AV_PIX_FMT_YUV420P);
            // 视频帧率
            recorder.setFrameRate(framerate);
            // 关键帧间隔,一般与帧率相同或者是视频帧率的两倍
            recorder.setGopSize((int) framerate * 2);
            // 开始推流
            recorder.start();
        }
        // 推送一帧画面到流服务器
        recorder.record(frame);
    }

}
这里多提一嘴,上述代码中,推流地址的规则是【协议://ip:端口/appname/流名称】,其中协议是rtmp,ip和端口取决于程序运行时的配置,appname是nginx上rtmp配置的application的名称,如下图,我这里设置的live,所以上面代码里是写的live,而流名称其实是自定义的,可以区分多个不同的视频流,我这里只存在一个视频流,所以写死的叫stream。

写个main方法运行代码,这里用main方法只是方便测试,如果要集成在各种容器中也是类似的。
package camera;

/**
 * 简易直播
 */
public class Live {

    public static boolean isAction;

    public static void main(String[] args) throws Exception {
        LiveClientFrame liveClientFrame = new LiveClientFrame("直播推流中...");
        // 加载配置窗口
        LiveConfigFrame configFrame = new LiveConfigFrame("配置");
        // 打开配置窗口
        configFrame.setVisible(true);

        while (!isAction) {
            Thread.sleep(1000);
        }
        liveClientFrame.setVisible(true);
        liveClientFrame.setAlwaysOnTop(true);
        liveClientFrame.play();
    }

}
至此,我们的推流程序就搞定了!推流成功之后,前端需要可通过http://127.0.0.1:8899/live?port=1935&app=live&stream=stream进行拉流,具体也要根据nginx配置的来,端口8899和第一个live是因为配置如下图,而后面参数的port、app、stream则是和上面推rtmp流的地址保持一致!!

前端源码这里就不贴了,有需要的自行取附件的nginx中的html目录下找就行。
至此,一个简易的直播功能就完成了,但是这只能算是个demo,其中前端和后端都有很大的优化空间,我本次实际实现的业务也比这个demo要复杂很多很多,中间踩了很多坑,如果有类似功能需要的人看到的话,希望能给你一些启发,在阅读或者实践本文的内容中遇到任何问题,都可以联系我,我可能不会,但是可以一起学习~
以下后端源码:
点击获取源码
资源附件:
获取windows版Nginx 提取码yyds


