公众号开发精品教程(4)——生成带参数的二维码及合成海报
系列文章传送门
公众号开发精品教程(1)——绪论及环境搭建
公众号开发精品教程(2)——将项目接入微信及简单交互
公众号开发精品教程(3)——创建菜单
公众号开发精品教程(4)——生成带参数的二维码及合成海报
公众号开发精品教程(5)——获取用户基本信息与网页授权
整个项目的源码已经上传到百度网盘(博主的Git在维护,就不拿出来丢人了),永久有效,免费,在ChatConf类中填写自己的APPID和开发者密钥,在相关地方替换一下外网域名,即可使用,如有任何问题,欢迎在下方评论:
链接:百度网盘传送门
提取码:03eb
目录
前言
实现思路
生成带参数的二维码及制作海报
上传素材
通过客服消息接口,将海报推给用户
总结
前言
在上一篇文章中,我们在公众号创建了菜单,其中有view类型的、click类型的,view类型的比较简单,直接指定一个URL即可,click类型的按钮功能我们还没有完善好。那么这一篇文章,就带领大家实现生成海报的功能。
生成海报的场景在推广中也很常见,我们为用户生成一张海报图,通过奖励机制促使其分享出去,其他用户扫描海报中的二维码就可以将其引入到公众号来,如此循环往复,形成营销闭环……
下面是在我朋友的公众号生成的海报,我们今天就是要实现这样的功能!
实现思路
用户点击“生成海报”按钮,我们的功能点需要做以下这些事:
- 服务器端接收点击菜单的事件,判断EventKey
- 调用微信生成二维码的接口,换取二维码图片
- 将换取到的二维码,与现有的一张背景图结合,生成一张带二维码的海报
- 将海报图片发送给用户
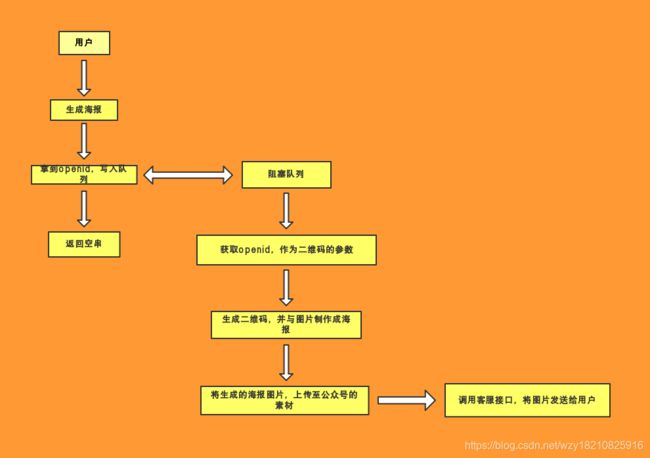
以上的四个步骤中,第二步、第三步是比较消耗性能的,因为涉及到远程IO,还有两张图片的结合绘制,而微信又要求必须在5秒内做出响应,所以我们接收到点击菜单的事件之后,只获取必要的信息(如ToUserName、FromUserName等),然后将生成海报的动作写入阻塞队列,再然后返回给微信一个空字符串即可,因为微信文档指出:若开发者无法保证在5s内做出响应,可回复空串,微信将不做任何处理。
那么我们返回了空串,怎样将这张图片发送给用户呢?这就需要调用客服接口了,而且发送图片消息,需要将这张图片上传至公众号的素材,所以今天我们要学习使用微信的三个接口:
生成二维码的接口、客服消息接口、上传素材接口
总体上来讲,流程如下:
今天也会是十足的干货,让我们开始吧!
生成带参数的二维码及制作海报
接下来的所有操作,请大家打开微信公众平台官方文档,以及登录到自己的测试号,并且将自己的主机映射到外网上。
根据文档,我们首先把创建临时二维码的接口地址、换取二维码图片的地址保存到之前的ChatConf类中:
//创建临时二维码的接口地址
public static final String CREATE_QRCODE_URL = "https://api.weixin.qq.com/cgi-bin/qrcode/create";
//换取二维码的接口地址,会返回一张图片,可直接使用IO流读取
public static final String GET_QRCODE_URL = "https://mp.weixin.qq.com/cgi-bin/showqrcode";
创建一个创建二维码的工具类:
package com.blog.wechat.utils;

import com.alibaba.fastjson.JSON;
import com.blog.wechat.conf.ChatConf;
import com.blog.wechat.conf.SSLConf;
import okhttp3.*;

import java.io.IOException;

/**
 *  创建二维码的工具类
 * @author 秋枫艳梦
 * @date 2019-06-08
 * */
public class QRCodeUtil {

    /**
     *  创建二维码
     * @param param 二维码参数
     * @return 获取到的ticket,调用换取二维码图片的接口时,需要使用此ticket
     * */
    public static String createQRCode(String param){
        OkHttpClient client = null;
        Request request = null;
        Response response = null;
        String ticket = "";

        try {
            client = new OkHttpClient.Builder()
                    .sslSocketFactory(SSLConf.getSslSocketFactory(),new SSLConf.TrustAllManager())
                    .hostnameVerifier(new SSLConf.TrustAllHost()).build();

            //请求体参数,JSON字符串,scene_str的value就是我们要放到二维码中的参数
            String body = "{\"expire_seconds\": 604800, \"action_name\": \"QR_STR_SCENE\", \"action_info\": {\"scene\": {\"scene_str\": \""+param+"\"}}}";
            //将JSON字符串放入请求体中
            RequestBody requestBody = RequestBody.create(MediaType.parse("application/json;charset=utf-8"),body);
            //实例化请求体对象
            request = new Request.Builder().url(ChatConf.CREATE_QRCODE_URL+"?access_token="+ChatConf.getToken())
                    .post(requestBody).build();
            //发起请求,获取响应体
            response = client.newCall(request).execute();
            if (response.isSuccessful()){
                ticket = JSON.parseObject(response.body().string()).getString("ticket");
            }
        }catch (IOException e){

        }finally {
            if (response!=null){
                response.close();
            }
            client.dispatcher().executorService().shutdown();
        }

        return ticket;
    }
}
然后创建一个生成海报的工具类,负责合成海报:
package com.blog.wechat.utils;

import javax.imageio.ImageIO;
import java.awt.*;
import java.awt.image.BufferedImage;
import java.io.File;
import java.io.IOException;
import java.net.URL;

/**
 *  生成海报的工具类
 * @author 秋枫艳梦
 * @date 2019-06-08
 * */
public class PosterUtil {

    /**
     *  生成海报
     * @param qrcodeUrl 换取二维码图片的地址,这个地址返回的是一张图片,所以我们待会可以直接IO流读取它
     * @param backgroundUrl 背景图的地址,需要定位到一张图片,如http://xxx.com/statics/img/demo.jpg
     * */
    public static File createPoster(String qrcodeUrl,String backgroundUrl){
        //最终的海报图
        BufferedImage posterImg = new BufferedImage(530,950,BufferedImage.TYPE_INT_RGB);
        //二维码图片
        BufferedImage qrcodeImg;
        //海报背景图
        BufferedImage backgroundImg;
        //File对象,将生成的海报保存到这个随机文件名,最后再返回给调用者
        File file = new File("C:\\Users\\Administrator\\Desktop\\poster\\"+System.currentTimeMillis()+".jpg");
        try {
            //读取二维码图片
            qrcodeImg = ImageIO.read(new URL(qrcodeUrl));
            backgroundImg = ImageIO.read(new URL(backgroundUrl));

            Graphics g = posterImg.getGraphics();//开启画图
            g.drawImage(backgroundImg.getScaledInstance(550, 978, Image.SCALE_DEFAULT), 0, 0, null); // 绘制缩小后的图
            g.drawImage(qrcodeImg.getScaledInstance(126, 126, Image.SCALE_DEFAULT), 47, 817, null); // 绘制缩小后的图
            g.setColor(Color.black);
            g.dispose();
            ImageIO.write(posterImg, "jpg", file);
        }catch (IOException e){

        }finally {

        }
        return file;
    }
}
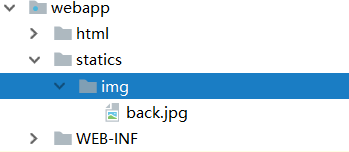
然后我们需要有一个阻塞队列,去监听生成海报的事件,在此之前我们先在项目中放一张背景图:
要确保能够访问(咳咳咳,不要在意图片是啥,重要的是知识):
然后我们写一个阻塞队列的类,用于监听生成海报的交互事件:
package com.blog.wechat.queue;

import com.blog.wechat.conf.ChatConf;
import com.blog.wechat.utils.PosterUtil;
import com.blog.wechat.utils.QRCodeUtil;

import java.io.File;
import java.util.concurrent.BlockingQueue;
import java.util.concurrent.LinkedBlockingDeque;

public class QRCodeQueue {
    //存放openid的阻塞队列.openid即微信推送的数据包中的FromUserName
    public static BlockingQueue codeQueue = new LinkedBlockingDeque<>();
    //监听队列的线程数量,这里我们开启15个线程去处理(并不是越多越好),提高吞吐量
    public static final int THREADS = 15;

    /**
     *  监听阻塞队列,执行相关业务
     * */
    public static void startListen(){
        for (int i = 0; i < THREADS; i++) {
            Runnable runnable = new Runnable() {
                @Override
                public void run() {
                    while (true){
                        try {
                            String openId = codeQueue.take();
                            //创建二维码,将用户的openid作为参数,用于后期数据消费,同时获取ticket
                            String ticket = QRCodeUtil.createQRCode(openId);
                            //生成海报,背景图
                            File file = PosterUtil.createPoster(ChatConf.GET_QRCODE_URL+"?ticket="+ticket,
                                    "http://3j4xkg.natappfree.cc/statics/img/back.jpg");
                            //先到这一步,我们先运行一下,看看现在的效果,再往下进行
                        }catch (Exception e){

                        }
                    }
                }
            };
            new Thread(runnable).start();
        }
    }
}
还记得我们在之前的文章中配置好的监听器吗?我们在监听器中启动这个方法,项目一启动就开始监听:
package com.blog.wechat.listener;

import com.blog.wechat.queue.QRCodeQueue;
import com.blog.wechat.utils.TokenUtil;

import javax.servlet.ServletContextEvent;
import javax.servlet.ServletContextListener;

public class ProjectListener implements ServletContextListener {
    @Override
    public void contextInitialized(ServletContextEvent servletContextEvent) {
        //定时获取access_token
        TokenUtil.startTask();
        //监听生成海报的事件
        QRCodeQueue.startListen();
    }

    @Override
    public void contextDestroyed(ServletContextEvent servletContextEvent) {

    }
}
然后,我们在控制层做一下处理,修改之前的代码:
//先判断是事件消息,还是普通消息
        if (map.get("MsgType").equals("event")){
            //如果是被关注事件,向用户回复内容,只需要将整理好的XML文本参数返回给微信即可
            if (map.get("Event").equals("subscribe")){
                content = "欢迎关注秋枫艳梦的测试公众号!";
            }else if (map.get("Event").equals("CLICK")){
                //点击菜单事件,判断EventKey
                if (map.get("EventKey").equals("CREATE_POSTER")){
                    //这里不返回空串了,没必要,因为所有的IO操作我们都是通过阻塞队列异步实现的
                    content = "正在为您制作海报,请稍等";
                    //写入到阻塞队列
                    try {
                        QRCodeQueue.codeQueue.put(toUser);
                    } catch (InterruptedException e) {
                        e.printStackTrace();
                    }
                }
            }
        }
好了,我们来测试一下吧:
看一下我们的文件夹:
OK,现在海报已经生成完毕,我们暂且不处理扫码事件,先把海报图片发送给用户。
上传素材
虽然我们已经生成了海报,但是想要发送给用户,必须要把这张图片作为素材上传到公众号,这是微信要求的,因为调用客服消息接口发送图片消息时,需要传入一个media_id,而这个参数需要在上传素材时获取。
以下是文档描述:
生死看淡,不服就干,来吧皮卡丘!
首先保存上传素材的接口地址(ChatConf.java):
//上传素材的接口地址
public static final String UPLOAD_FILE_URL = "https://api.weixin.qq.com/cgi-bin/media/upload";
然后写一个上传素材的工具类:
package com.blog.wechat.utils;

import com.alibaba.fastjson.JSON;
import com.blog.wechat.conf.ChatConf;
import com.blog.wechat.conf.SSLConf;
import okhttp3.*;

import java.io.File;
import java.io.IOException;

/**
 *  上传素材的工具类
 * @author 秋枫艳梦
 * @date 2019-06-08
 * */
public class UploadUtil {

    /**
     *  上传图片素材
     * @param file 素材文件
     * @return 素材ID,media_id
     * */
    public static String uploadImage(File file){
        OkHttpClient client = null;
        Request request = null;
        Response response = null;
        String mediaId = "";

        try {
            client = new OkHttpClient.Builder()
                    .sslSocketFactory(SSLConf.getSslSocketFactory(),new SSLConf.TrustAllManager())
                    .hostnameVerifier(new SSLConf.TrustAllHost()).build();

            MultipartBody body = new MultipartBody.Builder()
                    .setType(MultipartBody.FORM)
                    .addFormDataPart("media", file.getName(),RequestBody.create(MediaType.parse("application/octet-stream"),file))
                    .build();

            request = new Request.Builder().url(ChatConf.UPLOAD_FILE_URL+"?access_token="+ChatConf.getToken()+"&type=image")
                    .post(body).build();

            response = client.newCall(request).execute();
            if (response.isSuccessful()){
                //从响应体中获取media_id
                mediaId = JSON.parseObject(response.body().string()).getString("media_id");
            }
        }catch (IOException e){

        }finally {
            if (response!=null){
                response.close();
            }
            client.dispatcher().executorService().shutdown();
        }

        return mediaId;
    }
}
我们在阻塞队列中进行调用,修改之前的代码如下:
/**
     *  监听阻塞队列,执行相关业务
     * */
    public static void startListen(){
        for (int i = 0; i < THREADS; i++) {
            Runnable runnable = new Runnable() {
                @Override
                public void run() {
                    while (true){
                        try {
                            String openId = codeQueue.take();
                            //创建二维码,将用户的openid作为参数,用于后期数据消费,同时获取ticket
                            String ticket = QRCodeUtil.createQRCode(openId);
                            //生成海报,背景图
                            File file = PosterUtil.createPoster(ChatConf.GET_QRCODE_URL+"?ticket="+ticket,
                                    "http://3j4xkg.natappfree.cc/statics/img/back.jpg");
                            //将海报图片上传至素材
                            String mediaId = UploadUtil.uploadImage(file);
                            System.out.println("上传成功:"+mediaId);
                        }catch (Exception e){

                        }
                    }
                }
            };
            new Thread(runnable).start();
        }
    }
重新运行项目,我们可以看到素材已经上传成功了:
通过客服消息接口,将海报推给用户
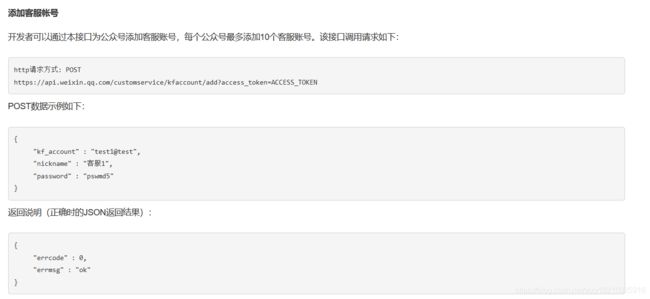
现在我们也有media_id了,接下来就可以通过客服消息接口,将图片发送给用户了。但是在这之前,我们需要先为自己的公众号创建客服,然后才能调用发送消息的接口。
保存一下这两个接口地址:
//添加客服的接口地址
public static final String ADD_SERVICE_URL = "https://api.weixin.qq.com/customservice/kfaccount/add";
//发送客服消息的接口地址
public static final String SEND_MESSAGE_URL = "https://api.weixin.qq.com/cgi-bin/message/custom/send";
然后先创建客服(这里的access_token就粘贴一个最新获取的,因为创建客服的动作一般只有一次,我们直接走main()方法):
注意:对于测试号,直接调用发送客服消息的接口就行了,这里只是为了记录正式号的场景。
package com.blog.wechat.utils;

import com.blog.wechat.conf.ChatConf;
import com.blog.wechat.conf.SSLConf;
import okhttp3.*;

import java.io.IOException;

/**
 *  客服接口的工具类
 * @author 秋枫艳梦
 * @date 2019-06-08
 * */
public class ServiceUtil {

    /**
     *  创建客服
     *
     * */
    public static void createService(){
        OkHttpClient client = null;
        Request request = null;
        Response response = null;

        try {
            client = new OkHttpClient.Builder()
                    .sslSocketFactory(SSLConf.getSslSocketFactory(),new SSLConf.TrustAllManager())
                    .hostnameVerifier(new SSLConf.TrustAllHost()).build();

            String param = "{\"kf_account\":\"service-1\",\"nickname\" : \"客服1\",\"password\" : \"pswd\"}";
            RequestBody requestBody = RequestBody.create(MediaType.parse("application/json;charset=utf-8"),param);
            request = new Request.Builder().url(ChatConf.ADD_SERVICE_URL+"?access_token=22_ueOrELkPh8yT5MTy4ESXYsPOupU9uxjGplVGbMokmkl12YYzYCXZt4c8dv67QTU1bHymP4YoqfPlO8ot8CpeHRCRlJKjIkGuKOQ9HVAXSYz99rjM0LL-i8w8ZUoPBGcAIAGSX")
                    .post(requestBody).build();

            response = client.newCall(request).execute();
            if (response.isSuccessful()){
                System.out.println(response.body().string());
            }
        }catch (IOException e){

        }finally {
            if (response!=null){
                response.close();
            }
            client.dispatcher().executorService().shutdown();
        }
    }

    public static void main(String[] args) {
        createService();
    }

}
然后我们继续在这个类里面写一个发送消息的方法,最后的ServiceUtil类:
package com.blog.wechat.utils;

import com.blog.wechat.conf.ChatConf;
import com.blog.wechat.conf.SSLConf;
import okhttp3.*;

import java.io.IOException;

/**
 *  客服接口的工具类
 * @author 秋枫艳梦
 * @date 2019-06-08
 * */
public class ServiceUtil {

    /**
     *  创建客服
     *
     * */
    public static void createService(){
        OkHttpClient client = null;
        Request request = null;
        Response response = null;

        try {
            client = new OkHttpClient.Builder()
                    .sslSocketFactory(SSLConf.getSslSocketFactory(),new SSLConf.TrustAllManager())
                    .hostnameVerifier(new SSLConf.TrustAllHost()).build();

            String param = "{\"kf_account\":\"service-1\",\"nickname\" : \"客服1\",\"password\" : \"pswd\"}";
            RequestBody requestBody = RequestBody.create(MediaType.parse("application/json;charset=utf-8"),param);
            request = new Request.Builder().url(ChatConf.ADD_SERVICE_URL+"?access_token=22_ueOrELkPh8yT5MTy4ESXYsPOupU9uxjGplVGbMokmkl12YYzYCXZt4c8dv67QTU1bHymP4YoqfPlO8ot8CpeHRCRlJKjIkGuKOQ9HVAXSYz99rjM0LL-i8w8ZUoPBGcAIAGSX")
                    .post(requestBody).build();

            response = client.newCall(request).execute();
            if (response.isSuccessful()){
                System.out.println(response.body().string());
            }
        }catch (IOException e){

        }finally {
            if (response!=null){
                response.close();
            }
            client.dispatcher().executorService().shutdown();
        }
    }

    public static void main(String[] args) {
        createService();
    }

    /**
     *  发送图片消息
     * @param openid 接收人
     * @param mediaId 素材ID
     * */
    public static void sendImage(String openid,String mediaId){
        OkHttpClient client = null;
        Request request = null;
        Response response = null;

        try {
            client = new OkHttpClient.Builder()
                    .sslSocketFactory(SSLConf.getSslSocketFactory(),new SSLConf.TrustAllManager())
                    .hostnameVerifier(new SSLConf.TrustAllHost()).build();

            String param = "{\"touser\":\""+openid+"\",\"msgtype\":\"image\",\"image\":{\"media_id\":\""+mediaId+"\"}}";
            RequestBody requestBody = RequestBody.create(MediaType.parse("application/json;charset=utf-8"),param);
            request = new Request.Builder().url(ChatConf.SEND_MESSAGE_URL+"?access_token="+ChatConf.getToken())
                    .post(requestBody).build();

            response = client.newCall(request).execute();
        }catch (IOException e){

        }finally {
            if (response!=null){
                response.close();
            }
            client.dispatcher().executorService().shutdown();
        }
    }
}
这样,我们只需要在阻塞队列中进行调用即可:
package com.blog.wechat.queue;

import com.blog.wechat.conf.ChatConf;
import com.blog.wechat.utils.PosterUtil;
import com.blog.wechat.utils.QRCodeUtil;
import com.blog.wechat.utils.ServiceUtil;
import com.blog.wechat.utils.UploadUtil;

import java.io.File;
import java.util.concurrent.BlockingQueue;
import java.util.concurrent.LinkedBlockingDeque;

public class QRCodeQueue {
    //存放openid的阻塞队列.openid即微信推送的数据包中的FromUserName
    public static BlockingQueue codeQueue = new LinkedBlockingDeque<>();
    //监听队列的线程数量,这里我们开启15个线程去处理(并不是越多越好),提高吞吐量
    public static final int THREADS = 15;

    /**
     *  监听阻塞队列,执行相关业务
     * */
    public static void startListen(){
        for (int i = 0; i < THREADS; i++) {
            Runnable runnable = new Runnable() {
                @Override
                public void run() {
                    while (true){
                        try {
                            String openId = codeQueue.take();
                            //创建二维码,将用户的openid作为参数,用于后期数据消费,同时获取ticket
                            String ticket = QRCodeUtil.createQRCode(openId);
                            //生成海报,背景图
                            File file = PosterUtil.createPoster(ChatConf.GET_QRCODE_URL+"?ticket="+ticket,
                                    "http://3j4xkg.natappfree.cc/statics/img/back.jpg");
                            //将海报图片上传至素材
                            String mediaId = UploadUtil.uploadImage(file);
                            //调用客服接口,发送图片消息,将海报发送给用户
                            ServiceUtil.sendImage(openId,mediaId);
                        }catch (Exception e){

                        }
                    }
                }
            };
            new Thread(runnable).start();
        }
    }
}
这样,就可以实现想要的效果了。我们来运行一下:
处理扫码事件
海报既然生成了,就肯定有扫这个二维码的时候,所以我们还需要处理一下扫码事件。
根据文档描述,扫码事件有两种情况:
- 用户未关注公众号,引导其进入到关注页面,如果用户取消关注,事件停止;如果用户关注了,那么微信会推给我们一个关注事件,与普通的关注事件的区别是有一个EventKey参数和Ticket参数
- 用户已关注公众号,微信则推给我们一个扫码事件,Event类型是SCAN,依然有EventKey参数和Ticket参数
根据以上信息,我们就可以在控制层做以下处理:
//先判断是事件消息,还是普通消息
        if (map.get("MsgType").equals("event")){
            //如果是被关注事件,向用户回复内容,只需要将整理好的XML文本参数返回给微信即可
            if (map.get("Event").equals("subscribe")){
                //如果没有EventKey,说明是普通关注,否则是扫码关注事件
                String eventKey = map.get("EventKey");
                if (eventKey==null){
                    content = "欢迎关注秋枫艳梦的测试公众号!";
                }else {
                    String param = eventKey.substring(eventKey.indexOf("_")+1);
                    //为了简单,这里直接返回一句话,实际业务场景要更复杂
                    content = "您是由openid为"+param+"的用户引进来的,我们已对其进行了奖励,您也可以生成海报,分享给朋友,可获得奖励";
                }
            }else if (map.get("Event").equals("CLICK")){
                //点击菜单事件,判断EventKey
                if (map.get("EventKey").equals("CREATE_POSTER")){
                    //这里不返回空串了,没必要,因为所有的IO操作我们都是通过阻塞队列异步实现的
                    content = "正在为您制作海报,请稍等";
                    //写入到阻塞队列
                    try {
                        QRCodeQueue.codeQueue.put(fromUser);
                    } catch (InterruptedException e) {
                        e.printStackTrace();
                    }
                }
            }else if (map.get("Event").equals("SCAN")){
                content = "您已关注我们的公众号,此活动仅限首次关注时参加一次";
            }
        }
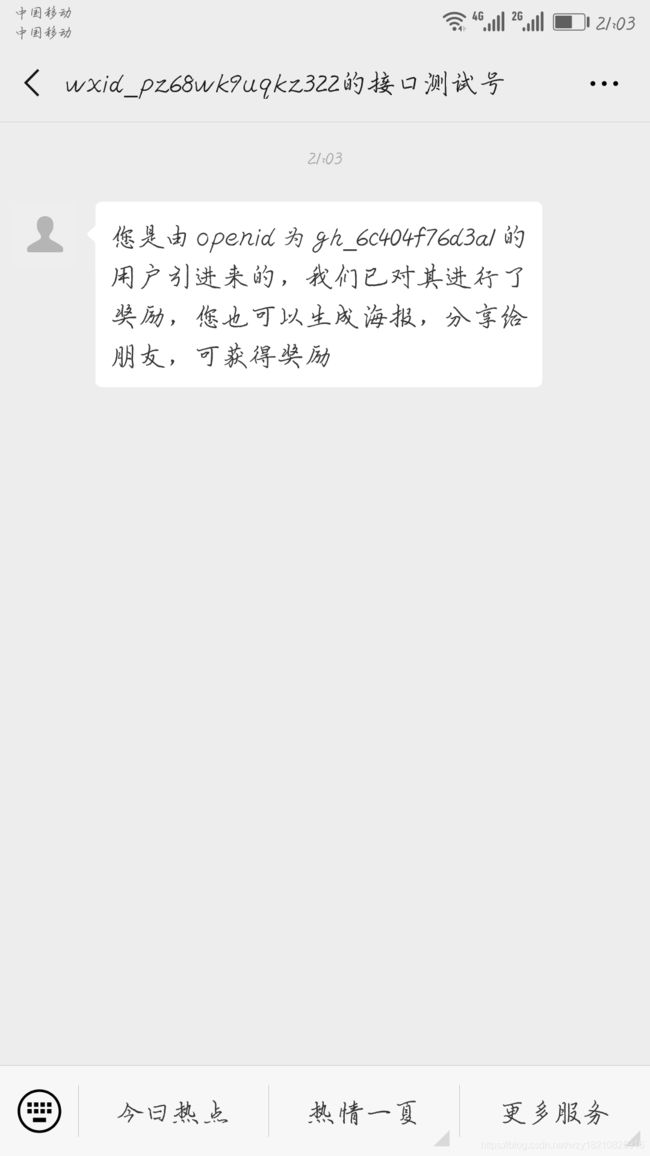
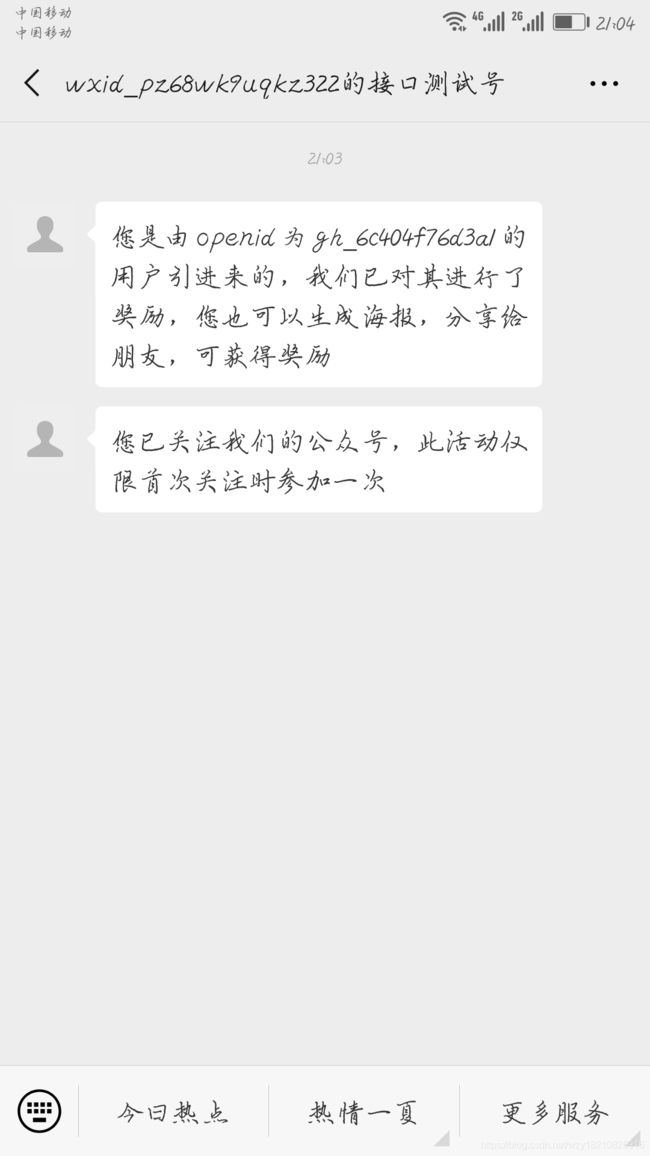
现在我们来测试一下,先取消关注公众号,再来扫码我上面生成的海报:
扫码关注时:
已经关注时,再次扫码:
总结
今天的内容就到这里了,干货还是挺多的。代码量相比之前有点多,但是思路还是很清晰的,希望大家越来越好!
在下一篇文章中,博主将带大家进行网页授权的开发,获取用户的基本信息,敬请关注!
