2023-12-29 服务器开发-Centos部署LNMP环境
摘要:
2023-12-29 服务器开发-Centos部署LNMP环境
centos7.2搭建LNMP具体步骤
1.配置防火墙
CentOS 7.0以上的系统默认使用的是firewall作为防火墙,
关闭firewall:
systemctl stop firewalld.service         #停止firewall
systemctl disable firewalld.service      #禁止firewall开机启动
2.安装以及配置nginx
(1)可直接使用服务器内自带的yum源进行安装。
yum install -y nginx
(2)修改nginx默认配置文件。
cd    /etc/nginx/                              #nginx的默认配置目录
mv    nginx.conf    nginx.conf.swf             #将通过yum安装自动生成的配置文件换名,不再使用。
mv     nginx.conf.default  nginx.conf          #将default文件修改为加载配置文件
(3)启动nginx,并访问。
systemctl start nginx.service                     #启动nginx
systemctl stop nginx.service                      #停止
systemctl restart nginx.service                   #重启
systemctl enable nginx.service
此时使用公网IP访问,即可打开nginx的默认欢迎页面。
3.安装php环境以及依赖扩展,并开启php
(1)安装环境。
yum install -y php-fpm php php-mysql php-gd libjpeg* php-ldap php-odbc php-pear php-xml php-xmlrpc php-mbstring php-bcmath php-mhashyum install php php-fpm php-mysql -y(2)启动php-fpm。
systemctl start php-fpm.service             #启动php-fpm
systemctl enable php-fpm.service            #设置开机启动
(3)修改配置文件,使nginx兼容php。
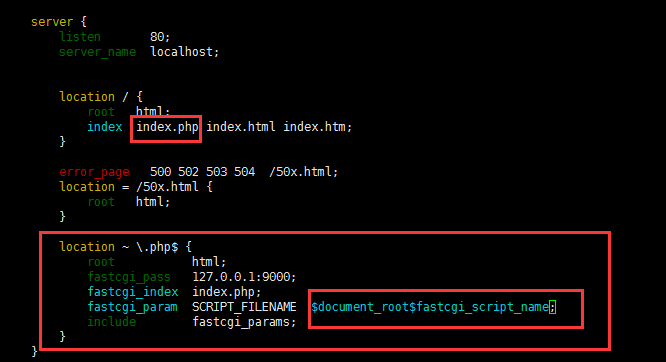
vim /etc/nginx/nginx.conf
在location内添加上index.php
把php识别之前的#注释给去掉就可以了,并且改一下fastcgi_param
location / {
root html;
index index.php index.html index.htm;
}

error_page 500 502 503 504 /50x.html;
location = /50x.html {
root html;
}

location ~ \.php$ {
root html;
fastcgi_pass 127.0.0.1:9000;
fastcgi_index index.php;
fastcgi_param SCRIPT_FILENAME    $document_root$fastcgi_script_name;
include fastcgi_params;
}
(4)重启nginx和php-fpm
systemctl restart php-fpm.service
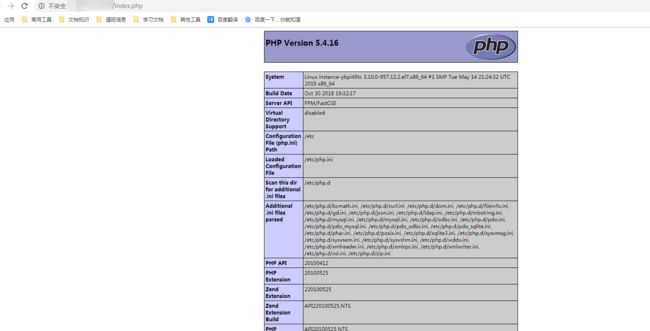
systemctl restart nginx.service(5)访问phpinfo验证
进入nginx默认根目录 cd /usr/share/nginx/html/
vim index.php
此时访问公网IP/index.php,可看到php的探针页面
4.安装mysql,并连接php进行验证
(1)centos7以上的系统,默认数据库为MariaDB,需要下载mysql源进行安装。
wget http://dev.mysql.com/get/mysql-community-release-el7-5.noarch.rpm
rpm -ivh mysql-community-release-el7-5.noarch.rpm
yum install -y mysql-community-server
成功安装之后重启mysql服务:
systemctl start mysqld
(2)安装后的mysql数据库是没有密码的,可进入数据库后授权,设置密码。
mysql -u root
mysql> use mysql;
mysql> update user set password=PASSWORD("这里输入root用户密码") where user='root';
mysql> flush privileges;
mysql> exit
(3)编写php测试mysql是否可连接的代码,并访问。
vim /usr/share/nginx/html/test.php
保存后,此时访问IP/test.php,可看到

至此,基于centos7.2系统所安装的LNMP环境已经全部搭建完毕。