理论:linux网络服务 -linux 网络设置
文章目录
- 一 :查看网络接口信息 ifconfig
-
- 1.1 查看所有活动网接口的信息
- 1.2 查看指定网络接口信息
- 二 : 查看主机名称 hostname
-
- 2.1 hostname命令
- 2.2 示例
- 三 :查看路由条目 route
-
- 3.1 route 命令
- 3.2 示例
- 四 : 查看网络连接情况 netstat
-
- 4.1 netstat 命令
- 4.2 常用选项
- 五 : 跟踪数据包 traceroute(中文译路由跟踪)
-
- 5.1 traceroute 命令
- 5.2 实验示例
- 六 : 域名解析 nslookup
-
- 6.1 nslookup 命令
- 6.2 示例
- 七 设置网络参数的方式
-
- 7.1 临时配置—— 使用命令调整网络参数
- 7.2 固定设置——— 通过配置文件修改网络参数
- 7.3 设置网络接口参数命令 ifconfig
- 八 :设置路由记录 route
-
- 8.1 添加到指定网段的路由记录
- 8.2 删除到网段的路由记录
- 8.3 删除路由表中的默认网关记录
- 8.4 向路由表中添加默认网关记录
- 九 : 修改主机名 hostname
-
- 9.1 hostname 命令
- 9.2 示例
- 十 : 网络接口配置文件
-
- 10.1 /etc/sysconfig/network-scripts/ 目录下
- 10.2 重启 network 网络服务
- 10.3 禁用网络接口
- 10.4 启用网络接口
- 10.5 双网卡配置
- 十一 : 配置文件
-
- 11.1 /etc/sysconfig/network 主机名称配置文件
- 11.2 /etc/resolv.conf 域名解析配置文件
- 11.3 /etc/hosts 本地主机映射文件
- 十二:总结:
前言了解:
-
查看网络设置
-
测试网络连接(配置路由,追踪路由)
-
使用网络配置命令
-
修改网络配置文件
一 :查看网络接口信息 ifconfig
1.1 查看所有活动网接口的信息
- 执行ifconfig 命令
1.2 查看指定网络接口信息
[root@localhost ~]# ifconfig 网络接口名
[root@localhost ~]# ifconfig ens33
'ens33第一块以太网卡的名称': flags=4163<UP,BROADCAST,RUNNING,MULTICAST>  mtu 1500
        'inet IP地址 192.168.139.153'  'netmask 子网掩码 255.255.255.0'  'broadcast 广播地址 192.168.139.255'
        inet6 fe80::413b:c9ad:e0e:1afc  prefixlen 64  scopeid 0x20<link>
        ether '00:0c:29:d6:c0:8a MAC地址'  txqueuelen 1000  (Ethernet)
        RX packets 28803  bytes 2100162 (2.0 MiB)
        RX errors 0  dropped 0  overruns 0  frame 0
        TX packets 21495  bytes 3147424 (3.0 MiB)
        TX errors 0  dropped 0 overruns 0  carrier 0  collisions 0
网卡名称ens33可以修改,修改时机是在安装系统时修改网卡名称
二 : 查看主机名称 hostname
2.1 hostname命令
-
查看或设置当前主机名
-
[root@localhost ~]# hostname
2.2 示例
[root@localhost ~]# hostname
localhost主机名.'localdomain含义是域,后期会提到'
[root@localhost ~]# hostnamectl --help
hostnamectl [OPTIONS...] COMMAND ...

Query or change system hostname.

  -h --help              Show this help
     --version           Show package version
     --no-ask-password   Do not prompt for password
  -H --host=[USER@]HOST  Operate on remote host
  -M --machine=CONTAINER Operate on local container
     --transient         Only set transient hostname
     --static            Only set static hostname
     --pretty            Only set pretty hostname

Commands:
  status                 Show current hostname settings
  set-hostname NAME      Set system hostname
  set-icon-name NAME     Set icon name for host
  set-chassis NAME       Set chassis type for host
  set-deployment NAME    Set deployment environment for host
  set-location NAME      Set location for host
  [root@localhost ~]# hostnamectl set-hostname gsy
[root@localhost ~]# su
[root@gsy ~]#
设置主机名的第二种方法,即修改配置文件
/etc/hostname 配置文件
[root@gsy ~]# hostname
gsy
[root@gsy ~]# vim /etc/sysconfig/network
'这个配置文件的修改适用于centos 6,不适用于centos 7'

# Created by anaconda
HOST=mysql
~
三 :查看路由条目 route
3.1 route 命令
- 查看或设置主机中的路由表信息
- route [-n]
- -n 以数字形式去显示
3.2 示例
[root@965 ~]# route -n
Kernel IP routing table
Destination     Gateway         Genmask         Flags Metric Ref    Use Iface
0.0.0.0         192.168.139.2   0.0.0.0         UG    100    0        0 ens33
192.168.122.0   0.0.0.0         255.255.255.0   U     0      0        0 virbr0
192.168.139.0   0.0.0.0         255.255.255.0   U     100    0        0 ens33
[root@965 ~]# route
Kernel IP routing table
Destination     Gateway         Genmask         Flags Metric Ref    Use Iface
default         gateway         0.0.0.0         UG    100    0        0 ens33
192.168.122.0   0.0.0.0         255.255.255.0   U     0      0        0 virbr0
192.168.139.0   0.0.0.0         255.255.255.0   U     100    0        0 ens33
Destination 网段 Gateway 网关 Genmask 子网掩码 metric 度量值
在centos 7中,route 与route -n 的区别在于默认网络改为数字0.0.0.0
在centos 6中,route 与route -n 具体区别如下显示
[root@gsy ~]# route
Kernel IP routing table
Destination     Gateway         Genmask         Flags Metric Ref    Use Iface
192.168.139.0   *               255.255.255.0   U     1      0        0 eth0
default         192.168.139.2   0.0.0.0         UG    0      0        0 eth0
[root@gsy ~]# route -n
Kernel IP routing table
Destination     Gateway         Genmask         Flags Metric Ref    Use Iface
192.168.139.0   0.0.0.0         255.255.255.0   U     1      0        0 eth0
0.0.0.0         192.168.139.2   0.0.0.0         UG    0      0        0 eth0
四 : 查看网络连接情况 netstat
4.1 netstat 命令
- 查看系统的网络连接状态、路由表、接口统计等信息
- netstat 【选项】
4.2 常用选项
| 选项 | 解释 |
|---|---|
| -a | 显示所有 |
| -n | 显示序列号 |
| -p | 显示端口协议 |
| -t | 显示TCP协议 |
| -u | 显示UDP协议 |
| -r | 显示route |
描述 DESCRIPTION
       Netstat 程序显示Linux网络子系统的信息。 输出信息的类型是由第一个参数控制的,就像这样:

   (none)
       无选项时,                               netstat                               显示打开的套接字.
       如果不指定任何地址族,那么打印出所有已配置地址族的有效套接字。

   --route , -r
       显示内核路由表。

   --groups , -g
       显示IPv4 和 IPv6的IGMP组播组成员关系信息。

   --interface=iface , -i
       显示所有网络接口列表或者是指定的 iface 。

   --masquerade , -M
       显示一份所有经伪装的会话列表。

   --statistics , -s
       显示每种协议的统计信息。

选项 OPTIONS
   --verbose , -v
       详细模式运行。特别是打印一些关于未配置地址族的有用信息。

   --numeric , -n
       显示数字形式地址而不是去解析主机、端口或用户名。

   --numeric-hosts
       显示数字形式的主机但是不影响端口或用户名的解析。

   --numeric-ports
       显示数字端口号,但是不影响主机或用户名的解析。

 --numeric-users
       显示数字的用户ID,但是不影响主机和端口名的解析。

   --protocol=family , -A
       指定要显示哪些连接的地址族(也许在底层协议中可以更好地描述)。                             family
       以逗号分隔的地址族列表,比如 inet, unix, ipx, ax25, netrom, 和 ddp。 这样和使用 --inet,  --unix
       (-x), --ipx, --ax25, --netrom, 和 --ddp 选项效果相同。

       地址族 inet 包括raw, udp 和tcp 协议套接字。

   -c, --continuous
       将使 netstat 不断地每秒输出所选的信息。

   -e, --extend
       显示附加信息。使用这个选项两次来获得所有细节。

   -o, --timers
       包含与网络定时器有关的信息。

   -p, --program
       显示套接字所属进程的PID和名称。

   -l, --listening
       只显示正在侦听的套接字(这是默认的选项)

   -a, --all
       显示所有正在或不在侦听的套接字。加上 --interfaces 选项将显示没有标记的接口。

   -F
       显示FIB中的路由信息。(这是默认的选项)

   -C
       显示路由缓冲中的路由信息。
 delay
       netstat将循环输出统计信息,每隔 delay 秒。
[root@965 ~]# netstat -natp
Active Internet connections (servers and established)
Proto Recv-Q Send-Q Local Address           Foreign Address         State       PID/Program name
tcp        0      0 0.0.0.0:111             0.0.0.0:*               LISTEN      1/systemd
tcp        0      0 192.168.122.1:53        0.0.0.0:*               LISTEN      1296/dnsmasq
tcp        0      0 0.0.0.0:22              0.0.0.0:*               LISTEN      1116/sshd
tcp        0      0 127.0.0.1:631           0.0.0.0:*               LISTEN      1117/cupsd
tcp        0      0 127.0.0.1:25            0.0.0.0:*               LISTEN      1300/master
tcp        0      0 127.0.0.1:6010          0.0.0.0:*               LISTEN      13953/sshd: root@pt
tcp        0     36 192.168.139.153:22      192.168.139.1:64738     ESTABLISHED 13953/sshd: root@pt
tcp6       0      0 :::111                  :::*                    LISTEN      1/systemd
tcp6       0      0 :::22                   :::*                    LISTEN      1116/sshd
tcp6       0      0 ::1:631                 :::*                    LISTEN      1117/cupsd
tcp6       0      0 ::1:25                  :::*                    LISTEN      1300/master
tcp6       0      0 ::1:6010                :::*                    LISTEN      13953/sshd: root@pt
sshd 指远程访问
可以结合检索命令去针对性查看
[root@965 ~]# netstat -natp | grep "22"
tcp        0      0 192.168.122.1:53        0.0.0.0:*               LISTEN      1296/dnsmasq
tcp        0      0 0.0.0.0:22              0.0.0.0:*               LISTEN      1116/sshd
tcp        0     36 192.168.139.153:22      192.168.139.1:64738     ESTABLISHED 13953/sshd: root@pt
tcp6       0      0 :::22                   :::*                    LISTEN      1116/sshd
[root@965 ~]# netstat -natp | grep ssh
tcp        0      0 0.0.0.0:22              0.0.0.0:*               LISTEN      1116/sshd
tcp        0      0 127.0.0.1:6010          0.0.0.0:*               LISTEN      13953/sshd: root@pt
tcp        0     36 192.168.139.153:22      192.168.139.1:64738     ESTABLISHED 13953/sshd: root@pt
tcp6       0      0 :::22                   :::*                    LISTEN      1116/sshd
tcp6       0      0 ::1:6010                :::*                    LISTEN      13953/sshd: root@pt
[root@965 ~]# netstat -naup
Active Internet connections (servers and established)
Proto Recv-Q Send-Q Local Address           Foreign Address         State       PID/Program name
udp        0      0 192.168.139.153:40345   192.168.139.2:53        ESTABLISHED 129301/hostname
udp        0      0 0.0.0.0:11836           0.0.0.0:*                           7860/dhclient
udp        0      0 0.0.0.0:44612           0.0.0.0:*                           707/avahi-daemon: r
udp      832      0 192.168.139.153:56951   192.168.139.2:53        ESTABLISHED 124308/ssh
udp        0      0 192.168.122.1:53        0.0.0.0:*                           1296/dnsmasq
udp        0      0 0.0.0.0:67              0.0.0.0:*                           1296/dnsmasq
udp        0      0 0.0.0.0:68              0.0.0.0:*                           7860/dhclient
udp        0      0 0.0.0.0:5353            0.0.0.0:*                           707/avahi-daemon: r
udp        0      0 127.0.0.1:323           0.0.0.0:*                           732/chronyd
udp6       0      0 ::1:323                 :::*                                732/chronyd
udp6       0      0 :::49510                :::*                                7860/dhclient
[root@965 ~]# netstat -naup | grep 22
udp        0      0 192.168.122.1:53        0.0.0.0:*                           1296/dnsmasq
[root@965 ~]# netstat -rn
Kernel IP routing table
Destination     Gateway         Genmask         Flags   MSS Window  irtt Iface
0.0.0.0         192.168.139.2   0.0.0.0         UG        0 0          0 ens33
192.168.122.0   0.0.0.0         255.255.255.0   U         0 0          0 virbr0
192.168.139.0   0.0.0.0         255.255.255.0   U         0 0          0 ens33
[root@965 ~]# netstat -r
Kernel IP routing table
Destination     Gateway         Genmask         Flags   MSS Window  irtt Iface
default         gateway         0.0.0.0         UG        0 0          0 ens33
192.168.122.0   0.0.0.0         255.255.255.0   U         0 0          0 virbr0
192.168.139.0   0.0.0.0         255.255.255.0   U         0 0          0 ens33
五 : 跟踪数据包 traceroute(中文译路由跟踪)
5.1 traceroute 命令
- 测试从当前主机到目的主机之间经过的网络节点
- traceroute 目标主机地址
5.2 实验示例
[root@965 network-scripts]# vim /etc/sysconfig/network-scripts/ifcfg-ens33

TYPE="Ethernet"
PROXY_METHOD="none"
BROWSER_ONLY="no"
BOOTPROTO="dhcp"
DEFROUTE="yes"
IPV4_FAILURE_FATAL="no"
IPV6INIT="yes"
IPV6_AUTOCONF="yes"
IPV6_DEFROUTE="yes"
IPV6_FAILURE_FATAL="no"
IPV6_ADDR_GEN_MODE="stable-privacy"
NAME="ens33"
UUID="0f432513-5d7a-455c-88b4-257a9a1dbb45"
DEVICE="ens33"
ONBOOT="yes"

修改为

TYPE="Ethernet"
PROXY_METHOD="none"
BROWSER_ONLY="no"
BOOTPROTO="static"	'将原来的dhcp自动分配ip地址协议改为静态协议'
DEFROUTE="yes"
IPV4_FAILURE_FATAL="no"
IPV6INIT="yes"
IPV6_AUTOCONF="yes"
IPV6_DEFROUTE="yes"
IPV6_FAILURE_FATAL="no"
IPV6_ADDR_GEN_MODE="stable-privacy"
NAME="ens33"
UUID="0f432513-5d7a-455c-88b4-257a9a1dbb45"
DEVICE="ens33"
ONBOOT="yes"
IPADDR=192.168.10.10	'ip地址为192.168.10.10'
NETMASK=255.255.255.0	'子网掩码为255.255.255.0'
GATEWAY=192.168.10.1	'网关为192.168.10.1'

:wq
配置完毕后重启网络服务
[root@965 network-scripts]# systemctl restart network
[root@965 network-scripts]# service network restart
Restarting network (via systemctl):                [  确定  ]
[root@965 network-scripts]# ifconfig
ens33: flags=4163<UP,BROADCAST,RUNNING,MULTICAST>  mtu 1500
        inet 192.168.10.10  netmask 255.255.255.0  broadcast 192.168.10.255
        inet6 fe80::413b:c9ad:e0e:1afc  prefixlen 64  scopeid 0x20<link>
        ether 00:0c:29:d6:c0:8a  txqueuelen 1000  (Ethernet)
        RX packets 121888  bytes 9724226 (9.2 MiB)
        RX errors 0  dropped 0  overruns 0  frame 0
        TX packets 161138  bytes 29666777 (28.2 MiB)
        TX errors 0  dropped 0 overruns 0  carrier 0  collisions 0
host1 配置完毕,接下来配置host2
然后配置R1和R2
R1#conf t
Enter configuration commands, one per line.  End with CNTL/Z.
R1(config)#int f0/0
R1(config-if)#ip add 192.168.10.1 255.255.255.0
R1(config-if)#no shut
*Mar  1 00:12:04.515: %LINK-3-UPDOWN: Interface FastEthernet0/0, changed state to up
*Mar  1 00:12:05.515: %LINEPROTO-5-UPDOWN: Line protocol on Interface FastEthernet0/0, changed state to up
R1(config-if)#int f0/1
R1(config-if)#ip add 192.168.20.1 255.255.255.0
R1(config-if)#no shut
*Mar  1 00:12:19.323: %LINK-3-UPDOWN: Interface FastEthernet0/1, changed state to up
*Mar  1 00:12:20.323: %LINEPROTO-5-UPDOWN: Line protocol on Interface FastEthernet0/1, changed state to up
R1(config-if)#ip route 0.0.0.0 0.0.0.0 192.168.20.20
R2#conf t
Enter configuration commands, one per line.  End with CNTL/Z.
R2(config)#int f0/0
R2(config-if)#ip add 192.168.20.20 255.255.255.0
R2(config-if)#no shut
R2(config-if)#int f0/1
*Mar  1 00:12:46.323: %LINK-3-UPDOWN: Interface FastEthernet0/0, changed state to up
*Mar  1 00:12:47.323: %LINEPROTO-5-UPDOWN: Line protocol on Interface FastEthernet0/0, changed state to up
R2(config-if)#ip add 192.168.30.1 255.255.255.0
R2(config-if)#no shut
R2(config-if)#ip route 0.0.0.0 0.0.0.0 192.168.20.1
[root@965 ~]# ping 192.168.30.30
PING 192.168.30.30 (192.168.30.30) 56(84) bytes of data.
64 bytes from 192.168.30.30: icmp_seq=3 ttl=126 time=47.3 ms
64 bytes from 192.168.30.30: icmp_seq=4 ttl=126 time=43.7 ms
64 bytes from 192.168.30.30: icmp_seq=5 ttl=126 time=43.4 ms
64 bytes from 192.168.30.30: icmp_seq=6 ttl=126 time=42.4 ms
^C
--- 192.168.30.30 ping statistics ---
6 packets transmitted, 4 received, 33% packet loss, time 5013ms
rtt min/avg/max/mdev = 42.432/44.244/47.386/1.881 ms
[root@965483 ~]# traceroute 192.168.30.30
traceroute to 192.168.30.30 (192.168.30.30), 30 hops max, 60 byte packets
 1  gateway (192.168.10.1)  3.021 ms  12.829 ms  23.697 ms
 2  192.168.20.20 (192.168.20.20)  33.630 ms  43.493 ms  54.322 ms
 3  * * *
 4  * * *
 5  * * *
 6  * * *
 7  * * *
 8  * * *
 9  * * *
10  * * *
11  * * *
12  * * *
13  * * *
14  * * *
15  * * *
16  * * *
17  * * *
18  * * *
19  * * *
20  * * *
21  * * *
22  * * *
23  * * *
24  * * *
25  * * *
26  * * *
27  * * *
28  * * *
29  * * *
30  * * *
启用server中的相关配置,可以实现远程终端链接
中间IP地址自动改变,要及时调整
六 : 域名解析 nslookup
6.1 nslookup 命令
- 测试DNS命令
- nslookup 目标主机地址 [DNS服务器地址]
6.2 示例
[root@localhost ~]# nslookup www.google.com
Server:		192.168.139.2	'dns服务器地址'
Address:	192.168.139.2#53

Non-authoritative answer:	'反馈的解析结果'
Name:	www.google.com
Address: 74.86.226.234
windows中的检测
C:\Users\GSY>nslookup www.google.com
服务器:  ns.gwbnnj.net.cn	'DNS服务器地址'
Address:  211.162.31.80

非权威应答:
名称:    www.google.com
Addresses:  2404:6800:4012::2004	'ipv6的地址'
          74.86.226.234	'反馈的结果'
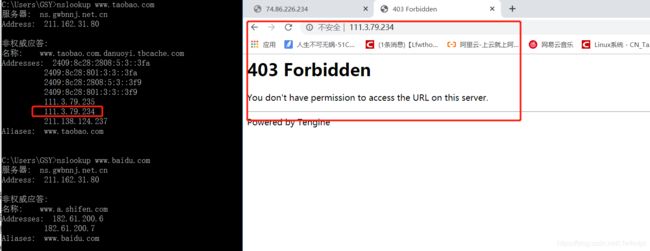
C:\Users\GSY>nslookup www.taobao.com
服务器:  ns.gwbnnj.net.cn
Address:  211.162.31.80

非权威应答:
名称:    www.taobao.com.danuoyi.tbcache.com	'taobao实际的域名'
Addresses:  2409:8c28:2808:5:3::3fa
          2409:8c28:801:3:3::3fa
          2409:8c28:2808:5:3::3f9
          2409:8c28:801:3:3::3f9
          111.3.79.235
          111.3.79.234
          211.138.124.237
Aliases:  www.taobao.com      	'别名'
服务器指的是DNS解析服务器,后面nj是南京的意思
可以把解析后的地址复制到浏览器中去访问,百度的可以,但是淘宝的不行,这是因为做了安全防护,dns服务器也做了相应的防护
七 设置网络参数的方式
7.1 临时配置—— 使用命令调整网络参数
- 简单、快速,可直接修改运行中的网络参数
- 一般只适合在调试网络的过程中使用
- 系统重启以后,所做的修改将会失效
7.2 固定设置——— 通过配置文件修改网络参数
- 修改各项参数的配置文件
- 适合对服务器设置固定参数时使用
- 需要重载网络服务或者重启以后才会生效
7.3 设置网络接口参数命令 ifconfig
-
设置网络接口的IP地址、子网掩码
ifconfig 接口名(网卡名) ip地址 [netmask 子网掩码]
ifconfig 网络接口 ip地址[/掩码长度]
-
禁用或重新激活网卡
ifconfig 网络接口 up
ifconfig 网络接口 down
-
设置虚拟网络接口
ifconfig 接口名:序号 IP地址
接口名 ens33
[root@localhost ~]# ifconfig
ens33: flags=4163<UP,BROADCAST,RUNNING,MULTICAST>  mtu 1500
        inet 192.168.139.157'ip地址'  netmask 255.255.255.0 '子网掩码' broadcast 192.168.139.255	'广播地址'
        inet6 fe80::413b:c9ad:e0e:1afc  prefixlen 64  scopeid 0x20<link>
        ether 00:0c:29:d6:c0:8a  txqueuelen 1000  (Ethernet)
        RX packets 4494  bytes 300077 (293.0 KiB)
        RX errors 0  dropped 0  overruns 0  frame 0
        TX packets 144  bytes 15965 (15.5 KiB)
        TX errors 0  dropped 0 overruns 0  carrier 0  collisions 0
临时修改,只用与维护时使用,
序号,0-123456,相当于逻辑接口,
当一台主机需要用多台IP地址时,可以使用逻辑接口配置
[root@localhost ~]# ifconfig ens33 8.8.8.8
[root@localhost ~]# ifconfig
ens33: flags=4163<UP,BROADCAST,RUNNING,MULTICAST>  mtu 1500
        'inet 8.8.8.8  netmask 255.0.0.0  broadcast 8.255.255.255'
        inet6 fe80::413b:c9ad:e0e:1afc  prefixlen 64  scopeid 0x20<link>
        ether 00:0c:29:d6:c0:8a  txqueuelen 1000  (Ethernet)
        RX packets 4544  bytes 305199 (298.0 KiB)
        RX errors 0  dropped 0  overruns 0  frame 0
        TX packets 162  bytes 19317 (18.8 KiB)
        TX errors 0  dropped 0 overruns 0  carrier 0  collisions 0
[root@localhost ~]# ifconfig ens33 8.8.8.8/24
[root@localhost ~]# ifconfig
ens33: flags=4163<UP,BROADCAST,RUNNING,MULTICAST>  mtu 1500
        'inet 8.8.8.8  netmask 255.255.255.0  broadcast 8.8.8.255'
        inet6 fe80::413b:c9ad:e0e:1afc  prefixlen 64  scopeid 0x20<link>
        ether 00:0c:29:d6:c0:8a  txqueuelen 1000  (Ethernet)
        RX packets 4568  bytes 308317 (301.0 KiB)
        RX errors 0  dropped 0  overruns 0  frame 0
        TX packets 170  bytes 21475 (20.9 KiB)
        TX errors 0  dropped 0 overruns 0  carrier 0  collisions 0
[root@localhost ~]# ifconfig ens33:1 192.168.9.9
[root@localhost ~]# ifconfig
ens33: flags=4163<UP,BROADCAST,RUNNING,MULTICAST>  mtu 1500
        inet 8.8.8.8  netmask 255.255.255.0  broadcast 8.8.8.255
        inet6 fe80::413b:c9ad:e0e:1afc  prefixlen 64  scopeid 0x20<link>
        ether 00:0c:29:d6:c0:8a  txqueuelen 1000  (Ethernet)
        RX packets 4663  bytes 315910 (308.5 KiB)
        RX errors 0  dropped 0  overruns 0  frame 0
        TX packets 197  bytes 25003 (24.4 KiB)
        TX errors 0  dropped 0 overruns 0  carrier 0  collisions 0

ens33:1: flags=4163<UP,BROADCAST,RUNNING,MULTICAST>  mtu 1500
        inet 192.168.9.9  netmask 255.255.255.0  broadcast 192.168.9.255
        ether 00:0c:29:d6:c0:8a  txqueuelen 1000  (Ethernet)
[root@localhost ~]# ifconfig ens33:1 down	‘关掉ens33:1’
[root@localhost ~]# ifconfig
ens33: flags=4163<UP,BROADCAST,RUNNING,MULTICAST>  mtu 1500
        inet 8.8.8.8  netmask 255.255.255.0  broadcast 8.8.8.255
        inet6 fe80::413b:c9ad:e0e:1afc  prefixlen 64  scopeid 0x20<link>
        ether 00:0c:29:d6:c0:8a  txqueuelen 1000  (Ethernet)
        RX packets 4683  bytes 317292 (309.8 KiB)
        RX errors 0  dropped 0  overruns 0  frame 0
        TX packets 203  bytes 25510 (24.9 KiB)
        TX errors 0  dropped 0 overruns 0  carrier 0  collisions 0
[root@localhost ~]# ifconfig ens33:1 up	'再次开启会发现无法找到这个地址'
SIOCSIFFLAGS: 无法指定被请求的地址
[root@localhost ~]# ifconfig ens33 down	'关掉物理网卡ens33'
[root@localhost ~]# ifconfig
lo: flags=73<UP,LOOPBACK,RUNNING>  mtu 65536
        inet 127.0.0.1  netmask 255.0.0.0
        inet6 ::1  prefixlen 128  scopeid 0x10<host>
        loop  txqueuelen 1  (Local Loopback)
        RX packets 1672  bytes 144872 (141.4 KiB)
        RX errors 0  dropped 0  overruns 0  frame 0
        TX packets 1672  bytes 144872 (141.4 KiB)
        TX errors 0  dropped 0 overruns 0  carrier 0  collisions 0

virbr0: flags=4099<UP,BROADCAST,MULTICAST>  mtu 1500
        inet 192.168.122.1  netmask 255.255.255.0  broadcast 192.168.122.255
        ether 52:54:00:e1:7d:d2  txqueuelen 1000  (Ethernet)
        RX packets 0  bytes 0 (0.0 B)
        RX errors 0  dropped 0  overruns 0  frame 0
        TX packets 0  bytes 0 (0.0 B)
        TX errors 0  dropped 0 overruns 0  carrier 0  collisions 0

[root@localhost ~]# ifconfig ens33 up	'可以成功开启'
[root@localhost ~]# ifconfig
ens33: flags=4163<UP,BROADCAST,RUNNING,MULTICAST>  mtu 1500
        inet 192.168.139.157  netmask 255.255.255.0  broadcast 192.168.139.255
        inet6 fe80::413b:c9ad:e0e:1afc  prefixlen 64  scopeid 0x20<link>
        ether 00:0c:29:d6:c0:8a  txqueuelen 1000  (Ethernet)
        RX packets 4739  bytes 322970 (315.4 KiB)
        RX errors 0  dropped 0  overruns 0  frame 0
        TX packets 229  bytes 29270 (28.5 KiB)
        TX errors 0  dropped 0 overruns 0  carrier 0  collisions 0
逻辑子接口(例:ens33:1)的down相当于把IP地址释放掉了
八 :设置路由记录 route
8.1 添加到指定网段的路由记录
- route add -net 网段地址 gw IP地址
8.2 删除到网段的路由记录
- route del -net 网段地址 gw IP地址
8.3 删除路由表中的默认网关记录
- route del defalut gw IP地址
8.4 向路由表中添加默认网关记录
- route add default gw IP地址
gw 下一跳地址
-net 目标网段
Destination     Gateway         Genmask         Flags Metric Ref    Use Iface
'0.0.0.0         192.168.139.2   0.0.0.0         UG    100    0        0 ens33
默认网关,即可以变相理解为默认路由
[root@localhost ~]# route add -net 192.168.10.0 gw 192.168.139.157
SIOCADDRT: 无效的参数
[root@localhost ~]# route add -net 192.168.10.0/24 gw 192.168.139.157
[root@localhost ~]# route
Kernel IP routing table
Destination     Gateway         Genmask         Flags Metric Ref    Use Iface
default         gateway         0.0.0.0         UG    100    0        0 ens33
'192.168.10.0    localhost.local 255.255.255.0   UG    0      0 '       0 ens33
192.168.122.0   0.0.0.0         255.255.255.0   U     0      0        0 virbr0
192.168.139.0   0.0.0.0         255.255.255.0   U     100    0        0 ens33
[root@localhost ~]# route -n
Kernel IP routing table
Destination     Gateway         Genmask         Flags Metric Ref    Use Iface
0.0.0.0         192.168.139.2   0.0.0.0         UG    100    0        0 ens33
192.168.10.0    192.168.139.157 255.255.255.0   UG    0      0        0 ens33
192.168.122.0   0.0.0.0         255.255.255.0   U     0      0        0 virbr0
192.168.139.0   0.0.0.0         255.255.255.0   U     100    0        0 ens33
[root@localhost ~]# route add -net 192.168.100.0/24 gw 192.168.139.157
[root@localhost ~]# route -n
Kernel IP routing table
Destination     Gateway '下一跳'    Genmask     Flags Metric Ref    Use Iface
0.0.0.0         192.168.139.2   0.0.0.0         UG    100    0        0 ens33
192.168.10.0    192.168.139.157 255.255.255.0   UG    0      0        0 ens33
'192.168.100.0   192.168.139.157 255.255.255.0   UG    0      0        0 ens33
192.168.122.0   0.0.0.0         255.255.255.0   U     0      0        0 virbr0
192.168.139.0   0.0.0.0         255.255.255.0   U     100    0        0 ens33
[root@localhost ~]# route del -net 192.168.100.0/24 gw 192.168.139.157
[root@localhost ~]# route -n
Kernel IP routing table
Destination     Gateway         Genmask         Flags Metric Ref    Use Iface
0.0.0.0         192.168.139.2   0.0.0.0         UG    100    0        0 ens33
192.168.10.0    192.168.139.157 255.255.255.0   UG    0      0        0 ens33
192.168.122.0   0.0.0.0         255.255.255.0   U     0      0        0 virbr0
192.168.139.0   0.0.0.0         255.255.255.0   U     100    0        0 ens33
九 : 修改主机名 hostname
9.1 hostname 命令
- 设置主机名
hostname 主机名称
9.2 示例
[root@localhost ~]# hostname gsy	'第一种方法'
[root@localhost ~]# su
[root@gsy ~]# hostnamectl set-hostname hostname	'第二种方法'
[root@gsy ~]# su	'或者bash'
[root@hostname ~]#
第三种方法:vim /etc/hostname 修改主机名,然后保存,关机重启即可
十 : 网络接口配置文件
10.1 /etc/sysconfig/network-scripts/ 目录下
- ifcfg-ens33:第一块以太网卡的配置文件
- …
[root@dabendan ~]# vim /etc/sysconfig/network-scripts/ifcfg-ens33

TYPE="Ethernet"	'类型,以太网卡'
PROXY_METHOD="none"		'代理方法'
BROWSER_ONLY="no"		'浏览器'
BOOTPROTO="dhcp"	'雇佣,ip地址获取,dhcp获取'
DEFROUTE="yes"			'默认路由'
IPV4_FAILURE_FATAL="no"		'ipv4失败验证     否'
IPV6INIT="yes"	'ipv6 初始化   开启'
IPV6_AUTOCONF="yes"	'ipv6自动配置     开启'
IPV6_DEFROUTE="yes"	'ipv6 默认配置 开启'
IPV6_FAILURE_FATAL="no"	'ipv6失败验证   否'
IPV6_ADDR_GEN_MODE="stable-privacy"	'ipv6地址协议模式v6为稳定私有'
NAME="ens33"	'名称'
UUID="0f432513-5d7a-455c-88b4-257a9a1dbb45"
DEVICE="ens33"	'设备'
ONBOOT="yes"	'在boot内核启动时网卡开启'

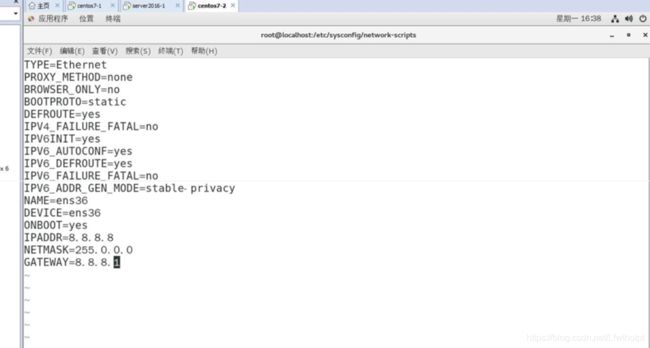
可以修改为静态IP地址网卡
BOOTPROTO="static"	'静态获取'
IPADDR=指定ip地址
NETMASK=指定子网掩码
GAREWAY=指定网关
10.2 重启 network 网络服务
-
[root@localhost ~]# systemctl restart network
10.3 禁用网络接口
-
[root@localhost ~]# ifdown ens33
10.4 启用网络接口
-
[root@localhost ~]# ifup ens33
10.5 双网卡配置
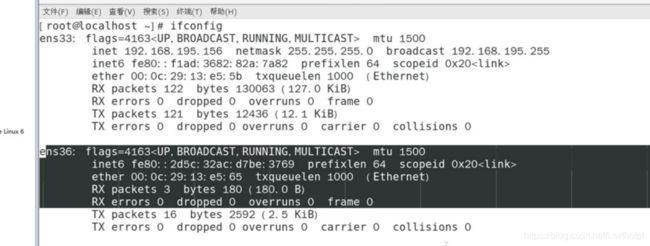
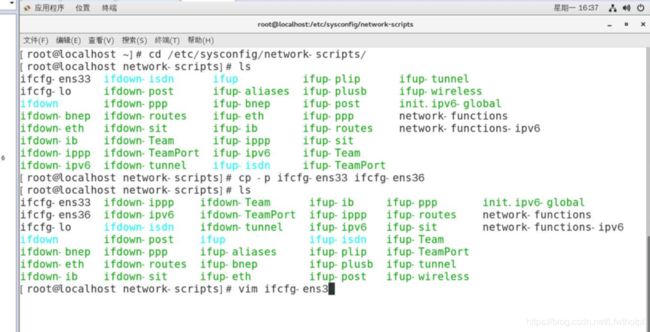
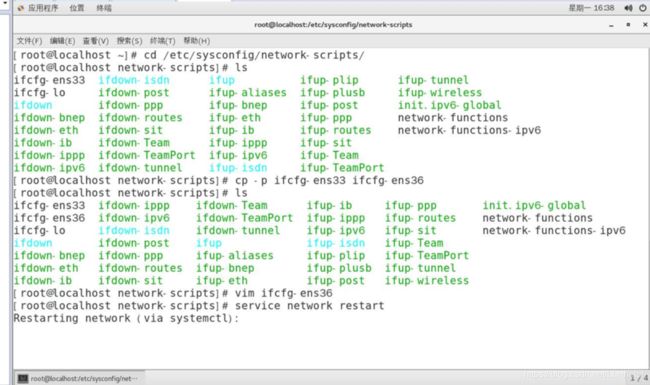
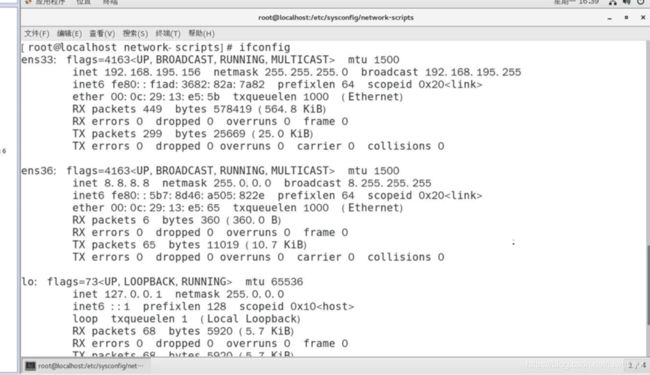
1.添加网卡,然后自动识别(不需要重启)
禁用启用网络接口也可以在配置文件中修改,就是把ONBOOT=no
十一 : 配置文件
11.1 /etc/sysconfig/network 主机名称配置文件
- 保存全局网络配置,主要包括主机信息
vim /etc/sysconfig/network

NETWORKING=yes
HOSTNAME=chenggong
:wq
reboot '重启生效'
这个第四种方法不能用于centos 7 ,在centos 6 中可以使用
11.2 /etc/resolv.conf 域名解析配置文件
- 保存本机需要使用DNS服务器的IP地址
[root@dabendan ~]# vim /etc/resolv.conf

# Generated by NetworkManager
search localdomain'主机域'
nameserver 192.168.139.2	'默认网关,也可以手动配置'
11.3 /etc/hosts 本地主机映射文件
- 保存主机名与IP地址的映射文件
[root@dabendan ~]# vim /etc/hosts


127.0.0.1   localhost localhost.localdomain localhost4 localhost4.localdomain4
::1         localhost localhost.localdomain localhost6 localhost6.localdomain6
119.75.218.70	www.baidu.com
- hosts文件和DNS服务器的比较
- 默认情况下,系统首先从hosts文件查找解析记录
- hosts文件只对当前的主机有效
- hosts文件可减少DNS查询过程,从而加快访问速度
域名解析会优先去查看/etc/hosts 映射文件,若是没有,就会再去找dns服务器
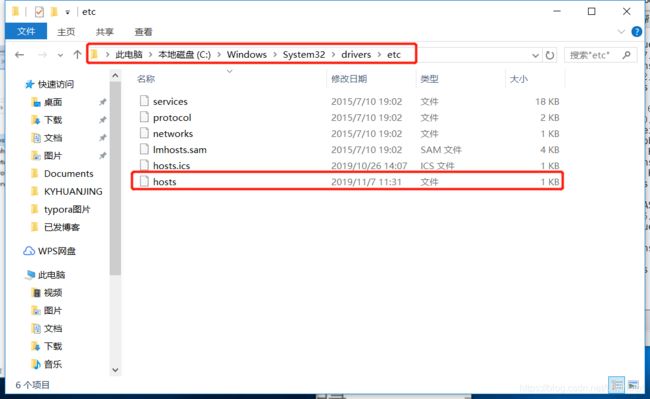
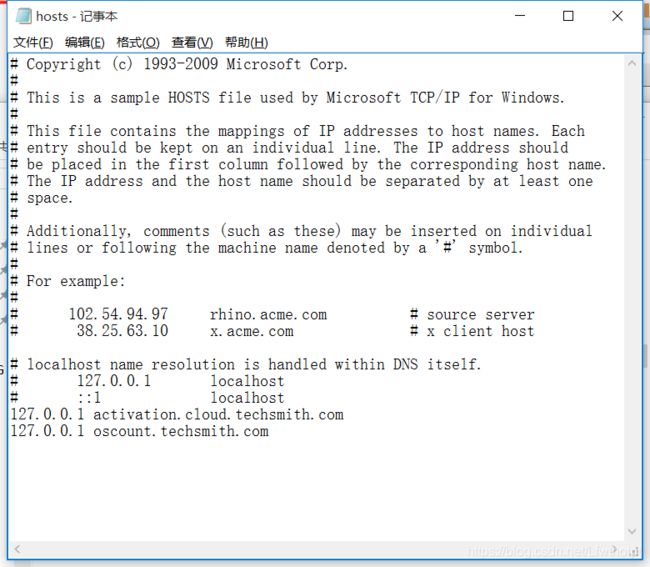
windows中hosts的文件所在位置
十二:总结:
-
查看网络配置
- ifconfig、hostname、route、netstat
-
测试网络连接
- ping、traceroute、nslookup
-
设置网络地址参数
- 临时配置、永久配置
-
相关的配置文件
-
/etc/sysconfig/network主机名配置文件
-
/etc/resolv.conf 域名解析配置文件
-
/etc/hosts 映射文件
-


