SpringBoot集成Vue3实现的系统(二)
学习目标:SpringBoot集成Vue3实现的系统(二)
提示:SpringBoot2与Vue3的小练习图文摘录(二)
例如:
- 三篇文章带你更熟悉掌握前后端分离的基本实现
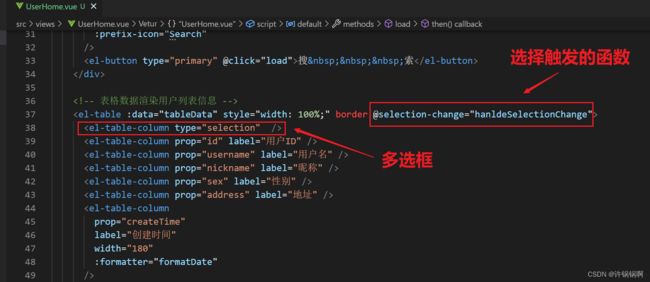
用户信息的批量删除
在表格中添加一列并设置其type属性为selection且在表格上绑定事件
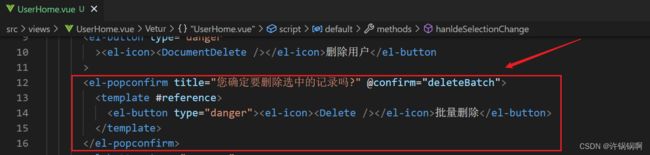
添加批量删除的触发事件气泡框组件
批量删除的函数定义实现
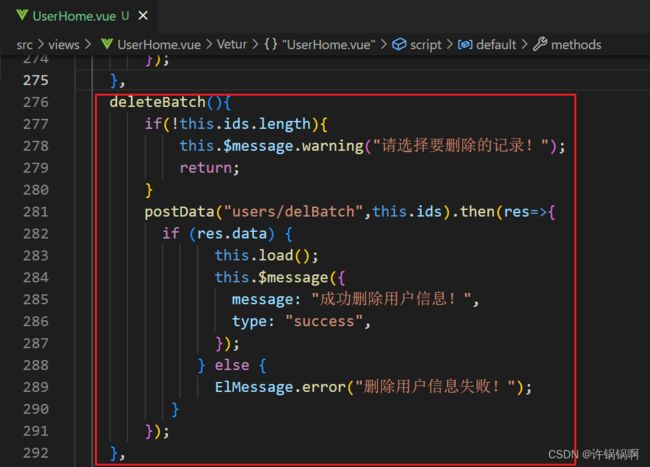
批量删除的函数:
deleteBatch(){
        if(!this.ids.length){
            this.$message.warning("请选择要删除的记录!");
            return;
        }
        postData("users/delBatch",this.ids).then(res=>{
          if (res.data) {
                this.load();
                this.$message({
                  message: "成功删除用户信息!",
                  type: "success",
                });
              } else {
                ElMessage.error("删除用户信息失败!");
           }
        });
}
后端控制器方法的编写:
@RequestMapping("/delBatch")
public Result delBatch(@RequestBody List<Integer> ids){
    //调用service中的批量删除实现
    boolean b = usersService.removeBatchByIds(ids);
    return Result.of(b);
}
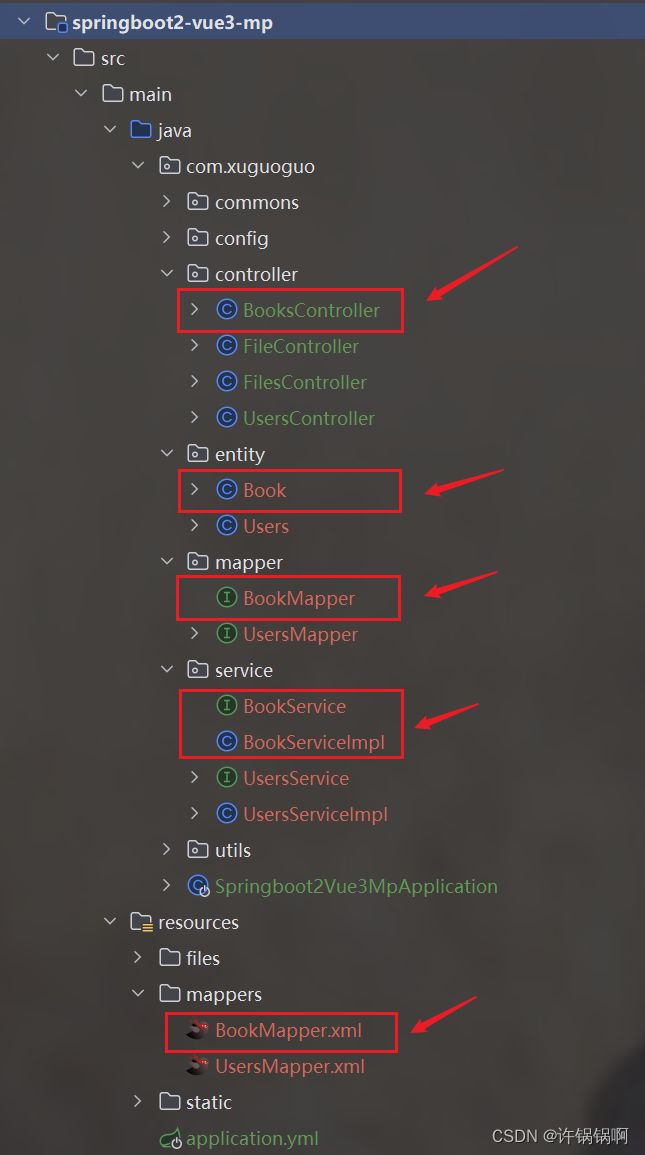
快速的引导并实现书籍信息模块化操作:
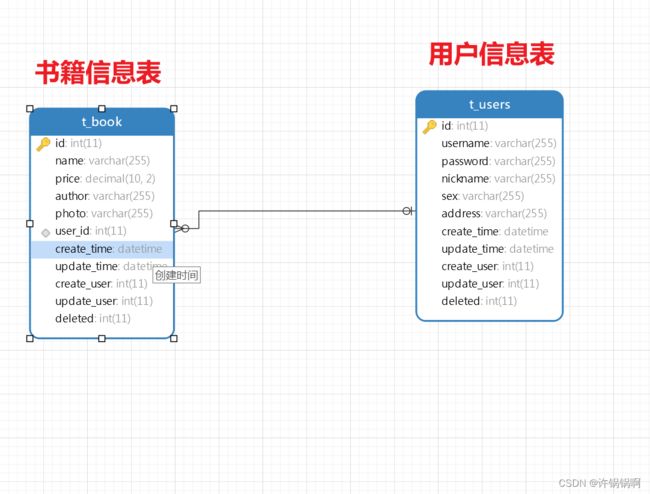
书籍信息表:
CREATE TABLE `t_book` (
    `id` INT ( 11 ) NOT NULL AUTO_INCREMENT COMMENT '书籍的编号',
    `name` VARCHAR ( 255 ) DEFAULT NULL COMMENT '书籍的名称',
    `price` DECIMAL ( 10, 2 ) DEFAULT NULL COMMENT '价格',
    `author` VARCHAR ( 255 ) DEFAULT NULL COMMENT '书籍的作者',
    `photo` VARCHAR ( 255 ) DEFAULT NULL COMMENT '书籍的封面',
    `user_id` INT ( 11 ) DEFAULT NULL COMMENT '指向所属的用户编号【外键列】',
    `create_time` DATETIME DEFAULT NULL COMMENT '创建时间',
    `update_time` DATETIME DEFAULT NULL COMMENT '更新时间',
    `create_user` INT ( 11 ) DEFAULT NULL COMMENT '创建用户',
    `update_user` INT ( 11 ) DEFAULT NULL COMMENT '更新用户',
    `deleted` INT ( 11 ) DEFAULT '0' COMMENT '逻辑删除列【默认值为0,已删除为1】',
    PRIMARY KEY ( `id` ),
    KEY `user_id` ( `user_id` ),
CONSTRAINT `t_book_ibfk_1` FOREIGN KEY ( `user_id` ) REFERENCES `t_users` ( `id` )

) ENGINE = INNODB AUTO_INCREMENT = 26 DEFAULT CHARSET = utf8;
通过MybatisX插件将Book的三层生成:
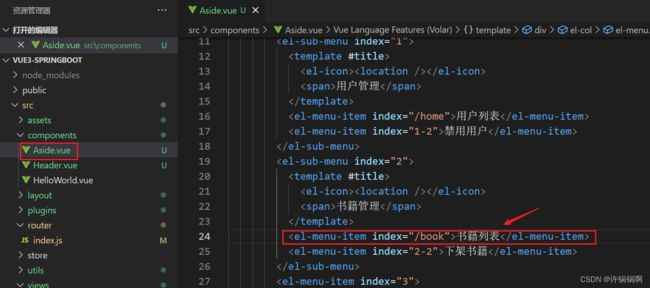
前端中在router目录下的index.js中添加书籍的路由:

修改components目录下的Aside.vue中的侧边导航的路由:
模块化功能类似,这里就不做过多记录了,自己加油多练习一下吧!~~~
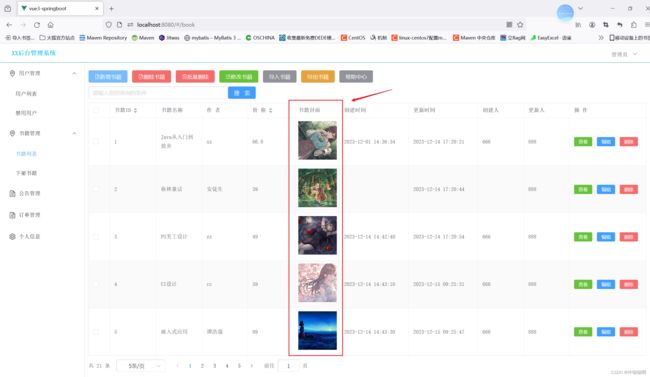
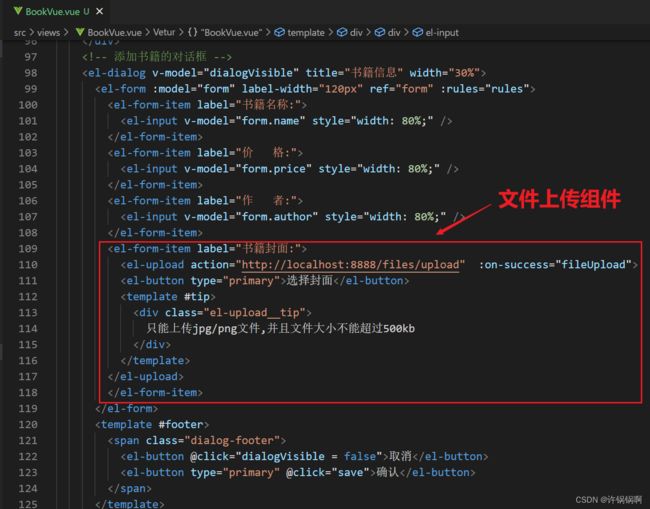
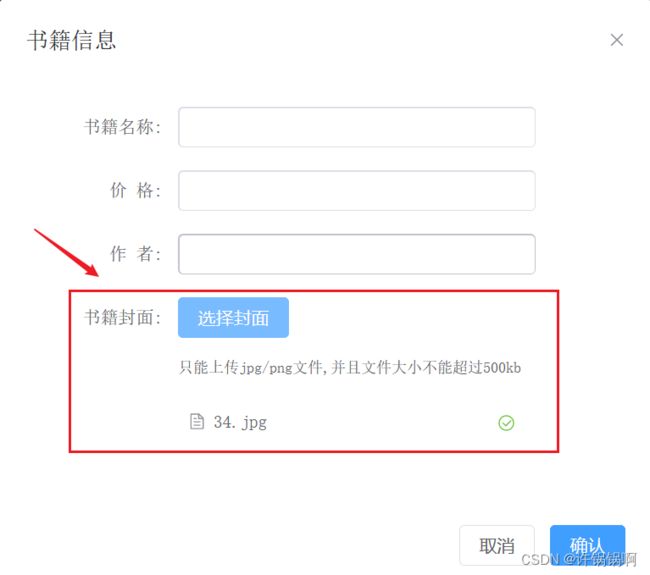
书籍封面处理【文件传输】
 ###### 基本效果图:
后端文件传输的控制器实现:
package com.xuguoguo.controller;

import cn.hutool.core.io.FileUtil;
import cn.hutool.core.util.IdUtil;
import cn.hutool.core.util.StrUtil;
import com.xuguoguo.commons.Result;
import org.springframework.beans.factory.annotation.Value;
import org.springframework.web.bind.annotation.CrossOrigin;
import org.springframework.web.bind.annotation.PathVariable;
import org.springframework.web.bind.annotation.RequestMapping;
import org.springframework.web.bind.annotation.RestController;
import org.springframework.web.multipart.MultipartFile;

import javax.servlet.ServletOutputStream;
import javax.servlet.http.HttpServletResponse;
import java.io.IOException;
import java.io.UnsupportedEncodingException;
import java.net.URLEncoder;
import java.util.List;

/**
 @Package: com.xuguoguo.controller
 @ClassName: FilesController
 @Author: XuGuoGuo
 @CreateTime: 2023/12/14-15:58
 @Description:
 */
//文件传输的控制器
@RestController
@RequestMapping("/files")
public class FilesController {

    @Value("${server.port}")
    private String port;

    public static final String IP="http://localhost";
    @RequestMapping("/upload")
//    @CrossOrigin
    public Result upload(MultipartFile file) throws IOException {
        //获取上传的文件名
        String filename = file.getOriginalFilename();
        //为了防止上传之后的文件名重复【1、随机uuid   2、按照时间毫秒值】
        String flag = IdUtil.fastSimpleUUID();
        //定义文件上传后的路径【第三方mino、oss】
        String rootPath=System.getProperty("user.dir")+"/springboot2-vue3-mp/src/main/resources/files/"+flag+"_"+filename;
        FileUtil.writeBytes(file.getBytes(), rootPath);
        return Result.of(IP+":"+port+"/files/"+flag);
    }

    @RequestMapping("/{flag}")
    public void preview(@PathVariable String flag, HttpServletResponse response) throws Exception {
        //定义预览的文件路径【服务器的路径】
        String rootPath=System.getProperty("user.dir")+"/springboot2-vue3-mp/src/main/resources/files/";
        //遍历目录下的所有的文件
        List<String> fileNames = FileUtil.listFileNames(rootPath);
        //根据请求的uuid的地址匹配一个文件
        String fileName = fileNames.stream().filter(name -> name.contains(flag)).findAny().orElse("");
        if (StrUtil.isNotEmpty(fileName)) {
            //设置响应
            response.setHeader("Content-Disposition", "attachment;filename="+ URLEncoder.encode(fileName, "UTF-8"));
            response.setContentType("application/octet-stream");//text/html; charset=UTF-8    application/json
            byte[] bytes = FileUtil.readBytes(rootPath + fileName);
            ServletOutputStream outputStream = response.getOutputStream();
            outputStream.write(bytes);
            outputStream.flush();
            outputStream.close();
        }
    }


}
文件上传的事件处理:【成功后的回调函数】
fileUpload(resp){
        console.log(resp);
        this.form.photo=resp.data;
}

用户信息表关联图书的实现:[一对多]
新增书籍
用户实体对象的变化:

后台控制器的请求变化:

//查看所有的用户信息列表以及每个用户拥有的书籍信息列表【分页】
@RequestMapping("/loadAllByPage3")
public Result loadAllByPage3(@RequestParam(value = "pageNum",defaultValue = "1")Integer pageNum,
                             @RequestParam(value = "pageSize",defaultValue = "5")Integer pageSize,
                             Users users){
    log.info("正在执行用户一对多查询:当前页:{} 页大小:{}",pageNum,pageSize);
    //通过分页的插件【拦截器】
    Page<Users> pages = new Page<>(pageNum, pageSize);
    Page<Users> page = usersService.findPage2(pages,users);
    log.info("正在执行用户一对多查询:数据为{}",page);
    return Result.of(page);
}
service业务层代码:

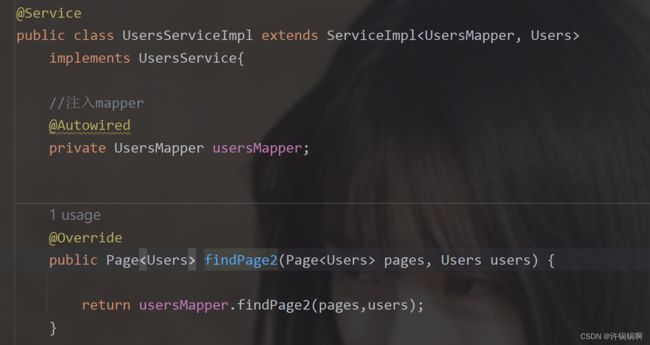
mapper接口以及xml的编写:

注意需要使用的是分步查询才是正确的哦!
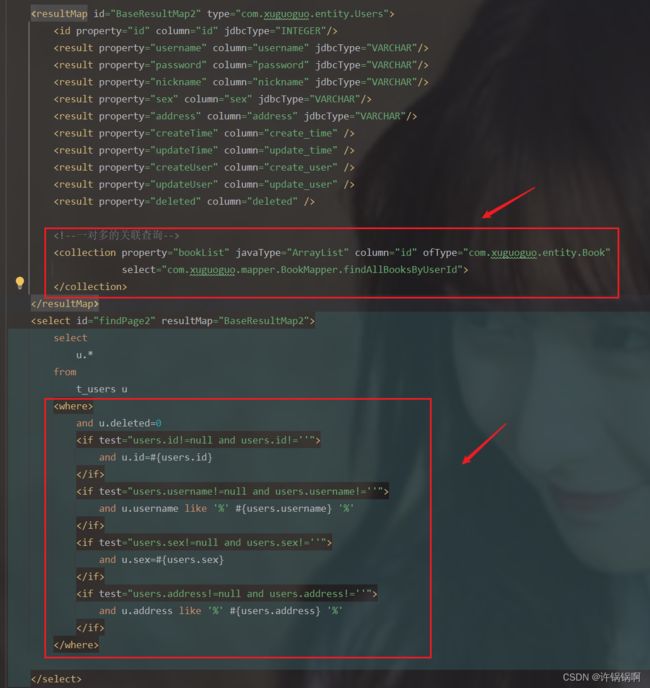
<resultMap id="BaseResultMap2" type="com.xuguoguo.entity.Users">
    <id property="id" column="id" jdbcType="INTEGER"/>
    <result property="username" column="username" jdbcType="VARCHAR"/>
    <result property="password" column="password" jdbcType="VARCHAR"/>
    <result property="nickname" column="nickname" jdbcType="VARCHAR"/>
    <result property="sex" column="sex" jdbcType="VARCHAR"/>
    <result property="address" column="address" jdbcType="VARCHAR"/>
    <result property="createTime" column="create_time" />
    <result property="updateTime" column="update_time" />
    <result property="createUser" column="create_user" />
    <result property="updateUser" column="update_user" />
    <result property="deleted" column="deleted" />


    <collection property="bookList" javaType="ArrayList" column="id" ofType="com.xuguoguo.entity.Book"
                select="com.xuguoguo.mapper.BookMapper.findAllBooksByUserId">
    collection>
resultMap>
<select id="findPage2" resultMap="BaseResultMap2">
    select
        u.*
    from
        t_users u
    <where>
        and u.deleted=0
        <if test="users.id!=null and users.id!=''">
            and u.id=#{users.id}
        if>
        <if test="users.username!=null and users.username!=''">
            and u.username like '%' #{users.username} '%'
        if>
        <if test="users.sex!=null and users.sex!=''">
            and u.sex=#{users.sex}
        if>
        <if test="users.address!=null and users.address!=''">
            and u.address like '%' #{users.address} '%'
        if>
    where>

select>
mapper接口
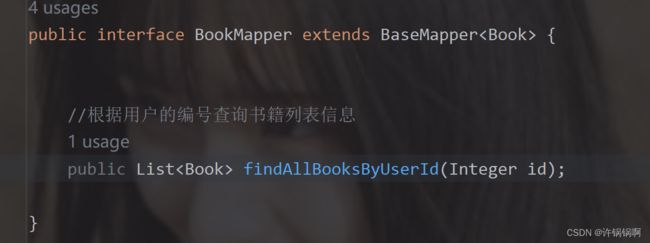
public interface BookMapper extends BaseMapper<Book> {


    //根据用户的编号查询书籍列表信息
    public List<Book> findAllBooksByUserId(Integer id);

}
<select id="findAllBooksByUserId" resultType="com.xuguoguo.entity.Book">
    select * from t_book where user_id=#{id}
        and
    deleted=0
select>
前端视图的变化:

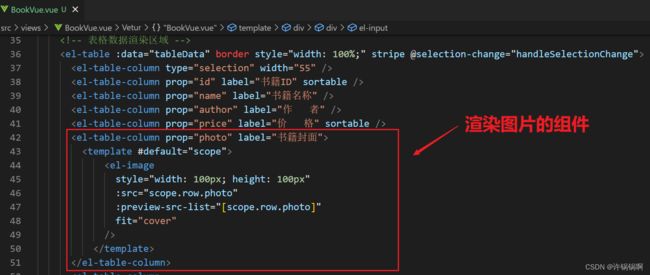
编写显示图书列表的对话框:
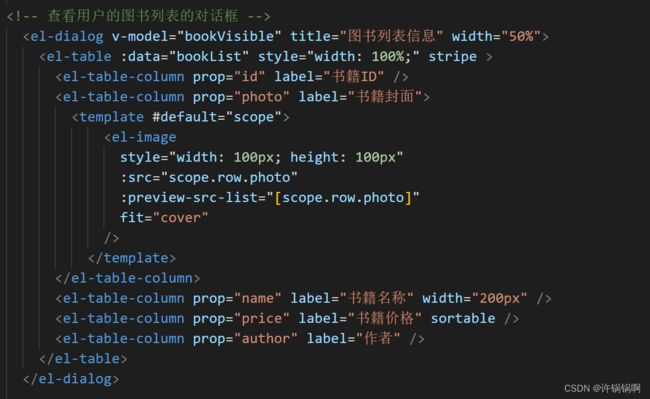
  <el-dialog v-model="bookVisible" title="图书列表信息" width="50%">
    <el-table :data="bookList" style="width: 100%;" stripe >
      <el-table-column prop="id" label="书籍ID" />
      <el-table-column prop="photo" label="书籍封面">
        <template #default="scope">
            <el-image
              style="width: 100px; height: 100px"
              :src="scope.row.photo"
              :preview-src-list="[scope.row.photo]"
              fit="cover"
            />
          template>
      el-table-column>
      <el-table-column prop="name" label="书籍名称" width="200px" />
      <el-table-column prop="price" label="书籍价格" sortable />
      <el-table-column prop="author" label="作者" />
    el-table>
  el-dialog>
修改后的UserHome.vue的完整代码如下:
<template>
<div style="padding: 10px;">
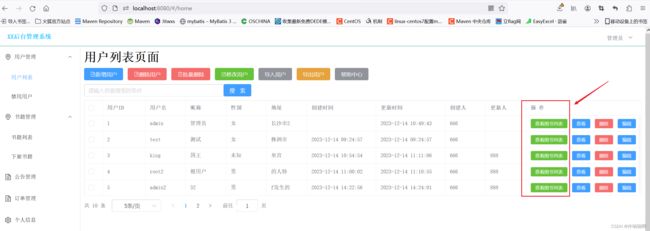
<h1>用户列表页面h1>
<div style="margin: 10px 0px;">
<el-button type="primary" @click="add"
><el-icon><DocumentAdd />el-icon>新增用户el-button
>
<el-button type="danger"
><el-icon><DocumentDelete />el-icon>删除用户el-button
>
<el-popconfirm title="您确定要删除选中的记录吗?" @confirm="deleteBatch">
<template #reference>
<el-button type="danger"><el-icon><Delete />el-icon>批量删除el-button>
template>
el-popconfirm>
<el-button type="success"
><el-icon><Edit />el-icon>修改用户el-button
>
<el-button type="info">导入用户el-button>
<el-button type="warning">导出用户el-button>
<el-button type="info">帮助中心el-button>
div>
<div style="margin: 10px 0px;">
<el-input
v-model="search"
clearable
placeholder="请输入您要搜索的条件"
style="width: 25%;"
:prefix-icon="Search"
/>
<el-button type="primary" @click="load">搜 索el-button>
div>
<el-table :data="tableData" style="width: 100%;" border @selection-change="hanldeSelectionChange">
<el-table-column type="selection" />
<el-table-column prop="id" label="用户ID" />
<el-table-column prop="username" label="用户名" />
<el-table-column prop="nickname" label="昵称" />
<el-table-column prop="sex" label="性别" />
<el-table-column prop="address" label="地址" />
<el-table-column
prop="createTime"
label="创建时间"
width="180"
:formatter="formatDate"
/>
<el-table-column
prop="updateTime"
label="更新时间"
width="180"
:formatter="formatDate"
/>
<el-table-column prop="createUser" label="创建人" />
<el-table-column prop="updateUser" label="更新人" />
<el-table-column fixed="right" label="操 作" width="300">
<template #default="scope">
<el-button type="success" size="small" @click="showBooks(scope.row.bookList)">
查看图书列表
el-button>
<el-button type="primary" size="small">
查看
el-button>
<el-popconfirm title="您确定要删除该记录吗?" @confirm="deleteUser(scope.row.id)">
<template #reference>
<el-button type="danger" size="small">
删除
el-button>
template>
el-popconfirm>
<el-button type="primary" size="small" @click="handleEdit(scope.row)">
编辑
el-button>
template>
el-table-column>
el-table>
<div style="margin: 10px 0px;">
<el-pagination
v-model:current-page="currentPage"
v-model:page-size="pageSize"
:page-sizes="[5, 10, 15, 20]"
:small="small"
:disabled="disabled"
:background="background"
layout="total, sizes, prev, pager, next, jumper"
:total="total"
@size-change="handleSizeChange"
@current-change="handleCurrentChange"
/>
div>
<div>
<el-dialog v-model="dialogVisible" title="用户信息" width="30%">
<el-form :model="form" label-width="120px" :rules="rules" ref="form">
<el-form-item label="用户名:" prop="username">
<el-input v-model="form.username" style="width: 80%;" clearable />
el-form-item>
<el-form-item label="密码:" prop="password">
<el-input
type="password"
v-model="form.password"
style="width: 80%;"
clearable
/>
el-form-item>
<el-form-item label="昵称:" prop="nickname">
<el-input v-model="form.nickname" style="width: 80%;" clearable />
el-form-item>
<el-form-item label="性 别:" prop="sex">
<el-radio v-model="form.sex" label="男" size="large">男el-radio>
<el-radio v-model="form.sex" label="女" size="large">女el-radio>
<el-radio v-model="form.sex" label="未知" size="large"
>未知el-radio
>
el-form-item>
<el-form-item label="地 址:" prop="address">
<el-input
type="textarea"
v-model="form.address"
style="width: 80%;"
clearable
/>
el-form-item>
el-form>
<template #footer>
<span class="dialog-footer">
<el-button @click="dialogVisible = false">关闭el-button>
<el-button type="primary" @click="save">确认el-button>
span>
template>
el-dialog>
div>
<el-dialog v-model="bookVisible" title="图书列表信息" width="50%">
<el-table :data="bookList" style="width: 100%;" stripe >
<el-table-column prop="id" label="书籍ID" />
<el-table-column prop="photo" label="书籍封面">
<template #default="scope">
<el-image
style="width: 100px; height: 100px"
:src="scope.row.photo"
:preview-src-list="[scope.row.photo]"
fit="cover"
/>
template>
el-table-column>
<el-table-column prop="name" label="书籍名称" width="200px" />
<el-table-column prop="price" label="书籍价格" sortable />
<el-table-column prop="author" label="作者" />
el-table>
el-dialog>
div>
template>
<script>
import { getData, postData } from "../utils/remote";
import moment from "moment";
export default {
name: "UserHome",
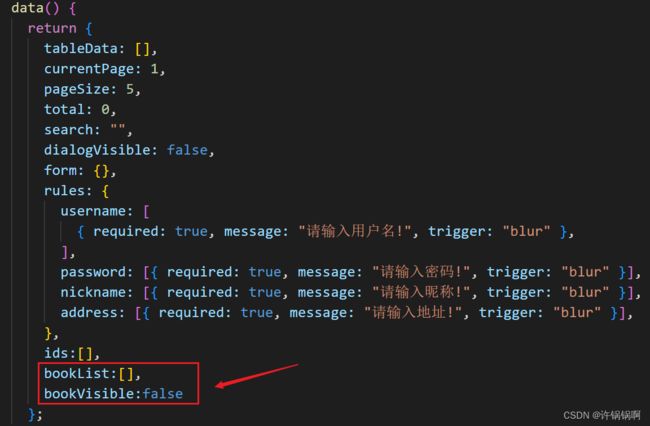
data() {
return {
tableData: [],
currentPage: 1,
pageSize: 5,
total: 0,
search: "",
dialogVisible: false,
form: {},
rules: {
username: [
{ required: true, message: "请输入用户名!", trigger: "blur" },
],
password: [{ required: true, message: "请输入密码!", trigger: "blur" }],
nickname: [{ required: true, message: "请输入昵称!", trigger: "blur" }],
address: [{ required: true, message: "请输入地址!", trigger: "blur" }],
},
ids:[],
bookList:[],
bookVisible:false
};
},
created() {
this.load();
},
methods: {
load() {
getData("users/loadAllByPage3", {
pageNum: this.currentPage,
pageSize: this.pageSize,
username: this.search,
}).then((res) => {
console.log(res);
this.tableData = res.data.records;
this.total = res.data.total;
});
},
handleSizeChange(pageSize) {
this.pageSize = pageSize;
this.load();
},
handleCurrentChange(pageNum) {
this.currentPage = pageNum;
this.load();
},
add() {
//显示对话框
this.dialogVisible = true;
this.form = {};
},
save() {
//表单提交处理
//表单校验处理
this.$refs["form"].validate((valid) => {
//校验通过发起请求保存用户信息
// console.log(valid);
if (valid) {
//如何区分是添加/更新
//更新【携带了id】
if (this.form.id) {
postData("users/edit",this.form).then(res=>{
if (res.data) {
this.load();
this.dialogVisible = false;
this.$message({
message: "成功更新用户信息!",
type: "success",
});
} else {
ElMessage.error("更新用户信息失败!");
}
});
} else {
//新增【没有id】
postData("users/save", this.form).then((res) => {
console.log(res.data);
if (res.data) {
this.load();
this.dialogVisible = false;
this.$message({
message: "成功添加用户信息!",
type: "success",
});
} else {
ElMessage.error("添加用户信息失败!");
}
});
}
}
});
},
formatDate(row, column) {
let datas = row[column.property];
if (datas == null) {
return "";
} else {
return moment(datas).format("yyyy-MM-DD HH:mm:ss");
}
},
handleEdit(row) {
console.log(row);
this.form = JSON.parse(JSON.stringify(row));
this.dialogVisible = true;
},
deleteUser(id){
console.log(id);
postData("users/"+id).then(res=>{
if (res.data) {
this.load();
this.$message({
message: "成功删除用户信息!",
type: "success",
});
} else {
ElMessage.error("删除用户信息失败!");
}
});
},
deleteBatch(){
if(!this.ids.length){
this.$message.warning("请选择要删除的记录!");
return;
}
postData("users/delBatch",this.ids).then(res=>{
if (res.data) {
this.load();
this.$message({
message: "成功删除用户信息!",
type: "success",
});
} else {
ElMessage.error("删除用户信息失败!");
}
});
},
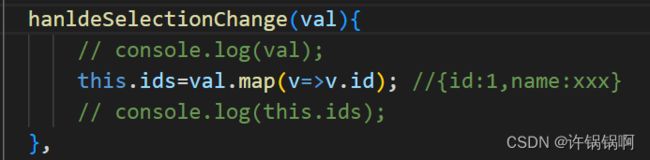
hanldeSelectionChange(val){
// console.log(val);
this.ids=val.map(v=>v.id); //{id:1,name:xxx}
// console.log(this.ids);
},
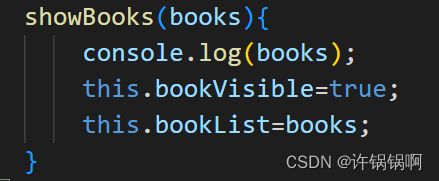
showBooks(books){
console.log(books);
this.bookVisible=true;
this.bookList=books;
}
},
};
script>
<style>style>
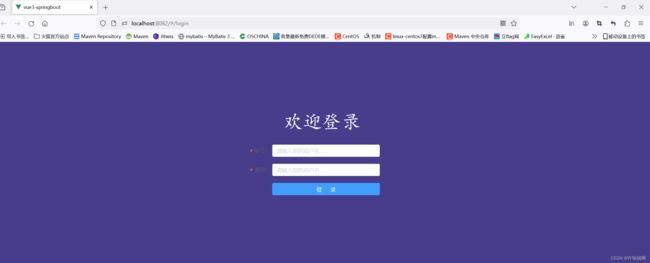
用户登录的引导与实现
在views目录下新建Login.vue文件
<template>
<div style="width:100%;height:100vh;background-color: darkslateblue;overflow: hidden;">
<div style="width:400px;margin:150px auto;">
<div style="color: white;font-size:50px;text-align:center;font-family:'楷体';padding: 30px 0px;
">
欢迎登录
div>
<el-form
:model="form"
ref="form"
:rules="rules"
label-width="120px"
size="normal"
style="position:relative;right:50px;"
>
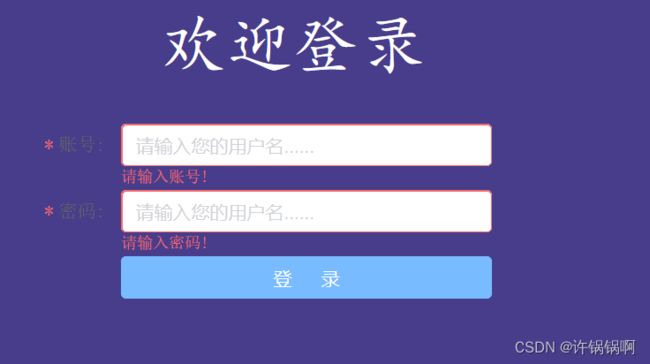
<el-form-item label="账号:" prop="username">
<el-input v-model="form.username" placeholder="请输入您的用户名……" />
el-form-item>
<el-form-item label="密码:" prop="password">
<el-input type="password" v-model="form.password" placeholder="请输入您的用户名……"/>
el-form-item>
<el-form-item>
<el-button style="width:100%;" type="primary" @click="login">登 录el-button>
el-form-item>
el-form>
div>
div>
template>
<script>
import { postData } from '@/utils/remote';
export default {
name:"Login",
data(){
return{
form:{},
rules:{
username:[
{required:true,message:"请输入账号!",trigger:"blur"}
],
password:[
{required:true,message:"请输入密码!",trigger:"blur"}
]
}
}
},
methods:{
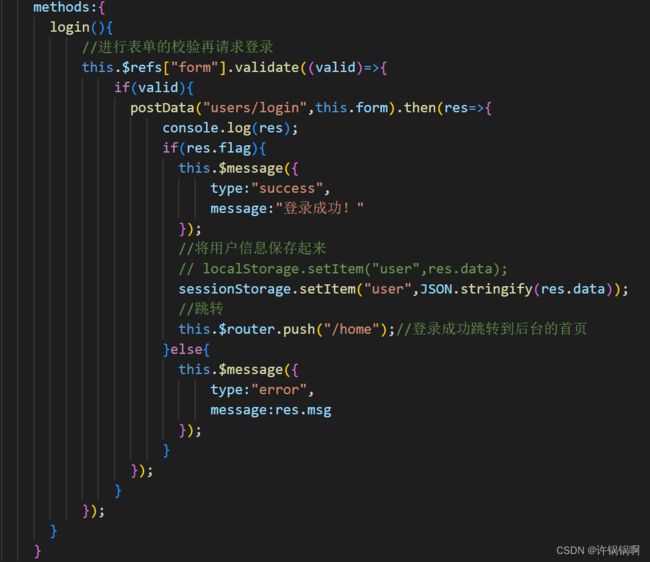
login(){
//进行表单的校验再请求登录
this.$refs["form"].validate((valid)=>{
if(valid){
postData("users/login",this.form).then(res=>{
console.log(res);
if(res.flag){
this.$message({
type:"success",
message:"登录成功!"
});
//将用户信息保存起来
// localStorage.setItem("user",res.data);
sessionStorage.setItem("user",JSON.stringify(res.data));
//跳转
this.$router.push("/home");//登录成功跳转到后台的首页
}else{
this.$message({
type:"error",
message:res.msg
});
}
});
}
});
}
}
}
script>
<style>
style>
基本的表单校验
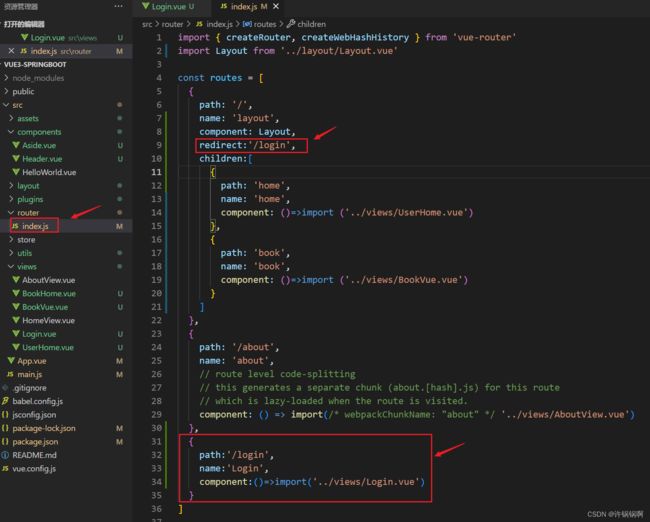
修改router目录下的index.js文件路由设置
前端请求
后台控制器的登录接口的实现
 @RequestMapping("/login")
    public Result login(@RequestBody Users users){
            //调用service中的条件查询
//        LambdaQueryWrapper wrapper = new LambdaQueryWrapper<>();
//        wrapper.eq(Users::getUsername,users.getUsername()).eq(Users::getPassword,users.getPassword());
        Users res = usersService.getOne(Wrappers.<Users>lambdaQuery().eq(Users::getUsername, users.getUsername()).eq(Users::getPassword, users.getPassword()));
        if (res==null) {
            return Result.error(false,"用户名或者密码错误!");
        }
        return Result.of(res);
    }
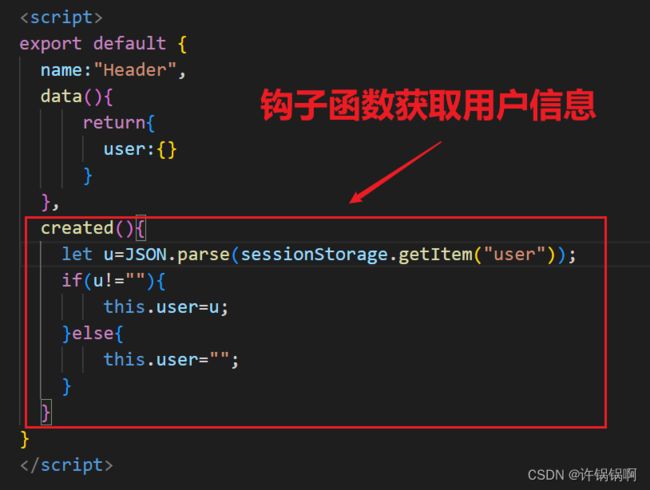
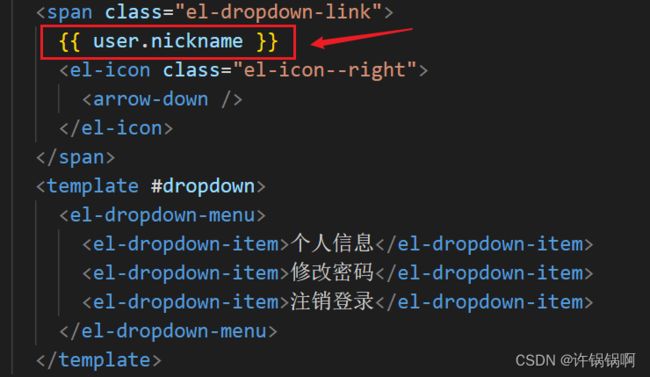
修改components目录下的Header.vue
本节完毕,章节后续更新!如果需要源码的朋友们可关注微信公众号"锅锅编程生活"或者扫描二维码关注回复关键字/后台留言获取即可!