仿射变换--getAffineTransform和wrapAffine
仿射变换--getAffineTransform和wrapAffine
- 介绍
-
- 示例代码
介绍
官网使用介绍:
Affine Transformations
getAffineTransform
wrapAffine
示例代码
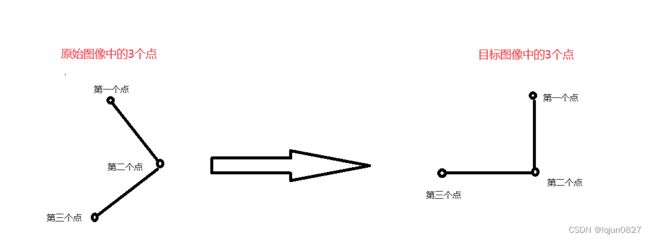
以下代码摘自CenterNet,使用cv2实现获取仿射变换矩阵:
import cv2

# 获取第三个点
def get_3rd_point(a, b):
    direct = a - b
    return b + np.array([-direct[1], direct[0]], dtype=np.float32)

# 获取旋转方向
def get_dir(src_point, rot_rad):
    sn, cs = np.sin(rot_rad), np.cos(rot_rad)

    src_result = [0, 0]
    src_result[0] = src_point[0] * cs - src_point[1] * sn
    src_result[1] = src_point[0] * sn + src_point[1] * cs

    return src_result

# 获取仿射变化矩阵
def get_affine_transform(center,
                         scale,
                         rot,
                         output_size,
                         shift=np.array([0, 0], dtype=np.float32),
                         inv=0):

    '''
    center:原始图像的中心点
    scale:原始图像缩放后的宽和高
    rot:旋转角度
    output_size:输出图像的宽和高
    shift:偏移量
    inv:是否为逆变换。
    '''

    if not isinstance(scale, np.ndarray) and not isinstance(scale, list):
        scale = np.array([scale, scale], dtype=np.float32)

    scale_tmp = scale
    src_w = scale_tmp[0]
    dst_w = output_size[0]
    dst_h = output_size[1]

    rot_rad = np.pi * rot / 180
    src_dir = get_dir([0, src_w * -0.5], rot_rad) # 构建原始偏移向量,加入旋转
    dst_dir = np.array([0, dst_w * -0.5], np.float32) # 构建目标偏移向量

    src = np.zeros((3, 2), dtype=np.float32)
    dst = np.zeros((3, 2), dtype=np.float32)
    src[0, :] = center + scale_tmp * shift # 构建原始第一个点
    src[1, :] = center + src_dir + scale_tmp * shift # 构建原始第二个点
    dst[0, :] = [dst_w * 0.5, dst_h * 0.5] # 构建目标第一个点,为目标图像的中心点
    dst[1, :] = np.array([dst_w * 0.5, dst_h * 0.5], np.float32) + dst_dir # 构建目标第二个点

    src[2:, :] = get_3rd_point(src[0, :], src[1, :]) # 构建原始第三个点 输入a,b两个点 计算获得垂直于ab的第3个点
    dst[2:, :] = get_3rd_point(dst[0, :], dst[1, :]) # 构建目标第三个点

    if inv:
        trans = cv2.getAffineTransform(np.float32(dst), np.float32(src))
    else:
        trans = cv2.getAffineTransform(np.float32(src), np.float32(dst))

    return trans
使用变换矩阵处理图像img:
out = cv2.warpAffine(img, trans_input,
                         (input_w, input_h),
                         flags=cv2.INTER_LINEAR)
使用变换矩阵转换点坐标:
def affine_transform(pt, t):
    new_pt = np.array([pt[0], pt[1], 1.], dtype=np.float32).T
    new_pt = np.dot(t, new_pt)
    return new_pt[:2]

point = [2.0, 3.0]
affine_transform(point, trans_input)
