springboot基础
一 springboot
1 spring 的缺点
在spring boot出现以前,使用spring框架的程序员是这样配置web应用环境的,需要大量的xml配置。下图展示了在xml配置的时代和SpringBoot的配置量的差别。
-
随着web项目集成软件的不断增多,xml配置也不断的增多,xml配置文件也在不断地增多,项目的依赖管理也越发的复杂。spring框架也因此饱受争议,配置文件难以理解且容易出错。
-
xml配置文件不但复杂,而且绝大部分属于模板配置,也就是说有80%以上的配置是不断重复的。在这个web项目里面这样配置,挪到另一个项目里面这部分配置仍然相同。
2 spring boot 改变了什么
Spring Boot的配置方式,就像是插头插座,就是这个标准。你第三方开源类库想接入进来,你就按照这个标准做一个starter的适配。spring MVC方式就像是手动接电线,很灵活,但是不同的人接出来的效果千差万别,而且很容易出错。Spring boot虽然灵活性不如Spring MVC的方式,并且你也不太清楚插座里面的线路是什么样,但就是方便易用。话说回来,当你习惯使用插头插座,你还期望自己是个电工不成?
这里有一个很重要的概念: 约定大于配置。你遵守一些规定,会让你的开发变得更加容易。
3 springboot项目搭建
# spring Initializr 方法
1 选择spring Initializr创建项目 http://start.aliyun.com
2 填写项目名称
3 选择springboot的版本,如果没有想要的版本,先随便选一个,然后去pom文件中修改
4 勾选需要的模块,比如web sql等
5 项目会自动生成启动类
6 编写controller 启动项目测试也可以用maven的方式,没有这个简单和方便
在实际开发中,pom配置文件不需要你去关心,练习中可以直接复制配置文件。
在我们搭的这套环境中有:代码生成器,和接口文档生成的插件。要求自己能配置起来。
4 热部署
1 设置 file- setting - bulid - compiler,勾选build project automatically ,并且保存
2 ctrl+shift+atl + / , 选择registry , 勾选compiler.automake.allow.when.app.running
3 在依赖中添加spring-boot-devtools (dev开发环境的工具)
    org.springframework.boot
    spring-boot-devtools
    true
    true
另一种开发中常用的热部署:JRebel Intellij热部署插件JRebel_jrebel idea版本-CSDN博客
Welcome to JetBrains License Server!:) +uuid
GUID online erstellen
5 依赖管理
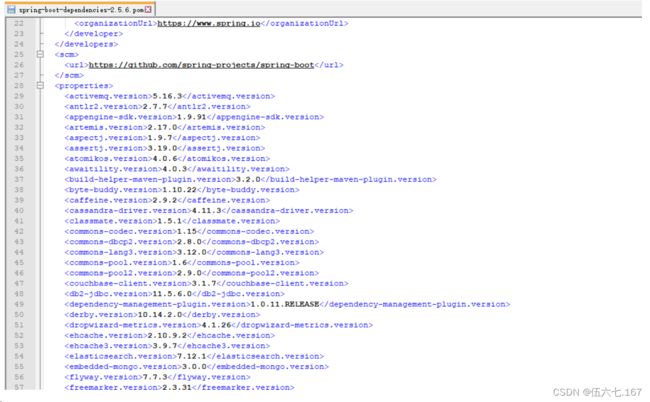
1 spring-boot-starter-parent 依赖: 底层依赖spring-boot-dependenies, 有个properties标签,里面包含了其他依赖的版本。可以理解为就是一个版本的管理器
2 spring-boot-starter-web 的理解:在springboot项目中引入此启动器,底层的原理是:系统写好了一个spring-boot-starter-web项目,这个项目依赖于spring-boot-starter-json, tomcat,web,webmvc。个人认为就是一种模块之间的依赖传递。
6 代码生成器
-
使用的是mybatis代码生成器
    org.mybatis.generator
    mybatis-generator-maven-plugin
    1.3.2

        src/main/resources/generatorConfig.xml
        true
        true
-
generatorConfig.xml
# 1 数据库驱动包位置
# 2 数据库链接URL、用户名、密码
# 3 实体类生成位置
# 4 mapper和xml位置
# 5 指定用哪个表来生成
@RestController = @ResponseBody + @Controller
@RequestBody 前端给你传的数据是json格式的(参数封装到请求体 post),可以直接封装到java对象中
如果给你的参数是地址栏拼接的,就不用RequestBody
404 找不到路径
403 禁止访问
405 请求方式不匹配
7 日志
logback-spring.xml
需要注意以后要修改包名,其他的不用动
怎么打印日志
Log log = LogFactory.getLog(类名.class);
log.info(日志内容)
8 日期转换
-
导入依赖
com.fasterxml.jackson.core
jackson-databind
2.10.1
com.fasterxml.jackson.core
jackson-core
2.10.1
com.fasterxml.jackson.core
jackson-annotations
2.10.1
-
消息转换器
package com.xinzhi.config;
import org.springframework.core.convert.converter.Converter;
import org.springframework.stereotype.Component;
import java.text.ParseException;
import java.text.SimpleDateFormat;
import java.util.Date;
@Component
public class DateConverter implements Converter {
SimpleDateFormat sdf = new SimpleDateFormat("yyyy-MM-dd HH:mm:ss");
@Override
public Date convert(String source) {
try {
return sdf.parse(source);
} catch (ParseException e) {
e.printStackTrace();
}
return null;
}
} -
配置文件中添加
spring.jackson.date-format =yyyy-MM-dd HH:mm:ss
spring.jackson.time-zone=GMT+8spring.jackson.date-format =yyyy-MM-dd HH:mm:ss
spring.jackson.time-zone=GMT+8
9 接口文档
Document
-
引入插件
     com.github.shalousun
     smart-doc-maven-plugin
     1.1.7


         ./src/main/resources/smart-doc.json

         sboot


             com.alibaba:fastjson


             com.alibaba:fastjson
-
指定配置文件

-
protected AutoConfigurationImportSelector.AutoConfigurationEntry getAutoConfigurationEntry(AnnotationMetadata annotationMetadata) {
        if (!this.isEnabled(annotationMetadata)) {
            return EMPTY_ENTRY;
        } else {
            // 获取@EnableAutoConfiguration标注类的元信息。(exclude,excludeName)
            AnnotationAttributes attributes = this.getAttributes(annotationMetadata);
            // 获取自动装配类的候选类名称。
            List configurations = this.getCandidateConfigurations(annotationMetadata, attributes);
            //去重,排除重复的configurations
            configurations = this.removeDuplicates(configurations);
            //获取自动装配组件的排除名单。
            Set exclusions = this.getExclusions(annotationMetadata, attributes);
            //检查排除类是否合法
            this.checkExcludedClasses(configurations, exclusions);
            //移除所有的排除名单
            configurations.removeAll(exclusions);
            //进行过滤,autoConfigurationMetadata充当过滤条件。
            configurations = this.getConfigurationClassFilter().filter(configurations);
            //自动装配的导入事件
            this.fireAutoConfigurationImportEvents(configurations, exclusions);
            return new AutoConfigurationImportSelector.AutoConfigurationEntry(configurations, exclusions);
        }
    }
# 自动装配原理: springboot启动时,是依靠启动类的main方法来进行启动的,而main方法中执行的是SpringApplication.run()方法,而SpringApplication.run()方法中会创建spring的容器,并且刷新容器。而在刷新容器的时候就会去解析启动类,然后就会去解析启动类上的@SpringBootApplication注解,而这个注解是个复合注解,这个注解中有一个@EnableAutoConfiguration注解,这个注解就是开启自动配置,这个注解中又有@Import注解引入了一个AutoConfigurationImportSelector这个类,这个类会进过一些核心方法,然后去扫描我们所有jar包下的META-INF下的spring.factories文件,而从这个配置文件中取找key为EnableAutoConfiguration类的全路径的值下面的所有配置都加载,这些配置里面都是有条件注解的,然后这些条件注解会根据你当前的项目依赖的pom以及是否配置了符合这些条件注解的配置来进行装载的。
-
@ComponentScan 组件扫描和 @Import({Registrar.class}) 配合使用,就是为了扫描和启动类同一级包名或包名下面所有的组件。


