RHCE学习笔记-253-3
system monitoring
Introduction to system monitoring
security breaches or system malfunctions can be detected with regular system monitoring
system monitoring includes:
file system monitoring
log file analysis
process monitoring
file system analysis
如果定期监控system file的使用情况,可以避免以下2种情况:
避免耗用掉所有file system资源
可以避免不正当的存取控制造成重大的安全性破坏
utilities:df, du,logwatch
df -h
du -sh /tmp
du -ah /tmp
logwatch用来检查log文件有没有记录错误的事件,默认每天都会执行,如果发现错误事件,就会以mail的方式寄一份报表给root账户
set user ID and set group ID permissions
programs owned by root with SUID or SGID permissions can be dangerous
when any user executes a SUID program owned by root,all the privileges given to root become effective for that program during its execution lifetime
ls -l /etc/passwd
[root@host home]# ls -l /etc/passwd
-rw-r–r-- 1 root root 1912 04-01 15:43 /etc/passwd
ls -l /usr/bin/passwd
-rwsr-xr-x 1 root root 22984 2007-01-07 /usr/bin/passwd
security policy should include monitoring SUID programs
find / -type f -perm +6000
mkdir testdir
cd testdir
touch 6000
touch 2000
touch 4000
touch 6600
chmod 6000 6000
chmod 2000 2000
chmod 4000 4000
chmod 6600 6600
ls -l
find . -type f -perm 6000 (完全符合)
find . -type f -perm -6000 (-表示有1的地方必须符合)
find . -type f -perm +6000(+表示有1的地方只要有一个即符合)
在使用mount命令时,加上参数nosuid可以锁定SUID and SGID,让其权限失效
mount -o remount,nosuid /
mount
su - tom
passwd
结果提示操作错误
mount -o remount /
typical problematic permissions
介绍如何监控一些有问题的权限
-
电脑无法识别档案的owners,所以可能无法授权存取这个档案
find / -nouser #找出这类档案
这类档案可以用如下命令把它交给某个用户托管
find / -nouser -exec chown root root {} ;
-exec后面跟linux命令,exec命令以分号结束‘;’,该分号前面要放反斜杠转义,{}花括号代表前面的命令执行的结果。 -
file/directories with “other” write permission (o+w) may indicate a problem:
find / -type f -perm -2
find / -type d -perm -2
EXT2/3 filesystem attributes
show attributes with lsattr
set attributes: chattr +|-|=attributes
A 档案修改时atime不会变
a 只允许读,添加内容,不允许删除,覆盖,此属性只有root帐号才能设定
d 当使用dump命令备份时,不备份这个档案
i 只读,不能添加删除修改重命名,只有root帐号才能设定
j 使作业系统将档案的资料记录在ext3的journal里, 只有root帐号才能设定
S 当档案被修改时,会立刻将资料写入到硬盘里,也就是立刻同步
system log file
监控系统log的必要性
1 帮助我们找出设备的问题
2 帮助我们找出使用者的问题
3 帮助我们找出从外部针对系统进行安全性的破坏
要监控哪些log
1 /var/log/messages 记录许多有关系统的信息
2 /var/log/secure 记录用户验证信息,及xinetd服务验证的信息
3 /var/log/vsftpd.log 记录FTP服务的传输信息
4 /var/log/maillog 记录邮件收发的信息
记录log的服务
1 许多daemons会传输信息给syslogd这个程序
2 kernel的事件记录由klogd这个程序负责
syslogd and klogd configuration
都记录在/etc/syslog.conf里
vi /etc/syslog.conf
语法:
facility.priority log_location
facility是指要记录哪个服务的log,priority设定要记录哪种信息等级,log_location设定log存放位置
authpriv.* /var/log/secure
mail.* - /var/log/maillog “-”的意思先记录到buffer,然后再记录到硬盘
等级:
debug 记录比较详细的信息
info 记录一般正常的信息
notice 也是记录正常的信息,但是需注意状态
warning 警告信息,但还没有到错误的阶段
err 错误的信息,应该检查一下错误的原因了
crit 错误信息,再不检查错误的原因就要发生问题了
alert 是记录要立刻处理错误的警告信息,再不处理就要宕机了
emerg 记录系统服务已经发生严重问题了,不能在提供服务了
级别是逐渐增加的,比如记录等级是info,那么会记录包括info在内的往下所有的信息,mail.none,不记录mail所有的信息
*.emerg *
当任何程序出现emerg的错误时,立刻显示给用户
local7.* /var/log/boot.log
开机过程中所有等级的log都存储在/var/log/boot.log中
advanced syslogd configuration
operators(运算符号,指的是服务名称,中间的点,及信息等级)
mail.info
.代表要记录mail服务info等级以及info等级以上的信息
mail.=info
.=代表只记录info等级的信息,其他忽略
mail.=!info
.=!代表除了不记录info等级,其他等级都记录
mail,cron.info
代表要记录mail和cron服务的info及以上信息
然后将log档案存储到特殊的目的地
存放到特定的使用者,如果由很多使用者,中间可以用",“隔开
vi /etc/syslog.conf
kern.info tom,root
一旦由log参生就会发送mail给这2个使用者
远程主机,@hostname
vi /etc/syslog.conf
authpriv.* @example
然后在example这台电脑上设置可以接受其他电脑传过来的log
vi /etc/sysconfig/syslog
SYSLOGD_OPTIONS=”-r -m 0"
log file analysis
分析log里有无异常的工作要定期执行
logwatch就是用来分析看log档案有无发生异常的
默认logwatch是存放在/etc/cron.daily/00-logwatch,
[root@host testdir]# ls -l /etc/cron.daily/0logwatch
lrwxrwxrwx 1 root root 39 03-02 22:32 /etc/cron.daily/0logwatch -> /usr/share/logwatch/scripts/logwatch.pl
每天会作一次,可能还是间隔太长
mv /etc/cron.daily/0logwatch /etc/cron.hourly/ 这样就会每个小时执行一次
monitoring processes
监控正在执行的程序可以判断
1 可以判断什么原因造成性能下降
2 可以判断是否由可疑的程序正在执行
工具
1 top
2 gnome-system-monitor
3 sar
process monitoring utilities
top
用来查看正在运行的程序信息
调整进程可以使用kill or rinice
GUI tools:
gnome-system-monitor
kpm:KDE界面的系统监控工具
system activity reporting
介绍系统运作的报表是如何产生的
sar(system activity reporting)
可以看到每隔十分钟就会记录一次系统运作的信息
必须安装sysstat RPM,设定在/etc/cron.d/sysstat,产生的报表存放在/var/log/sa
process accounting tools
history会记录用户曾经输入的命令
在每个用户的home目录都由一个.bash_history,记录了输入过的命令
last 可以显示用户的登陆记录,记录在/var/log/wtmp,但整个档案是二进制格式,无法直接查看
last tom
介绍有关帐号记录的工具
必须安装psacct RPM
rmp -qa | grep psacct
accton /var/account/pacct 启用账户记录,后跟log目录
accton 停止账户记录
lastcomm | more 查看刚才记录了哪些内容
accton可能会影响系统性能
ac display user connect times from /var/log/wtmp
ac -p 显示各个用户登陆的时间长度
ac -d 显示了每天用户登陆的总时间
securing networks
IP forwarding
启用ip forwarding以后就可以把我们的linux主机变成一个路由器
起用方式:echo “1” >/proc/sys/net/ipv4/ip_forward
也就是把ip_forward值设置为1
一般作为router的主机都由2个物理网卡
在启用forward之后的主机也可以启用动态路由协议和扮演防火墙角色
firewall可以过滤网段间的数据包
动态路由协议,像OSPF,BGRP,等允许多个router之间交换路由表
Routing
routers可以在2个不同网段之间转发数据包
每个主机上都要设置一个网关
我们可以使用route命令来增加一条路由记录
如果有一条不太可能变化的路由,我们可以写入/etc/sysconfig/static-routes
netfilter overview
2.4 kernel之后的版本提供的数据包过滤机制
换句话说是由kernel来过滤包而不是服务来过滤,所以我们不能关掉这个机制
我们可以在OSI当中的2,3,4层中来设置过滤规则
netfilter会通过netfilter模块来与kernel沟通,我们可以使用iptables这个软件来控制netfilter
see http://www.netfilter.org
netfilter architecture

iptables有三种功能
1 filter:过滤数据包:根据发出去的,流进来的,转发的数据包来设置过滤条件
2 NAT:所有路由收到的及传送给自己的数据包,从本机出去的数据包,所有从本机出去包括本机及本机路由的数据包
3 mangle:改变数据包内容,如:我们可以用mangle的功能改变数据包的ttl
这些不同形式的数据包成为IPTABLES的chains,要设定的过滤条件和要转换的ip及要改变的数据包内容成为IPTABLES的rules,在每个chain的后面都有一个默认的rule,这个rule叫policy,也就是当前面的rule都没有匹配的时候,就会套用policy里面的设置
netfilter tables and chains
iptables共有3个table,filter,nat,mangle
iptables共有5个chain
input 从别的主机发出来,目的地址是本机的数据包
forward 从别的主机发出来,目的地是其他主机的数据包
output 从本机发送出去,目的是别的主机的数据包
prerouting 数据包进入网卡,但是还没有判断目的地的时候
postrouting 数据包即将离开网卡的时候,有可能是本机发出也有可能是经由本机转发的数据包
原则上在5个chain都可以设置filter,一般会用在以上图中所示的三个中设置过滤条件
netfilter packet flow
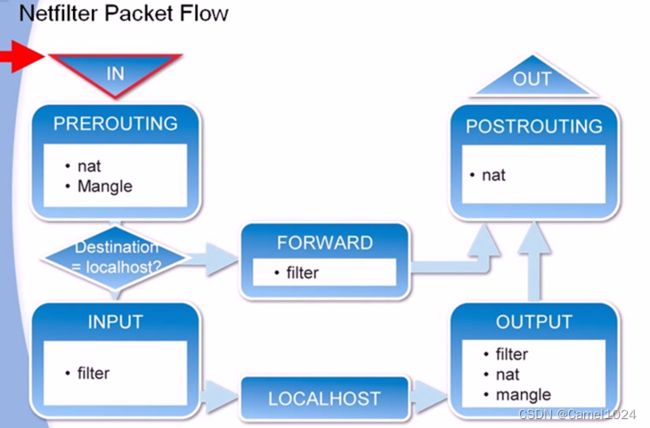
当数据包从网卡进来以后,首先经过prerouting这个chain,并判断在prerouting里有没有nat,mangle的rule,经过prerouting的处理后系统才会判断目的地是本地的数据包,还是经过本机路由要转发到其他主机的数据包,若是要转送到其他主机的数据包,会经过forward这个chain,并判断里面的filter过滤条件,经过forward的处理后,送到postrouting这个chain,并看里面是否有nat之类的rules,然后从网卡送出去;如果是送到本机的数据包,会经过input,并判断在input里面有无filter过滤条件,再依据这个数据包的内容送到相关的服务所使用的port,当这个数据包处理完毕后,系统会传送一个回应给来源主机,这时候就会经过output这个chain,根据ouput里面有无filter,nat,mangle的rules,进行相应处理,经过处理后再送到postrouting,再判断postrouting里有无nat,然后送到网卡出去.
rule matching
首先要把所有rule按照顺序把清单写下来,iptables会依据rule的清单里面的顺序逐条比对,看看这个数据包是不是符合rule里面的描述,如果比对到有符合描述的rule的话,就会依据rule里面的规定来处理这个数据包,然后退出这个chain,而不会继续往下比对。我们可以在一条rule里面设计许多判断的标准来描述某一种类型的数据包,如果在一条rule里面有许多判断标准的话,数据包必须满足所有标准才算符合这个rule,也就是会用and这个逻辑运算去比对所有的判断标准。
rule
source:not from 192.168.0.0/24,
destination:www server 80 port,
DROP
如果比对完所有的rule都不符合,就会采用Policy:ACCEPT
rule targets
rule targets就是当比对到符合判断标准的时候,对数据包的处理方式
man iptablesREJECT 退回数据包
LOG只会记录不会处理,所以需要在后面加上一个rule对此数据包进行处理
simple example
eg:拒绝所有来自192.168.0.0/24
iptables -t filter -A INPUT -s 192.168.0.0/24 -d 127.0.0.1 -j DROP
使用iptalbes命令在filter这个table里增加一笔rule,放在INPUT这个chain中,把符合条件的数据包DROPbasic chain operations
有哪些基本的参数可以用来管理chain
man iptables
/chain
additional chain operations
man iptables
-Z, -N, -X, -P, -E, -p
rules:general considerations
from any to any include loopback
允许需要允许的,然后拒绝所有
所以限制其他数据报的时候,如果没有其他标准,有可能导致限制X-windows而启动失败
rule是存储在内存的,直接用命令修改rule的话,reboot后这些rule就会不见,通常会把rule写成script档,然后把它放在/etc/rc.local/里
match criteria (filter table)
介绍可以从哪些方向来设置过滤条件
在一个数据包里,包头写有通讯协议,如TCP/UDP/ICMP等,源地址,目的地址,源端口,目的端口,进入/出去的网卡接口等根据这些条件来过滤数据报
tcp match extensions (filter table)
tcp
–sourec-port
–destination-port
–tcp-flags
flags: SYN ACK FIN RST URG PSH ALL NONE
udp and icmp match extensions
udp
–sourec-port
–destination-port
Icmp
–icmp-type
match argumentschain criteria
介绍在一个chain里面设计过滤条件时有哪些限制
在使用-o时,只能用在FORWARD,OUTPUT,POSTROUTING类型的chain里。
-i只能用在INPUT,FORWARD,PREROUTING
owner
依据数据包的owner来过滤,但有些数据包没有owner,例如ping传回的ICMP数据报,使用此功能时,必须加-m(–match),并指定–uid-owner等,owner只能用在OUTPUT

directional filtering 1
保护主机一般是让主机可以发送,不接受
OUTPUT policy ACCEPT
INPUT policy DROP
eg:
iptables -L
iptables -F
iptables -P OUTPUT ACCEPT
iptables -P INPUT DROP
但这样,当主机主动发起连接,对方回复表示同意建立连接的数据报也会被拒绝掉,比较好的做法是:由此主机主动发起连接的数据报的时候,允许其他主机回复给此主机的数据报进入主机,不允许有其他主机主动连接的数据包进入。
主动连接的数据包只有SYN FLAG,而回应的有SYN/ACK FLAG,所以拒绝只有SYN的数据报,允许SYN/ACK进来。
iptables -L
iptables -F
iptables -P INPUT ACCEPT
iptables -L
iptables -A INPUT -p tcp --tcp-flags ACK SYN -j ACCEPT
iptables -A INPUT -p tcp --tcp-flags SYN,ACK SYN -j DROP
表示要过滤掉只有SYN标签,而没有ACK标签的数据报
iptables -L
directional filtering 2
以上例子只能拒绝使用TCP协议的数据报,而不能拒绝非TCP的数据报
拒绝ping
iptables -A INPUT -s ! 192.168.0.0/24 -p icmp -j DROP
拒绝本机某些数据传送(root建立的数据报)
iptables -A OUTPUT -d ! 192.168.0.0/24 -m owner --uid-owner 0 -j DROP
connection tracking
man iptables 可以根据连线状态来过滤数据报
/state
必须加-m state(–match state)
state 参数有:INVALID 未知状态
ESTABLISHED 三次握手过后,正在传送的数据报
NEW 新建立的连接产生的数据报,还在三次握手过程中的数据报
RELATED 指跟一条已建立的连接有关,但是会建立另外一条连接的数据报,如FTP(20 command, 21 data transfer),
connection tracking example
通常在传送资料时,会使用多个数据报才能传完
iptables -A INPUT -m state --state ESTABLISHED,RELATED -j ACCEPT
如果想要限制用户的数量,例如限制在同一时间有1000 client可以存取WEB SERVRER则可以使用NEW,判断WEB SERVER的连接数量后可以使用
iptables -A INPUT -m state --state NEW -p tcp --dport 80 -j REJECT
network address translation(NAT)
PREROUTING — DNAT
POSTROUTING — SNAT
OUTPUT
SNAT example
iptables -t nat -A POSTROUTING -s 192.168.0.0/24 -o eth0 -j MASQUERADE
等同于:
iptables -t nat -A POSTROUTING -s 192.168.0.0/24 -j SNAT --to-source 202.102.240.78
DNAT example
iptables -t nat -A PREROUTING -d 202.102.240.78 -p tcp --dport 80 -j DNAT --to-dest 192.168.8.10
也可写成以下形式(此类应该需要能解析到此域名)
iptables -t nat -A PREROUTING -d www.example.com -p tcp --dport 80 -j DNAT --to-dest 192.168.8.10
rules persistence
iptables is not a daemon
system V management
service iptables status
rules stored in memory
securing services
system V startup control
确定哪些服务是开机启动或由xinetd管理的
chkconfig --list
chkconfig on 设定某一服务开机自启动
chkconfig off 设定默认开机不启动
chkconfig httpd --ist
关闭不必要的服务
securing the service
增加服务的安全性
1.每个服务本身的设定
每个服务像httpd都由关于安全的设置
vi /etc/httpd/conf/httpd.conf
order allow,deny
allow from all
2.服务的公用设定
tcp_wrappers的安全性机制
根据/etc/hosts.allow和/etc/hosts.deny判断哪些IP可以或不可以访问服务器的哪些服务
为许多网络服务提供host-base的访问控制,host-base只是根据客户端IP来判断
怎样判断服务支持tcp_wrappers的安全性机制?
只要服务的程序link到libwrap.so,此服务就可以使用
怎样判断已经link?
ls -l /usr/sbin/xinetd
ldd /usr/sbin/xinetd
[root@host ~]# ldd /usr/sbin/xinetd
libwrap.so.0 => /usr/lib/libwrap.so.0 (0x00f75000)
libnsl.so.1 => /lib/libnsl.so.1 (0x00b8b000)
libm.so.6 => /lib/libm.so.6 (0x00d3b000)
libcrypt.so.1 => /lib/libcrypt.so.1 (0x005aa000)
libc.so.6 => /lib/libc.so.6 (0x00110000)
libdl.so.2 => /lib/libdl.so.2 (0x00c3b000)
libsepol.so.1 => /lib/libsepol.so.1 (0x00b01000)
/lib/ld-linux.so.2 (0x00ebc000)
xinetd管理的服务都支持tcp_wrappers安全性机制
还有其他服务,如:
sendmail,sshd,xinetd,gdm,portmap,vsftpdtcp_wrappers configuration
configuration stored in two files:
permissions in /etc/hosts.allow
denials in /etc/hosts.denybasic syntax:
daemon_list:client_list[:options]daemon specification
tcp_wrappers设定里程序名称如何设定
tcp_wrappers程序名称有一下设定:
设置daemon名称要设定服务在运行时的真正名称
比如禁止192.168.8.10访问服务器的telnet
vi /etc/hosts.deny
telnet : 192.168.8.10 #错误
telnetd : 192.168.8.10 #错误
in.telnetd : 192.168.8.10 #正确
cat /etc/xinetd.d/telnet
在设定daemon名称时,可以同时制定多个daemon名称
in.telnetd,vsftpd : 192.168.8.10
可以使用ALL来代表所有的服务
ALL : 192.168.8.10
advanced syntax:
当服务器上安装了多个网卡才会用到
daemon@host : client_list
vi /etc/hosts.allow
[email protected] : 192.168.8.0/255.255.255.0
[email protected] : 10.0.0.0/255.255.255.0
client specification
要制定客户端可以有三种方法:
by ip address 192.168.8.100,10.0.1. #代表10.0.1.0整个网段,最后必须有个点
by network/netmask 192.168.8.0/255.255.255.0
by host name www.redhat.com, .example.com
advanced syntax
wildcarads
ALL 代表所有电脑
LOCAL 代表电脑名称里不代“.”的电脑
UNKNOWN 代表不能解析电脑名称的电脑
KNOWN 代表能解析电脑名称的电脑
PARANOID 代表正向解析和反向解析不一致的电脑
EXCEPT operator
排除操作
vi /etc/hosts.deny
ALL EXCEPT in.telnet : 192.168.8.
ALL : 192.168.8. EXCEPT 192.168.8.100
options
syntax
daemon_list : client_list[:option1 :option2]
spawn,触发指当tcp_wrappers有符合的规则时,要作什么动作
例如:in.telnetd : ALL : spawn echo “login attempt from %c to %s | mail -s warning root
%c client information (user@host)
%s server information (daemon@host)
DENY
Can be used as an option in hosts.allow
example: ALL: ALL :Deny
所有的电脑都不允许访问服务器的所有服务,这样就不用设置/etc/hosts.deny
example
1.192.168.8.4 deny telnet
vi /etc/hosts.deny
in.telnetd : 192.168.8.4
2. 192.168.8.0 deny ftp
vsftpd : 192.168.8.0/255.255.255.0 == 192.168.8.
3. 只允许192.168.8.0 ssh
vi /etc/hosts.allow
sshd : 192.168.8.
vi /etc/hosts.deny
sshd : ALL
另一种方法
sshd : ALL EXCEPT 192.168.8.
securing xinetd-managed services
tcp_wrappers is still used
xinetd provides its own set of access control functions
host-based 根据host ip来控制
time-based 根据时间来控制
xinetd access control
syntax
allow with only_from = host_pattern
deny with no_access = host_pattern
vi /etc/xinetd.d/telnet
no_accesss = 192.168.8.200
only_from = 192.168.8.10
host patterns
host masks for xinted may be:
numeric address
vi /etc/xinitd.d/telnet
only_from = 192.168.1.0
hostname or domain
only_from = .domain.com
ip address/netmask range
only_from = 192.168.8.0/255.255.255.0
advanced security options
access by time
vi /etc/xinitd.d/telnet
access_time = 9:00-18:00
number of simultaneous connections
vi /etc/xinitd.d/telnet
instances = 60
per_source = 5
securing data
The need for encryption
insecure traditional protocols
insecure passwords
不加密密码telnet,ftp,pop3
insecure information
传输的信息没有加密,sendmail,NFS,等
insecure authentication
不安全的验证,账户及密码没有加密
rsh,rcp
random numbers
为了取得不同的随机数,kernel收集鼠标的动作,键盘的动作,磁盘写入写出的数值来生成随机数,ls -l /dev/random 加密用
ls -l /dev/unrandom 解密用
cat /dev/random 就可以看到产生的随机数,如果移动鼠标,会看到产生新的随机数
one way hashes
vi /etc/shadow
第二列就时MD5 hash的密文,MD5是不可逆的。
常见算法:MD2,MD5,MDC2,RMD160,SHA,SHA1
symmetric encryption
对称加密,加密解密用统一个钥匙
算法:DES,3DES,BLOWFISH,RC2,RC4,RC5,IDEA,CAST5
asymmetric encryption
非对称加密,一对钥匙,一把叫公钥,一把叫私钥,一把加密一把解密
digital certificates
用第三方的认证机构(CA)来验证双方的关系
IMAPS也会用certificates,IMAPS不会将信件下载到本地
LAB:creating a certificate for IMAPS
cd /usr/share/ssl/certs
ls -l
rm dovecot.pem
make dovecot.pem
cp docecot.pem /usr/share/ssl/private
vi /etc/dovecot.conf
protocols = pop3 pop3s imap imaps
service dovecot restart
mutt -f {[email protected]}
o
输入账户密码,阅读邮件
openssh overview
当我们用telnet,rsh,rlogin登陆服务器时,都是明文传输,不安全的。
openssh提供了一种安全的shell,提供网络间资料传输的加密,使用sftp来替代ftp,scp来替代rcp,
service profile:SSH
type: system V-managed service
packages: openssh,openssh-client,openssh-server
daemons: sshd
scripts: sshd
ports: 22
configuration: /etc/ssh/*,$HOME/.ssh/ 家目录存放pub key和private keyopenssh server configure
/etc/ssh/sshd_config
vi /etc/ssh/sshd_config
ssh支持public key和privat key的身份验证方式。
这种认证方式不需要输入用户密码