Fortigate 飞塔防火墙命令行常用操作 CLI
文章目录
-
- 1.基本配置
-
- 1. 设备console口设置
- 2. 设置接口IP
- 3. 设置网关
- 4. 设置DNS
- 5. 设置NTP
- 6. 设置时区和主机名
- 7. 配置备份
- 2.HA相关
-
- 1. 查看HA状态
- 3.基本元素
-
- 1. 新建IP库
- 2. 新建IP组
- 3. 新建虚拟IP库(端口映射)
- 4. 新建虚拟IP group,并关联虚拟IP
- 4.策略相关
-
- 1. 新建策略
- 2. 删除策略
- 3. 使策略失效
- 4. 调整策略顺序
- 5. 查看与诊断
-
- 1. 查看DNS查询表
- 2. 查看扩展信息
- 3. 查看策略路由
- 4. grep 命令
- 5. 查看CPU、Memory信息
- 6. 动态查看资源占用率
- 7. 查看端口信息
- 8. 查看硬件状态信息
- 9. 路由相关
- 10. 查看当前在线管理员信息
- 11. 查看ARP表
- 12. 查看模块功能状态
- 13. 查看包统计信息
- 14. 会话相关
- 15. 查看spanning tree 状态
- 16. 查看配置相关
- 16. 查看系统状态
- 17. 查看策略相关
- 18. 清除arp表
- 19. 抓包
- 20. 重置密码
1.基本配置
1. 设备console口设置
Bits per second	9600
Data bits	8
Parity	None
Stop bits	1
Flow control	None
2. 设置接口IP
本节关键字:DHCP中继、SNMP、接口角色、禁ping、SSH、telnet。
下面的配置我省略了部分相同配置的接口,关于每条命令的作用详见注释。关于接口角色分别有WAN、LAN、DMZ和Undefined这4个角色,每个角色所具有的功能不一样,比如LAN和Undefined能配置dhcp相关功能。
config system interface
    edit "port1"										//接口编号
        set vdom "root"
        set mode dhcp									//设置为DHCP模式
        set allowaccess ping https ssh http fgfm		//该接口运行哪些协议
        set type physical								//接口类型,自动配置
        set snmp-index 1								//SNMP 自动配置
    next
    edit "port4"
        set vdom "root"
        set ip 172.16.1.254 255.255.255.0				//设置IP地址
        set allowaccess ping
        set type physical
        set role wan									//可选配置,设置为WAN接口
        set snmp-index 4
    next
    edit "port10"
        set vdom "root"
        set dhcp-relay-service enable					//开启DHCP中继服务
        set ip 192.168.152.144 255.255.255.0
        set allowaccess ping https ssh http telnet
        set type physical
        set device-identification enable
        set role lan									//可选配置,设置为LAN接口
        set snmp-index 10
		set dhcp-relay-ip "192.168.152.188" "192.168.152.189" 			//DCHP中继地址,可以设置一个或多个
    next
    edit "ssl.root"
        set vdom "root"
        set type tunnel									//自动配置,接口类型为tunnel
        set alias "SSL VPN interface"
        set snmp-index 11
    next
end
3. 设置网关
config router static
    edit 1
        set gateway 172.16.1.1
        set device "port4"				//出接口
        set comment "cest"				//描述
    next
end
4. 设置DNS
config system dns
 set primary 65.39.139.52
 set secondary 65.39.139.62
end
5. 设置NTP
config system ntp
 set server 172.30.62.81
 set status enable
end
6. 设置时区和主机名
config system global
    set alias "test"					//别名
    set hostname "FW-02"				//主机名
    set timezone 55						//北京时间 东8区
end
7. 配置备份
将配置备份通过tftp备份到192.168.1.1. 备份名称为configuration20200101.cfg
execute backup config tftp configuration20200101.cfg 192.168.1.1
2.HA相关
1. 查看HA状态
get system ha status
show system ha
execute ha failover set **   手动执行防火墙切换
execute ha manage **		CLI命令行登录另一台设备
3.基本元素
1. 新建IP库
config firewall address
    edit "none"																		//设置条目名称,配置的时候不用打引号
        set uuid e2c79b60-6292-51ea-c19c-685789e1df11								//UUID 自动生成
        set subnet 0.0.0.0 255.255.255.255
    next
    edit "google-play"
        set uuid e2c7abc8-6292-51ea-0206-8441b85fbda1
        set type fqdn
        set fqdn "play.google.com"													//设置FQDN
    next
    edit "all"																		//如果要匹配所有,则默认什么都不配置
        set uuid e3340232-6292-51ea-2f82-0149c2008fd0
    next
    edit "192.168.152.188"
        set uuid 8bdc9984-6366-51ea-7a45-3b296501e321
        set subnet 192.168.152.188 255.255.255.255									//设置ip范围
    next
    edit "172.16.1.1"
        set uuid 9b89e170-6366-51ea-9c91-2f06c438a341
        set subnet 172.16.1.1 255.255.255.255
    next
end
2. 新建IP组
config firewall addrgrp
    edit "IP_group"
        set uuid 412fed06-6383-51ea-31ab-135d3075f831
        set member "172.16.1.1" "192.168.152.188"					//引号内的都是名称,并不是IP地址
        set comment "test"
    next
end
3. 新建虚拟IP库(端口映射)
下面将3389和69端口由外部地址172.16.1.1 映射到内部192.168.152.188
config firewall vip
    edit "3389"
        set uuid a6ad60fe-6375-51ea-1323-74e0daee592b				//UUID自动生成
        set comment "test"											//描述
        set extip 172.16.1.254										//对外IP
        set extintf "any"											//对外接口
        set portforward enable										//启动端口转发,也就是端口映射
        set color 6													//可选,配置颜色,6为红色
        set mappedip "192.168.1.188"								//映射到内部的IP
        set extport 3389											//对外端口
        set mappedport 3389											//映射到内部的端口
    next
    edit "69"
        set uuid 4b81f326-6379-51ea-3b7f-492557b2123f
        set comment "tftp 69"
        set extip 172.16.1.254
        set extintf "any"
        set portforward enable
        set mappedip "192.168.152.188"
        set protocol udp
        set extport 69
        set mappedport 69
    next
end
4. 新建虚拟IP group,并关联虚拟IP
config firewall vipgrp
    edit "Test"													//创建组名
        set uuid 31aa331c-637b-51ea-4b5f-35d239897836			//UUID 自动生成
        set interface "any"										//接口任意
        set comments "Test_VIP_Group"							//可选,描述
        set member "3389" "69"									//将之前创建的 3389和69加入到该组
    next
end
4.策略相关
1. 新建策略
config firewall policy
    edit 1															//策略ID,匹配时从小到大匹配
        set name 192_TO_172
        set uuid a1eb8eba-6366-51ea-3f7b-d051c21a7fad      		  	//自动生成,也可以手动设置
        set srcintf port10
        set dstintf port4
        set srcaddr 192.168.152.188
        set dstaddr 172.16.1.1
        set action accept
        set status disable											//状态为失效状态
        set schedule always
        set service ALL
        set fsso disable
    next
    edit 2
        set name "port_forwarding"									//用作端口转发的策略
        set uuid 11e51b44-637d-51ea-590f-9b2878cf7fb1
        set srcintf "port4"
        set dstintf "port10"
        set srcaddr "172.16.1.1"
        set dstaddr "Test"											//目的地址为虚拟IPgroup,也可以是虚拟IP,怎么方便怎么调用
        set action accept
        set schedule "always"
        set service "ALL"
        set fsso disable
    next
end
end
2. 删除策略
config firewall policy
	delete ID															//删除某条策略
3. 使策略失效
以下命令将使策略失效,但不删除策略。
config firewall policy
	edit ID
	set status [disable | enable]										//设置策略状态为启用还是禁用
4. 调整策略顺序
config firewall policy
	move ID [before | after ] ID
5. 查看与诊断
1. 查看DNS查询表
get firewall dnstranslation
2. 查看扩展信息
get extender modem-status +序列号
3. 查看策略路由
get firewall proute
4. grep 命令
{get | show| diagnose} | grep <regular_expression>
5. 查看CPU、Memory信息
get hardware cpu                 //查看CPU信息
get hardware memory              //查看内存信息
get system performance status   //硬件信息
6. 动态查看资源占用率
get system performance top [<delay_int>] <max_lines_int>]]
• 按Q和Ctrl+C 退出
• 按P进行CPU排序
• 按M进行内存排序排序
7. 查看端口信息
get hardware nic <interface_name>
get system interface physical
8. 查看硬件状态信息
get hardware status
9. 路由相关
get router info protocols        //查看当前激活的路由协议
get router info +路由类型         //查看路由信息比如 ospf rip isis bgp
get router info kernel + 路由类型   //查看核心路由表
get router info routing-table [all|bgp|connected|database|ospf|rip|static]
10. 查看当前在线管理员信息
get system admin list
get system admin status       //View the status of the currently logged in admin and their session
get system info admin status  //查看管理员登录方式 ssh 还是 web
11. 查看ARP表
get system arp //在多vdom 模式下不可用
12. 查看模块功能状态
get system fortiguard-service status
13. 查看包统计信息
get system performance firewall packet-distribution     //统计不同大小包的个数
get system performance firewall statistics				//基于不同应用统计包数和大小,防火墙重启到当前时间范围
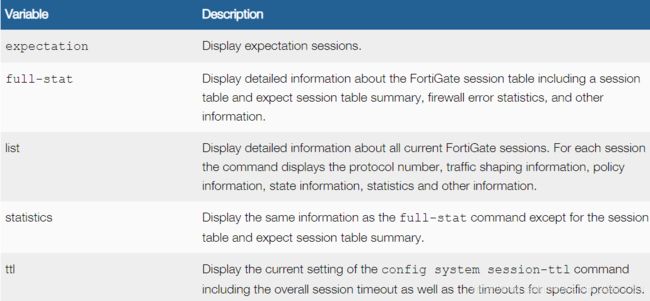
14. 会话相关
get system session list
get system session status


get system session-info expectation
get system session-info full-stat
get system session-info list
get system session-info statistics
get system session-info ttl
15. 查看spanning tree 状态
get system stp list
16. 查看配置相关
show
show |grep xxxx
show full-configuration
show full-configuration | grep XXXX
show full-configuration | grep -f XXXX           //← display with tree view
16. 查看系统状态
get system status
17. 查看策略相关
 show firewall policy
 show firewall policy XXXX
18. 清除arp表
execute clear system arp table
19. 抓包
 diagnose sniffer packet port15
 diagnose sniffer packet any 'host xx.xx.xx.xx'
 diagnose sniffer packet port15 'host xx.xx.xx.xx'
 diagnose sniffer packet any 'host xx.xx.xx.xx or host yy.yy.yy.yy'
 diagnose sniffer packet any 'udp port 53 or tcp port 53'
 diagnose sniffer packet any 'host xx.xx.xx.xx and tcp port 80'
20. 重置密码
- 关机重启,屏幕会弹出序列号
- 用户名输入:maintainer 密码为:bcpb+序列号(没有+号)
- 修改admin账户密码
config system admin
    edit "admin"
        set password <your password>
    next
end
如果要禁用maintainer账户,命令如下:
config system global
    set admin-maintainer disable