MySQL数据库:索引
目录
一. 索引的价值
二. 数据库与磁盘的IO
2.1 磁盘的结构
2.2 磁盘访问
2.3 MySQL与磁盘的交互
三. 对索引的理解
3.1 Page的结构
3.2 B树和B+树索引结构
3.2.1 B树的结构
3.2.2 B+树
3.3 聚簇索引和非聚簇索引
四. 索引的操作
4.1 索引的创建
4.2 索引的查看
4.3 使用索引字段检索数据
4.4 索引的删除
五. 复合索引
5.1 复合索引的价值
5.3 复合索引操作
六. 总结
一. 索引的价值
索引,能够极大提高数据库检索性能,对数据库添加合适的索引,能够在不额外使用内存,不编写新的程序,不调用sql的情况下,大大提高数据的检索效率。
一般的企业级大型数据库,管理的数据量可以达到数千万甚至上亿级别,更有甚者超过百亿千亿的数据量,如果不添加适当的索引,那么查找数据就会变为逐个遍历数据查询,这样的查找效率显然是不可接受的。而数据库一般都是远端网络服务,数据库中的数据存储在磁盘中,磁盘和网络的IO效率都是十分低下的。那么,建立适当的索引就能够大大减少IO的次数,提高数据检索效率。
索引,底层是通过特定的数据结构来实现的,常见的可用于检索的数据结构有:二叉搜索树、平衡树(AVL树、红黑树)、哈希表、B/B+树等。在数据库中,通常使用B+树作为检索的数据结构。
然而,索引并不是没有代价的,对数据库添加索引,会降低插入和删除数据的效率,因为插入和删除数据需要调整索引的数据结构,因此索引适用于对存有海量数据、被高频检索的数据库。
数据库的索引,可以分为四类:(1)主键索引,(2)唯一键索引,(3)普通索引,(4)全文索引。在创建表的时候,如果指定了主键/唯一键,那么MySQL就会自动为主键和唯一键添加索引,而普通索引和全文索引需要手动添加。
二. 数据库与磁盘的IO
2.1 磁盘的结构
数据库中的数据是存储在磁盘上的,而磁盘在计算机中是一个机械设备,相比于内存和寄存器,效率十分低下,那么要提高数据库的效率,就有尽量减少与磁盘之间的IO操作。
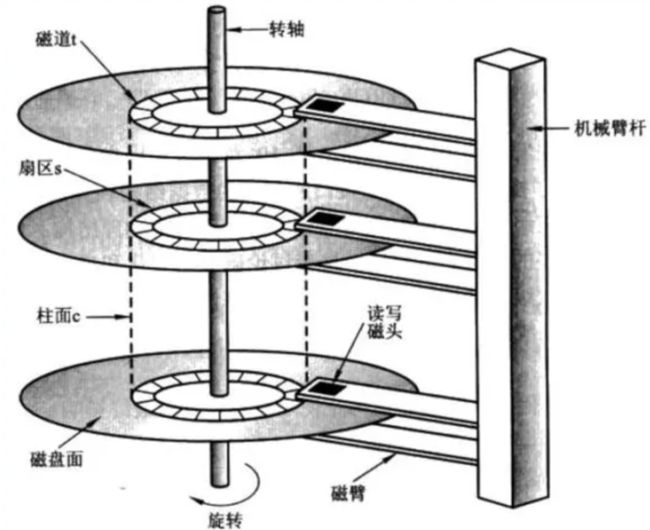
首先来了解一下磁盘的基本结构,我们主要关注磁盘的盘片即可,单个磁盘盘片是双面有效的,其上下面都可以存储数据,磁盘盘面上被划分为若干个同心圆,每个同心圆又按照相等的角度划分为一个个扇区,每个删除存储固定大小的数据。一般而言,一个扇区存储512bytes数据,近年来,单个扇区的数据正有被扩展为4KB大小的趋势。
在Linux操作系统下,绝大部分文件都是存储在存盘上的,除了proc、sys等少部分内存级文件。
2.2 磁盘访问
从磁盘中读取数据,首先要定位到数据所在的扇区,如图2.2为磁盘的寻址结构,只要知道磁头、柱面和扇区所对应的编号,就能获取目标扇区。
- 柱面:对于多盘磁盘,每个磁盘都是两面,所有盘面上相同半径的磁道就构成了柱面。
- 磁头:用于读取磁盘盘片上存储的数据,每个盘面都对应一个磁头。
- CHS寻址:通过定位磁头(Head)、柱面(Cylinder)和扇区(Sector),就能够找到目标扇区,这种寻址方法称为CHS寻找法。
- 在内存及上层应用软件中,并不是直接采用CHS来进行寻址的,而是采用LBA法,一种线性寻址的方法来进行寻址,操作系统会将线性地址进行转换,得到对应的CHS地址。
一个扇区的大小一般为512bytes,操作系统从磁盘中读取数据的基本单位是4KB,不让OS读取磁盘数据的基本单位和扇区大小保持一致的原因在于:
- 在软件和硬件层面实现解耦,如果操作系统IO基本单位和磁盘扇区大小一致,那么当磁盘扇区大小改变时,操作系统源代码也需要重新编写,不符合软件工程高内聚、低耦合的设计理念。
- 一次IO读取512bytes的数据还是偏少,磁盘IO效率低的主要问题并不在于读取本身,而在于读取前的准备工作,比如定位扇区,真正开始读取磁盘数据后效率并不低。
磁盘的访问可分为连续访问和随机访问:
- 磁盘的连续访问:多次访问磁盘的地址相邻,不需要过多的定位,就可以找到对应的扇区。
- 磁盘的随机访问:多次访问磁盘的地址不连续,每次访问需要磁盘磁头摆动较大的范围,才能找到对应的扇区位置。
- 磁盘时通过磁头的机械运动来进行寻址的,对于随机访问,如果摆动范围过大,会严重降低磁盘的IO效率,连续访问的效率要高于随机访问。
2.3 MySQL与磁盘的交互
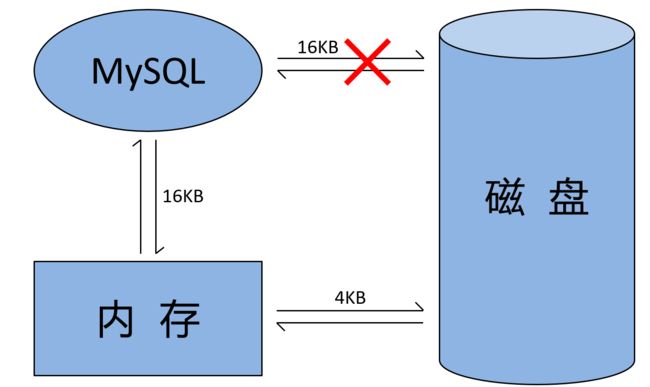
MySQL数据库是一款上层应用软件,其作用是对海量数据进行管理,相比于操作系统,需要更多的IO操作,因此MySQL一次IO的基本单位是16KB,16KB的基本IO单元,在MySQL中被称为页(Page),这里要注意区分MySQL于操作系统Page的区别,操作系统的Page基本单位是4KB。
MySQL是应用层软件,无法与磁盘直接交互,需要现将数据从磁盘预加载到内存中,然后MySQL才能将数据读取。如果需要更新数据库中的数据,需要以4KB为基本单位将更新后的数据写到内存中,然后再将数据刷新到磁盘中去。图2.3为MySQL与磁盘之间交互的示意图。
三. 对索引的理解
3.1 Page的结构
设想一本几百页的厚书,我们希望检索其中的特定内容,如果我们逐页遍历检索,那么效率就会十分低下,而现实中一般采用目录的方式,来提高检索效率。书本中的目录,就类似于MySQL数据库中的检索。对于一张表的主键(key primary)和 唯一键(unique),MySQL会自动为其创建索引结构。
创建测试表:
mysql> create table stu (
    -> id int unsigned primary key,
    -> age tinyint unsigned,
    -> name varchar(20) not null
    -> );
Query OK, 0 rows affected (0.15 sec)
插入数据:
mysql> insert into stu values
    -> (3,20,'张三'),(1,25,'李四'),
    -> (4,18,'王五'),(5,23,'赵六'),
    -> (2,28,'田七');
Query OK, 5 rows affected (0.03 sec)
Records: 5  Duplicates: 0  Warnings: 0
查看表中数据:
mysql> select * from stu;
+----+------+--------+
| id | age  | name   |
+----+------+--------+
|  1 |   25 | 李四   |
|  2 |   28 | 田七   |
|  3 |   20 | 张三   |
|  4 |   18 | 王五   |
|  5 |   23 | 赵六   |
+----+------+--------+
5 rows in set (0.00 sec)
通过观察发现,我们看到的表中数据,与实际插入数据的顺序并不相同,显然数据被重新排序了,数据之所以被重新排序,就是因为MySQL为数据库建立了检索。
对单个Page的理解
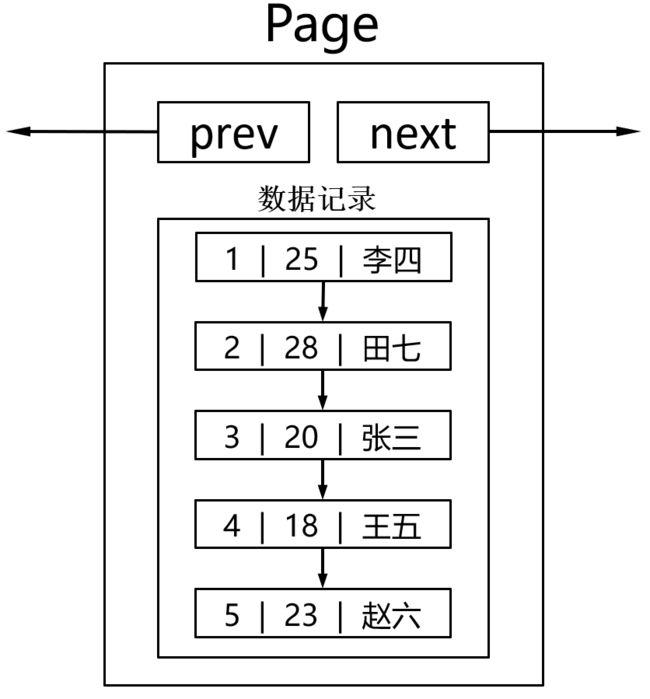
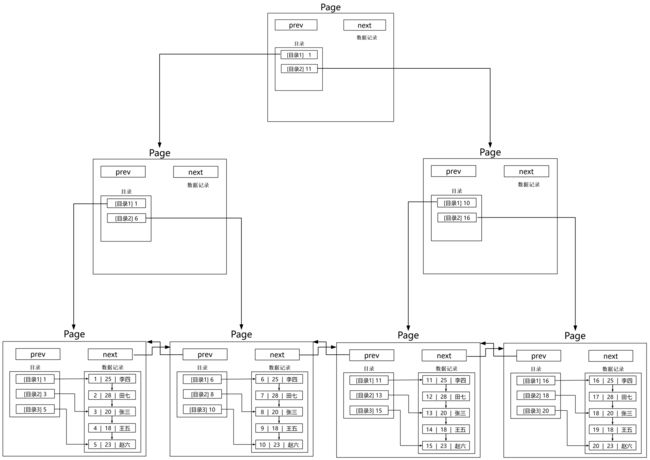
在MySQL中,数据IO的基本单位是页,一个页的大小为16KB,MySQL中可能会同时存在多个页,这些页需要被管理起来,需要通过特定的数据结构进行组织。不同的Page,在MySQL中,页会被组织为双向链表,每个Page中包含一个prev指针一个Next指针指向前后的Page,同时每一条数据记录之间也会被组织为单链表。
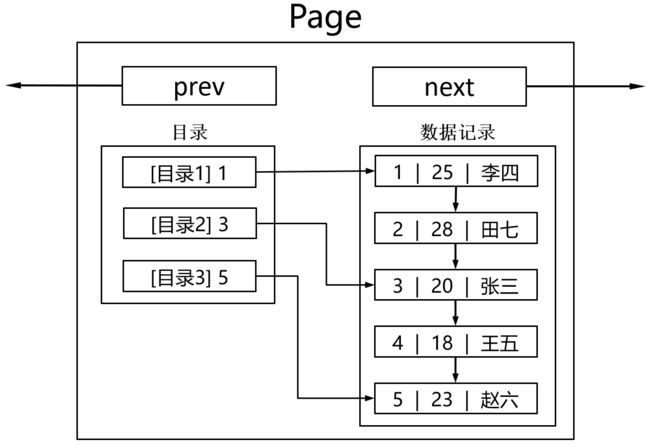
MySQL的单个Page大小16KB,在单个Page中通过逐个遍历进行数据检索,效率还是太低,为了提高检索效率,每个Page中对应索引字段还会建立相应的目录,这样就能通过索引键的值锁定范围,以降低IO的次数,提高效率。
对多个Page的理解
如果MySQL中管理的数据过多,一个Page无法容纳所有数据数据,那么就需要更多的Page来对数据进行管理,在每个Page之间,通过双向链表结构进行连接。这样,在进行数据检索的时候,就可以遍历多个Page结构,通过单个Page里面的目录,判断所要检索的数据是否位于某个Page之中,这就体现了单个Page内部目录的作用。
然而,如果MySQL中管理的数据量进一步加大,那么仅仅通过单链表组织结构,依次遍历每一个Page,仍然会存在IO次数多,检索效率低下的问题,因此,对于MySQL中的每个Page,依然会对其建立目录索引结构。
解决Page过多造成检索效率低下问题的方法:给Page也带上目录。
- 目录页的本质也是Page,在目录页中,记录所指向页的最小键值数据。
- 一般的数据库都采用B+树作为索引数据结构,非叶子节点(目录页)只记录目录数据,而不存储有效数据。
- 目录页只存储目录不存储有效数据的目的是提高单页能够存放的目录数据量,以减少IO的次数,提高检索的效率。
在MySQL中,检索使用的数据库也是存储在磁盘中的。通过图3.4我们可以发现,这就是B+树,大部分情况下,检索都是通过B+树来实现的,而每个页都是B+树的一个节点。在实际的工程项目中,常用的检索结构还有:二叉搜索树、平衡二叉树、哈希表等,而采用B+树而不是其它几种数据结构的原因在于:
- 二叉搜索树,在极端情况下,会退化为线性检索。
- 平衡二叉树虽然能避免二叉搜索树退化为线性检索的问题,但其检索效率仍然为O(logN),而从磁盘中读取数据是一种效率低下的操作,O(logN)比O(1)的效率会很明显降低。
- 哈希表虽然可实现平均时间复杂度为O(1)的检索,但是如果发生过多的哈希冲突,效率依然会明显降低甚至退化为O(N)的检索效率。
3.2 B树和B+树索引结构
3.2.1 B树的结构
B树是一种高效的搜索树结构,对于一个M阶的B树,具有以下特点:
- B树的根节点,至少有两个孩子节点。
- 每个分支节点有k个孩子节点和k-1个键值,其中 ceil(m/2) <= k <= m。
- 每个叶子节点的键值都是小到大排序的,键值key为子树的阈值划分。
- 所有叶子节点都在同一层。
3.2.2 B+树
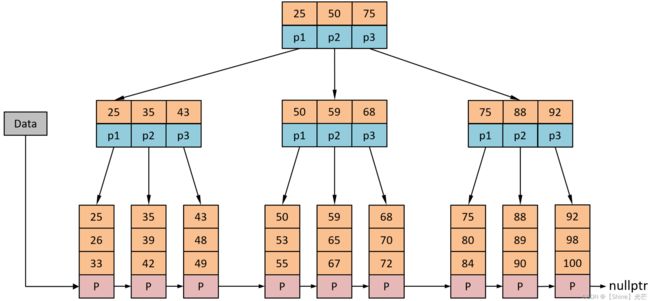
B+树相对于B树有以下的区别:
- 每个节点的键值和孩子节点的数目是相同的。
- 只有叶子节点存有有效数据,分支节点存储的都是键值。
- 孩子节点指针p[i]所执行的子树的节点值范围在[k[i], k[i+1])之间,每个子树的第一个节点的值是其父亲节点对应的键值k[i]。
- 所有孩子节点都被指针连接起来了。
3.3 聚簇索引和非聚簇索引
MySQL最常用的两种搜索引擎为MyISAM和InnoDB,这两种引擎创建的索引,底层都是通过B+树来实现的,MyISAM和InnoDB的区别在于:
- MyISAM采用的是非聚簇索引:存储的有效数据和B+树检索结构分离,B+树叶子节点中的有效数据data是实际存储数据的映射(地址)。
- InnoDB采用的是聚簇索引:有效数据就被存放在B+树的叶子节点data区域。
下面来对MyISAM和InnoDB这两种搜索引擎进行测试,打开两个终端,其中一个终端启动mysql服务(终端A),另一个终端进行监测(终端B),按照如下步骤进行测试:
- 在终端A下创建名为test_index的数据库,终端B进入路径/var/lib/mysql/test_index下。
- 在test_index数据库下,创建两张表testMyISAM和testInnoDB,分别采用MyISAM和InnoDB为搜索引擎。
- 在终端B下通过ll指令,查看目录/var/lib/mysql/test_index下的文件及其属性信息。
通过观察发现,在/var/lib/mysql/test_index路径下,表testMyISAM对应2个文件:testMyISAM.frm为表的属性相关信息、testMyISAM.idb为索引结构和有效数据,表testInnoDB对应三个文件:testInnoDB.frm为表的属性相关信息、testInnoDB.MYI为索引、testInnoDB.MYD为有效数据。
终端A:
mysql> create database test_index;
Query OK, 1 row affected (0.00 sec)

mysql> use test_index;
Database changed
mysql> create table testMyISAM (
    -> id int unsigned primary key,
    -> name varchar(10) not null
    -> );
Query OK, 0 rows affected (0.22 sec)

mysql> create table testInnoDB (
    -> id int unsigned primary key,
    -> name varchar(10) not null
    -> )engine MyISAM;
Query OK, 0 rows affected (0.04 sec)
终端B:
[root@VM-8-5-centos ~]# cd /var/lib/mysql/test_index
[root@VM-8-5-centos test_index]# pwd
/var/lib/mysql/test_index
[root@VM-8-5-centos test_index]# ll
total 128
-rw-r----- 1 mysql mysql    61 Jan  2 18:53 db.opt
-rw-r----- 1 mysql mysql  8586 Jan  2 18:56 testInnoDB.frm
-rw-r----- 1 mysql mysql     0 Jan  2 18:56 testInnoDB.MYD
-rw-r----- 1 mysql mysql  1024 Jan  2 18:56 testInnoDB.MYI
-rw-r----- 1 mysql mysql  8586 Jan  2 18:55 testMyISAM.frm
-rw-r----- 1 mysql mysql 98304 Jan  2 18:55 testMyISAM.ibd
四. 索引的操作
4.1 索引的创建
主键索引
通过以下三种方法,可以创建主键索引:
方法1:直接在表成员声明后面添加key primary关键字声明主键。
mysql> create table t1 (
    -> id int primary key,
    -> name varchar(10) not null
    -> );
Query OK, 0 rows affected (0.16 sec)方法2:在创建表的指令最后单独声明主键。
mysql> create table t2 (
    -> id int unsigned,
    -> name varchar(10) not null,
    -> primary key(id)
    -> );
Query OK, 0 rows affected (0.09 sec)方法3:在完成表的创建后添加主键。
mysql> create table t3 (
    -> id int unsigned,
    ->  name varchar(10) not null
    -> );
Query OK, 0 rows affected (0.27 sec)

mysql> alter table t3 add primary key(id);
Query OK, 0 rows affected (0.47 sec)
Records: 0  Duplicates: 0  Warnings: 0
唯一键索引
如果对一个唯一键添加not null声明,那么这个唯一键索引就等同于主键索引,有以下三种方法可以创建唯一键索引:
方法1:直接在表成员声明后面添加unique关键字声明唯一键。
mysql> create table t4 (
    -> id int unsigned unique,
    -> name varchar(10)
    -> );
Query OK, 0 rows affected (0.20 sec)方法2:在创建表的指令最后单独声明唯一键。
mysql> create table t5 (
    -> id int unsigned,
    -> name varchar(10),
    -> unique(id)
    -> );
Query OK, 0 rows affected (0.39 sec)方法3:在完成表的创建后添加唯一键。
mysql> create table t6 (
    -> id int unsigned,
    -> name varchar(10)
    -> );
Query OK, 0 rows affected (0.24 sec)

mysql> alter table t6 add unique(id);
Query OK, 0 rows affected, 1 warning (0.19 sec)
Records: 0  Duplicates: 0  Warnings: 1
普通索引
普通索引相比于主键索引和唯一键索引,其值可以重复,有以下三种方法可以创建普通索引:
方法1:在创建表的指令后面声明普通索引。
mysql> create table t7 (
    -> id int unsigned not null,
    -> name varchar(10) not null,
    -> index(id)
    -> );
Query OK, 0 rows affected (0.27 sec)方法2:在创建完表后通过alter指令添加普通索引。
mysql> create table t8 (
    -> id int unsigned not null,
    -> name varchar(10) not null
    -> );
Query OK, 0 rows affected (0.13 sec)

mysql> alter table t8 add index(id);
Query OK, 0 rows affected (0.19 sec)
Records: 0 Duplicates: 0 Warnings: 0方法3:在创建完表后添加普通索引,自定义索引名称。
mysql> create table t9 (
    -> id int unsigned not null,
    -> name varchar(10) not null
    -> );
Query OK, 0 rows affected (0.10 sec)

mysql> create index myIndex on t9(id);
Query OK, 0 rows affected (0.20 sec)
Records: 0  Duplicates: 0  Warnings: 0
全文索引
当对大段文字进行索引的时候,需要用到全文索引。MySQL支持全问索引,但是MySQL的全文索引受到以下的限制:
- 必须使用MyISAM搜索引擎。
- 只能支持英文索引,不支持中文索引。
mysql> create table t10 (
    -> id int unsigned primary key,
    -> title varchar(100) not null,
    -> body text,
    -> fulltext (title,body)
    -> );
Query OK, 0 rows affected (1.82 sec)
4.2 索引的查看
方法1:show keys from 表名 \G
mysql> show keys from t1 \G
*************************** 1. row ***************************
        Table: t1
   Non_unique: 0
     Key_name: PRIMARY   -- 索引名称
 Seq_in_index: 1
  Column_name: id        -- 建立索引的字段名称
    Collation: A
  Cardinality: 0
     Sub_part: NULL
       Packed: NULL
         Null:
   Index_type: BTREE     -- 索引使用的数据结构
      Comment:
Index_comment:
1 row in set (0.00 sec)方法2:show index from 表名 \G
mysql> show index from t1 \G
*************************** 1. row ***************************
        Table: t1
   Non_unique: 0
     Key_name: PRIMARY
 Seq_in_index: 1
  Column_name: id
    Collation: A
  Cardinality: 0
     Sub_part: NULL
       Packed: NULL
         Null:
   Index_type: BTREE
      Comment:
Index_comment:
1 row in set (0.00 sec)方法3:desc 表名;
desc为打印表的详细属性信息,其中字段key就是索引信息,PRI表示主键索引、UNI表示唯一键索引、MUL表示普通索引。
mysql> desc t1;
+-------+-------------+------+-----+---------+-------+
| Field | Type        | Null | Key | Default | Extra |
+-------+-------------+------+-----+---------+-------+
| id    | int(11)     | NO   | PRI | NULL    |       |
| name  | varchar(10) | NO   |     | NULL    |       |
+-------+-------------+------+-----+---------+-------+
2 rows in set (0.00 sec)
4.3 使用索引字段检索数据
通过where条件筛选,可以实现通过索引来检索特定的行数据。我们采用 explain + 指令 的方法来查看MySQL通过索引字段检索数据的底层实现。
explain:不实际执行指令,输出指令的底层实现流程。
如果explain后面跟的检索指令所使用的条件筛选字段没有对应的索引,那么其explain的key字段为NULL,反之,key字段为其使用的索引名称。
mysql> insert into t1 values (1,'zhangsan'),(2,'lisi');
Query OK, 2 rows affected (0.04 sec)
Records: 2  Duplicates: 0  Warnings: 0

mysql> explain select * from t1 where name='zhangsan' \G
*************************** 1. row ***************************
           id: 1
  select_type: SIMPLE
        table: t1
   partitions: NULL
         type: ALL
possible_keys: NULL
          key: NULL    -- 不使用索引,遍历查找
      key_len: NULL
          ref: NULL
         rows: 2
     filtered: 50.00
        Extra: Using where
1 row in set, 1 warning (0.00 sec)

mysql> explain select * from t1 where id=1 \G
*************************** 1. row ***************************
           id: 1
  select_type: SIMPLE
        table: t1
   partitions: NULL
         type: const
possible_keys: PRIMARY
          key: PRIMARY   -- 使用主键索引查找
      key_len: 4
          ref: const
         rows: 1
     filtered: 100.00
        Extra: NULL
1 row in set, 1 warning (0.00 sec)
对于全文索引,通过like模糊匹配,无法有效利用全文索引,如下所示代码,向建立了全文索引的表t10中插入数据,然后通过模糊匹配查找带有 'DataBase' 的文本,explain查看其底层实现,发现并没有使用全文索引,而是遍历匹配。
使用全文检索的语法:match ... against ...
通过模糊匹配检索文本:
mysql> insert into t10 values
    -> (1,'MySQL Tutorial','DBMS stands for DataBase ...'),
    -> (2,'How To Use MySQL Well','After you went through a ...'),
    -> (3,'Optimizing MySQL','In this tutorial we will show ...'),
    -> (4,'1001 MySQL Tricks','1. Never run mysqld as root. 2. ...'),
    -> (5,'MySQL vs. YourSQL','In the following database comparison ...'),
    -> (6,'MySQL Security','When configured properly, MySQL ...');
Query OK, 6 rows affected (0.03 sec)
Records: 6  Duplicates: 0  Warnings: 0

mysql> select * from t10 where body like '%DataBase%';
+----+-------------------+------------------------------------------+
| id | title             | body                                     |
+----+-------------------+------------------------------------------+
|  1 | MySQL Tutorial    | DBMS stands for DataBase ...             |
|  5 | MySQL vs. YourSQL | In the following database comparison ... |
+----+-------------------+------------------------------------------+
2 rows in set (0.00 sec)

mysql> explain select * from t10 where body like '%DataBase%' \G
*************************** 1. row ***************************
           id: 1
  select_type: SIMPLE
        table: t10
   partitions: NULL
         type: ALL
possible_keys: NULL
          key: NULL
      key_len: NULL
          ref: NULL
         rows: 6
     filtered: 16.67
        Extra: Using where
1 row in set, 1 warning (0.00 sec)
通过全文检索匹配文本:
mysql> select * from t10 where match (title,body) against ('DataBase');
+----+-------------------+------------------------------------------+
| id | title             | body                                     |
+----+-------------------+------------------------------------------+
|  1 | MySQL Tutorial    | DBMS stands for DataBase ...             |
|  5 | MySQL vs. YourSQL | In the following database comparison ... |
+----+-------------------+------------------------------------------+
2 rows in set (0.00 sec)

mysql> explain select * from t10 where match (title,body) against ('DataBase') \G
*************************** 1. row ***************************
           id: 1
  select_type: SIMPLE
        table: t10
   partitions: NULL
         type: fulltext
possible_keys: title
          key: title
      key_len: 0
          ref: const
         rows: 1
     filtered: 100.00
        Extra: Using where; Ft_hints: sorted
1 row in set, 1 warning (0.00 sec)
4.4 索引的删除
根据索引的不同类型,有以下三种方法可以删除索引:
- 方法1(用于删除主键索引):alter table 表名 drop primary key;
- 方法2(用于删除除主键索引外的其它索引):alter table 表名 drop index 索引名;
- 方法3:drop index 索引名 on 表名;
其中,方法2和方法3所使用的表名,是show index from ... 查询到的Key_name值。
mysql> alter table t1 drop primary key;
Query OK, 2 rows affected (0.62 sec)
Records: 2  Duplicates: 0  Warnings: 0

mysql> alter table t5 drop index id;
Query OK, 0 rows affected (0.16 sec)
Records: 0  Duplicates: 0  Warnings: 0

mysql> drop index myIndex on t9;
Query OK, 0 rows affected (0.08 sec)
Records: 0  Duplicates: 0  Warnings: 0
五. 复合索引
5.1 复合索引的价值
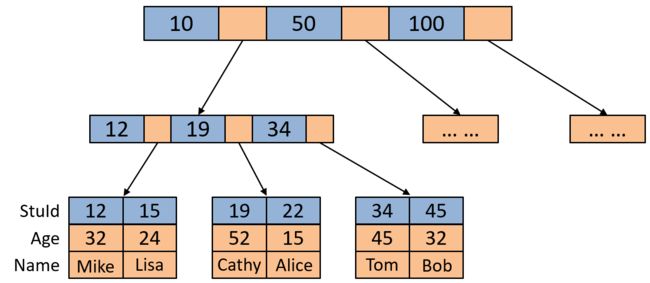
对于使用InnoDB建立索引的表,由于检索使用的B+树,叶子节点直接存储有效数据,这种索引叫做聚簇索引,表中有效数据要按照主键来进行聚簇,因此InnoDB必须要有主键。
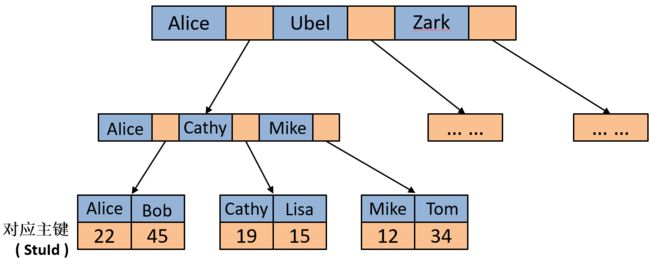
对应使用InnoDB索引建立的表,创建辅助索引,辅助索引所使用的B+树叶子节点的data记录的是对应的主键,通过辅助索引检索数据时,要先通过辅助索引的B+树拿到对应的主键值,然后再根据拿到的主键值去主键索引建立的B+树中检索数据。这样就需要二次索引。
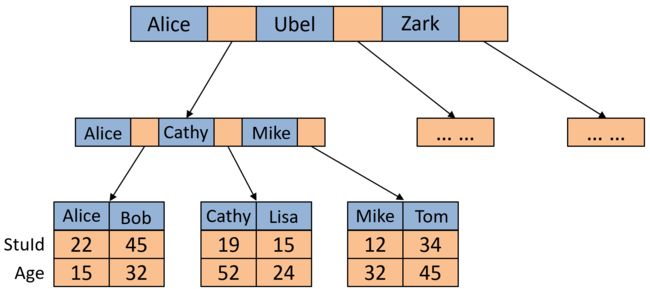
复合索引的价值在于,能够避免二次检索造成效率降低的问题,复合索引就是在使用非主键天剑的索引B+树结构的叶子节点data中,添加复合的字段值,例如:如果要建立(name,age)的复合索引,那么会以name为键值创建B+树,并且在叶子节点上添加对应age的值。
5.3 复合索引操作
创建复合索引
语法:create index 索引名称 on 表名称(字段1, 字段2, ... ...);
mysql> create table stu (
    -> StuId int unsigned primary key,
    -> age tinyint unsigned,
    -> name varchar(20) not null
    -> );
Query OK, 0 rows affected (0.23 sec)

mysql> insert into stu values
    -> (12,32,'Mike'),(15,24,'Lisa'),(19,52,'Cathy'),
    -> (22,15,'Alice'),(34,45,'Tom'),(45,32,'Bob');
Query OK, 6 rows affected (0.06 sec)
Records: 6  Duplicates: 0  Warnings: 0

mysql> create index myIndex on stu(name,age);  -- 创建name/age复合索引
Query OK, 0 rows affected (0.34 sec)
Records: 0  Duplicates: 0  Warnings: 0
以(name, age)复合索引为例,这个索引对应的B+树是以name为键值来创建的,这就引出了对于复合索引使用时的一条原则:最左匹配原则。
最左匹配原则
对于复合索引(fild1, fild2, ... ),如果使用的检索条件是符合索引靠近左边的字段,那么就走复合索引进行检索,如果不是就遍历检索。如果where条件中同时指出fild1和fild2的值,或者只给出fild1的值,那么就走复合索引,如果只给出fild2的值,那么就遍历查找。
mysql> explain select * from stu where name='Mike' \G
*************************** 1. row ***************************
           id: 1
  select_type: SIMPLE
        table: stu
   partitions: NULL
         type: ref
possible_keys: myIndex   -- 使用myIndex索引进行查找
          key: myIndex
      key_len: 62
          ref: const
         rows: 1
     filtered: 100.00
        Extra: Using index
1 row in set, 1 warning (0.00 sec)

mysql> explain select * from stu where name='Mike' and age=32 \G
*************************** 1. row ***************************
           id: 1
  select_type: SIMPLE
        table: stu
   partitions: NULL
         type: ref
possible_keys: myIndex   -- 使用myIndex索引进行查找
          key: myIndex
      key_len: 64
          ref: const,const
         rows: 1
     filtered: 100.00
        Extra: Using index
1 row in set, 1 warning (0.00 sec)

mysql> explain select * from stu where age=32 \G
*************************** 1. row ***************************
           id: 1
  select_type: SIMPLE
        table: stu
   partitions: NULL
         type: index
possible_keys: NULL      -- 遍历查找,不使用索引
          key: myIndex
      key_len: 64
          ref: NULL
         rows: 6
     filtered: 16.67
        Extra: Using where; Using index
1 row in set, 1 warning (0.00 sec)
索引覆盖
索引覆盖,就是在执行一个查询语句的时候,在辅助索引中就能够查找到对应的数据,不需要再拿着主键回表查询,变二次检索为一次检索,这样就能够很大程度上提高检索的效率。使用复合索引进行检索,就能够实现索引覆盖。
通过explain语句查看检索的底层实现逻辑,Extra字段值 using index 表示使用索引,Using where表示全文遍历检索。
mysql> explain select name,age from stu where name='Mike' \G
*************************** 1. row ***************************
           id: 1
  select_type: SIMPLE
        table: stu
   partitions: NULL
         type: ref
possible_keys: myIndex
          key: myIndex
      key_len: 62
          ref: const
         rows: 1
     filtered: 100.00
        Extra: Using index
1 row in set, 1 warning (0.00 sec)
六. 总结
- 数据库索引的价值在于避免遍历所有数据进行检索,大大提高了数据检索的效率。
- 磁盘通过CHS法来进行寻址,定位到要检索的数据所在的扇区,磁盘是计算机体系中的一种机械设备,IO效率相比于内存和寄存器十分低下,对于数据库这种频繁进行IO操作的应用软件,减少与磁盘的IO次数是提高效率的关键。
- 操作系统与磁盘的IO基本单位是4KB,MySQL与磁盘IO的基本单位是16KB,MySQL要读取或者向磁盘中写数据,需要以内存为中间媒介。
- 在MySQL中,一般以B+树作为索引使用的数据结构,每个16KB的Page是一个B+树的节点,除了叶子节点的Page以外,其他的分支节点仅存储目录信息,而存有有效数据的叶子节点中,也有对应的目录信息。
- 索引分为主键索引、唯一键索引、普通索引和全文索引,如果在对表的某个字段声明了主键或唯一键,那么mysql会自动为其创建索引,主键索引和唯一键索引对应的字段不允许有重复值,而普通索引对应的字段有重复值。
- MyISAM和InnoDB都是使用B+树作为索引数据结构的,区别在于MyISAM是聚簇索引,即有效数据和索引结构放在一起,InnoDB是非聚簇索引,即有效数据和索引结构分离。
- InnoDB创建辅助索引,其索引结构中data处的数据为对应主键值,需要二次检索才能够拿到有效数据。
- 使用复合索引,能够实现索引覆盖,从而避免二次索引,提高数据检索效率,复合索引遵循最左匹配原则。
