SpringMVC SpringMVC 的入门
2.1.环境搭建
2.1.1.创建工程
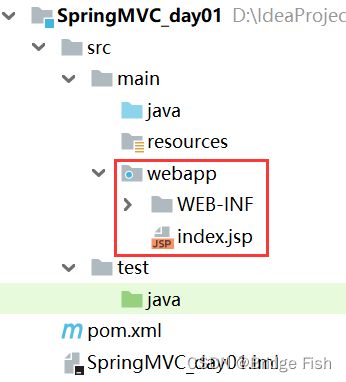
2.1.2.添加web支持
2.添加web支持
3.效果
- 注意:
- 不要先添加打包方式
- 将web目录要拖拽到main目录下,并改名为webapp
2.1.3.pom.xml
<project xmlns="http://maven.apache.org/POM/4.0.0"
         xmlns:xsi="http://www.w3.org/2001/XMLSchema-instance"
         xsi:schemaLocation="http://maven.apache.org/POM/4.0.0 http://maven.apache.org/xsd/maven-4.0.0.xsd">
    <modelVersion>4.0.0modelVersion>

    <groupId>com.bygroupId>
    <artifactId>SpringMVC_day01artifactId>
    <version>1.0-SNAPSHOTversion>

    <packaging>warpackaging>

    <dependencies>
        <dependency>
            <groupId>org.springframeworkgroupId>
            <artifactId>spring-contextartifactId>
            <version>5.1.8.RELEASEversion>
        dependency>
        <dependency>
            <groupId>org.springframeworkgroupId>
            <artifactId>spring-webartifactId>
            <version>5.1.8.RELEASEversion>
        dependency>
        <dependency>
            <groupId>org.springframeworkgroupId>
            <artifactId>spring-webmvcartifactId>
            <version>5.1.8.RELEASEversion>
        dependency>

        <dependency>
            <groupId>javax.servletgroupId>
            <artifactId>servlet-apiartifactId>
            <version>2.5version>
            <scope>providedscope>
        dependency>

        <dependency>
            <groupId>javax.servlet.jspgroupId>
            <artifactId>jsp-apiartifactId>
            <version>2.0version>
            <scope>providedscope>
        dependency>
    dependencies>
    <build>
        <plugins>

            <plugin>
                <groupId>org.apache.tomcat.mavengroupId>
                <artifactId>tomcat7-maven-pluginartifactId>
                <version>2.2version>
                <configuration>

                    <port>8080port>

                    <path>/path>
                configuration>
            plugin>
        plugins>
    build>
project>
2.2.入门案例
2.2.1.index.jsp
<%@ page contentType="text/html;charset=UTF-8" language="java" %>
<html>
  <head>
    <title>$Title$title>
  head>
  <body>
  <a href="/hello">helloa>
  body>
html>
2.2.2.controller
@Controller
public class HelloController {
	//Map<"/hello", hello()>
    @RequestMapping("/hello")
    public ModelAndView hello() {
        //ModelAndView对象封装了模型数据和视图名称
        ModelAndView mv = new ModelAndView();
        //添加数据,request.setAttribute(“hello”,”hello springmvc!!”)
        mv.addObject("hello", "欢迎你 springmvc");
        //设置逻辑视图路径
        mv.setViewName("success");
        //返回数据和视图
        return mv;
    }
}
2.2.3.springmvc.xml
<beans xmlns="http://www.springframework.org/schema/beans"
       xmlns:xsi="http://www.w3.org/2001/XMLSchema-instance" xmlns:p="http://www.springframework.org/schema/p"
       xmlns:context="http://www.springframework.org/schema/context"
       xmlns:mvc="http://www.springframework.org/schema/mvc"
       xsi:schemaLocation="http://www.springframework.org/schema/beans http://www.springframework.org/schema/beans/spring-beans.xsd
        http://www.springframework.org/schema/mvc http://www.springframework.org/schema/mvc/spring-mvc.xsd
        http://www.springframework.org/schema/context http://www.springframework.org/schema/context/spring-context.xsd">

    <context:component-scan base-package="com.by">context:component-scan>


    <bean class="org.springframework.web.servlet.view.InternalResourceViewResolver">
        <property name="prefix" value="/WEB-INF/pages/">property>
        <property name="suffix" value=".jsp">property>
    bean>


    <mvc:annotation-driven>mvc:annotation-driven>
beans>
2.2.4.success.jsp
<%@ page contentType="text/html;charset=UTF-8" language="java" %>
<html>
<head>
    <title>Titletitle>
head>
<body>
	<h2>${msg}h2>
body>
html>
2.2.5.web.xml
<web-app xmlns="http://xmlns.jcp.org/xml/ns/javaee"
         xmlns:xsi="http://www.w3.org/2001/XMLSchema-instance"
         xsi:schemaLocation="http://xmlns.jcp.org/xml/ns/javaee http://xmlns.jcp.org/xml/ns/javaee/web-app_4_0.xsd"
         version="4.0">
    <servlet>
        <servlet-name>springmvcservlet-name>
        <servlet-class>org.springframework.web.servlet.DispatcherServletservlet-class>

        <init-param>
            <param-name>contextConfigLocationparam-name>
            <param-value>classpath:springmvc.xmlparam-value>
        init-param>

        <load-on-startup>1load-on-startup>
    servlet>
    <servlet-mapping>
        <servlet-name>springmvcservlet-name>
        <url-pattern>/url-pattern>
    servlet-mapping>
web-app>
2.2.6.测试
访问:http://localhost:8080/hello
2.3.springmvc组件
2.3.1.DispatcherServlet前端控制器
用户请求到达前端控制器,它就相当于mvc模式中的c,dispatcherServlet 是整个流程控制的中心,由它调用其它组件处理用户的请求,dispatcherServlet 的存在降低了组件之间的耦合性。
2.3.2.HandlerMapping处理器映射器
HandlerMapping负责根据用户请求找到 Handler 即处理器,SpringMVC 提供了不同的映射器实现不同的映射方式,例如:配置文件方式,实现接口方式,注解方式等。
2.3.3.Handler处理器
它就是我们开发中要编写的具体业务控制器。由DispatcherServlet 把用户请求转发到 Handler。由Handler对具体的用户请求进行处理。
2.3.4.HandlAdapter处理器适配器
通过 HandlerAdapter 对处理器进行执行,这是适配器模式的应用,通过扩展适配器可以对更多类型的处理器进行执行。
适配器对应的处理器以及这些处理器的作用:
- AnnotationMethodHandlerAdapter 主要是适配注解类处理器,注解类处理器就是我们经常使用的 @Controller 的这类处理器
- HttpRequestHandlerAdapter 主要是适配静态资源处理器,静态资源处理器就是实现了 HttpRequestHandler 接口的处理器,这类处理器的作用是处理通过 SpringMVC 来访问的静态资源的请求
- SimpleControllerHandlerAdapter 是 Controller 处理适配器,适配实现了 Controller 接口或 Controller 接口子类的处理器,比如我们经常自己写的 Controller 来继承 MultiActionController.
- SimpleServletHandlerAdapter 是 Servlet 处理适配器, 适配实现了 Servlet 接口或 Servlet 的子类的处理器,我们不仅可以在 web.xml 里面配置 Servlet,其实也可以用 SpringMVC 来配置 Servlet,不过这个适配器很少用到,而且 SpringMVC 默认的适配器没有他,默认的是前面的三种。
2.3.5.View Resolver视图解析器
ViewResolver首先根据逻辑视图名解析成物理视图名即具体的页面地址,再生成View视图对象返回给DispatcherServlet
2.3.6.View视图渲染器
view对象会调用render将model中的数据全部存放到request中完成了请求的处理,源码如下:
public interface View {
    String RESPONSE_STATUS_ATTRIBUTE = View.class.getName() + ".responseStatus";
    String PATH_VARIABLES = View.class.getName() + ".pathVariables";
    String SELECTED_CONTENT_TYPE = View.class.getName() + ".selectedContentType";

    @Nullable
    default String getContentType() {
        return null;
    }
   //把model里的数据存放到request,request和response负载跳转
   void render(Map<String, ?> model, HttpServletRequest request,
               			HttpServletResponse response) throws Exception;
}
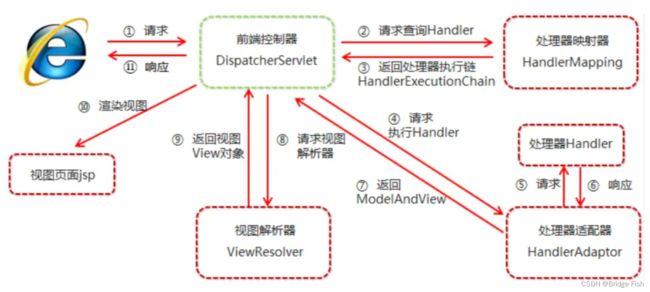
2.4.SpringMVC执行流程
-
具体步骤
Ø 第一步:发起请求到前端控制器(DispatcherServlet)
Ø 第二步:前端控制器请求HandlerMapping查找 Handler
Ø 第三步:处理器映射器HandlerMapping向前端控制器返回Handler,HandlerMapping会把请求映射为HandlerExecutionChain对象(包含一个Handler处理器对象,多个HandlerInterceptor拦截器对象),通过这种策略模式,很容易添加新的映射策略
Ø 第四步:前端控制器调用处理器适配器去执行Handler
Ø 第五步:处理器适配器HandlerAdapter将会根据适配的结果去执行Handler
Ø 第六步:Handler执行完成给适配器返回ModelAndView
Ø 第七步:处理器适配器向前端控制器返回ModelAndView (ModelAndView是springmvc框架的一个底层对象,包括 Model和view)
Ø 第八步:前端控制器请求视图解析器去进行视图解析 (根据逻辑视图名解析成真正的视图),通过这种策略很容易更换其他视图技术,只需要更改视图解析器即可
Ø 第九步:视图解析器向前端控制器返回View
Ø 第十步:前端控制器进行视图渲染 (将数据(在ModelAndView对象中)填充到request域)
Ø 第十一步:前端控制器向用户响应结果
2.RequestMapping注解
2.1.使用说明
-
作用:用于建立请求URL和处理请求方法之间的对应关系。
-
出现位置:
-
类上:
请求 URL的第一级访问目录。此处不写的话,就相当于应用的根目录。写的话需要以/开头。它出现的目的是为了使我们的 URL 可以按照模块化管理,例如:
账户模块:
/account/add
/account/update
/account/delete …
订单模块:
/order/add
/order/update
/order/delete
红色的部分就是把RequsetMappding写在类上,使我们的URL更加精细。
-
方法上:
请求URL的第二级访问目录,可以窄化请求路径
-
-
属性:
value:用于指定请求的URL。它和path属性的作用是一样的。
method:用于指定请求的方式。
注意:以上属性只要出现2个或以上时,他们的关系是与的关系。
2.2.窄化路径示例
-
使用二级目录访问
@Controller @RequestMapping("/account") public class AccountController { @RequestMapping("/findAccount") public ModelAndView findAccount() { ModelAndView mv = new ModelAndView(); mv.addObject("msg", "欢迎你 springmvc"); mv.setViewName("success"); return mv; } } -
在index.jsp里面定义超链接
<a href="/account/findAccount">窄化路径a>
2.3.method属性示例
-
描述需要使用指定的请求方式来请求该方法
@Controller @RequestMapping("/account") public class AccountController { //指定的请求方式 @RequestMapping(value = "/findAccount1", method = RequestMethod.POST) public ModelAndView findAccount1() { ModelAndView mv = new ModelAndView(); mv.addObject("msg", "欢迎你 springmvc"); mv.setViewName("success"); return mv; } } -
测试:在index.jsp里使用get方式请求
<a href="/account/findAccount1">请求方式a>结果:
-
我们再换一种请求方式
  <form action="account/findAccount1" method="post">
    <input type="submit" value="保存账户,post 请求">
  form>
结果:


