使用Rust开发操作系统(UEFI内存管理和文件系统使用)
在上一篇文章中我们简单介绍了UEFI的基本概念在本章中我们介绍uefi-rs库的内存管理和文件系统使用
文章目录
- 基本结构
- UEFI的HelloWorld!
-
- 使用QEMU启动
- 基本的数据结构
-
- Result
-
- 改造Result
- 内存管理
-
- 内存分配的注意事项
- 内存分配的关键点
- 基本数据结构
-
- MemoryType
- AllocateType
- MemoryAttribute
- AllocatePool基本使用
- AllocatePages基本使用
- Protocol
-
- SimpleFileSystem Protocol
-
- 基本数据结构
- 遍历文件夹内容
- 读取文件内容
- 下一步要做什么
基本结构
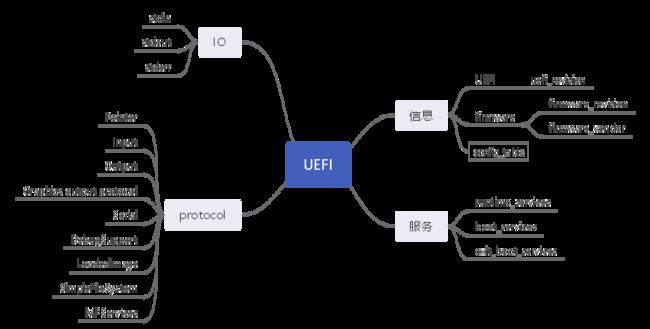
uefi-rs中基本的结构已经画成脑图的形式

uefi-rs中主要分为以下内容
- 信息类: 固件的信息,UEFI信息,uefi配置表
- 服务类: 在
uefi-rs中主要包含运行时服务,启动服务,退出启动服务等 - Protocol(协议): 在
uefi-rs中支持以下协议,所有的Protocol需要使用BootServer.local_protocol::();来获取( ProtocolName表示Protocol名称,例如BootServer.local_protocol::())(以上都是伪代码)- 标准输入
Input - 标准输出
Output - 图形输出协议
GOP(Grahpics Output Protocol) - 串行IO设备访问
Serial - 调试服务
DebugSupport - 镜像加载
LoadImage - 文件系统
SimpleFileSystem - 多处理器服务
MPService
- 标准输入
- 其他服务: 内存分配等
UEFI的HelloWorld!
我们创建好项目后再Cargo.toml中添加如下内容
[dependencies.uefi]
version="0.4.0"
features = ['exts']

[dependencies.uefi-services]
version = "0.2.0"
features = ["qemu"]

[dependencies.log]
version = "0.4.8"
然后我们在main.rs中添加几个feature
// main.rs
#![no_std]
#![no_main]
#![feature(asm)]
#![feature(abi_efiapi)] // uefi-rs使用的是efi调用约定
#![feature(never_type)]
extern crate uefi;
然后定义UEFI的入口函数
#[entry]
fn efi_main(image: Handle, st: SystemTable) -> Status{}
其中#[entry]在uefi-marcos中定义主要功能是将我们定义的函数转化为pub extern "efiapi" fn eif_main这样的形式
程序进入main函数后的第一件事情就是uefi服务进入DXE(Driver Execution Environment)阶段
#[entry]
fn efi_main(image: Handle, st: SystemTable) -> Status{
	if let Err(e) = uefi_services::init(&st).log_warning(){
        info!("{:?}",e);
        // 如果服务初始化失败后则不能继续执行
        return e.status();
    }
    info!("Hello World!");
    Status::SUCCESS
}
我们编写完毕代码后再项目的根目录(与src目录同级)创建.cargo文件夹,随后创建config文件并填写一下内容(rust已经支持了x86_64-unknown-uefi编译目标)
# build settings
[build]
target = "x86_64-unknown-uefi"
这样我们在运行时不需要指定--target参数,否则每次运行时需要添加,例如
cargo xbuild --target x86_64-unknown-uefi
Cargo代理
如果连接到cargo.io比较慢可以添加国内代理
//in .cargo/config
[source.crates-io]
registry = "https://github.com/rust-lang/crates.io-index"
replace-with = 'ustc'

[source.ustc]
registry = "http://mirrors.ustc.edu.cn/crates.io-index"
这样当我们运行cargo xbuild后会在target/debug目录中找到xxx.efi文件(xxx表示起的项目名称)
使用QEMU启动
当编译完毕后我们需要创建一个目录esp/EFI/Boot然后将我们编译的xxx.efi命名成BootX64.efi
目录结构如下
project
	├── .cargo
	├── src
	├── target
	├── Cargo.toml
	├── Cargo.lock
	└──esp
		└── EFI
			 └── Boot
			      └──BootX64.efi
esp目录是我们需要挂载的文件目录
因为我们使用的是虚拟机,我们需要使用OVMF(开放虚拟机固件Open Virtual Machine Firmware)OVMF的制作请参考使用Rust开发操作系统(UEFI基本介绍)的OVMF制作章节,然后为QEMU指定OVMF_CODE.fd路径,OVMF_VARS.fd的路径,以及我们创建的esp文件夹路径
例如(为了方便阅读对命令进行了换行)
qemu-system-x86_64
-drive if=pflash,format=raw,file=,readonly=on
-drive if=pflash,format=raw,file=,readonly=on
-drive format=raw,file=fat:rw:
以下是参考命令(windows)
qemu-system-x86_64
-drive if=pflash,format=raw,file=C:\Users\VenmoSnake\Desktop\ReboxOS\OVMF_CODE.fd,readonly=on
-drive if=pflash,format=raw,file=C:\Users\VenmoSnake\Desktop\OS\OVMF_VARS.fd,readonly=on
-drive format=raw,file=fat:rw:C:\Users\VenmoSnake\Desktop\OS\esp
这样我们可以在QEMU上运行我们编写的efi
基本的数据结构
Result
pub type Result在uefi-rs中Result的定义有些许不同而且使用方式跟通常用法也不同,因此我们要具体说明一下
我们