Mybatis-Plus基础学习
目录
- 第一章、快速了解mybatis-plus
-
- 1.1)相关概念介绍
- 1.2)为什么使用MyBatis-Plus
- 1.3)学习过程中的疑问
- 第二章、 MyBatis-Plus与SpringBoot集成
-
- 2.1)使用Spring Initializr创建SpringBoot项目
- 2.2)安装Lombok插件
- 2.3)准备数据库表
- 2.3)配置文件application.properties
- 2.4)pom文件添加依赖
- 第三章、使用 MyBatis-Plus提供的注解
-
- 3.1)常用注解介绍
-
-
- @TableName:
- @TableId:
- @TableField:
-
- 3.2)不常用注解
-
-
- @TableLogic:
- @EnumValue:
- @Version:
- @JsonProperty:
-
- 第四章、MyBatis-Plus提供的代码生成器
-
- 4.1)添加依赖
- 4.2)准备CodeGenerator类
- 4.3)右键运行main方法
- 第五章、MyBatis-Plus提供字段填充功能
-
- 5.1)插入数据库字段时通常需要带上创建时间
- 5.2)配置MetaObjectHandler开启自动填充功能
- 5.3)字段上使用@TableField
- 第六章、Basemapper和Wrapper条件构造器
-
- 6.1)
友情提醒: 使用文心一言AI工具参与创作
先看文章目录,大致了解文章知识点结构,点击文章目录可直接跳转到文章指定位置。有用记得关注
第一章、快速了解mybatis-plus
1.1)相关概念介绍
MyBatis是什么?
MyBatis是一个开源的Java持久层ORM框架,基于XML配置文件将SQL语句与程序代码分离,直接在XML配置文件中修改SQL语句。MyBatis内部封装了JDBC,简化了加载驱动、创建连接、创建statement等繁杂的过程,提供了数据持久化的基本功能,如SQL映射、缓存管理等。但是使用MyBatis对XML和SQL的编写规范要求较高。
ORM框架:
对象关系映射框架的简称,主要用于实现面向对象编程语言与关系型数据库之间的映射。ORM框架的核心思想是将数据库表映射成程序中的对象,将表中的记录映射成对象列表,将表的字段映射成对象的属性。
MyBatis-Plus是什么?
MyBatis-Plus是一个MyBatis的增强工具包,仅依赖Mybatis以及Mybatis-Spring,在MyBatis的基础上进行了扩展,使用注解和API的方式进行数据持久化,
1.2)为什么使用MyBatis-Plus
MyBatis-Plus的一些主要特点和功能:
损耗小无侵入性:启动就生成通用的CRUD方法损耗小。只增强MyBatis,不会对现有工程产生影响。
简化开发过程:提供了代码生成器,自动生成通用的CRUD方法,支持主键自动生成,支持Lambda表达式查询
分页插件:提供了分页查询的功能
条件构造器:提供了强大的条件构造器
可扩展性:自定义SQL语句。用户可以通过自定义MybatisSqlInjector来扩展SQL语句,也允许用户自定义Condition类来实现复杂查询。
1.3)学习过程中的疑问
这里是我学习过程中产生的几个疑问:
- 如何与springboot集成
- 代码生成器怎么用?如何一次性创建所需的dao、mapper、通用CRUDservice类。
- Mybatis-Plus提供了哪些注解给我们使用
- 如何在插入数据的同时自动插入时间
- Lambda表达式查询怎么使用
- 什么是BaseMapper
- 分页插件如何使用
- 条件构造器Wrapper是什么,怎么使用
- 如何自定义SQL语句。如何自定义Condition类来实现复杂查询
后续会一个个解决,开个专栏,出个系列文章。
第二章、 MyBatis-Plus与SpringBoot集成
2.1)使用Spring Initializr创建SpringBoot项目
①创建SpringBoot项目
教程链接:
idea快速搭建Springboot项目(一)
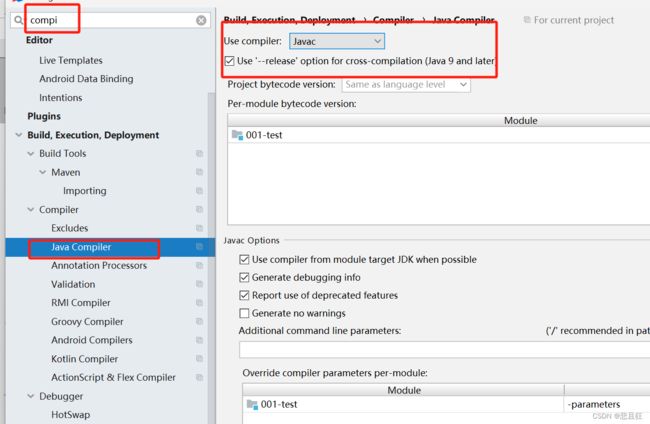
②setting里查看编译器。我是Jdk11

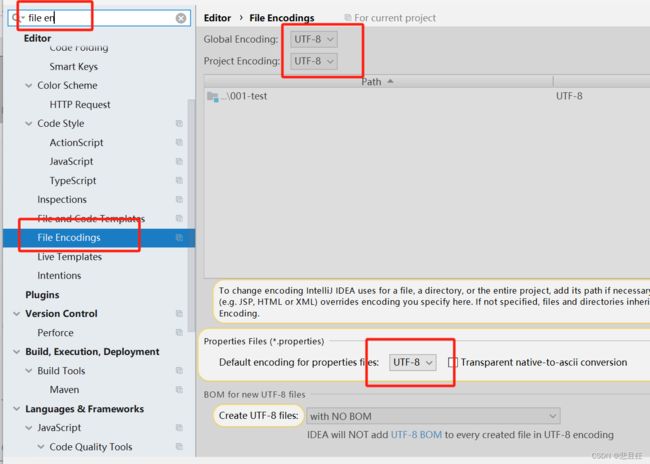
③setting里查看字符编码是否一致

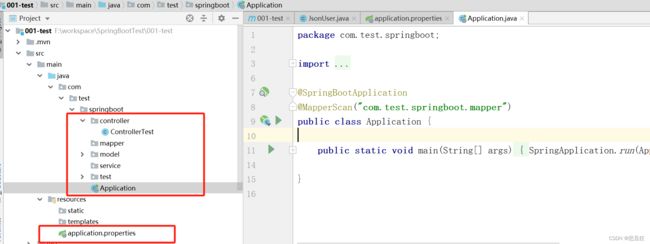
④新建项目子包
项目结构如图

启动类使用@MapperScan注解扫描 Mapper 文件夹
package com.test.springboot;
org.springframework.boot.autoconfigure.SpringBootApplication;

@SpringBootApplication
@MapperScan("com.test.springboot.mapper")
public class Application {

    public static void main(String[] args) {
        SpringApplication.run(Application.class, args);
    }

}
2.2)安装Lombok插件
setting–>plugins–>右侧marketplace 搜索Lombok–>
点击install–>安装完了点击restartIDE
![]()
Lombok作用:提高开发效率,通过注解形式使javabean生成get、set、构造器、toString等方法
@Data
@ToString, @EqualsAndHashCode,
所有属性的@Getter, 所有non-final属性的@Setter
和@RequiredArgsConstructor的组合
@Getter / @Setter
放在类上,会对所有的非静态属性生成Getter/Setter方法,
放在属性上,会对该属性生成Getter/Setter方法。
并可以指定Getter/Setter方法的访问级别。
@ToString
生成toString方法
@EqualsAndHashCode
生成equals和hascode方法,可以指定具体使用哪些属性。
@NoArgsConstructor
@RequiredArgsConstructor
@AllArgsConstructor
生成无参构造器、部分参数构造器、全参构造器,
要重载多个构造器的时候,无法使用
2.3)准备数据库表
创建表:
CREATE TABLE `user` (
 `id` bigint(11) NOT NULL AUTO_INCREMENT COMMENT 'ID',
 `name` varchar(32) DEFAULT NULL COMMENT '姓名',
 `age` int(11) DEFAULT NULL COMMENT '年龄',
 `skill` varchar(32) DEFAULT NULL COMMENT '技能',
 `evaluate` varchar(64) DEFAULT NULL COMMENT '评价',
 `fraction` bigint(11) DEFAULT NULL COMMENT '分数',
 PRIMARY KEY (`id`)
) ;
插入数据:
INSERT INTO `user` VALUES (1, '小明', 20, '画画', '画画高手', 89);
INSERT INTO `user` VALUES (2, '小强', 19, '游戏', '喜欢游戏', 64);
INSERT INTO `user` VALUES (3, '小张', 18, '英语', '外国人', 90);
INSERT INTO `user` VALUES (4, '小黄', 20, '体育', 'yellow', 76);
INSERT INTO `user` VALUES (5, '小白', 17, '绘画', '别龙马', 77);
INSERT INTO `user` VALUES (7, '小红', 18, 'JAVA', '码农', 59);
INSERT INTO `user` VALUES (9, '小李', 18, '睡觉', '肥宅', 60);
INSERT INTO `user` VALUES (11, '数据1', 3, '画肖像', NULL, 61);
INSERT INTO `user` VALUES (12, '数据2', 3, NULL, NULL, 61);
INSERT INTO `user` VALUES (13, '数据3', 3, NULL, NULL, 61);
2.3)配置文件application.properties
因为Spring Boot 2.1 集成了 8.0版本的jdbc驱动,这个版本的 jdbc 驱动需要添加这个后缀 ?serverTimezone=Hongkong
server.port=9001

server.servlet.context-path=/001-test

spring.datasource.driver-class-name=com.mysql.cj.jdbc.Driver
spring.datasource.url=jdbc:mysql://localhost:3306/mybatisplus?serverTimezone=UTC&characterEncoding=utf-8
spring.datasource.username=root
spring.datasource.password=root

mybatis-plus.mapper-locations=classpath:mapper/*.xml
2.4)pom文件添加依赖
之前的pom文件里有这个依赖的得先删了,因为Mybatis-plus的依赖包含了原先Mybaits部分

数据库版本加到pom文件的 properties标签里面,后面MySQL加依赖,版本号就是这个了
<mysql-connector-java-version>8.0.28</mysql-connector-java-version>
加mysql依赖,加Mybatis-Plus依赖,加lombok依赖
<!--mysql-->
<dependency>
	<groupId>mysql</groupId>
	<artifactId>mysql-connector-java</artifactId>
	<version>${mysql-connector-java-version}</version>
</dependency>

<dependency>
	<groupId>com.baomidou</groupId>
	<artifactId>mybatis-plus-boot-starter</artifactId>
	<version>3.3.1.tmp</version>
</dependency>

<dependency>
	<groupId>org.projectlombok</groupId>
	<artifactId>lombok</artifactId>
	<optional>true</optional>
</dependency>
第三章、使用 MyBatis-Plus提供的注解
3.1)常用注解介绍
MyBatis使用Mapper.XML文件来进行数据表映射。有resultMap、sql、insert、update、delete和select等元素。其中resultMap用于描述如何从数据库结果集中加载对象。
MyBatis-Plus可以使用XML配置进行数据表映射,也可以使用注解来映射。
下面是注解方式详细介绍:
@TableName:
@TableName("数据库的表名"):用于指定实体类对应的数据库表名。

//举例
@TableName("table_user")
public class User {
    // ...
}
@TableId:
@TableId("主键名"):用于指定实体类中的某个属性作为数据库表的主键。
@TableId(value = "id", type = IdType.AUTO):自增
@TableId(value = "id", type = IdType.ID_WORKER_STR):分布式全局唯一ID字符串类型
@TableId(value = "id", type = IdType.INPUT):自行输入
@TableId(value = "id", type = IdType.ID_WORKER):分布式全局唯一ID 长整型类型
@TableId(value = "id", type = IdType.UUID):32位UUID字符串
@TableId(value = "id", type = IdType.NONE):无状态

//举例
@TableId(value = "id", type = IdType.AUTO)
private Long id;
@TableField:
@TableField("字段名"):用于指定实体类中的某个属性与数据库表中的某个字段的对应关系。
@TableField(exist = false):表示该属性不为数据库表字段,但又是必须使用的。
@TableField(exist = true):表示该属性为数据库表字段。
@TableField(condition = SqlCondition.LIKE):表示该属性可以模糊搜索。
@TableField(fill = FieldFill.INSERT):注解填充字段 ,生成器策略部分也可以配置!

//举例
@TableField("username")
private String username;
3.2)不常用注解
@TableLogic:
@TableLogic:用于在执行删除操作时,启用或禁用级联删除功能。

//举例
@TableLogic(logicType = LogicType.KEEP)
private Boolean isDeleted;
@EnumValue:
@EnumValue: 用于将枚举类型属性映射到数据库表中的字符串类型字段。

//举例
public enum Gender {
    MALE, FEMALE;
}

@TableField("gender")
@EnumValue(value = "name")
private Gender gender;
@Version:
@Version:乐观锁注解、在使用乐观锁时,还需要在 MyBatis-Plus 的配置文件
中启用乐观锁插件,并配置乐观锁的策略。这样可以保证乐观锁功能的正确性。

//举例
@Version
private Integer version;
@JsonProperty:
@JsonProperty: 用于实体类的属性上,作用是重命名属性,以便在反序列化时使用不同的名称。
第四章、MyBatis-Plus提供的代码生成器
4.1)添加依赖
mybatis-plus-generator依赖和velocity-engine-core依赖和commons-lang3依赖加到pom文件里面,代码生成器会用到
        <dependency>
            <groupId>com.baomidou</groupId>
            <artifactId>mybatis-plus-generator</artifactId>
            <version>3.4.0</version>
        </dependency>

        <dependency>
            <groupId>org.apache.velocity</groupId>
            <artifactId>velocity-engine-core</artifactId>
            <version>2.0</version>
        </dependency>

         <dependency>
            <groupId>org.apache.commons</groupId>
            <artifactId>commons-lang3</artifactId>
            <version>3.5</version>
        </dependency>
4.2)准备CodeGenerator类
新建一个CodeGenerator类
package com.icbc.coresd.util;

import com.baomidou.mybatisplus.annotation.IdType;
import com.baomidou.mybatisplus.generator.AutoGenerator;
import com.baomidou.mybatisplus.generator.config.DataSourceConfig;
import com.baomidou.mybatisplus.generator.config.GlobalConfig;
import com.baomidou.mybatisplus.generator.config.PackageConfig;
import com.baomidou.mybatisplus.generator.config.StrategyConfig;
import com.baomidou.mybatisplus.generator.config.TemplateConfig;
import com.baomidou.mybatisplus.generator.config.rules.DateType;
import com.baomidou.mybatisplus.generator.config.rules.NamingStrategy;

public class CodeGenerator {
    public static void main(String[] args) {
        AutoGenerator mpg = new AutoGenerator();

        // 数据源配置
        DataSourceConfig dsc = new DataSourceConfig();
        dsc.setUrl("jdbc:mysql://xxx.xx.xxx:3306/sdtools?useUnicode=true&characterEncoding-utf-8&useSSL=false&serverTimezone=UTC");
        dsc.setDriverName("com.mysql.jdbc.Driver");
        dsc.setUsername("数据库账号");
        dsc.setPassword("数据库密码");
        mpg.setDataSource(dsc);

        // 全局配置
        GlobalConfig gc = new GlobalConfig();
        //代码输出的目录在java下
        gc.setOutputDir(System.getProperty("user.dir") + "/src/main/java/");
        gc.setAuthor("作者名称");
        gc.setOpen(false);
        //每次生成代码的时候是否重置
        gc.setFileOverride(false);
        //主键自增长
        gc.setIdType(IdType.AUTO);
        gc.setDateType(DateType.ONLY_DATE);
        mpg.setGlobalConfig(gc);

        // 包配置
        PackageConfig pc = new PackageConfig();
        //在目录的哪个包下
        pc.setParent("com.xxxx.core");
        mpg.setPackageInfo(pc);

        // 策略配置
        StrategyConfig strategy = new StrategyConfig();
        //下划线转驼峰
        strategy.setNaming(NamingStrategy.underline_to_camel);
        strategy.setColumnNaming(NamingStrategy.underline_to_camel);
        strategy.setEntityLombokModel(true);
        strategy.setRestControllerStyle(true);
        strategy.setControllerMappingHyphenStyle(true);
        strategy.setTablePrefix(pc.getModuleName() + "_");
        mpg.setStrategy(strategy);

        // 模板配置
        TemplateConfig templateConfig = new TemplateConfig();
        templateConfig.setXml(null);
        mpg.setTemplate(templateConfig);

        // 执行生成
        mpg.execute();
    }
}
4.3)右键运行main方法
在CodeGenerator类中配置代码生成的设置后,右键运行main方法后,Mybatis-Plus会识别这个类,并根据类中的设置生成相应代码。生成的代码包括:entity类,接口,实现类等。里面具体的配置写了注释,如果想弄懂每个配置的含义,可以把每个配置拿去查一下具体的含义。
第五章、MyBatis-Plus提供字段填充功能
5.1)插入数据库字段时通常需要带上创建时间
在设计数据库表时,通常必须有以下字段
自增ID
创建时间:createdTime
修改时间:updatedTime
创建人:createBy
修改人:updateBy
而MyBatis-Plus提供字段填充功能可以让我们轻松实现插入数据的同时,在createTime字段填充当前时间。
①确保数据库时间字段类型与实体类中的字段类型匹配
如:实体类中的字段类型为java.util.Date
则数据库的字段为TIMESTAMP
②在application.yaml文件中配置下面这些信息,允许bean定义重写,其实不写配置也行,就当拓展知识点了。
spring:
  main:
    allow-bean-definition-overriding: true
5.2)配置MetaObjectHandler开启自动填充功能
①创建一个类并实现MetaObjectHandler接口,该接口包含了insertFill和updateFill两个方法,用于指定在插入和更新操作时自动填充的字段
import com.baomidou.mybatisplus.core.handlers.MetaObjectHandler;
import org.apache.ibatis.reflection.MetaObject;
import org.springframework.stereotype.Component;
import java.util.Date;

@Component
public class MyMetaObjectHandler implements MetaObjectHandler {

    @Override
    public void insertFill(MetaObject metaObject) {
        this.strictInsertFill(metaObject, "createdTime", Date.class, new Date());
        // 其他需要插入填充的字段
    }

    @Override
    public void updateFill(MetaObject metaObject) {
        this.strictUpdateFill(metaObject, "updatedTime", Date.class, new Date());
        // 其他需要更新填充的字段
    }
}
5.3)字段上使用@TableField
实体类的相应字段上使用@TableField注解,指定需要自动填充的字段。
@Data
@Builder
@AllArgsConstructor
@NoArgsConstructor
@TableName("table_user")
public class user{
    @TableId(type = IdType.AUTO)
    private Long id;

    @TableField(value = "created_time",fill = FieldFill.INSERT)
    private Date createdTime;

    @TableField(value = "updated_time",fill = FieldFill.INSERT_UPDATE)
    private Date updatedTime;

    // 其他字段
}
配置好以后,尝试插入数据,发现created_time字段已经字段填充了当前时间
第六章、Basemapper和Wrapper条件构造器
6.1)
Lambda查询