C语言数字图像处理(六):低通滤波器和高通滤波器
0. 完整仓库&教程:
这一章节的完整代码在:Chapter 6. Low Pass Filter and High Pass Filter
如果你喜欢这个系列的文章或者感觉对你有帮助,请给我的仓库一个⭐️。
1. 低通滤波器
-
1.1 理想低通滤波器(Ideal Low Pass Filter)
算法:
首先对图像进行二维离散傅里叶变换(这部分的原理可以参考:离散傅里叶变换和重建),得到每个像素的复数数组。 每个复数的实部和虚部分别乘以 (, )。 (, ) 的公式为:
其中 ![]() 代表通带(passband)的半径。(, )的计算方法是通过以下公式计算两点之间的距离:
代表通带(passband)的半径。(, )的计算方法是通过以下公式计算两点之间的距离:
其中, 和 是图像的长和宽。 最后,使用二维离散傅里叶逆变换(iDFT)恢复处理后的图像。
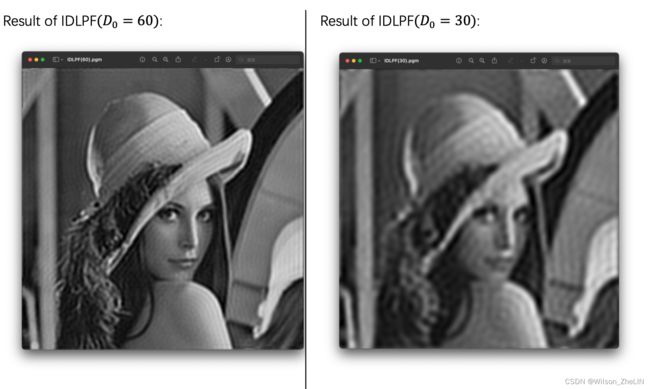
图像和结果对比(lena):
结果分析:
理想的低通滤波器可以完全抑制所有高于截止频率的频率信号,而低于截止频率的信号可以不受影响地通过。 由于理想低通滤波器的过渡特性过于尖锐,因此会出现振铃现象(ringing)。 它滤除了图像的高频部分,从而使图像变得模糊。 另外,![]() 选择的值越小,图像处理的效果越明显,即越模糊。
选择的值越小,图像处理的效果越明显,即越模糊。
代码:
void IDLPF(Image *image, float *real_array, float *imaginary_array) {
    unsigned char *tempin, *tempout;
    float height = image->Height, width = image->Width;
    float real[(int)(height*width)], imaginary[(int)(height*width)];
    Image *outimage;
    outimage = CreateNewImage(image, (char*)"#testing function");
    tempin = image->data;
    tempout = outimage->data;

    for(int i = 0; i < height; i++) {
        for(int j = 0; j < width; j++) {
            float dis = sqrt(pow((float)i - height/2, 2) + pow((float)j - width/2, 2));
            int H;
            if(dis <= 60) H = 1;
            else H = 0;
            real[(int)(i*height + j)] = real_array[(int)(i*height + j)] * H;
            imaginary[(int)(i*height + j)] = imaginary_array[(int)(i*height + j)] * H;
        }
    }
    printf("IDLPF Finished!\n");
    outimage = iDFT(image, real, imaginary);
    SavePNMImage(outimage, (char*)"IDLPF.pgm");
}
1.2 巴特沃斯低通滤波器(Butterworth Low Pass Filter):
算法:
与上面 IDLFT 相比唯一的区别是它改变了 (, ) 的公式:
其中 是巴特沃斯滤波器的阶数。
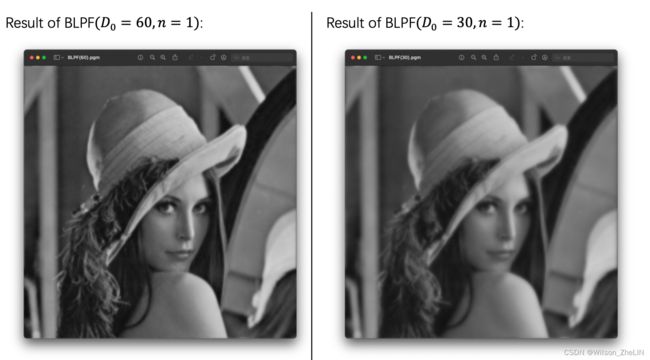
图像和结果对比(lena):
结果分析:
根据巴特沃斯滤波器的特性,在通带(pass band)内频率响应曲线是平坦的、无纹波,且在阻带(stop band)内逐渐降至零。 因此它处理的图像明显比上面的IDLPF 更自然、更平滑。 选择的![]() 值越小,图像会越模糊。不过随着次数的增加,振铃现象会变得更加明显。
值越小,图像会越模糊。不过随着次数的增加,振铃现象会变得更加明显。
代码实现(完整代码见顶部GitHub):
void BLPF(Image *image, float *real_array, float *imaginary_array) {
    unsigned char *tempin, *tempout;
    float height = image->Height, width = image->Width;
    float real[(int)(height*width)], imaginary[(int)(height*width)];
    Image *outimage;
    outimage = CreateNewImage(image, (char*)"#testing function");
    tempin = image->data;
    tempout = outimage->data;

    for(int i = 0; i < height; i++) {
        for(int j = 0; j < width; j++) {
            float dis = sqrt(pow((float)i - height/2, 2) + pow((float)j - width/2, 2));
            float H = 1 / (1 + pow(dis / (float)60, 2));
            real[(int)(i*height + j)] = real_array[(int)(i*height + j)] * H;
            imaginary[(int)(i*height + j)] = imaginary_array[(int)(i*height + j)] * H;
        }
    }
    printf("BLPF Finished!\n");
    outimage = iDFT(image, real, imaginary);
    SavePNMImage(outimage, (char*)"BLPF.pgm");
}
1.3 高斯低通滤波器(Gaussian Low Pass Filter):
算法:
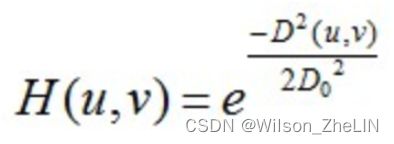
高斯低通滤波器中,(, )的公式为:
其他部分与之前的算法相同。
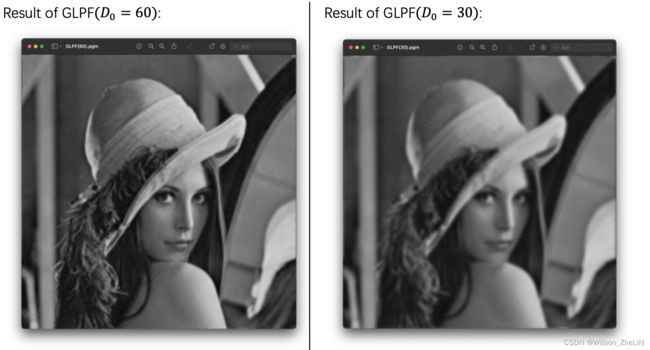
图像和结果对比(lena):
结果分析:
高斯滤波器的过渡特性非常平坦,因此即使![]() 非常小,也不会出现振铃现象。处理后的图像非常平滑,选择较小的
非常小,也不会出现振铃现象。处理后的图像非常平滑,选择较小的![]() 值会导致图像更加模糊。此外,这个算法也可适用于去除图像噪音和背景模糊。
值会导致图像更加模糊。此外,这个算法也可适用于去除图像噪音和背景模糊。
代码实现(完整代码见顶部GitHub):
void GLPF(Image *image, float *real_array, float *imaginary_array) {
    unsigned char *tempin, *tempout;
    float height = image->Height, width = image->Width;
    float real[(int)(height*width)], imaginary[(int)(height*width)];
    Image *outimage;
    outimage = CreateNewImage(image, (char*)"#testing function");
    tempin = image->data;
    tempout = outimage->data;

    for(int i = 0; i < height; i++) {
        for(int j = 0; j < width; j++) {
            float dis = sqrt(pow((float)i - height/2, 2) + pow((float)j - width/2, 2));
            float H = pow(M_E, pow(dis, 2) * -1 / (pow(60, 2) * 2));
            real[(int)(i*height + j)] = real_array[(int)(i*height + j)] * H;
            imaginary[(int)(i*height + j)] = imaginary_array[(int)(i*height + j)] * H;
        }
    }
    printf("GLPF Finished!\n");
    outimage = iDFT(image, real, imaginary);
    SavePNMImage(outimage, (char*)"GLPF.pgm");
}
2. 高通滤波器
算法:
首先对图像进行DFT变换,得到每个像素的复数数组。 每个复数的实部和虚部分别乘以 (, )。 (,)的公式如下(为了图像锐化的效果,这里选择巴特沃斯低通滤波器):
其中![]() 表示通带的半径。 (, )的计算方法也是两点之间的距离,通过公式:
表示通带的半径。 (, )的计算方法也是两点之间的距离,通过公式:
其中, 和 是图像的长和宽。 最后,使用iDFT恢复处理后的图像。
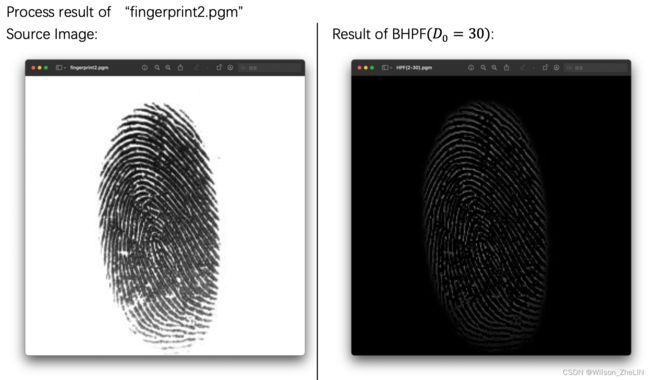
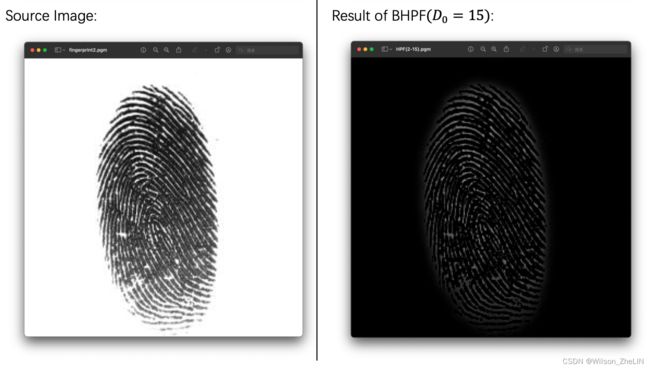
图像和结果对比(fingerprint1, fingerprint2):
结果分析:
为了获得更明显的锐化效果这里选择了巴特沃斯高通滤波器。 从输出结果可以看出,高频值被去除,低频值被保留,因此指纹的边缘被锐化并突出显示。 ![]() 的值越低,图像处理的效果越明显。
的值越低,图像处理的效果越明显。
代码实现(完整代码见顶部GitHub):
void HPF(Image *image, float *real_array, float *imaginary_array) {
    unsigned char *tempin, *tempout;
    float height = image->Height, width = image->Width;
    float real[(int)(height*width)], imaginary[(int)(height*width)];
    Image *outimage;
    outimage = CreateNewImage(image, (char*)"#testing function");
    tempin = image->data;
    tempout = outimage->data;

    for(int i = 0; i < height; i++) {
        for(int j = 0; j < width; j++) {
            float dis = sqrt(pow((float)i - height/2, 2) + pow((float)j - width/2, 2));
            float H = 1 / (1 + pow((float)30 / dis, 2));
            real[(int)(i*height + j)] = real_array[(int)(i*height + j)] * H;
            imaginary[(int)(i*height + j)] = imaginary_array[(int)(i*height + j)] * H;
        }
    }
    printf("HPF Finished!\n");
    outimage = iDFT(image, real, imaginary);
    SavePNMImage(outimage, (char*)"HPF.pgm");
}
3. 完整代码
这一章节的完整代码在:Chapter 6. Low Pass Filter and High Pass Filter
更多关于数字图像处理的章节,以及所有的原图像在:Introduction to Digital Image Processing
整理代码、翻译原理,和可视化每一个章节的工作非常耗时耗力,并且不会有任何收入和回报。如果你喜欢这个系列的文章或者感觉对你有帮助,请给我的仓库一个⭐️,这将是对独立作者最大的鼓励。
-END-


