图像分类 | 基于 Labelme 数据集和 VGG16 预训练模型实现迁移学习
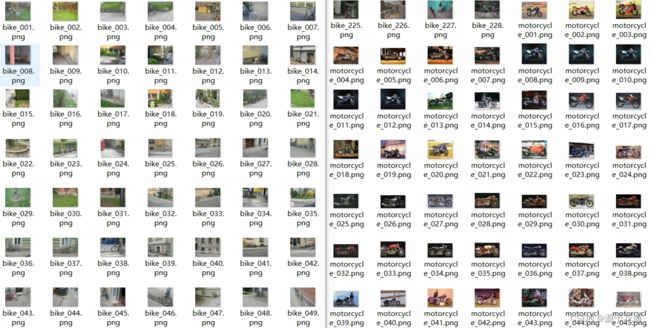
Hi,大家好,我是源于花海。本文主要使用数据标注工具 Labelme 对自行车(bike)和摩托车(motorcycle)这两种训练样本进行标注,使用预训练模型 VGG16 作为卷积基,并在其之上添加了全连接层。基于标注样本的信息和预训练模型的特征提取能力,训练自己构建的图像分类器,从而实现迁移学习。
目录
一、导入必要库
二、定义目录变量
三、数据预处理--数据增强 + 标签处理
1. 定义图像数据生成器
2. 标注样本的数据说明
四、导入预训练网络--VGG16
五、模型构建
六、模型训练
七、可视化训练过程
八、模型预测
一、导入必要库
导入必要的库(os、json、numpy、matplotlib.pyplot 等,详见如下),设置相关配置(警告和字体),为后续的图像处理和深度学习任务做准备。
- os: 用于与操作系统进行交互,例如文件路径操作等。
- json: 处理JSON格式的数据。
- numpy: 提供对多维数组进行操作的功能。
- matplotlib.pyplot: 用于绘制图表和可视化。
- keras.preprocessing.image: 包含用于图像处理的工具,如ImageDataGenerator。
- keras.applications: 包含一些预训练的深度学习模型,这里导入VGG16。
- keras.layers、keras.models、keras.optimizers: 用于构建深度学习模型的Keras组件。
- PIL.Image: Python Imaging Library,用于图像处理。
- warnings: 用于忽略警告信息。
import os
import json
import numpy as np
import matplotlib.pyplot as plt
from keras.preprocessing.image import ImageDataGenerator, load_img, img_to_array
from keras.applications import VGG16
from keras import layers, models, optimizers
from PIL import Image
import warnings

# 忽略警告信息
warnings.filterwarnings("ignore")
# 设置中文显示
plt.rcParams['font.sans-serif'] = ['SimHei']  # 设置黑体样式
plt.rcParams['axes.unicode_minus'] = False  # 正常显示负号
二、定义目录变量
首先定义基本目录和获取当前工作目录,设置训练集和验证集的文件夹路径,通过 "os.path.join" 连接各个目录,使用 "os.path.normpath" 规范化路径格式。构建包含训练和验证图像标签的 JSON 文件的目录。
通过定义相关目录和路径来指定训练集、验证集以及图像标签的存储位置,为后续的数据加载和训练做准备。
数据集一共有近 500 张图像,使用 split.py 脚本划分数据集,规定比例为训练集 72%,验证集 18%,测试集 10% 。
# 定义基本目录和获取当前工作目录
base_dir = r'dataset'
current_dir = os.getcwd()

# 设置训练集和验证集的文件夹路径
train_dir = os.path.normpath(os.path.join(current_dir, base_dir, 'images', 'train'))
validation_dir = os.path.normpath(os.path.join(current_dir, base_dir, 'images', 'val'))

# 构建到包含训练和验证图像标签的 JSON 文件的目录
train_labels_dir = os.path.normpath(os.path.join(current_dir, base_dir, 'json'))
validation_labels_dir = os.path.normpath(os.path.join(current_dir, base_dir, 'json'))
三、数据预处理--数据增强 + 标签处理
1. 定义图像数据生成器
定义了一个实时数据增强的生成器函数,该函数通过随机应用多种变换来实现图像数据的动态增强,同时提供了对应的标签信息,大大提高了模型的泛化能力。
- 设置ImageDataGenerator:创建了一个 ImageDataGenerator 对象,用于实施数据增强。设置了多种数据增强的参数,如像素值缩放、随机旋转、水平/垂直平移、剪切、随机缩放和水平翻转。
- 读取并处理标签信息:构建一个字典 labels_dict,用于存储图像文件名和对应的标签类别。通过读取 JSON 文件中的标签信息,将图像文件名与类别建立映射。
| 图像种类 | bike(自行车) | motorcycle(摩托车) |
|---|---|---|
| 标签量化 | 0 | 1 |
- 生成器主体部分:
- 获取图像文件列表,然后进入一个无限循环,每次循环生成一个批次的图像数据和对应的标签。
- 从图像文件列表中随机选择一个批次的图像索引,并加载图像,进行预处理,然后将其添加到批次列表中。
- 加载对应的标签,并将图像数据和标签作为批次的一部分返回。这是一个无限循环,可用于 Keras 模型的 fit_generator 函数进行模型训练。
# 实时数据增强--提高模型的泛化能力
def data_generator(directory, labels_directory, batch_size, target_size):
    ImageDataGenerator(
        rescale=1. / 255,  # 像素值缩放到 [0, 1] 之间
        rotation_range=40,  # 随机旋转角度范围
        width_shift_range=0.2,  # 水平平移范围
        height_shift_range=0.2,  # 垂直平移范围
        shear_range=0.2,  # 剪切强度
        zoom_range=0.2,  # 随机缩放范围
        horizontal_flip=True,  # 随机水平翻转
        fill_mode='nearest'  # 使用最近邻插值来填充新创建的像素
    )

    # 用于存储图像文件名和对应标签类别的映射
    labels_dict = {}

    # 读取标签信息并建立映射
    for json_file in os.listdir(labels_directory):
        if json_file.endswith('.json'):  # 确保文件是 JSON 格式的文件
            with open(os.path.join(labels_directory, json_file)) as f:  # 打开 JSON 文件
                json_data = json.load(f)  # 加载 JSON 数据

            # 处理 JSON 数据
            label = 1 if json_data["shapes"][0]["label"] == "motorcycle" else 0  # 根据标签信息确定类别(二分类--0/1)
            img_filename = os.path.basename(json_data["imagePath"])  # 获取图像文件名
            labels_dict[img_filename] = label  # 将图像文件名和对应标签类别存储在字典中

    image_list = [img for img in os.listdir(directory) if img.endswith('.png')]  # 获取图像文件列表

    while True:
        # 从图像文件列表中随机选择一个批次的图像索引
        batch_indices = np.random.choice(len(image_list), batch_size)
        batch_x = []  # 存储当前批次的图像数据
        batch_y = []  # 存储当前批次的类别数据

        for index in batch_indices:
            img_filename = image_list[index]  # 获取图像文件名
            # 加载并预处理图像
            img_path = os.path.join(directory, img_filename)  # 构建图像路径
            img = load_img(img_path, target_size=target_size)  # 加载并调整图像大小
            img_array = img_to_array(img)  # 将图像转换为 NumPy 数组
            img_array = img_array / 255.0  # 将像素值缩放到 [0, 1] 之间
            batch_x.append(img_array)  # 将图像数据添加到批次列表中
            # 加载标签
            batch_y.append(labels_dict[img_filename])  # 将对应的标签添加到批次标签列表中

        # 将批次的图像和标签转换为 NumPy 数组并返回作为生成器的一部分
        yield np.array(batch_x), np.array(batch_y)
2. 标注样本的数据说明
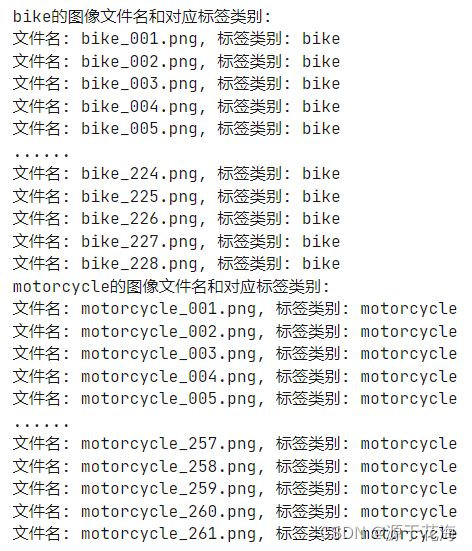
从指定的数据集中读取图像文件的标签信息,筛选并输出指定标签类别的图像文件名和对应的标签类别,并展示其中一部分标注信息。
- 函数参数:
defget_labels(dataset_path, json_path, target_label, num_show=5):- dataset_path:数据集的路径,包含图像文件。
- json_path:存储与图像文件对应标签信息的 JSON 文件的路径。
- target_label:目标标签类别,用于筛选图像。
- num_show:要显示的图像数量,默认为 5。
- 初始化一个列表,用于存储图像文件名和对应标签类别:
image_labels = [] - 遍历数据集中的图像文件:
- 对数据集中的每个图像文件进行遍历。
- 构建与图像文件对应的 JSON 文件路径,读取 JSON 文件,并获取标签信息。
- 如果标签与目标标签一致,将图像文件名和对应标签类别添加到 image_labels 列表中。
- 输出图像文件名和对应标签类别: 设置数据集和 JSON 文件路径,调用 get_labels 函数,只展示每种图像的前五张和后五张的标注信息。
def get_labels(dataset_path, json_path, target_label, num_show=5):
    # 初始化一个列表,用于存储图像文件名和对应标签类别
    image_labels = []

    # 遍历数据集中的图像文件
    for image_file in os.listdir(dataset_path):
        if image_file.endswith('.png'):
            # 构建与图像文件对应的JSON文件路径
            json_file_path = os.path.join(json_path, image_file.replace('.png', '.json'))
            # 读取JSON文件,获取标签信息
            with open(json_file_path) as f:
                json_data = json.load(f)
                label = json_data["shapes"][0]["label"]

            # 将图像文件名和对应标签类别存储在列表中
            if label == target_label:
                image_labels.append((image_file, label))

    # 输出图像文件名和对应标签类别
    print(f"{target_label}的图像文件名和对应标签类别:")
    total_images = len(image_labels)
    for i, (image_file, label) in enumerate(image_labels[:num_show]):
        print(f"文件名: {image_file}, 标签类别: {label}")
    if total_images > num_show * 2:
        print("......")
    for i, (image_file, label) in enumerate(image_labels[-num_show:]):
        print(f"文件名: {image_file}, 标签类别: {label}")

# 数据集和JSON文件路径
dataset_path = './dataset/PNGImages'
json_path = './dataset/json'
# 输出bike和输出motorcycle的图像文件名和标签类别
get_labels(dataset_path, json_path, 'bike')
get_labels(dataset_path, json_path, 'motorcycle')
四、导入预训练网络--VGG16
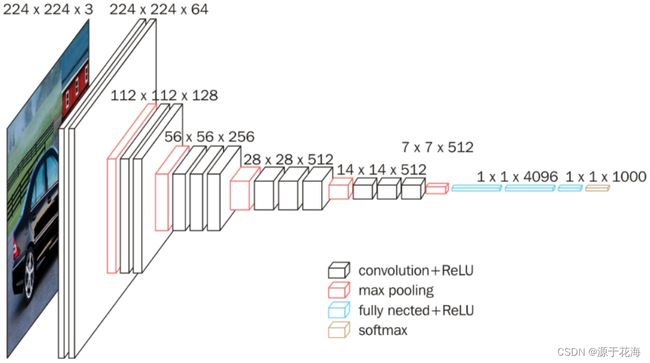
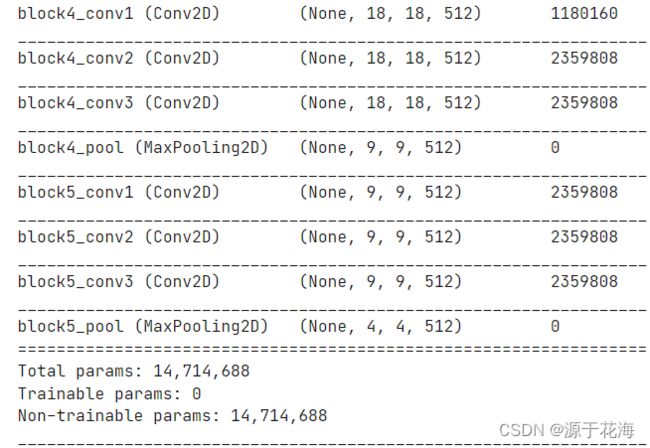
VGG16 卷积神经网络 —— 13 层卷积层和 5 层池化层 负责进行特征的提取,最后的 3 层全连接层 负责完成分类任务。
VGG16 的卷积核:(每层卷积的滑动步长 stride=1,padding=1)
- conv3-xxx: 卷积层均为 3×3 的卷积核,xxx表示通道数。其步长为 1,用 padding=same 填充;
- input: 输入图片大小为 224×244 的彩色图像,通道为3(RGB image),即 224×224×3;
- maxpool: 最大池化,在 VGG16 中,pooling 采用的是 2×2 的最大池化方法;
- FC-4096: 全连接层中有 4096 个节点,同样地,FC-1000 为该层全连接层有 1000 个节点;
- padding: 对矩阵在外边填充 n 圈,padding=1 即填充 1 圈,5×5 大小的矩阵,填充一圈后变成 7X7 大小;
因 VGG16 网络用于 1000 分类,而该任务只是二分类,故需修改 VGG16 网络的全连接层,同时冻结原网络的特征提取层(卷积层和池化层的权重保持不变),防止权重更新而破坏预训练权重,减少训练时间和计算资源。
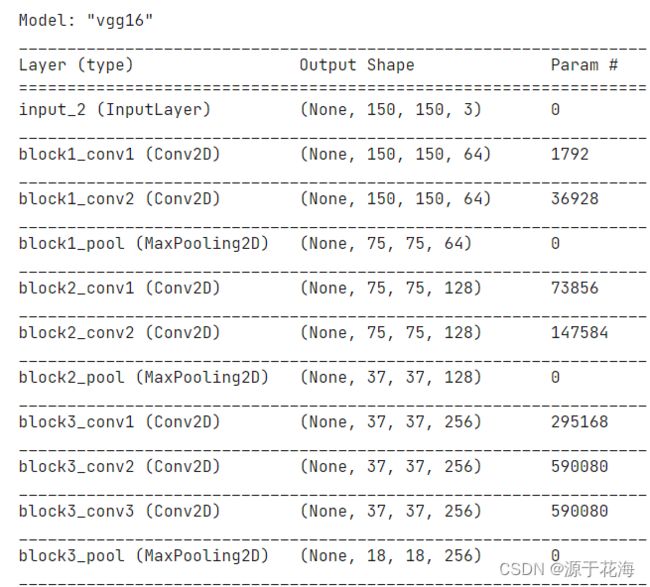
使用 Keras 中的 VGG16 模型实例作为卷积基础(conv_base),并使用 ImageNet 上的预训练权重,通过将卷积层设为不可训练,可以在此基础上构建自定义的全连接网络,从而适应特定的图像分类任务,而无需重新训练 VGG16 的卷积层。
conv_base = VGG16(include_top=False,  # 不包含顶层的全连接网络
                  weights='imagenet',  # 使用 ImageNet 数据集上的预训练权重
                  input_shape=(150, 150, 3))  # 输入图像的形状为 150x150 像素,RGB 三通道
conv_base.trainable = False  # 冻结 VGG16 的卷积层,使之不被更新

conv_base.summary()  # 显示VGG16模型的摘要
五、模型构建
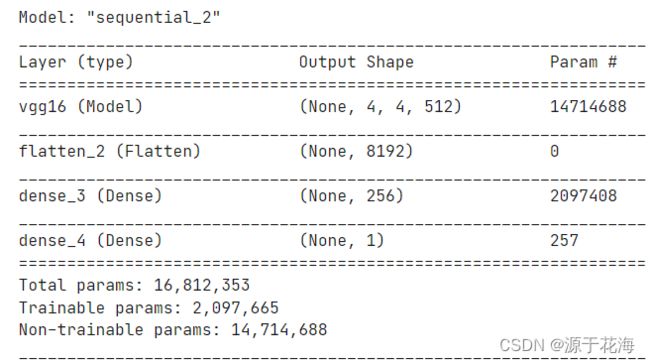
构建了一个顺序模型(Sequential Model),使用了预训练的 VGG16 模型作为卷积基础,添加了全连接层来适应特定的图像分类任务。
- 输出层使用 sigmoid 激活函数(适用于二分类)
- 使用 binary_crossentropy 二分类交叉熵作为损失函数。
- 使用 RMSprop 优化器,学习率为 2e-5。
model = models.Sequential()  # 创建顺序模型
model.add(conv_base)  # 将预训练的 VGG16 模型添加到顺序模型中
model.add(layers.Flatten())  # 将卷积层输出的多维数据展平成一维
model.add(layers.Dense(256, activation='relu'))  # 256个神经元的全连接层,ReLU 激活函数
model.add(layers.Dense(1, activation='sigmoid'))  # 1个神经元的输出层,sigmoid 激活函数,进行二分类
# model = VGG16()
model.summary()  # 输出模型的结构摘要

model.compile(loss='binary_crossentropy',  # 使用二分类交叉熵作为损失函数
              optimizer=optimizers.RMSprop(lr=2e-5),  # 使用 RMSprop 优化器,学习率为 2e-5
              metrics=['acc'])  # 监控模型的准确率
六、模型训练
设置数据生成器的批处理和图像大小,设定训练 25 次,观察训练过程及其训练集和验证集的准确率、损失率。
# 模型训练的参数准备
batch_size = 20  # 设置数据生成器的批处理大小
target_size = (150, 150)  # 设置将图像调整大小为 (150, 150) 的目标大小

history = model.fit(
    data_generator(train_dir, train_labels_dir, batch_size, target_size),  # 使用自定义数据生成器产生训练数据
    steps_per_epoch=len(os.listdir(train_dir)) // batch_size,  # 每个 epoch 中迭代的步数
    epochs=25,  # 训练的总 epoch 数
    validation_data=data_generator(validation_dir, validation_labels_dir, batch_size, target_size),
    # 使用自定义数据生成器产生验证数据
    validation_steps=len(os.listdir(validation_dir)) // batch_size
)
七、可视化训练过程
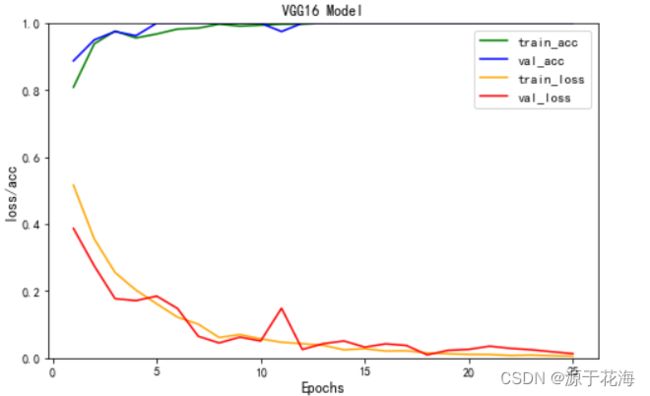
经过 25 轮的训练后,基于下方的 "loss/acc" 的可视化图,可以看出训练集和验证集的准确率稳定地高达 100%,训练集的损失率最低能达到 0.55%,验证集的损失率最低能达到 0.95%,可见该模型的训练效果非常好。
train_acc = history.history['acc']
train_loss = history.history['loss']
val_acc = history.history['val_acc']
val_loss = history.history['val_loss']

epoch = range(1, len(train_acc) + 1)

plt.figure(figsize=(8, 5))
plt.plot(epoch, train_acc, color='green', label='train_acc')  # 训练集准确率
plt.plot(epoch, val_acc, color='blue', label='val_acc')  # 验证集准确率
plt.plot(epoch, train_loss, color='orange', label='train_loss')  # 训练集损失率
plt.plot(epoch, val_loss, color='red', label='val_loss')  # 验证集损失率
plt.title("VGG16 Model")

plt.xlabel('Epochs', fontsize=12)
plt.ylabel('loss/acc', fontsize=12)
plt.legend(fontsize=11)
plt.ylim(0, 1)  # 设置纵坐标范围为0-1
plt.show()
八、模型预测
通过定义图像预测函数,读取测试集文件夹,以 25 个结果为一个批次,输出最终预测的结果。结果显示,测试集的 49 个图片都能被准确地预测出来。
# 定义单张图像的预测函数
def predict_image(model, image_path, target_size):
    img = Image.open(image_path)  # 打开图像文件
    img = img.resize(target_size)  # 调整图像大小
    img_array = img_to_array(img)  # 将图像转换为数组
    img_array = img_array / 255.0  # 对图像进行归一化处理
    img_array = img_array.reshape((1,) + img_array.shape)  # 将图像数组形状调整为符合模型输入要求
    # 使用模型进行图像预测
    prediction = model.predict(img_array)[0, 0]
    return prediction


# 定义显示一组图像及其结果的函数
def display_images_with_results(image_paths, predictions):
    plt.figure(figsize=(15, 10))

    for i, (image_path, prediction) in enumerate(
            zip(image_paths, predictions), 1):
        plt.subplot(5, 5, i)  # 调整子图显示
        img = Image.open(image_path)  # 打开图像文件

        # 根据预测概率确定预测类别
        predicted_class = "motorcycle" if prediction > 0.5 else "bike"

        plt.imshow(img)  # 显示图像
        plt.title(
            f"文件名: {os.path.basename(image_path)}\n预测类别: {predicted_class}")
        plt.axis('off')

    plt.tight_layout()
    plt.show()


# 设置测试集文件夹路径
test_dir = os.path.normpath(os.path.join(current_dir, base_dir, 'images', 'test'))
# 初始化空列表,用于存储每组25个结果的信息
batch_image_paths, batch_predictions, batch_actual_labels = [], [], []

# 循环遍历测试文件夹中的图像文件
for i, image_file in enumerate(os.listdir(test_dir), 1):
    if image_file.endswith('.png'):
        image_path = os.path.join(test_dir, image_file)  # 构建图像文件的完整路径
        # 使用定义的图像预测函数进行预测
        prediction = predict_image(model, image_path, target_size)
        # 将结果添加到当前批次中
        batch_image_paths.append(image_path)
        batch_predictions.append(prediction)
        # 如果达到每组25个结果,调用显示函数并清空当前批次信息
        if i % 25 == 0:
            display_images_with_results(batch_image_paths, batch_predictions)
            batch_image_paths, batch_predictions = [], []

# 如果还有剩余结果不足25个,调用显示函数
if batch_image_paths:
    display_images_with_results(batch_image_paths, batch_predictions)