QT quick基础:qml界面切换
需求说明,在项目开发过程中,可能会出现多个界面切换问题。再测试过程中发现,程序开始运行时,所有界面的功能逻辑都在运行,这可能导致程序开始运行时浪费性能。因此,学习找到一种方式,当前显示的界面相关功能运行,否则停止运行。因此,写这篇文章记录一下。
参考学习文档:https://blog.csdn.net/u011555996/article/details/122004214
实例中,写了两个界面,登录界面和主界面。程序运行默认显示登录界面,点击“登录页面-登录按钮”按钮,界面切换到主界面。点击“主页面-返回按钮”按钮,返回登录界面。两个界面都添加了一个定时器,方便通过日志观察每个界面运行的时机。
一、静态加载
1、隐藏法
// main.qml
import QtQuick 2.12
import QtQuick.Window 2.12
import QtQuick.Controls 2.12

Window {
    visible: true
       width: 640
       height: 480
       title: qsTr("Hello World")

       // 静态
       // 主页面一开始设置"隐藏",登录成功后才显示
       MainPage {
           id: mainPage
           width: 500
           height: 350
           visible: false // 设置"隐藏"
           anchors.centerIn: parent
       }

       LoginPage {
           id: loginPage
           width: 300
           height: 200
           anchors.centerIn: parent
       }
}

// LoginPage.qml
import QtQuick 2.0
import QtQuick.Controls 2.3
Rectangle {
    width: 400
    height: 300
    color: "#051f58"
    radius: 8

    Button {
        text: "登录页面-登录按钮"
        anchors.centerIn: parent
        onClicked: {
            // 静态
            loginPage.visible = false
            mainPage.visible = true
        }
    }

    Timer {
        interval: 100; running: true; repeat: true;
        onTriggered: console.log("loginPage lili 123456");
    }
}

// MainPage.qml
import QtQuick 2.0
import QtQuick.Controls 2.3

Rectangle {
    color: "#498ff8"
    radius: 8

    Button {
        text: "主页面-返回按钮"
        anchors.centerIn: parent
        onClicked: {
            // 静态
            loginPage.visible = true
            mainPage.visible = false
        }
    }

    Timer {
        interval: 100; running: true; repeat: true;
        onTriggered: console.log("mainPage lili 123456");
    }
}
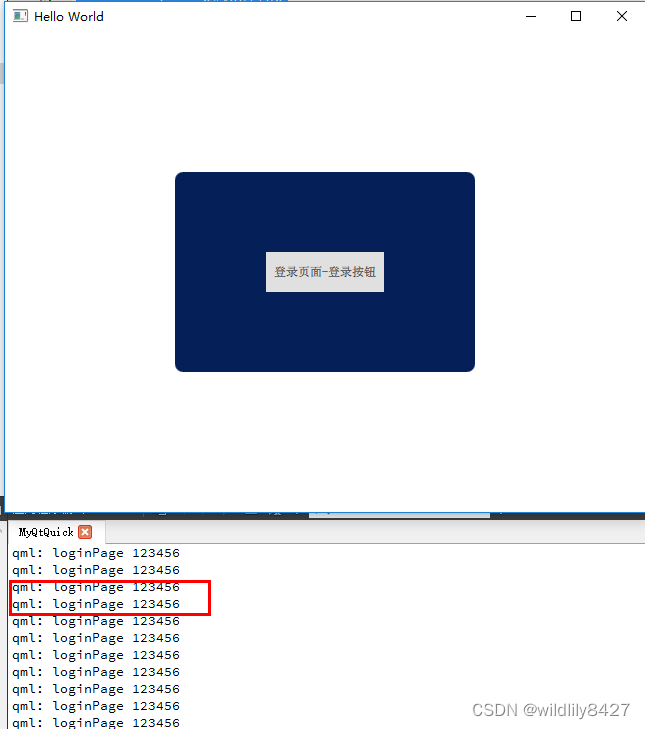
运行效果:
登录界面:

主界面:

通过运行效果可以看出,在登录界面和主界面,两个界面的功能逻辑都在运行。既程序运行后,两个界面同时加载,只是通过,界面显示和隐藏逻辑,确定哪个界面输出。
2、SwipeView
参考文章:https://blog.csdn.net/weixin_44697562/article/details/116334077
代码:
// main.qml
import QtQuick 2.12
import QtQuick.Window 2.12
import QtQuick.Controls 2.12

Window {
   id: mainWin
   visible: true
   width: 640
   height: 480
   title: qsTr("Hello World")

   Item {
       anchors.fill: parent
       Rectangle{
           id:rect_BG
           anchors.fill: parent
           radius: 5
           color: "#018574"
       }


       SwipeView{
           id:swipeView
           anchors.left: parent.left
           anchors.leftMargin: 10
           anchors.right: parent.right
           anchors.rightMargin: 10
           anchors.top: parent.top
           anchors.topMargin: 50
           anchors.bottom: parent.bottom
           anchors.bottomMargin: 30

           spacing: 10

           ServerPanel{id:sp_ROOT}

           ListPanel{id:lp_ROOT}
       }

       PageIndicator{
           id:indicator
           anchors.bottom: parent.bottom
           anchors.bottomMargin: 10
           anchors.horizontalCenter: parent.horizontalCenter

           currentIndex: swipeView.currentIndex
           count:swipeView.count
       }
   }
}

// ListPanel.qml
import QtQuick 2.0
import QtQuick.Controls 2.5
Page {
    id:lp_ROOT
    background: null
    Label{
        anchors.horizontalCenter: parent.hoverEnabled
        Text {
            text: "列表界面"
            color: "white"
            font.bold: true
            font.pointSize: 14
        }
    }

    Timer {
        interval: 10; running: true; repeat: true;
        onTriggered: console.log("listPanel  123456");
    }
}

// ServerPanel.qml
import QtQuick 2.0
import QtQuick.Controls 2.5


Page {
    background: null
    Label{
        anchors.horizontalCenter: parent.hoverEnabled

        Text {
            text: "服务器界面"
            color: "white"
            font.bold: true
            font.pointSize: 14
        }
    }

    Timer {
        interval: 10; running: true; repeat: true;
        onTriggered: console.log("ServerPanel  123456");
    }
}
效果图:

该组件类似android的ViewPaper + fragment效果。程序开始运行,要显示的page全部加载进来。SwipeView是通过更改currentIndex来实现切换页面的,所以只需要将你的SwipeView内的id声明出来然后修改currentIndex即可。
Button{
        id:btn_Front
        text: "上一个"
        anchors.centerIn: parent
        onClicked: {
            bg_ROOT.swipeView.currentIndex -= 1
        }
    }
二、动态切换
1、使用Loader动态加载QML组件
代码:
// main.qml
import QtQuick 2.12
import QtQuick.Window 2.12
import QtQuick.Controls 2.12

Window {
    visible: true
       width: 640
       height: 480
       title: qsTr("Hello World")

       // 动态加载
       // 1. Loader加载不同组件,实现切换页面的功能
           Loader{
               id:myLoader
               anchors.centerIn: parent // 弹出的界面都居中显示
           }
           Component.onCompleted: myLoader.sourceComponent = loginPage // 一开始显示登录页面

           // 2. 登录页面-Component
           Component{
               id:loginPage
               LoginPage {
                   width: 300
                   height: 200
                   anchors.centerIn: parent
               }
           }

           // 3.主页面-Component
           Component{
               id:mainPage
               MainPage {
                   width: 500
                   height: 350
                   anchors.centerIn: parent
               }
           }
}

// LoginPage.qml
import QtQuick 2.0
import QtQuick.Controls 2.3

Rectangle {
    width: 400
    height: 300
    color: "#051f58"
    radius: 8

    Button {
        text: "登录页面-登录按钮"
        anchors.centerIn: parent
        onClicked: {

            // 动态
            myLoader.sourceComponent = mainPage // 切换显示主页面
        }
    }

    Timer {
        interval: 100; running: true; repeat: true;
        onTriggered: console.log("loginPage lili 123456");
    }
}

// MainPage.qml
import QtQuick 2.0
import QtQuick.Controls 2.3

Rectangle {
    color: "#498ff8"
    radius: 8

    Button {
        text: "主页面-返回按钮"
        anchors.centerIn: parent
        onClicked: {

            // 动态
             myLoader.sourceComponent = loginPage // 切换显示登录页面
        }
    }

    Timer {
        interval: 100; running: true; repeat: true;
        onTriggered: console.log("mainPage lili 123456");
    }
}
运行效果:
登录界面

主界面

返回登录界面:

通过日志可以看出,哪个界面在前台,就运行哪个界面。
2、利用 createComponent 创建并切换
代码:
// main.qml
import QtQuick 2.12
import QtQuick.Window 2.12
import QtQuick.Controls 2.12

Window {
   id: mainWin
   visible: true
   width: 640
   height: 480
   title: qsTr("Hello World")


      // 2. 利用 createComponent 创建并切换
       LoginPage {
             width: 300
             height: 200
             anchors.centerIn: parent
       }
}

// LoginPage.qml
import QtQuick 2.0
import QtQuick.Controls 2.3

Rectangle {
    id: loginPage
    width: 400
    height: 300
    color: "#051f58"
    radius: 8
    clip:true

    Button {
        text: "登录页面-登录按钮"
        anchors.centerIn: parent
        onClicked: {
            // 先隐藏登录页面
            loginPage.visible = false

            // 在主窗口上显示主页面
            var compMain = Qt.createComponent("MainPage.qml")
            .createObject(mainWin, {x:50, y:50, width:500, height:350});
        }
    }

    Timer {
        interval: 10; running: true; repeat: true;
        onTriggered: console.log("loginPage 123456");
    }
}

// MainPage.qml
import QtQuick 2.0
import QtQuick.Controls 2.3

Rectangle {
    id: mainPage
       color: "#498ff8"
       radius: 8

   Button {
       text: "主页面-返回按钮"
       anchors.centerIn: parent
       onClicked: {
           // 先隐藏主页面
           mainPage.visible = false

           // 在主窗口上显示登录页面
           var compLogin = Qt.createComponent("LoginPage.qml")
           .createObject(mainWin, {x:100, y:100, width:500, height:350});
       }
   }

    Timer {
        interval: 10; running: true; repeat: true;
        onTriggered: console.log("mainPage  123456");
    }
}
运行效果:
登录界面
主界面

返回登录界面

通过日志可以看出,程序运行时,只有前台界面运行。打开主界面后及返回登录界面,两个界面都在运行。