【学习笔记】CNN构建卷积神经网络笔记
CNN构建卷积神经网络笔记
文章目录
-
-
- CNN构建卷积神经网络笔记
-
- pytorch的类
-
- DataLoader
-
- DataLoader简介
- DataLoader如何遍历
- Sequential
- 构建卷积神经网络的类
- 计算准确率
- 训练过程
- 利用GPU运行pytorch
- 备注
-
pytorch的类
DataLoader
DataLoader简介
官网的解释:
CLASStorch.utils.data.DataLoader(dataset, batch_size=1, shuffle=None, sampler=None, batch_sampler=None, num_workers=0, collate_fn=None, pin_memory=False, drop_last=False, timeout=0, worker_init_fn=None, multiprocessing_context=None, generator=None, ***, prefetch_factor=None, persistent_workers=False, pin_memory_device=‘’)
DataLodaer
Parameters:
-
dataset (Dataset) – dataset from which to load the data.
-
batch_size (int, optional) – how many samples per batch to load (default:
1). -
shuffle (bool, optional) – set to
Trueto have the data reshuffled at every epoch (default:False). -
sampler (Sampler or Iterable*,* optional) – defines the strategy to draw samples from the dataset. Can be any
Iterablewith__len__implemented. If specified,shufflemust not be specified. -
batch_sampler (Sampler or Iterable*,* optional) – like
sampler, but returns a batch of indices at a time. Mutually exclusive withbatch_size,shuffle,sampler, anddrop_last. -
num_workers (int, optional) – how many subprocesses to use for data loading.
0means that the data will be loaded in the main process. (default:0) -
collate_fn (Callable*,* optional) – merges a list of samples to form a mini-batch of Tensor(s). Used when using batched loading from a map-style dataset.
-
pin_memory (bool, optional) – If
True, the data loader will copy Tensors into device/CUDA pinned memory before returning them. If your data elements are a custom type, or yourcollate_fnreturns a batch that is a custom type, see the example below. -
drop_last (bool, optional) – set to
Trueto drop the last incomplete batch, if the dataset size is not divisible by the batch size. IfFalseand the size of dataset is not divisible by the batch size, then the last batch will be smaller. (default:False) -
timeout (numeric*,* optional) – if positive, the timeout value for collecting a batch from workers. Should always be non-negative. (default:
0) -
worker_init_fn (Callable*,* optional) – If not
None, this will be called on each worker subprocess with the worker id (an int in[0, num_workers - 1]) as input, after seeding and before data loading. (default:None) -
generator (torch.Generator, optional) – If not
None, this RNG will be used by RandomSampler to generate random indexes and multiprocessing to generate base_seed for workers. (default:None) -
prefetch_factor (int, optional*,* keyword-only arg) – Number of batches loaded in advance by each worker.
2means there will be a total of 2 * num_workers batches prefetched across all workers. (default value depends on the set value for num_workers. If value of num_workers=0 default isNone. Otherwise if value of num_workers>0 default is2). -
persistent_workers (bool, optional) – If
True, the data loader will not shutdown the worker processes after a dataset has been consumed once. This allows to maintain the workers Dataset instances alive. (default:False) -
pin_memory_device (str, optional) – the data loader will copy Tensors into device pinned memory before returning them if pin_memory is set to true.
dataset:从中加载数据集batch_size:每次所取的数量,默认值为1shuffle:如果shuffle=True则表明将数据打乱随机获取一个batch_size个数据,shuffle=False相反。
DataLoader如何遍历
这里将train_loader每次会随机获取一个batch的数据以及标签每一个data[index]都是一张图片,每一个tatget[index]是该图标的标签。
train_loader=torch.utils.data.DataLoader(dataset=train_dataset,
                                         batch_size=batch_size,
                                         shuffle=True)

for batch_idx,(data,tatget) in enumerate(train_loader):
    print(batch_idx,data.shape,tatget.shape)
输出:
1 torch.Size([64, 1, 28, 28]) torch.Size([64])
2 torch.Size([64, 1, 28, 28]) torch.Size([64])
3 torch.Size([64, 1, 28, 28]) torch.Size([64])
4 torch.Size([64, 1, 28, 28]) torch.Size([64])
'''
936 torch.Size([64, 1, 28, 28]) torch.Size([64])
937 torch.Size([32, 1, 28, 28]) torch.Size([32])
Sequential
构建一个序列化的container,可以把想要在神经网络中添加的操作都放进去,按顺序进行执行。
比如:
model = nn.Sequential(
          nn.Conv2d(1,20,5),
          nn.ReLU(),
          nn.Conv2d(20,64,5),
          nn.ReLU()
        )
看着里面的参数,非常的多,但其实很多都有默认值,下面我们来看下给出的参数解释:
in_channels (int) - 输入图像中的通道数
out_channels (int) – 卷积产生的通道数即输出图片的通道数
kernel_size (int or tuple) – 卷积核的大小(可以是个数,也可以是元组)
**stride (int or tuple, optional) **-- 卷积的步幅。 默认值:1
**padding (int, tuple or str, optional) **– 填充添加到输入的所有四个边。 默认值:0
padding_mode (string, optional) –填充的几个选择 ‘zeros’, ‘reflect’, ‘replicate’ 或 ‘circular’。 默认值:“零”
dilation (int or tuple, optional) – 内核元素之间的间距。 默认值:1
groups (int, optional) – 从输入通道到输出通道的阻塞连接数。 默认值:1
bias (bool, optional) – 如果为真,则为输出添加可学习的偏差。 默认值:真
构建卷积神经网络的类
卷积计算公式:
N = W − F + 2 P S + 1 N=\frac{W-F+2P}{S}+1 N=SW−F+2P+1
W为输入大小,F为卷积核大小,P为填充大小(padding),S为步长(stride),N为输出大小。
输入一张1×28×28>>conv>>ReLu>>MaxPool2dconv>>ReLu>>MaxPool2d>>Linear

class CNN(nn.Module):
    def __init__(self):
        super(CNN,self).__init__()
        self.conv1=nn.Sequential(    # 输入大小(1,28,28)
            nn.Conv2d(
                in_channels=1,       # 输入的张量的维数 灰度图像
                out_channels=16,     # 输出的张量的维数 要得到几个特征图
                kernel_size=5,       # 卷积核大小 5*5
                stride=1,            # 步长
                padding=2
            ),
            nn.ReLU(),
            nn.MaxPool2d(kernel_size=2)
        )
        self.conv2=nn.Sequential(
            nn.Conv2d(16,32,5,1,2), #输出(32,14,14)
            nn.ReLU(),
            nn.MaxPool2d(2), # 输出 32*7*7
        )
        self.out=nn.Linear(32*7*7,10)

    def forward(self,x):
        """前向传播"""
        x=self.conv1(x)
        x=self.conv2(x)
        x=x.view(x.size(0),-1) # flatten操作
        output=self.out(x)
        return output
计算准确率
torch.max(input,dim):imput输入一个tensor,dim是索引的维度,0是每列的最大值,1是每行的最大值。
view_as:返回被视作与给定的tensor相同大小的原tensor。
代码:
def accuracy(predictions, lables):
    # 返还的是正确的个数和标签的个数
    pred = torch.max(predictions.data, 1)[1]
    rights = pred.eq(lables.data.view_as(pred)).sum()
    return rights, len(lables)

right = accuracy(output, tatget)
训练过程
for epoch in range(num_epochs):
    train_rights = []

    for batch_idx, (data, tatget) in enumerate(train_loader):
        net.train()
        output = net(data)
        # 计算损失函数
        loss = criterion(output, tatget)
        # 随机梯度下降
        optimizer.zero_grad()
        # 反向传播
        loss.backward()
        """
        optimizer.step()????
        跟新参数???
        反向传播后不更新参数  当然没法训练啊
        """
        optimizer.step()

        # 计算准确率
        right = accuracy(output, tatget)

        train_rights.append(right)

        if batch_idx % 100 == 0:
            net.eval()
            val_rights = []

            for (data, target) in test_loader:
                output = net(data)
                right = accuracy(output, target)
                val_rights.append(right)

            # 准确率计算
            train_r = (sum([tup[0] for tup in train_rights]), sum([tup[1] for tup in train_rights]))
            val_r = (sum([tup[0] for tup in val_rights]), sum([tup[1] for tup in val_rights]))

            print(
                '当前epoch: {} [{}/{} ({:.0f}%)]\t损失: {:.6f}\t训练集准确率: {:.2f}%\t测试集正确率: {:.2f}%'.format(
                    epoch, batch_idx * batch_size, len(train_loader.dataset),
                           100. * batch_idx / len(train_loader),
                    loss.data,
                           100. * train_r[0].numpy() / train_r[1],
                           100. * val_r[0].numpy() / val_r[1]))
利用GPU运行pytorch
在容器内部访问时,需要配置GPU。
这里采用在dockerhub中拉去一个anaconda,将服务器中的目录挂在到容器内使用。
执行以下命令从docker仓库拉取一个conda镜像,将所有GPU给容器使用。
docker run -i -t --gpus all -v /data2/home/liguochun/:/tmp --name liguochun_conda2 continuumio/anaconda3 /bin/bash
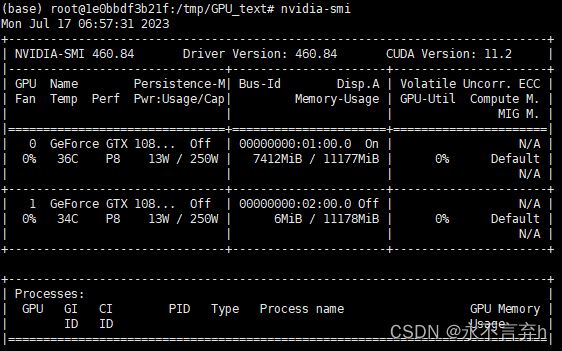
执行一下命令查看容器中是否可以运行GPU
nvidia-smi
备注
以下补充docker的使用。
拉去一个镜像
$ docker pull ubuntu
运行容器,以命令行模式进入终端
$ docker run -it ubuntu /bin/bash
OPTIONS说明:
- -a stdin: 指定标准输入输出内容类型,可选 STDIN/STDOUT/STDERR 三项;
- -d: 后台运行容器,并返回容器ID;
- -i: 以交互模式运行容器,通常与 -t 同时使用;
- -P: 随机端口映射,容器内部端口随机映射到主机的端口
- -p: 指定端口映射,格式为:主机(宿主)端口:容器端口
- -t: 为容器重新分配一个伪输入终端,通常与 -i 同时使用;
- –name=“nginx-lb”: 为容器指定一个名称;
- –dns 8.8.8.8: 指定容器使用的DNS服务器,默认和宿主一致;
- –dns-search example.com: 指定容器DNS搜索域名,默认和宿主一致;
- -h “mars”: 指定容器的hostname;
- -e username=“ritchie”: 设置环境变量;
- –env-file=[]: 从指定文件读入环境变量;
- –cpuset=“0-2” or --cpuset=“0,1,2”: 绑定容器到指定CPU运行;
- **-m:**设置容器使用内存最大值;
- –net=“bridge”: 指定容器的网络连接类型,支持 bridge/host/none/container: 四种类型;
- –link=[]: 添加链接到另一个容器;
- –expose=[]: 开放一个端口或一组端口;
- –volume , -v: 绑定一个卷
- **–gpus all:**将宿主机上的GPU提供给容器使用
停止一个容器
$ docker stop ubuntu
启动停止的容器
$ docker start myrunoob
重启容器
$ docker restart myrunoob
进入容器
$ sudo docker exec -it 775c7c9ee1e1 /bin/bash