基于LSTM深度学习模型进行温度的单步预测(使用PyTorch构建模型)
一、引言
我们使用PyTorch构建了一个LSTM模型来进行单步温度预测。我们首先爬取成都市近十年的温度数据并进行预处理,然后定义了LSTM模型、损失函数和优化器。接着,我们进行了多轮训练,每轮训练包括前向传播、计算损失、反向传播和更新权重等步骤。最后,我们使用训练好的模型进行了温度预测,并将预测结果与真实温度值进行了比较。
目前关于LSTM原理的文章有很多,这里不过多赘述。
二、数据
天气网历史天气频道(lishi.tianqi.com)提供全国34个省、市所属的2290个地区的历史天气预报查询,数据来源于城市当天的天气信息,可以查询到历史天气气温,历史风向,历史风力等历史天气状况,并有城市的生活指数,健康指数,旅游指数,天气预警等信息。 状况,最高气温,最低气温,方便用户出行旅游。
先观察目标城市不同时间天气数据网址:
- 成都市2022年12月:http://lishi.tianqi.com/chengdu/202212.html
- 成都市2012年12月:http://lishi.tianqi.com/chengdu/201212.html
可以看到目标网址的粗体部分对应不同时间的天气数据,所以我们通过改变粗体部分获取成都市历史天气数据。
import os
import pandas as pd
import time
import requests
from bs4 import BeautifulSoup

def get_url(city, start, end):#定义获取链接函数
    url_list = []
    for year in range(start, end):
        for month in range(1, 13):
            y = year*100 + month
            url1 = "http://lishi.tianqi.com/"+city +"/"+ str(y) + ".html"
            url_list.append(url1)
    return url_list


def get_weather_month(url, file):#定义获取每月天气函数
    headers = {
        'user-agent':'Mozilla/5.0 (Windows NT 10.0; Win64; x64) AppleWebKit/537.36 (KHTML, like Gecko) Chrome/78.0.3904.70 Safari/537.36'
        }#设置请求头,防止被反爬
    html = requests.get(url,headers=headers)#使用Requests发送网络请求。
    html.encoding = 'utf-8' #设置编码方式
    soup = BeautifulSoup(html.text, 'lxml')#转化成BeautifulSoup对象
    weather_list = soup.select('ul[class="thrui"]')#选取每月天气的块
    for weather in weather_list:
        ul_list = weather.select('li')  #查找标签为li的
        for li in ul_list:
            div_list = li.select('div')
            try:
                dates = div_list[0].string[:10]
            except:
                dates = 'error'
            try:
                maxTem = div_list[1].string
            except:
                maxTem = 'error'
            try:
                minTem = div_list[2].string
            except:
                minTem = 'error'
            try:
                weathers = div_list[3].string
            except:
                weathers = 'error'
            try:
                wind = div_list[4].string
            except:
                wind = 'error'
            # 写入
            if(weathers==None):weathers='阵雨'
            f = open(file, 'a')
            l = dates+','+maxTem+','+minTem+','+weathers+','+wind+'\n'
            f.write(l)
            f.close()

# 调用函数爬取天气数据
city = "chengdu"
time1 = 2012
time2 = 2023
file = f"weather_{city}.csv"  # 注意自己的存储位置
all_url = get_url(city, time1, time2)
# 信息存储
if not os.path.exists(file):
    f = open(file, 'a')
    f.write('date,maxTem,minTem,weather,wind\n')
    f.close()
for url in all_url:
    try:
        get_weather_month(url, file)
        time.sleep(3) #每个月数据爬取后停顿3秒,避免频繁发送请求被服务器屏蔽
    except:
        print(f'{url} Error')
    print(f'网页 {url} 抓取完成')
结果可视化
import pandas as pd
import numpy as np
import matplotlib.pyplot as plt

city = "chengdu"
file = f"weather_{city}.csv"
df = pd.read_csv(file, encoding='gbk')#读取历史天气数据
df['maxTem'] = df['maxTem'].str.replace('℃','').astype(np.float64)  # replace方法替换
df['minTem'] = df['minTem'].str.extract('(\d+)').astype(np.float64)  #正则表达式方法替换

# 制图
df.index = df['date']
df['minTem'].plot(figsize=(20,10))  # 低温
df['maxTem'].plot(figsize=(20,10))  # 高温
plt.xlabel('date', fontsize=15)  #设置X轴名称
plt.ylabel('temperature', fontsize=15)  #设置Y轴名称
plt.title('Max/Min Temperature(2012-2022)', fontsize=20)  #设置图片标题
plt.tick_params(labelsize=10)
plt.legend()
plt.show()
三、LSTM温度预测
导入包
import datetime
import time, math
import pandas as pd
import numpy as np
import matplotlib.pyplot as plt
import matplotlib as mpl
import seaborn as sns
import torch
import torch.nn as nn
import torchvision.transforms as transforms
import torchvision.models as models
import torch.nn.functional as F
from torch.utils.data import DataLoader, Dataset
from sklearn.preprocessing import MinMaxScaler, StandardScaler
from sklearn.metrics import mean_squared_error, mean_absolute_error
构建数据集
def Create_Sequences_One(data, sequence_length, slip_size):
    data_len = len(data)
    data_slip = int(slip_size * data_len)

    x = torch.zeros(data_len-sequence_length, sequence_length, 1)
    y = torch.zeros(data_len-sequence_length, 1)

    for i in range(data_len-sequence_length-1):
        x[i] = data[i:i+sequence_length].reshape(-1,1)
        y[i] = data[i+sequence_length+1]

    train_X = x[:data_slip]
    train_Y = y[:data_slip]
    valid_X = x[data_slip:]
    valid_Y = y[data_slip:]

    return train_X, train_Y, valid_X, valid_Y

class CreateDataset(Dataset):
    def __init__(self, x, y):
        self.x = x
        self.y = y

    def __len__(self):
        return len(self.x)

    def __getitem__(self, index):
        X = self.x[index]
        Y = self.y[index]
        return X, Y

def DataLoaders(batch_size, train_x, train_y, valid_x, valid_y):
    train_Set = CreateDataset(train_x, train_y)
    valid_Set = CreateDataset(valid_x, valid_y)
    train_Loader = DataLoader(train_Set, batch_size=batch_size, shuffle=False)
    valid_Loader = DataLoader(valid_Set, batch_size=batch_size, shuffle=False)
    return train_Loader, valid_Loader
模型
class LSTMModel(nn.Module):
    def __init__(self, input_dim, hidden_dim, num_layers, output_dim):
        super(LSTMModel, self).__init__()
        self.num_layers = num_layers
        self.hidden_dim = hidden_dim

        # 定义LSTM层
        self.lstm = nn.LSTM(input_dim, hidden_dim, num_layers, batch_first=True)

        # 输出层
        self.fc = nn.Linear(hidden_dim, output_dim)

    def forward(self, x):
        # 初始化LSTM隐藏状态
        h0 = torch.zeros(self.num_layers, x.size(0), self.hidden_dim).to(x.device)
        c0 = torch.zeros(self.num_layers, x.size(0), self.hidden_dim).to(x.device)

        # 前向传播
        out, _ = self.lstm(x, (h0, c0))

        # 只需要最后一个时间步的输出
        out = self.fc(out[:, -1, :])
        return out
训练
def train_model(model, train_loader, valid_loader, loss_fn, optimizer, num_epochs, device):
    train_losses = []
    valid_losses = []
    train_mse = []
    valid_mse = []
    train_rmse = []
    valid_rmse = []
    train_mae = []
    valid_mae = []
    for epoch in range(num_epochs):
        # 训练模式
        model.train()
        train_loss = 0.0
        train_predictions = []  # 存储训练集的预测值
        train_targets = []  # 存储训练集的目标值
        for inputs, targets in train_loader:
            inputs, targets = inputs.to(device), targets.to(device)
            optimizer.zero_grad()
            outputs = model(inputs)
            loss = loss_fn(outputs, targets)
            loss.backward()
            optimizer.step()
            train_loss += loss.item()
            train_predictions.extend(outputs.cpu().detach().numpy())  # 将预测值添加到列表中
            train_targets.extend(targets.cpu().numpy())  # 将目标值添加到列表中
        # train_predictions = scaler.inverse_transform(np.array(train_predictions).reshape(-1, 1))
        # train_targets = scaler.inverse_transform(np.array(train_targets).reshape(-1, 1))
        # 验证模式
        model.eval()
        valid_loss = 0.0
        valid_predictions = []  # 存储验证集的预测值
        valid_targets = []  # 存储验证集的目标值
        with torch.no_grad():
            for inputs, targets in valid_loader:
                inputs, targets = inputs.to(device), targets.to(device)
                outputs = model(inputs)
                loss = loss_fn(outputs, targets)
                valid_loss += loss.item()
                valid_predictions.extend(outputs.cpu().numpy())  # 将预测值添加到列表中
                valid_targets.extend(targets.cpu().numpy())  # 将目标值添加到列表中
        # valid_predictions = scaler.inverse_transform(np.array(valid_predictions).reshape(-1, 1))
        # valid_targets = scaler.inverse_transform(np.array(valid_targets).reshape(-1, 1))
        # 计算平均损失
        train_loss /= len(train_loader)
        valid_loss /= len(valid_loader)
        # 计算均方误差(MSE)
        train_mse_value = F.mse_loss(torch.tensor(train_predictions), torch.tensor(train_targets))
        valid_mse_value = F.mse_loss(torch.tensor(valid_predictions), torch.tensor(valid_targets))
        # 计算均方根误差(RMSE)和平均绝对误差(MAE)
        train_rmse_value = torch.sqrt(train_mse_value)
        valid_rmse_value = torch.sqrt(valid_mse_value)
        train_mae_value = F.l1_loss(torch.tensor(train_predictions), torch.tensor(train_targets))
        valid_mae_value = F.l1_loss(torch.tensor(valid_predictions), torch.tensor(valid_targets))
        # 记录损失和精度评价指标
        train_losses.append(train_loss)
        valid_losses.append(valid_loss)
        train_mse.append(train_mse_value.item())
        valid_mse.append(valid_mse_value.item())
        train_rmse.append(train_rmse_value.item())
        valid_rmse.append(valid_rmse_value.item())
        train_mae.append(train_mae_value.item())
        valid_mae.append(valid_mae_value.item())

        print(f"Epoch [{epoch+1}/{num_epochs}] - Train Loss: {train_loss:.4f}, Valid Loss: {valid_loss:.4f}")

    return train_losses, valid_losses, train_mse, valid_mse, train_rmse, valid_rmse, train_mae, valid_mae
预测值与真实值对比
def predict_plot(model, test_loader, scaler, device):
    model.eval()
    predictions = []
    true_values = []
    with torch.no_grad():
        for inputs, targets in test_loader:
            inputs = inputs.to(device)
            outputs = model(inputs)
            predictions.extend(outputs.cpu().numpy())
            true_values.extend(targets.cpu().numpy())
    # 反向缩放预测值和真实值
    predicted_values = scaler.inverse_transform(np.array(predictions).reshape(-1, 1))
    true_values = scaler.inverse_transform(np.array(true_values).reshape(-1, 1))
    # 绘制对比图
    plt.figure(figsize=(10, 5))
    plt.plot(true_values, label='True Values', color='blue', lw=0.6)
    plt.plot(predicted_values, label='Predicted Values', color='red', lw=0.6)
    plt.xlabel('Time')
    plt.ylabel('Value')
    plt.legend()
    plt.grid(True)
    plt.title('True vs. Predicted Values')
    plt.show()

    plt.figure(figsize=(10, 5))
    plt.plot(true_values[:100], label='True Values', color='blue')
    plt.plot(predicted_values[:100], label='Predicted Values', color='red')
    plt.legend()
    plt.xlabel('Time')
    plt.ylabel('Value')
    plt.grid(True)
    plt.title('Predicted vs Valid(tail 100)')
    plt.show()

    plt.figure(figsize=(10, 5))
    plt.plot(true_values[len(true_values)-100:], label='True Values', color='blue')
    plt.plot(predicted_values[len(predicted_values)-100:], label='Predicted Values', color='red')
    plt.legend()
    plt.xlabel('Time')
    plt.ylabel('Value')
    plt.grid(True)
    plt.title('Predicted vs Valid(head 100)')
    plt.show()
实验
# 预处理
city = "chengdu"
file = f"weather_{city}.csv"
data = pd.read_csv(file, encoding='gbk')#读取历史天气数据
data['maxTem'] = data['maxTem'].str.replace('℃','').astype(np.float64)  # replace方法替换

scaler = MinMaxScaler(feature_range=(0,1))  # 缩放尺度
data['maxTem'] = scaler.fit_transform(data['maxTem'].values.reshape(-1,1))  # 对所有列进行拟合和转换,必须先用fit_transform(trainData),之后再transform(testData)

# 转tensor
datat = np.array(data['maxTem'])
datat = torch.tensor(datat)
# 创建模型对象
input_dim = 1  # 输入特征维度
hidden_dim = 256  # LSTM隐藏层维度
num_layers = 3  # LSTM层数
output_dim = 1  # 输出维度
lr = 0.0001  # 学习率
device = torch.device("cuda" if torch.cuda.is_available() else "cpu")  # 计算位置
model = LSTMModel(input_dim, hidden_dim, num_layers, output_dim).to(device)  # 初始化模型
lossF = nn.MSELoss()  # 定义损失函数
optimizer = torch.optim.Adam(model.parameters(), lr=lr)  # 定义优化器
batch_size=64  # 数据批量
seq_length = 10  # 数据步长
train_x, train_y, valid_x, valid_y = Create_Sequences_One(datat,seq_length,0.8)
train_loader, valid_loader = DataLoaders(batch_size, train_x, train_y, valid_x, valid_y)
%%time
# 调用训练函数
num_epochs = 40  # 设置训练的轮数
train_losses, valid_losses, train_mse, valid_mse, train_rmse, valid_rmse, train_mae, valid_mae = train_model(
    model, train_loader, valid_loader, lossF, optimizer, num_epochs, device)
结果
plt.figure(figsize=(10, 5))
plt.plot(train_losses, label='Training', color='red')
plt.plot(valid_losses, label='Validation', color='blue')
plt.xlabel('Epoch')
plt.ylabel('Loss')
plt.legend()
plt.grid(True)
plt.title('Training vs Validation')
plt.show()
predict_plot(model, valid_loader, scaler, device)
# 训练
plt.figure(figsize=(10, 5))
plt.plot(train_mse, label='MSE', color='blue')
plt.plot(train_rmse, label='RMSE', color='green')
plt.plot(train_mae, label='MAE', color='orange')
plt.xlabel('Epoch')
plt.ylabel('Result')
plt.legend()
plt.grid(True)
plt.title('Training')
plt.show()

# 测试
plt.figure(figsize=(10, 5))
plt.plot(valid_mse, label='MSE', color='blue')
plt.plot(valid_rmse, label='RMSE', color='green')
plt.plot(valid_mae, label='MAE', color='orange')
plt.xlabel('Epoch')
plt.ylabel('Result')
plt.legend()
plt.grid(True)
plt.title('Validation')
plt.show()
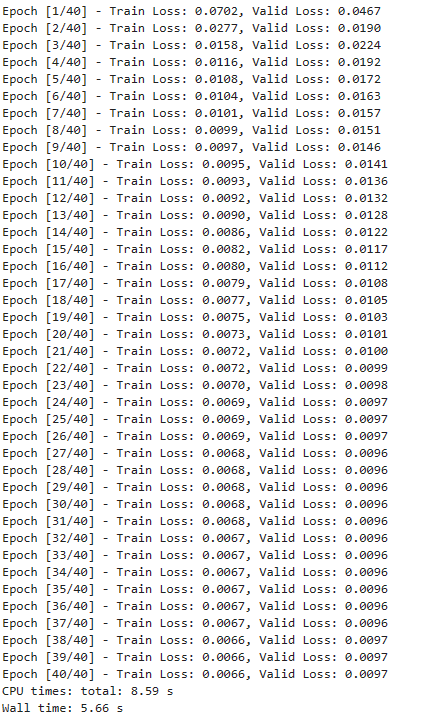
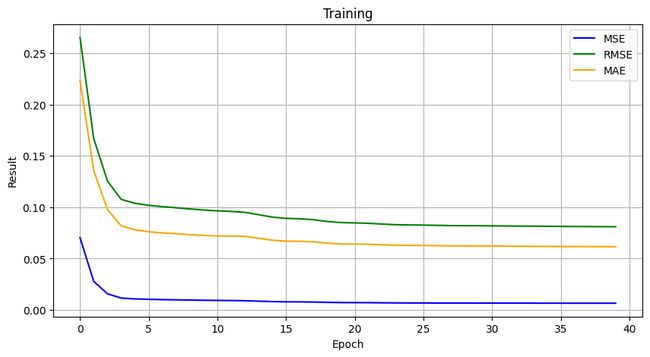
- 模型训练过程中,loss随迭代次数的增加而减少,说明我们的模型正在逐步学习并改进其预测能力。
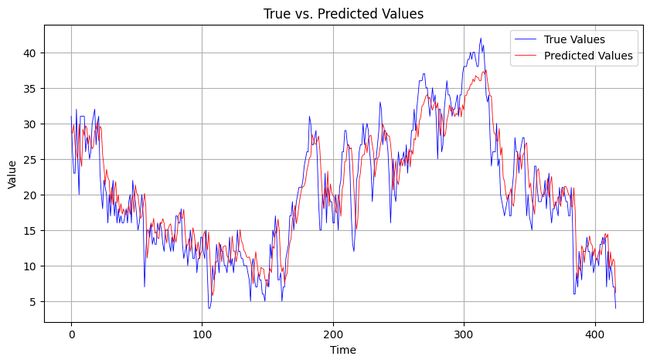
- 在验证集上,训练的模型可以预测出温度的大致趋势,但是放大细节可以看到,预测结果有一定的前置,但是我将模型的最后一步预测结果作为输出值,应该不会存在这样的问题,后续还需要再完善。
- 模型没有进行参数调优,只选择了常用的参数推荐,使用本文章代码还需要根据任务做调整。


