Zygote的启动流程
在zygote进程对应的文件是app_main.cpp文件,在app_main.cpp文件的main()方法中先解析了init.rc中配置的参数并根据配置的参数设置zygote的状态。
在状态设置阶段主要做了:
- 设置进程名称为zygote
- 通过startSystemServer = true标示启动的是systemServer
- 调用runtime.start()方法
............
 if (zygote) {
336          runtime.start("com.android.internal.os.ZygoteInit", args, zygote);
337      } else if (className) {
338          runtime.start("com.android.internal.os.RuntimeInit", args, zygote);
339      } else {
340          fprintf(stderr, "Error: no class name or --zygote supplied.\n");
341          app_usage();
342          LOG_ALWAYS_FATAL("app_process: no class name or --zygote supplied.");
343      }
然后调用runtime.start()方法。runtime的类型是由AndroidRuntime派生类AppRunTime,start()方法定义在AndroidRunTime类中。在启动zygote进程是start()方法接受的第一参数是com.android.internal.os.ZygoteInit,这个参数很重要。下面看一下AndroidRuntime——>start()方法的实现:
void AndroidRuntime::start(const char* className, const Vector& options, bool zygote)
1137  {
1138      ALOGD(">>>>>> START %s uid %d <<<<<<\n",
1139              className != NULL ? className : "(unknown)", getuid());
1140
1141      static const String8 startSystemServer("start-system-server");
1142      // Whether this is the primary zygote, meaning the zygote which will fork system server.
1143      bool primary_zygote = false;
1144
1145      /*
1146       * 'startSystemServer == true' means runtime is obsolete and not run from
1147       * init.rc anymore, so we print out the boot start event here.
1148       */
1149      for (size_t i = 0; i < options.size(); ++i) {
1150          if (options[i] == startSystemServer) {
1151              primary_zygote = true;
1152             /* track our progress through the boot sequence */
1153             const int LOG_BOOT_PROGRESS_START = 3000;
1154             LOG_EVENT_LONG(LOG_BOOT_PROGRESS_START,  ns2ms(systemTime(SYSTEM_TIME_MONOTONIC)));
1155          }
1156      }
1157
1158      const char* rootDir = getenv("ANDROID_ROOT");
1159      if (rootDir == NULL) {
1160          rootDir = "/system";
1161          if (!hasDir("/system")) {
1162              LOG_FATAL("No root directory specified, and /system does not exist.");
1163              return;
1164          }
1165          setenv("ANDROID_ROOT", rootDir, 1);
1166      }
1167
1168      const char* artRootDir = getenv("ANDROID_ART_ROOT");
1169      if (artRootDir == NULL) {
1170          LOG_FATAL("No ART directory specified with ANDROID_ART_ROOT environment variable.");
1171          return;
1172      }
1173
1174      const char* i18nRootDir = getenv("ANDROID_I18N_ROOT");
1175      if (i18nRootDir == NULL) {
1176          LOG_FATAL("No runtime directory specified with ANDROID_I18N_ROOT environment variable.");
1177          return;
1178      }
1179
1180      const char* tzdataRootDir = getenv("ANDROID_TZDATA_ROOT");
1181      if (tzdataRootDir == NULL) {
1182          LOG_FATAL("No tz data directory specified with ANDROID_TZDATA_ROOT environment variable.");
1183          return;
1184      }
1185
1186      //const char* kernelHack = getenv("LD_ASSUME_KERNEL");
1187      //ALOGD("Found LD_ASSUME_KERNEL='%s'\n", kernelHack);
1188
1189      /* start the virtual machine */
1190      JniInvocation jni_invocation;
1191      jni_invocation.Init(NULL);
1192      JNIEnv* env;
1193      if (startVm(&mJavaVM, &env, zygote, primary_zygote) != 0) {
1194          return;
1195      }
1196      onVmCreated(env);
1197
1198      /*
1199       * Register android functions.
1200       */
1201      if (startReg(env) < 0) {
1202          ALOGE("Unable to register all android natives\n");
1203          return;
1204      }
1205
1206      /*
1207       * We want to call main() with a String array with arguments in it.
1208       * At present we have two arguments, the class name and an option string.
1209       * Create an array to hold them.
1210       */
1211      jclass stringClass;
1212      jobjectArray strArray;
1213      jstring classNameStr;
1214
1215      stringClass = env->FindClass("java/lang/String");
1216      assert(stringClass != NULL);
1217      strArray = env->NewObjectArray(options.size() + 1, stringClass, NULL);
1218      assert(strArray != NULL);
1219      classNameStr = env->NewStringUTF(className);
1220      assert(classNameStr != NULL);
1221      env->SetObjectArrayElement(strArray, 0, classNameStr);
1222
1223      for (size_t i = 0; i < options.size(); ++i) {
1224          jstring optionsStr = env->NewStringUTF(options.itemAt(i).string());
1225          assert(optionsStr != NULL);
1226          env->SetObjectArrayElement(strArray, i + 1, optionsStr);
1227      }
1228
1229      /*
1230       * Start VM.  This thread becomes the main thread of the VM, and will
1231       * not return until the VM exits.
1232       */
1233      char* slashClassName = toSlashClassName(className != NULL ? className : "");
1234      jclass startClass = env->FindClass(slashClassName);
1235      if (startClass == NULL) {
1236          ALOGE("JavaVM unable to locate class '%s'\n", slashClassName);
1237          /* keep going */
1238      } else {
1239          jmethodID startMeth = env->GetStaticMethodID(startClass, "main",
1240              "([Ljava/lang/String;)V");
1241          if (startMeth == NULL) {
1242              ALOGE("JavaVM unable to find main() in '%s'\n", className);
1243              /* keep going */
1244          } else {
1245              env->CallStaticVoidMethod(startClass, startMeth, strArray);
1246
1247  #if 0
1248              if (env->ExceptionCheck())
1249                  threadExitUncaughtException(env);
1250  #endif
1251          }
1252      }
1253      free(slashClassName);
1254
1255      ALOGD("Shutting down VM\n");
1256      if (mJavaVM->DetachCurrentThread() != JNI_OK)
1257          ALOGW("Warning: unable to detach main thread\n");
1258      if (mJavaVM->DestroyJavaVM() != 0)
1259          ALOGW("Warning: VM did not shut down cleanly\n");
1260  }
AndroidRuntime主要做了三件事儿:
- 调用startVM()函数启动虚拟机
- 调用startReg()函数注册jni方法
- 通过调用的方法调用com.android.internal.os.ZygoteInit类main()方法。
startVM()方法多了大量的命令参数拼接最后通过JNI_CreateJavaVM()方法创建虚拟机。
startReg()方法注册JNI方法,Android中java和Native层的交互需要通过JNI机制来完成,并且Android中大量使用JNI函数。
看下面截图方法:
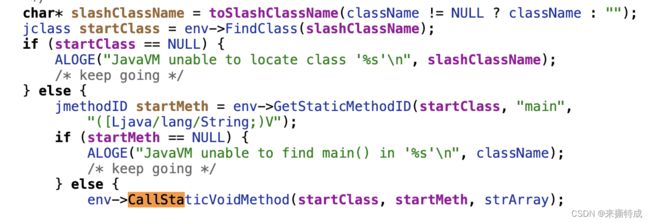 其中CallStaticVoidMethod 这个方法就是调用ZygoteInit这个类中的main方法,终于到java中了。
 public static void main(String argv[]) {
833          ZygoteServer zygoteServer = null;
834
835          // Mark zygote start. This ensures that thread creation will throw
836          // an error.
837          ZygoteHooks.startZygoteNoThreadCreation();
838
839          // Zygote goes into its own process group.
840          try {
841              Os.setpgid(0, 0);
842          } catch (ErrnoException ex) {
843              throw new RuntimeException("Failed to setpgid(0,0)", ex);
844          }
845
846          Runnable caller;
847          try {
848              // Store now for StatsLogging later.
849              final long startTime = SystemClock.elapsedRealtime();
850              final boolean isRuntimeRestarted = "1".equals(
851                      SystemProperties.get("sys.boot_completed"));
852
853              String bootTimeTag = Process.is64Bit() ? "Zygote64Timing" : "Zygote32Timing";
854              TimingsTraceLog bootTimingsTraceLog = new TimingsTraceLog(bootTimeTag,
855                      Trace.TRACE_TAG_DALVIK);
856              bootTimingsTraceLog.traceBegin("ZygoteInit");
857              RuntimeInit.preForkInit();
858
859              boolean startSystemServer = false;
860              String zygoteSocketName = "zygote";
861              String abiList = null;
862              boolean enableLazyPreload = false;
863              for (int i = 1; i < argv.length; i++) {
864                  if ("start-system-server".equals(argv[i])) {
865                      startSystemServer = true;
866                  } else if ("--enable-lazy-preload".equals(argv[i])) {
867                      enableLazyPreload = true;
868                  } else if (argv[i].startsWith(ABI_LIST_ARG)) {
869                      abiList = argv[i].substring(ABI_LIST_ARG.length());
870                  } else if (argv[i].startsWith(SOCKET_NAME_ARG)) {
871                      zygoteSocketName = argv[i].substring(SOCKET_NAME_ARG.length());
872                  } else {
873                      throw new RuntimeException("Unknown command line argument: " + argv[i]);
874                  }
875              }
876
877              final boolean isPrimaryZygote = zygoteSocketName.equals(Zygote.PRIMARY_SOCKET_NAME);
878              if (!isRuntimeRestarted) {
879                  if (isPrimaryZygote) {
880                      FrameworkStatsLog.write(FrameworkStatsLog.BOOT_TIME_EVENT_ELAPSED_TIME_REPORTED,
881                              BOOT_TIME_EVENT_ELAPSED_TIME__EVENT__ZYGOTE_INIT_START,
882                              startTime);
883                  } else if (zygoteSocketName.equals(Zygote.SECONDARY_SOCKET_NAME)) {
884                      FrameworkStatsLog.write(FrameworkStatsLog.BOOT_TIME_EVENT_ELAPSED_TIME_REPORTED,
885                              BOOT_TIME_EVENT_ELAPSED_TIME__EVENT__SECONDARY_ZYGOTE_INIT_START,
886                              startTime);
887                  }
888              }
889
890              if (abiList == null) {
891                  throw new RuntimeException("No ABI list supplied.");
892              }
893
894              // In some configurations, we avoid preloading resources and classes eagerly.
895              // In such cases, we will preload things prior to our first fork.
896              if (!enableLazyPreload) {
897                  bootTimingsTraceLog.traceBegin("ZygotePreload");
898                  EventLog.writeEvent(LOG_BOOT_PROGRESS_PRELOAD_START,
899                          SystemClock.uptimeMillis());
900                  preload(bootTimingsTraceLog);
901                  EventLog.writeEvent(LOG_BOOT_PROGRESS_PRELOAD_END,
902                          SystemClock.uptimeMillis());
903                  bootTimingsTraceLog.traceEnd(); // ZygotePreload
904              }
905
906              // Do an initial gc to clean up after startup
907              bootTimingsTraceLog.traceBegin("PostZygoteInitGC");
908              gcAndFinalize();
909              bootTimingsTraceLog.traceEnd(); // PostZygoteInitGC
910
911              bootTimingsTraceLog.traceEnd(); // ZygoteInit
912
913              Zygote.initNativeState(isPrimaryZygote);
914
915              ZygoteHooks.stopZygoteNoThreadCreation();
916
917              zygoteServer = new ZygoteServer(isPrimaryZygote);
918
919              if (startSystemServer) {
920                  Runnable r = forkSystemServer(abiList, zygoteSocketName, zygoteServer);
921
922                  // {@code r == null} in the parent (zygote) process, and {@code r != null} in the
923                  // child (system_server) process.
924                  if (r != null) {
925                      r.run();
926                      return;
927                  }
928              }
929
930              Log.i(TAG, "Accepting command socket connections");
931
932              // The select loop returns early in the child process after a fork and
933              // loops forever in the zygote.
934              caller = zygoteServer.runSelectLoop(abiList);
935          } catch (Throwable ex) {
936              Log.e(TAG, "System zygote died with exception", ex);
937              throw ex;
938          } finally {
939              if (zygoteServer != null) {
940                  zygoteServer.closeServerSocket();
941              }
942          }
943
944          // We're in the child process and have exited the select loop. Proceed to execute the
945          // command.
946          if (caller != null) {
947              caller.run();
948          }
949      }
ZygoteInit的main()方法主要做了5件事儿:
通过registerZygoteSocket()函数创建了一个Zygote的socket接口用来和AMS进行通信。
调用preload()预加载类和资源
调用startSystemServer()方法启动systemServer
调用runSelectLoop()方法监听socket接口
通过捕获一个MethodAndArgsCaller异常并调用捕获的异常的run()方法。
1.预加载 
其中画红线的部分是拷贝到我们的应用进程中的。代码如下:

preload()方法主要预先加载了framework中通用的类和资源(core/res/res/values/arrays.xml)、openGL、本地共享库、webView的一些资源。
预先加载主要是为了在启动新应用程序时不用重复加载这些资源从而加快启动速度。
2.创建Zygote Socket 服务
zygoteServer = new ZygoteServer(isPrimaryZygote);这里没有用Binder机制,
(1).binder 没有初始化完成
(2)fork写时拷贝,容易死锁
zygote的socket接口主要是通过/dev/socket/zygote文件的文件操作符进行通信。
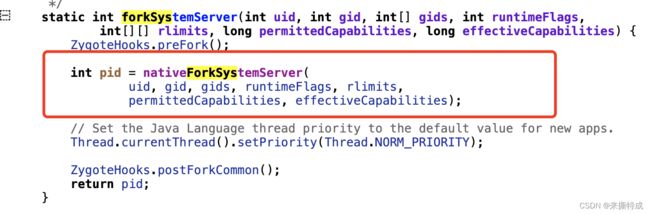
3. 然后创建 system_server进程

最终调用的事Zygote类里面的forkSystemServer方法
4. runSelectLoop,等待AMS发送消息,创建进程
