QT tcp与udp网络通信以及定时器的使用 (7)
QT tcp与udp网络通信以及定时器的使用
文章目录
- QT tcp与udp网络通信以及定时器的使用
- 1、QT网络与通信简单介绍
- 2、QT TCP通信
-
- 1、 服务器的流程
- 2、 客户端的流程
- 3、服务器的编写
- 4、客户端的编写
- 3、QT UDP通信
-
- 1、客户端流程
- 2、客户端编写
- 3、UDP广播
- 4、UDP组播
- 4、定时器的用法
-
- 1、方法一
- 2、方法2
- 2、方法3(不建议使用)
- 5、Tcp传文件
-
- 1、服务器编写
- 2、客户端编写
- 6、tcp与udp对比
- 7.总结
1、QT网络与通信简单介绍
QT5提供了一套完善的网络模块,包括了TCP、UDP、HTTP等协议的支持,可以方便地在QT应用程序中进行网络通信。通过QT5的网络模块,开发者可以实现客户端和服务器之间的数据传输、消息推送、远程控制等功能。
Qt中提供的所有的Socket类都是非阻塞的。
Qt中常用的用于socket通信的套接字类:
QTcpServer
用于TCP/IP通信, 作为服务器端套接字使用
QTcpSocket
用于TCP/IP通信,作为客户端套接字使用。
QUdpSocket
用于UDP通信,服务器,客户端均使用此套接字。
QSslSocket
用于实现安全的网络通信、
QWebSocket
用于实现WebSocket协议的通信等。
下面是继承关系:

2、QT TCP通信
TCP协议,传输控制协议(英语:Transmission Control Protocol,缩写为:TCP)是一种面向连接的、可靠的、基于字节流的通信协议。分为服务器与客户端。
1、 服务器的流程

2、 客户端的流程

总体双方的流程如下:

3、服务器的编写
完成的结果如下:客户端点击连接服务器按钮。成功连接就可以相互进行通信了。

注意,要使用QT的网络模块,需要在.pro文件中添加QT += network声明,以添加网络模块的依赖。
- 声明TCP监听套接字与通信套接字
#include - 创建QTcpServer套接字。QTcpSocket套接字在客户端成功连接时获取。此时为空。
pTcpListenSocket = new QTcpServer(this);
pTcpCommunicatSocket = nullptr;
- 监听客户端连接请求并处理
pTcpListenSocket->listen(QHostAddress::Any, 7777); /* 服务器地址和端口 */
- 获取通信套接字
/* 取出建立好的连接套接字 */
 pTcpCommunicatSocket = pTcpListenSocket->nextPendingConnection();
- 最后就可以进行发送接收数据
/* 发送给客户端数据接口 */
pTcpCommunicatSocket->write(sendData);
/* 接收客户端的数据接口 */
QByteArray arry = pTcpCommunicatSocket->readAll();
- 断开连接
pTcpClientSocket->disconnectFromHost();
pTcpClientSocket->close();
服务器整体的代码如下:
首先Ui的布局:

serveridget.h
#include serveridget.cpp
#include "serveridget.h"
#include "ui_serveridget.h"
#include 4、客户端的编写
- 声明TCP通信套接字
#include - 创建TCP通信套接字
pTcpClientSocket = new QTcpSocket(this);
- 主动与服务器建立连接
/* 主动与服务器建立连接 */
pTcpClientSocket->connectToHost(QHostAddress(ip), port);
- 读写数据
/* 发送数据给服务器 */
pTcpClientSocket->write(sendData);
/* 接收服务器的数据 */
QByteArray arry =  pTcpClientSocket->readAll();
- 断开连接
pTcpClientSocket->disconnectFromHost();
pTcpClientSocket->close();
客户端整体的代码如下:
首先Ui的布局:

客户端的创建:


clientwidget.h
#include clientwidget.cpp
#include "clientwidget.h"
#include "ui_clientwidget.h"
#include main.cpp
#include "serveridget.h"
#include "clientwidget.h"
#include 3、QT UDP通信
使用Qt提供的QUdpSocket进行UDP通信。在UDP方式下,客户端并不与服务器建立连接,它只负责调用发送函数向服务器发送数据。类似的服务器也不从客户端接收连接,只负责调用接收函数,等待来自客户端的数据的到达。
在UDP通信中,服务器端和客户端的概念已经显得有些淡化,两部分做的工作都大致相同.
1、客户端流程

创建其它的客户端也是一样的流程。
总体双方的流程如下:

2、客户端编写
注意,要使用QT的网络模块,需要在.pro文件中添加QT += network声明,以添加网络模块的依赖。
最后的效果如下:

客户端的ui界面:

- 声明UDP通信套接字
#include - 创建UDP通信套接字
pUdpSocket = new QUdpSocket(this);
- 绑定端口
pUdpSocket->bind(QHostAddress::Any,7777);
- 读写数据
/* 获取数据 */
 pUdpSocket->writeDatagram(sendData, QHostAddress(strIP), port);
/* 读取对方发送的内容 */
char buf[1024] = {0}; /* 保存对方的数据 */
QHostAddress cliAddr; /* 对方地址 */
quint16 port;    /* 对方端口 */
qint64 size = pUdpSocket->readDatagram(buf, sizeof(buf), &cliAddr, &port);
总体的代码如下:
clientwidget.h
#include clientwidget.cpp
#include "clientwidget.h"
#include "ui_clientwidget.h"
#include 例外一端是一样的。把绑定端口换一下就行。
pUdpSocket->bind(QHostAddress::Any,8888);
3、UDP广播

4、UDP组播

注意组播在绑定是IP要选择QHostAddress::AnyIPv4 并且组播是D类地址。
udpSocket->leaveMulticastGroup(QHostAddress(“224.0.0.2”)) 如果不想接收也可以退出这个组播。
4、定时器的用法
1、方法一
最后的效果:

只是简单使用两个不同的定时器。
1、定义一个QTimer对象
QTimer* timer;
timer = new QTimer(this);
- 启动定时器
timer->start(1000)
3 . 连接信号槽
当start启动定时器就会每隔设定的时间触发timeout信号
connect(timer, &QTimer::timeout,
            [=]()
            {
            /* 定时器时间到的处理 */
            }
            );
- 停止计时
timer->stop();
mywidget.h
#include mywidget.cpp
#include "mywidget.h"
#include "ui_mywidget.h"

MyWidget::MyWidget(QWidget *parent)
    : QWidget(parent)
    , ui(new Ui::MyWidget)
{
    ui->setupUi(this);
    pTime_1 = new QTimer(this);
    pTime_2 = new QTimer(this);
    i = 0;
    j = 0;
    connect(pTime_1, &QTimer::timeout,
            [=]()
            {
                i++;
                ui->lcdNumberOne->display(i);
            }

            );
    connect(pTime_2, &QTimer::timeout,
            [=]()
            {
                j++;
                ui->lcdNumberTwo->display(j);
            }

            );
}

MyWidget::~MyWidget()
{
    delete ui;
}
void MyWidget::on_pushButtonStartOne_clicked()
{
    //启动定时器
    //时间间隔为1s
    //每隔1s,定时器pTime_1自动触发timeout()
    //如果定时器没有激活,才启动
    if(pTime_1->isActive() == false)
    {
        pTime_1->start(1000);
    }
}

void MyWidget::on_pushButtonStartTwo_clicked()
{
    if(pTime_2->isActive() == false)
    {
        pTime_2->start(1000);
    }
}

void MyWidget::on_pushButtonStopOne_clicked()
{
    if(pTime_1->isActive() == true)
    {
        pTime_1->stop();
    }
}

void MyWidget::on_pushButtonStoptwo_clicked()
{
    if(pTime_2->isActive() == true)
    {
        pTime_2->stop();
    }
}
2、方法2
1、重写虚函数
void timerEvent(QTimerEvent* e);
2、启动定时器
/* 返回定时器的Id 并且是唯一的 就是区分不同定时器 */
timeId_1 = startTimer(1000);
- 定时器时间到进入timerEvent事件
void MyWidget::timerEvent(QTimerEvent *e)
{
    static int i = 0;
    static int j = 0;
    if (e->timerId() == timeId_1) {
        ui->lcdNumberOne->display(++i);
    } else if (e->timerId()== timeId_2) {
        ui->lcdNumberTwo->display(++j);
    }
}
- 关闭定时器
killTimer(timeId_1);
mywidget.h
#include mywidget.cpp
#include "mywidget.h"
#include "ui_mywidget.h"

MyWidget::MyWidget(QWidget *parent)
    : QWidget(parent)
    , ui(new Ui::MyWidget)
{
    ui->setupUi(this);

}

MyWidget::~MyWidget()
{
    delete ui;
}

void MyWidget::timerEvent(QTimerEvent *e)
{
    static int i = 0;
    static int j = 0;
    if (e->timerId() == timeId_1) {
        ui->lcdNumberOne->display(++i);
    } else if (e->timerId()== timeId_2) {
        ui->lcdNumberTwo->display(++j);
    }
}

void MyWidget::on_pushButtonStartOne_clicked()
{
    //启动定时器
    //时间间隔为1000ms
    //每隔1s,进入timerEvent事件
    timeId_1 = startTimer(1000);
}


void MyWidget::on_pushButtonStartTwo_clicked()
{
    timeId_2 = startTimer(4000);
}


void MyWidget::on_pushButtonStopOne_clicked()
{
    killTimer(timeId_1);
}


void MyWidget::on_pushButtonStoptwo_clicked()
{
    killTimer(timeId_2);
}
2、方法3(不建议使用)
singleShot静态函数
原型:void QTimer::singleShot(int msec, const QObject *receiver, const char *member)
解释:这个静态函数在一个给定时间间隔 msec(毫秒) 之后调用一个槽。
只调一次:
假设类A有个槽函数 function() { }
我们要在1s之后执行它
QTimer::singleShot(1000,this, &A::function())
实现循环:
槽函数中还是singleShot 即:
这样的话就是一个每1秒执行一次的定时器
bool condition = true;
function(){
    if(condition){  //条件控制
        QTimer::singleShot(1000,this, &A::function());
    }
}
5、Tcp传文件
具体的流程图如下:
 最终的效果如下:

注意,要使用QT的网络模块,需要在.pro文件中添加QT += network声明,以添加网络模块的依赖。
1、服务器编写
服务器ui的设计:

serverwidget.h
#include serverwidget.cpp
#include "serverwidget.h"
#include "ui_serverwidget.h"
#include 2、客户端编写
客户端ui的设计:

功能:当客户端与服务器成功连接后。服务器选择发送一个文件给客户端。
clientwidget.h
#include clientwidget.cpp
#include "clientwidget.h"
#include "ui_clientwidget.h"
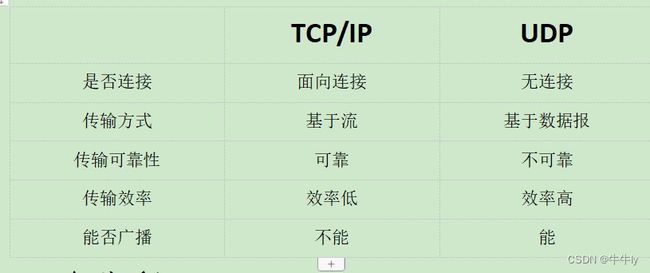
//#include 6、tcp与udp对比
7.总结
以上就是今天要讲的内容,本文简单介绍了QT的Tcp与udp网络通信。tcp传输文件的案列。以及定时器的多种用法