Android应用启动优化:一种DelayLoad的实现和原理
上一篇文章我们使用第三种方法来实现延迟加载。不过上一篇写的比较简单,只是讲解了如何去实现,这一篇就来讲一下为何要这么做,以及这么做后面的原理。
其中会涉及到一些 Android 中的比较重要的类,以及 Activity 生命周期中比较重要的几个函数。
其实这个其中的原理比较简单,不过要弄清楚其实现的过程,还是一件蛮好玩的事情,其中会用到一些工具,自己加调试代码等,一步一步下来,自己对 Activity 的启动的理解又深了一层,希望大家读完之后也会对大家有一定的帮助。
上一篇中我们最终使用的 DelayLoad 的核心方法是在 Activity 的 onCreate 函数中加入下面的方法 :
getWindow().getDecorView().post(new Runnable() {
    @Override
    public void run() {
        myHandler.post(mLoadingRunnable);
    }

});
我们一一来看涉及到的类和方法
1. Activity.getWindow 及 PhoneWindow 的初始化时机
Activity 的 getWindow 方法获取到的是一个 PhoneWindow 对象:
public Window getWindow() {
    return mWindow;
}
这个 mWindow 就是一个 PhoneWindow 对象,其初始化的时机为这个 Activity attach 的时候:
final void attach(Context context, ActivityThread aThread,
    Instrumentation instr, IBinder token, int ident,
    Application application, Intent intent, ActivityInfo info,
    CharSequence title, Activity parent, String id,
    NonConfigurationInstances lastNonConfigurationInstances,
    Configuration config, String referrer, IVoiceInteractor voiceInteractor) {
        attachBaseContext(context);
        mFragments.attachActivity(this, mContainer, null);
        mWindow = PolicyManager.makeNewWindow(this);
        mWindow.setCallback(this);
        mWindow.setOnWindowDismissedCallback(this);
        mWindow.getLayoutInflater().setPrivateFactory(this);

        ........
        // PolicyManager.makeNewWindow(this) 最终会调用 Policy 的 makeNewWindow 方法
        public Window makeNewWindow(Context context) {
            return new PhoneWindow(context);
        }
}
总结:这里需要注意 Activity 的 attach 方法很早就会调用的,是要早于 Activity 的 onCreate 方法的。
- PhoneWindow 与 Activity 是一对一的关系,通过上面的初始化过程你应该更加清楚这个概念
- Android 中对 PhoneWindow 的注释是 :Android-specific Window ,可见其重要性
- PhoneWindow 中有很多大家比较熟悉的方法,比如 setContentView / addContentView 等 ; 也有几个重要的内部类,比如:DecorView ;
2. PhoneWindow.getDecorView 及 DecorView 的初始化时机
上面我们说到 DecorView是 PhoneWindow 的一个内部类,其定义如下:
private final class DecorView extends FrameLayout implements RootViewSurfaceTaker
那么 DecorView 是什么时候初始化的呢?DecorView 是在 Activity 的父类的 onCreate 方法中被初始化的,比如我例子中的 MainActivity 是继承自 android.support.v7.app.AppCompatActivity ,当我们调用 MainActivity 的 super.onCreate(savedInstanceState); 的时候,就会调用下面的
protected void onCreate(@Nullable Bundle savedInstanceState) {
    getDelegate().installViewFactory();
    getDelegate().onCreate(savedInstanceState);
    super.onCreate(savedInstanceState);
}
由于我们导入的是 support.v7 包里面的AppCompatActivity, getDelegate() 得到的就是AppCompatDelegateImplV7 ,其 onCreate 方法如下:
public void onCreate(Bundle savedInstanceState) {
    super.onCreate(savedInstanceState);
    mWindowDecor = (ViewGroup) mWindow.getDecorView();
    ......
}
就是这里的 mWindow.getDecorView() ,对 DecorView 进行了实例化:
public final View getDecorView() {
    if (mDecor == null) {
        installDecor();
    }
    return mDecor;
}
第一次调用 getDecorView 的时候,会进入 installDecor 方法,这个方法对 DecorView 进行了一系列的初始化 ,其中比较重要的几个方法有:generateDecor / generateLayout 等,generateLayout 会从当前的 Activity 的 Theme 提取相关的属性,设置给 Window,同时还会初始化一个 startingView,添加到 DecorView上,也就是我们所说的 startingWindow。
总结
- Decor 有装饰的意思,DecorView 官方注释为 “This is the top-level view of the window, containing the window decor” , 我们可以理解为 DecorView 是我们当前 Activity 的最下面的布局。所以我们打开 DDMS 查看 Tree Overview 的时候,可以发现最根部的那个 View 就是 DecorView:


- 应用从桌面启动的时候,在主 Activity 还没有显示的时候,如果主题没有设置窗口的背景,那么我们就会看到白色(这个和手机的Rom也有关系),如果应用启动很慢,那么用户得看好一会白色。如果要避免这个,则可以在 Application 或者 Activity 的 Theme 中设置 WindowBackground , 这样就可以避免白色(当然现在各种大厂都是SplashActivity+广告我也是可以理解的)
3. Post
当我们调用 DecorView 的 Post 的时候,其实最终会调用 View 的 Post ,因为 DecorView 最终是继承 View 的:
public boolean post(Runnable action) {
    final AttachInfo attachInfo = mAttachInfo;
    if (attachInfo != null) {
        return attachInfo.mHandler.post(action);
    }
    // Assume that post will succeed later
    ViewRootImpl.getRunQueue().post(action);
    return true;
}
注意这里的 mAttachInfo ,我们调用 post 是在 Activity 的 onCreate 中调用的,那么此时 mAttachInfo 是否为空呢?答案是 mAttachInfo 此时为空。
这里有一个点就是 Activity 的各个回调函数都是干嘛的?是不是平时自己写应用的时候,貌似在 onCreate 里面搞定一切就OK了, onResume ? onStart?没怎么涉及到嘛,其实不然。
onCreate 顾名思义就是 Create ,我们在前面看到,Activity 的 onCreate 函数做了很多初始化的操作,包括 PhoneWindow/DecorView/StartingView/setContentView等,但是 onCreate 只是初始化了这些对象.
真正要设置为显示则在 Resume 的时候,不过这些对开发者是透明了,具体可以看 ActivityThread 的 handleResumeActivity 函数,handleResumeActivity 中除了调用 Activity 的 onResume 回调之外,还初始化了几个比较重要的类:ViewRootImpl / ThreadedRenderer。
ActivityThread.handleResumeActivity:
if (r.window == null && !a.mFinished && willBeVisible) {
    r.window = r.activity.getWindow();
    View decor = r.window.getDecorView();
    decor.setVisibility(View.INVISIBLE);
    ViewManager wm = a.getWindowManager();
    WindowManager.LayoutParams l = r.window.getAttributes();
    a.mDecor = decor;
    l.type = WindowManager.LayoutParams.TYPE_BASE_APPLICATION;
    l.softInputMode |= forwardBit;
    if (a.mVisibleFromClient) {
        a.mWindowAdded = true;
        wm.addView(decor, l);
    }
}
主要是 wm.addView(decor, l); 这句,将 decorView 与 WindowManagerImpl联系起来,这句最终会调用到 WindowManagerGlobal 的 addView 函数,
public void addView(View view, ViewGroup.LayoutParams params,
    Display display, Window parentWindow) {
        ......
        ViewRootImpl root;
        View panelParentView = null;
        ......
        root = new ViewRootImpl(view.getContext(), display);
        view.setLayoutParams(wparams);
        mViews.add(view);
        mRoots.add(root);
        mParams.add(wparams);

    // do this last because it fires off messages to start doing things
    try {
        root.setView(view, wparams, panelParentView);
    } catch (RuntimeException e) {
        ......
    }
}
我们知道 ViewRootImpl 是 View 系统的一个核心类,其定义如下:
public final class ViewRootImpl implements ViewParent,

View.AttachInfo.Callbacks, HardwareRenderer.HardwareDrawCallbacks
ViewRootImpl 初始化的时候会对 AttachInfo 进行初始化,这就是为什么之前的在 onCreate 的时候 attachInfo 为空。ViewRootImpl 里面有很多我们比较熟悉也非常重要的方法,比如 performTraversals / performLayout / performMeasure / performDraw / draw 等。
我们继续 addView 中的root.setView(view, wparams, panelParentView); 传入的 view 为 decorView,root 为 ViewRootImpl ,这个函数中将 ViewRootImpl 的mView 变量 设置为传入的view,也就是 decorView。
这样来看,ViewRootImpl 与 DecorView 的关系我们也清楚了。
扯了一圈,我们再回到大标题的 Post 函数上,前面有说这个 Post 走的是 View 的Post 函数,由于 在 onCreate 的时候 attachInfo 为空,所以会走下面的分支:ViewRootImpl.getRunQueue().post(action);
注意这里的 getRunQueue 得到的并不是 Looper 里面的那个 MessageQueue,而是由 ViewRootImpl 维持的一个 RunQueue 对象,其核心为一个 ArrayList :
private final ArrayList mActions = new ArrayList();

void post(Runnable action) {
    postDelayed(action, 0);
}

void postDelayed(Runnable action, long delayMillis) {
    HandlerAction handlerAction = new HandlerAction();
    handlerAction.action = action;
    handlerAction.delay = delayMillis;
    synchronized (mActions) {
        mActions.add(handlerAction);
    }
}

void executeActions(Handler handler) {
    synchronized (mActions) {
        final ArrayList actions = mActions;
        final int count = actions.size();
        for (int i = 0; i < count; i++) {
            final HandlerAction handlerAction = actions.get(i);
            handler.postDelayed(handlerAction.action, handlerAction.delay);
        }
        actions.clear();
    }
}
当我们执行了 Post 之后 ,其实只是把 Runnable 封装成一个 HandlerAction 对象存入到 ArrayList 中,当执行到 executeActions 方法的时候,将存在这里的 HandlerAction 再通过 executeActions 方法传入的 Handler 对象重新进行 Post。
那么 executeActions 方法是什么时候执行的呢?传入的 Handler 又是哪个 Handler 呢?
4. PerformTraversals
我们之前讲过,ViewRootImpl 的 performTraversals 方法是一个很核心的方法,每一帧绘制都会走一遍,调用各种 measure / layout / draw 等 ,最终将要显示的数据交给 hwui 去进行绘制。
我们上一节讲到的 executeActions ,就是在 performTraversals 中执行的:
// Execute enqueued actions on every traversal in case a detached view enqueued an action
getRunQueue().executeActions(mAttachInfo.mHandler);
可以看到这里传入的 Handler 是 mAttachInfo.mHandler ,上一节讲到 mAttachInfo 是在 ViewRootImpl 初始化的时候一起初始化的:
mAttachInfo = new View.AttachInfo(mWindowSession, mWindow, display, this, mHandler, this);
这里的 mHandler 是一个 ViewRootHandler 对象:
final class ViewRootHandler extends Handler{
    ......
}
......
final ViewRootHandler mHandler = new ViewRootHandler();
我们注意到 ViewRootHandler 在创建的时候并没有传入一个 Looper 对象,这意味着此 ViewRootHandler 的 Looper 就是 mainLooper。
这下我们就清楚了,我们在 onCreate 中 Post 的 runnable 对象,最终还是在第一个 performTraversals 方法执行的时候,加入到了 MainLooper 的 MessageQueue 里面了。
绕了一圈终于我们终于把文章最前面的那句话解释清楚了,当然中间还有很多的废话,不过我估计能耐着性子看到这里的人会很少,所以如果你看到了这里,可以在底下的评论里面将 index ++ ;这里 index = 0 ;就是看看几个人是真正认真看了这篇文章的。
5. UpdateText
接着 performTraversals 我们继续说,话说在第一篇文章 我们有讲到,Activity 在启动时,会在第二次执行 performTraversals 才会去真正的绘制,原因在于第一次执行 performTraversals 的时候,会走到 Egl 初始化的逻辑,然后会重新执行一次 performTraversals 。
所以前一篇文章的评论区有人问为何在 run 方法里面还要 post 一次,如果在 run 方法里面直接执行 updateText 方法 ,那么 updateText 就会在第一个 performTraversals 之后就执行,而不是在第一帧绘制完成后才去执行,所以我们又 Post 了一次 。所以大概的处理步骤如下:
第一步:Activity.onCreate –> Activity.onStart –> Activity.onResume
第二步:ViewRootImpl.performTraversals –>Runnable
第三步:Runnable –> ViewRootImpl.performTraversals
第四步:ViewRootImpl.performTraversals –> UpdateText
第五步:UpdateText
6. 总结
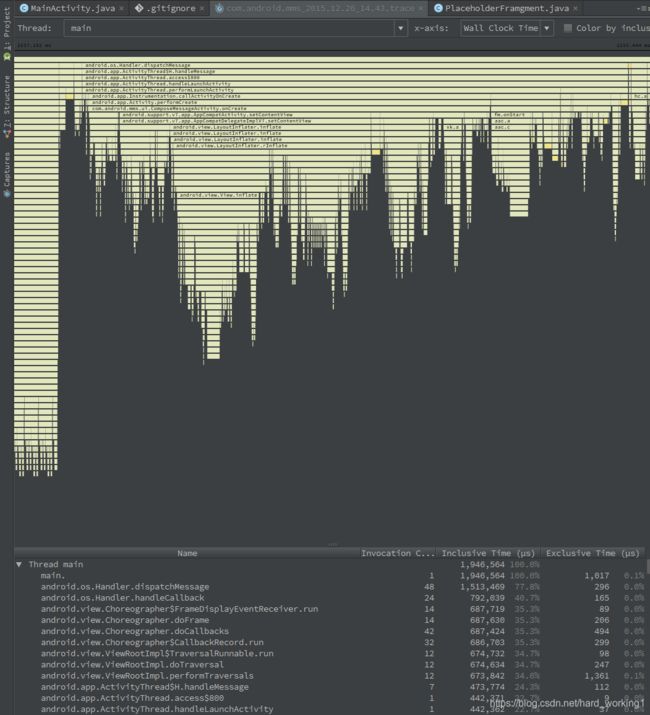
其实一路跟下来发现其实原理很简单,其实 DelayLoad 其实只是一个很小的点,关键是教大家如何去跟踪一个自己不认识的知识点或者优化,这里面主要用到了两个工具:Systrace 和 Method Trace, 以及源码编译和调试。
关于 Systrace 和 Method Trace 的使用,之后会有详细的文章去介绍,这两个工具非常有助于理解源码和一些技术的实现。
Systrace
Method Trace
源码编译与调试
应用级别调试
Systrace并不会追踪应用的所有工作,所以你可以在有需求的情况下自己添加要追踪的代码部分。在Android 4.3及以上的代码中,你可以通过 Trace 类来实现这个功能。它能够让你在任何时候跟踪应用的一举一动。在你获取trace的过程中, Trace.beginSection() 与 Trace.endSection() 之间代码工作会一直被追踪。
下面这部分代码展示了使用 Trace 的例子,在整个方法中含有两个Trace块。
public void ProcessPeople() {
    Trace.beginSection("ProcessPeople");
    try {
        Trace.beginSection("Processing Jane");
        try {
           // 待追踪的代码
        } finally {
            Trace.endSection(); // 结束 "Processing Jane"
        }

        Trace.beginSection("Processing John");
        try {
            // 待追踪的代码
        } finally {
            Trace.endSection(); // 结束 "Processing John"
        }
    } finally {
        Trace.endSection(); // 结束 "ProcessPeople"
    }
} void ProcessPeople() {
    Trace.beginSection("ProcessPeople");
    try {
        Trace.beginSection("Processing Jane");
        try {
           // 待追踪的代码
        } finally {
            Trace.endSection(); // 结束 "Processing Jane"
        }

        Trace.beginSection("Processing John");
        try {
            // 待追踪的代码
        } finally {
            Trace.endSection(); // 结束 "Processing John"
        }
    } finally {
        Trace.endSection(); // 结束 "ProcessPeople"
    }
}publicvoidProcessPeople(){
Trace.beginSection("ProcessPeople");
try{
Trace.beginSection("Processing Jane");
try{
// 待追踪的代码
}finally{
Trace.endSection();// 结束 "Processing Jane"
}
Trace.beginSection("Processing John");
try{
// 待追踪的代码
}finally{
Trace.endSection();// 结束 "Processing John"
}
}finally{
Trace.endSection();// 结束 "ProcessPeople"
}
}
(){
Trace.beginSection("ProcessPeople");
try{
Trace.beginSection("Processing Jane");
try{
// 待追踪的代码
}finally{
Trace.endSection();// 结束 "Processing Jane"
}
Trace.beginSection("Processing John");
try{
// 待追踪的代码
}finally{
Trace.endSection();// 结束 "Processing John"
}
}finally{
Trace.endSection();// 结束 "ProcessPeople"
}
}
注意:在Trace是被嵌套在另一个Trace中的时候, endSection() 方法只会结束理它最近的一个 beginSection(String) 。即在一个Trace的过程中是无法中断其他Trace的。所以你要保证 endSection() 与 beginSection(String) 调用次数匹配。
注意:Trace的begin与end必须在同一线程之中执行!
当你使用应用级别追踪的时候,你必须通过 -a 或者 -app= 来显式地指定应用包名。可以通过 Systrace指南 查看更多关于它的信息。
// 测试源码
public class MainActivity extends AppCompatActivity {
private static final int DELAY_TIME = 50;
private ImageView mImageOne, mImageTwo, mImageThree;
private TextView mTextOne, mTextTwo, mTextThree;
private Handler mHandler = new Handler();
private Runnable mLoadingRunnable = new Runnable() { // 匿名内部类对象,可能会造成内存泄露
@Override
public void run() {
updateText();
}
};
private void updateText() {
TraceCompat.beginSection("updateText");
mTextOne.setText("imageOne : w = " + mImageOne.getWidth() + " , h = " + mImageOne.getHeight());
mTextTwo.setText("imageTwo : w = " + mImageTwo.getWidth() + " , h = " + mImageTwo.getHeight());
mTextThree.setText("imageThree : w = " + mImageThree.getWidth() + " , h = " + mImageThree.getHeight());
TraceCompat.endSection();
}
@Override
protected void onCreate(Bundle savedInstanceState) {
super.onCreate(savedInstanceState);
setContentView(R.layout.activity_main);
initViews();
}
private void initViews() {
mImageOne = findView(R.id.image_one);
mImageTwo = findView(R.id.image_two);
mImageThree = findView(R.id.image_three);
mTextOne = findView(R.id.text_one);
mTextTwo = findView(R.id.text_two);
mTextThree = findView(R.id.text_three);
// 第一种写法: 直接post
// mHandler.post(mLoadingRunnable);
// 第二种写法: 直接postDelayed(mLoadingRunning, DELAY_TIME)
mHandler.postDelayed(mLoadingRunnable, DELAY_TIME);
// // 第三种写法: 优化的DelayLoad
// getWindow().getDecorView().post(new Runnable() {
// @Override
// public void run() {
// mHandler.post(mLoadingRunnable);
// }
// });
getMainLooper().dump(new Printer() {
@Override
public void println(String x) {
Log.i("@@@", x);
}
}, "onCreate");
}
private
return (T)findViewById(resId);
}
}
第一种情况:updateText()的执行时机
第二种情况:updateText()的执行时机(延时50ms)
第二种情况:updateText()的执行时机(延时300ms)
第三种情况:updateText()的执行时机
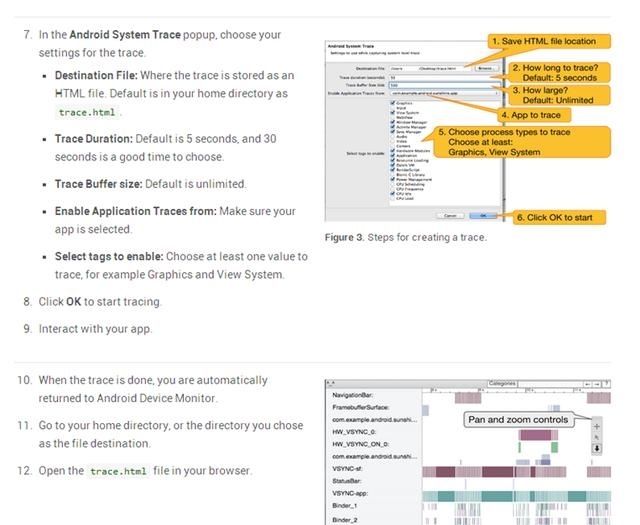
使用方法:
方法二:使用android studio—Android Device Monitor—systrace。详细解释如下:
下面是设置界面的介绍:
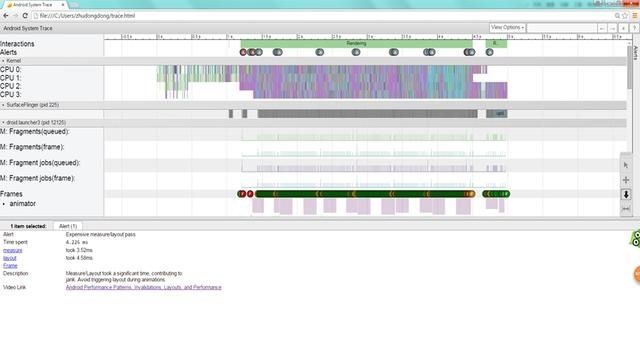
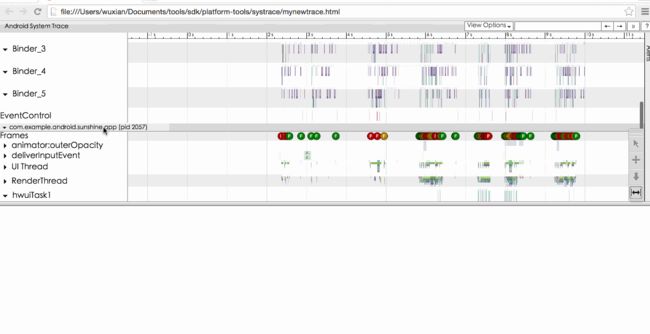
通过工具抓取的数据用浏览器打开后显示如下:
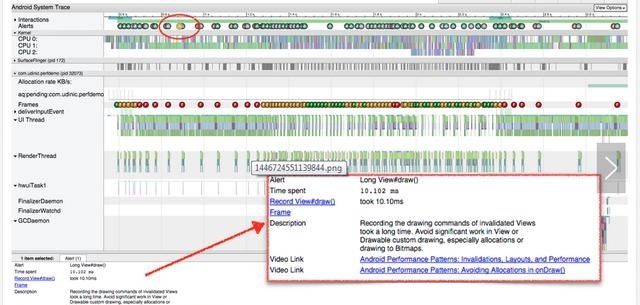
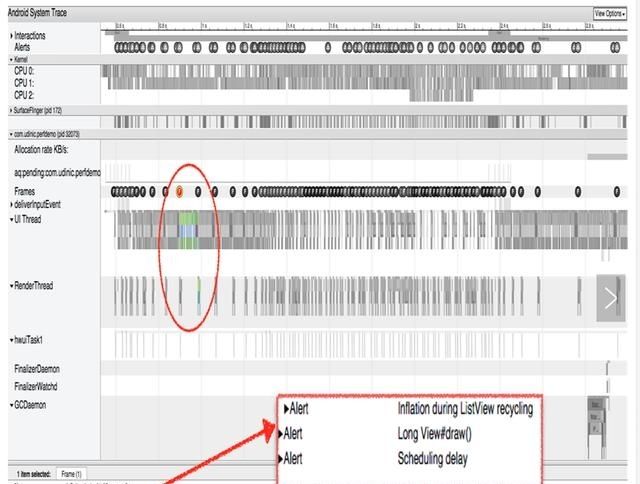
这个警告指出了,有一个View#draw()方法执行了比较长的时间。我们可以在下面看到问题的描述,链接,甚至是相关的视频。下面我们看Frames这一行,可以看到这里展示了被绘制出来的每一帧,并且用绿、黄、红三颜色来区分它们在绘制时的性能。我们选一个红色帧来瞅瞅:
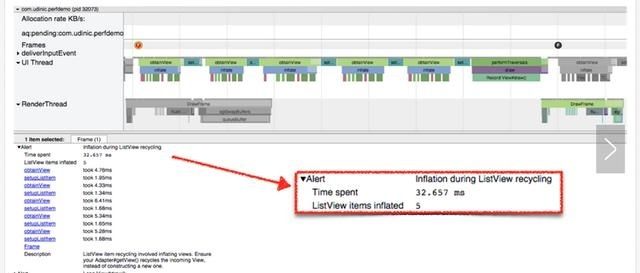
在最下方,我们看到了与这一帧所相关的一些警告。在这三个警告中,有一个是我们上面所提到的(View#draw())。接下来我们在这一帧处放大并在下方展开“Inflation during ListView recycling”这条警告:
我们可以看到警告部分的总耗时,32毫秒,远高于了我们对保障60fps所需的16毫秒绘制时间。同时还有更多的ListView每个条目的绘制时间,大约是6毫秒每个条目,总共五个。而Description描述项中的内容会帮助我们理解问题,甚至提供问题的解决方案。回到我们上一张图片,我们可以在“inflate”这一个块区处放大,并且观察到底是哪些View在被填充过程中耗时比较严重。
下面是另外一个渲染过慢的实例:
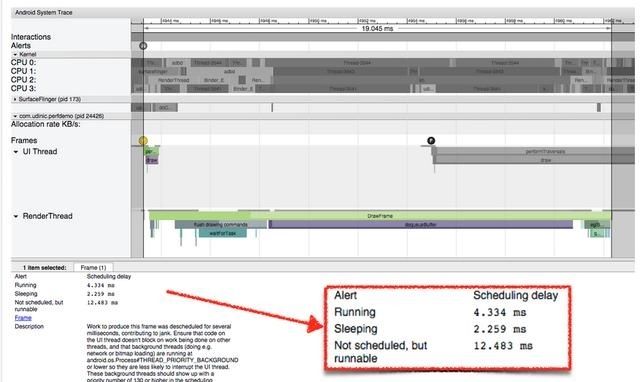
在选择了某一帧之后,我们可以按“m”键来高亮这一帧,并且在上方看到了这一部分的耗时,如图,我们看到了这一阵的绘制总共耗时超过19毫秒。而当我们展开这一帧唯一的一个警告时,我们发现了“Scheduling delay”这条错误。
Scheduling delay(调度延迟)的意思就是一个线程在处理一块运算的时候,在很长一段时间都没有被分配到CPU上面做运算,从而导致这个线程在很长一段时间都没有完成工作。我们选择这一帧中最长的一块,从而得到更加详细的信息:
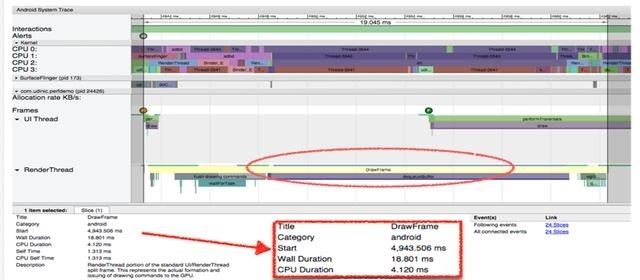
在红框区域内,我们看到了“Wall duration”,他代表着这一区块的开始到结束的耗时。之所以叫作“Wall duration”,是因为他就像是墙上的一个时钟,从线程的一开始就为你计时。
但是,CPU Duration一项中显示了实际CPU在处理这一区块所消耗的时间。
很显然,两个时间的差距还是非常大的。整个区块耗时18毫秒,而在这之中CPU只消耗了4毫秒的时间去运算。这就有点奇怪了,所以我们应该看一下在这整个过程之中,CPU去干吗了。
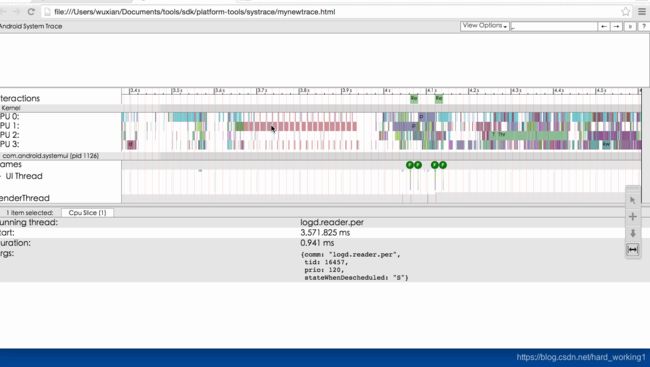
可以看到,所有四个线程都非常的繁忙。
选择其中的一个线程会告诉我们是哪个程序在占用他,在这里是一个包名为com.udinic.keepbusyapp的程序。在这里,由于另外一个程序占用CPU,导致了我们的程序未能获得足够的CPU资源。
但是这种情况其实是暂时的,因为被其他后台应用占用CPU的情况并不多见(- -),但仍有其他应用的线程或是主线程占用CPU。而其也只能为我们提供一个概览,他的深度是有限的。所以要找到我们app中到底是什么让我们的CPU繁忙,我们还要借助另一个工具——Traceview。
另外:
1、按住鼠标左键上下拖动可以放大/缩小视图;
2、w/s:zoom in/out(+shift:faster)—按w/s键可以放大/缩小视图,shift+w/s可以加快;
3、a/d:pan left/right (+shift:faster)—按a/d键可以左右移动视图, shift+a/d可以加快;
4、→:Select previous event 选择前一个事件
5、←:Select next event 选择后一个事件
systrace快捷键
| 快捷键 | 作用 |
|---|---|
| w | 放大 |
| s | 缩小 |
| a | 左移 |
| d | 右移 |
| f | 返回选中区域,切放大选中区域 |
Alerts
Alerts一栏标记了以下性能有问题的点,你可以点击该点查看详细信息,右边侧边栏还有一个Alerts框,点击可以查看每个类型的Alerts的数量:
Frame
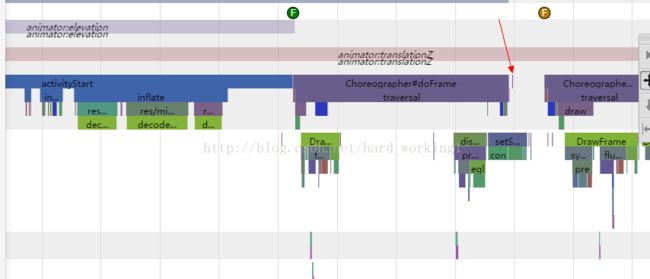
在每个包下都有Frame一栏,该栏中都有一个一个的F代表每一个Frame,用颜色来代表性能的好坏,依次为绿-黄-红(性能越来越差),点击某一个F,会显示该Frame绘制过程中的一些Alerts信息: 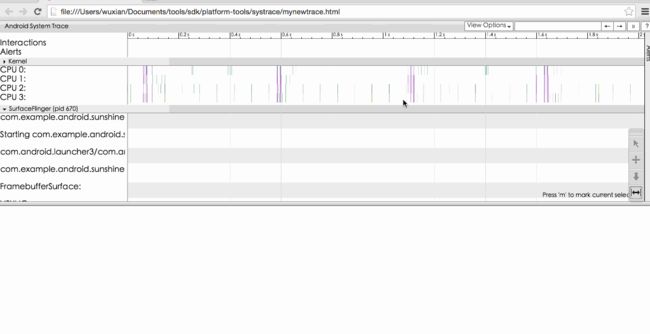
如果你想查看Frame的耗时,可以点击某个F标志,然后按m键:
http://androidperformance.com/2015/12/31/How-to-calculation-android-app-lunch-time.html

