GaussianEditor:通过用户指令编辑 GS 三维场景
Paper: Chen Y, Chen Z, Zhang C, et al. GaussianEditor: Swift and Controllable 3D Editing with Gaussian Splatting[J]. arXiv preprint arXiv:2311.14521, 2023.
Introduction: https://buaacyw.github.io/gaussian-editor/
Code: https://github.com/buaacyw/GaussianEditor
GaussianEditor 是首个基于 3D Gaussian Splatting 的三维场景编辑方法,能够在 5 ~ 10 分钟内完成对原有 3D GS 表示的三维场景的编辑任务。GaussianEditor 保留了 Instruct-NeRF2NeRF 中多视角使用 InstructPix2Pix 的编辑策略,并在此基础上扩展了增加和删除元素的功能。
GaussianEditor 使用语义信息分类场景中的元素,即通过使用 SAM 模型对二维图像进行分割并标注语义,然后将语义信息反向投影到 Gaussians。为了限制 GS 的过度流动导致的难以收敛,GaussianEditor 采用了分层 GS 架构,对不同训练时期的 Gaussians 施加不同的约束。
目录
- 一. 研究思路
- 二. GaussianEditor 模型
- 三. Gaussian semantic tracing
- 四. Hierarchical Gaussian Splatting
- 五. 3D Inpainting
-
- 1. Object Removal
- 2. Object Incorporation
- 六. 总结
- 七. 复现
一. 研究思路
在三维场景编辑领域,传统的基于 mesh 或点云的显示三维场景表示方法难以精确刻画细节,基于 NeRF 的隐式三维场景表示方法处理速度太慢并且不易精准控制编辑区域。因此文中引入最新的三维场景表示方法 —— 3D Gaussian splatting,在 3D-GS 的基础上提出 GaussianEditor,从而更快更精准地进行三维场景编辑。
编辑 GS 首先需要精准识别目标 Gaussians,GaussianEditor 提出的方法是语义追踪 (Gaussian semantic tracing):将二维图像的分割 mask 反向投影 (unprojection) 到 Gaussians,为每个 Gaussian 分配语义标签 (semantic tag)。(但在具体实现的实验中,作者团队只将其用于 Object Removal。)
然而,GS 编辑引入的高度随机生成式引导 (random generative guidance) 导致优化 GS 时 3D-GS 过度流动 (excessive fluidity),因此难以收敛。于是,GaussianEditor 提出了新的架构 —— 分层 GS (hierarchical Gaussian splatting, HGS):对训练早期的 Gaussians 施加严格约束,以减少流动性,从而保持原始状态;对训练后期的 Gaussians 放宽约束,以增强适应性,从而刻画细节。
随机生成式引导优化 GS 难以收敛的一种合理解释是 GS 没有 NeRF 的神经网络作缓冲,参数的随机性会直接暴露在当前结果中导致大量的 Gaussians 更新。
GaussianEditor 保留 InstructPix2Pix 作引导,并且扩展了增加和删除元素的功能,设计了相应的 3D inpainting 算法。删除元素时,删除相应的 Gaussians 然后投影到 2D 图像上使用周围元素进行填充;增加元素时,用户在视图上绘制 mask 并提供 prompt 文本,GaussianEditor 通过 2D inpainting 技术在该视图上增加元素,然后通过 image-to-3D 技术生成 mesh,再将其转换成 HGS 表示。
二. GaussianEditor 模型
记 prompt 文本为 y y y;第 i i i 轮 GS 参数为 Θ i = { x i , s i , q i , α i , c i } \Theta_i=\{x_i, s_i, q_i, \alpha_i, c_i\} Θi={xi,si,qi,αi,ci},分别表示 Gaussian 的三维位置、缩放矩阵、旋转矩阵、透明度和球谐系数;训练完成得到目标场景 Θ y \Theta_y Θy。
三. Gaussian semantic tracing
(笔者复现实验后发现,semantic tracing 只在 Object Removal 前执行,为了给场景中的目标 Gaussians 分配语义信息。Gaussian semantic tracing 需要用户 click 以提取元素并提供其 group name。)
GaussianEditor 为每个 Gaussian 增加语义标签 m m m, m i j m_{ij} mij 表示第 i i i 个 Gaussian 第 j j j 个语义的值。训练场景时,新增的 Gaussian(即致密化过程)继承原有 Gaussian 的语义标签。编辑场景时,只需要根据语义标签更新特定的 Gaussians 的属性。
为了获得 Gaussians 的语义标签:先使用 SAM 分割训练图像得到 mask M \mathcal{M} M,其中 M j \mathcal{M}_j Mj 表示第 j j j 个语义的值;然后将二维图像的语义信息按像素逆向映射到三维 Gaussians 中。但由于像素 ray tracing 时会经过三维空间中的多个 Gaussians,因此对逆向映射过程中的 Gaussians 编号,记 w i j w_{ij} wij 表示第 i i i 个 Gaussian 第 j j j 个语义的权重。 w i j w_{ij} wij 从 pixel 逆映开始便不断累加,因此有:
w i j = ∑ o i ( p ) ∗ T i j ( p ) ∗ M j ( p ) w_i^j=\sum o_i(\boldsymbol{p}) * T_i^j(\boldsymbol{p}) * \mathcal{M}^j(\boldsymbol{p}) wij=∑oi(p)∗Tij(p)∗Mj(p)
训练完成后,可以通过比较 Gaussians 第 j j j 个语义的权重是否达到阈值来确定是否属于该语义类别。
四. Hierarchical Gaussian Splatting
3D-GS 过度流动导致其难以收敛,因此引入了分层 GS 架构:对训练早期的 Gaussians 施加严格约束以减少流动性,对训练后期的 Gaussians 放宽约束以增强适应性。
具体来说,标记当前 Gaussian 的某一属性 P P P 的值为锚点状态 (anchor state),记为 P ^ \hat{P} P^。于是有锚定损失 (anchor loss):
L anchor P = ∑ i = 0 n λ i ( P i − P ^ i ) 2 \mathcal{L}_{\text {anchor }}^P=\sum_{i=0}^n \lambda_i\left(P_i-\hat{P}_i\right)^2 Lanchor P=i=0∑nλi(Pi−P^i)2
Densification 时将 Gaussian 各属性的锚定损失加入损失函数以约束 Gaussian 的状态变化:
L = L Edit + ∑ P ∈ { x , s , q , α , c } λ P L anchor P \mathcal{L}=\mathcal{L}_{\text {Edit }}+\sum_{P \in\{x, s, q, \alpha, c\}} \lambda_P \mathcal{L}_{\text {anchor }}^P L=LEdit +P∈{x,s,q,α,c}∑λPLanchor P
GaussianEditor 还将 densification 的阈值改为百分比,即只选择那些三维位置梯度在前 k% 范围内的 Gaussians 进行 densification。
五. 3D Inpainting
GaussianEditor 保留了 InstructPix2Pix 的场景编辑引导,并在此基础上扩展了增加和删除元素的功能,为此设计了相应的 3D inpainting 算法。
1. Object Removal
笔者原以为 GS 要想删除元素可以直接根据 Gaussians 的语义标签删除对应 Gaussians,但事实并非如此,因为:
(1)一个 Gaussian 可能属于多个对象(即语义标签中多个权重超过阈值),这也解释了对象连接处的伪影问题;
(2)整个 GS 场景都是根据训练视图训练得到的,删除某个对象对应的 Gaussians 后原本遮挡的位置并不能因为显式表达而直接显现,因为该区域的颜色特征并没有经过训练。
Object Removal 前需要先进行 semantic tracing,为场景中的目标 Gaussians 分配语义信息。然后通过语义标签筛选满足语义类别要求的 Gaussians 并删除,并使用 KNN 聚类被删除 Gaussians 周围的 Gaussians 并将其投影到训练视图,再通过扩大 mask 对删除位置及其周围的部分进行填充。
2. Object Incorporation
在原始场景 θ \theta θ 上增加元素时,不仅需要 prompt 文本 y y y,还需要用户在某一机位 p p p 视角下的渲染图像 I I I 上绘制的 mask M M M。
在给定 I I I、 M M M、 y y y 后,使用 2D inpainting diffusion 模型 —— Sdxl 1,根据 y y y 的指示在 I I I 的 M M M 处局部生成图像;然后使用 image-to-3D 技术 —— Wonder3d 2,将 I I I 生成 3D mesh;再将 mesh 转换成 Gaussians θ y \theta_y θy。
虽然用户在 I I I 上绘制了 M M M 的具体位置,但无法保证其深度。因此,为了让 θ y \theta_y θy 和 θ \theta θ 对齐,使用 DPT 3 技术粗略估计其深度,再使用最小二乘法将估算的深度与在机位 p p p 视角下由 θ \theta θ 渲染的深度图对齐。
六. 总结
GaussianEditor 为每个 Gaussian 分配语义标签,以区分场景中的元素。为了限制 GS 的过度流动导致的难以收敛,采用了分层 GS 架构,对不同训练时期的 Gaussians 施加不同的约束。为了在三维场景中增加和删除元素,GaussianEditor 还设计了相应的 3D inpainting 算法。
七. 复现
- 平台:AutoDL
- 显卡:RTX A5000 24G
- 镜像:PyTorch 2.0.0、Python 3.8(ubuntu20.04)、Cuda 11.8
- 源码:https://github.com/buaacyw/GaussianEditor
实验过程:
-
创建
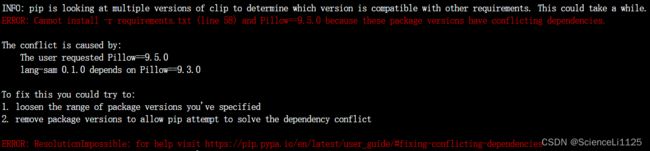
conda环境一直不成功,索性直接在当前环境下使用pip安装(即 Option two); -
安装
requirements.txt里依赖项时,Pillow 9.5.0与其他项产生冲突,将其降为Pillow 9.3.0即可:
-
在克隆完作者 fork 的 viser 仓库后,使用
pip install -e viser本地安装可编辑 viser 时,遇到报错显示无法以编辑模式安装:Directory cannot be installed in editable mode: /root/GaussianEditor/extern/viser (A "pyproject.toml" file was found, but editable mode currently requires a setuptools-based build.)。升级 pip 4 后就可以顺利安装:pip install --upgrade pip; -
下载完 Wonder3D 的 checkpoints 后,继续按照 WebUI Guide 进行编辑;
-
直接在服务器上下载数据集和预训练的 3D-GS 模型要耗时数天,可以先下载到本地再上传并解压;
-
AutoDL 的系统盘只有 30G,不足以支持近 40G 的数据集和预训练模型,因此将其放入数据盘;

-
执行
python webui.py --colmap_dir ../autodl-tmp/dataset/bicycle --gs_source ../autodl-tmp/dataset/bicycle/point_cloud/iteration_7000/point_cloud.ply指令启动 WebUI,出现npm ERR:

安装 Node.js 和 npm 并配置 npm 接受自签名证书:
# 安装 Node.js 和 npm
sudo apt update
sudo apt install nodejs
sudo apt install npm
# 验证 Node.js 和 npm 是否正确安装
node -v
npm -v
# 配置 npm 接受自签名证书
npm config set strict-ssl false
此时再启动 WebUI 又出现自签名证书无法建立安全连接的问题,因为 npm 无法验证证书的有效性:

将 npm 的 registry 设置为淘宝镜像地址,绕过 registry.npmjs.org 的证书验证:npm config set registry https://registry.npm.taobao.org安装 yarn:
npm install -g yarn更新 Node.js 和 npm 版本:
# 安装 NVM 在同一台计算机上管理多个 Node.js 版本
curl -o- https://raw.githubusercontent.com/nvm-sh/nvm/v0.38.0/install.sh | bash
# 重启终端
source ~/.bashrc
# 安装并升级 Node.js
nvm install node
全局安装 TypeScript:
npm install -g yarn
yarn global add typescript
禁用 HTTPS:
yarn config set strict-ssl false经过上面一通操作后成功启动 WebUI。
-
使用 AutoDL 转发网页时无法直接使用 ssh 指令转发,需要按照 AutoDL帮助文档 | VSCode远程开发 配置端口转发。转发至本机的 WebUI (127.0.0.1:8084) 如下:
-
GaussianEditor 提供的 WebUI 可以进行基本渲染设置:分辨率调节、视场缩放、机位切换;

-
Delete 场景内元素时,出现
RuntimeError: Function _RasterizeGaussiansBackward returned an invalid gradient at index 2 - got [0, 0, 3] but expected shape compatible with [0, 16, 3]报错,一开始以为是 Colmap 数据集的问题 5 。后来发现是删除元素前没有进行 Semantic tracing; -
Delete 场景内元素前 Semantic tracing 时,出现
torch.cuda.OutOfMemoryError: CUDA out of memory.报错,因为 SAM 添加的点过多,选取几个点能将 mask 提取出来即可; -
Add 场景内元素时,将 2D Inpainting 的结果扩展到三维场景的过程中出现
FileNotFoundError: [Errno 2] No such file or directory: '.cache/dpt/omnidata_dpt_depth_v2.ckpt'报错,可能是之前清理系统盘空间的时候删除了所有缓存(rm -rf /root/.cache)。手动下载 omnidata_dpt_depth_v2.ckpt 后上传至.cache/dpt即可,并将GaussianEditor/threestudio/utils/dpt.py的 1004 和 1013 行的 path 变量前加上../。后续清理系统盘时保留.cache/dpt下文件:find /root/.cache -mindepth 1 ! -path '/root/.cache/dpt*' -delete; -
Add 场景内元素时,解决完
omnidata_dpt_depth_v2.ckpt'的问题后,又出现FileNotFoundError: [Errno 2] No such file or directory: '/root/GaussianEditor/add_cache/add_bear/inpaint_a_teddy_bear_on_bench/inpaint_gs.obj'报错,尚未解决; -
使用 Command Line 编辑场景时,出现
OSError: Unknown compute capability. Ensure PyTorch with CUDA support is installed.报错。一开始以为是 CUDA 版本太低(实验要求 11.7 或 11.8,本机只有 11.3),于是更换配有更高版本 CUDA 的显卡,但还是相同报错:

后来又推测是 tinycudann 的问题,尝试了 6 7 都没能解决,重配了两台也还是同样的问题。最后发现是 GPU 指定错了,将--gpu 1改为--gpu 0即可。正确的 Add 编辑的 Command Line 指令 8 如下:# Add a teddy bear on bench python launch.py --config configs/add.yaml --train --gpu 0 data.source=../autodl-tmp/dataset/bicycle system.gs_source=../autodl-tmp/dataset/bicycle/point_cloud/iteration_7000/point_cloud.ply system.inpaint_prompt="a teddy bear on bench" system.refine_prompt="make it a teddy bear" system.cache_overwrite=False system.cache_dir="add_bear" trainer.max_steps=1 system.loggers.wandb.enable=true system.loggers.wandb.name="add_bear"
实验结果:
使用 WebUI,以 7k 轮 GS 训练的 bicycle 结果作为原始场景,即 python webui.py --colmap_dir ../autodl-tmp/dataset/bicycle --gs_source ../autodl-tmp/dataset/bicycle/point_cloud/iteration_7000/point_cloud.ply。
-
Edit Type:
Edit,Guidance Type:InstructPix2Pix,Text:Make the grass on fire;
-
Edit Type:
Edit,Guidance Type:InstructPix2Pix,Text:Make it winter;
-
Edit Type:
Add,Text:A teddy bear on bench;
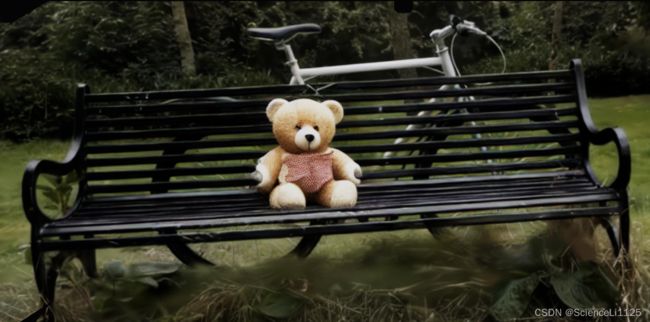
(Draw Bounding Box 时,先在视图上 click 一个点作为 Left UP,再click 一个点作为 Right Down,不需要拖动鼠标); -
Edit Type:
Add,Text:A rabbit on grass;
-
Edit Type:
Add,Text:A child riding the bike;
-
Edit Type:
Add,Text:A cup of coffee on the table;
-
Edit Type:
Delete,Text:The bench;


-
Edit Type:
Delete,Text:The bike;

-
Edit Type:
Delete,Text:The vase;

-
Edit Type:
Delete,Text:The table;
Weakness:
-
增加场景内元素时,2D inpainting 的结果不稳定,经常出现 四肢或五官不协调、数量混乱、甚至添加错误元素等问题。以
Add a teddy bear on bench为例,2D inpainting 生成的令人满意的结果不足 30%:
-
对于稍微精细一点的 Add 指令,如 复杂的位置信息,2D inpainting 难以令人满意。以下分别是
Add a child riding the bike、Add a tiger behind bench的结果:

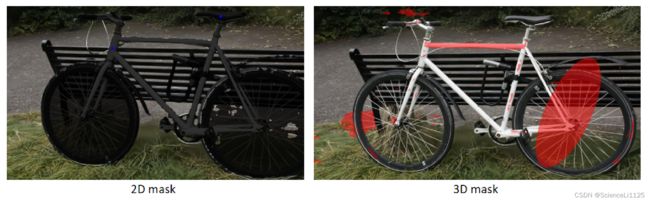
-
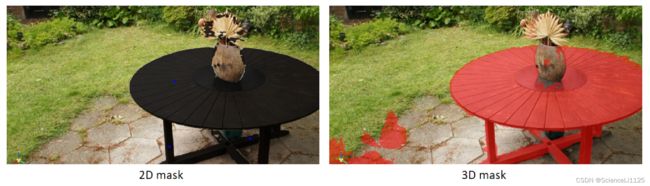
删除场景内元素时,SAM 提取 2D mask 的结果很理想,但 lift 到 3D mask 的结果不稳定,甚至缺失准确度:
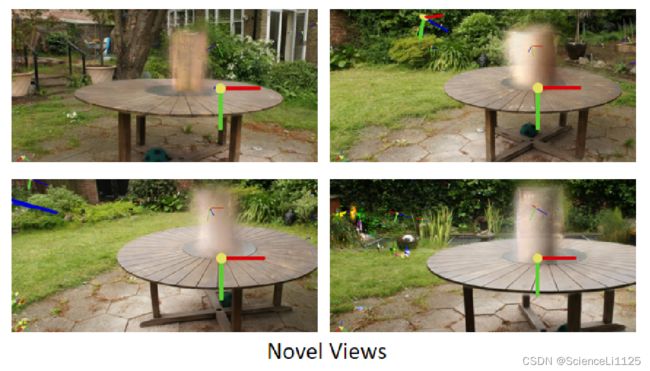
-
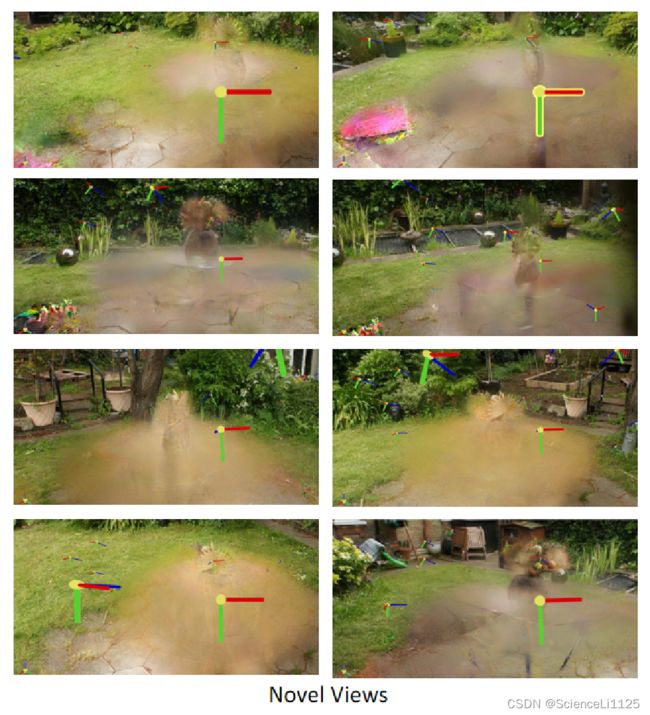
删除场景内元素时,即使得到的 3D mask 非常准确,编辑场景后也会有很明显的伪影:
Podell D, English Z, Lacey K, et al. Sdxl: Improving latent diffusion models for high-resolution image synthesis[J]. arXiv preprint arXiv:2307.01952, 2023. ↩︎
Long X, Guo Y C, Lin C, et al. Wonder3d: Single image to 3d using cross-domain diffusion[J]. arXiv preprint arXiv:2310.15008, 2023. ↩︎
Ranftl R, Bochkovskiy A, Koltun V. Vision transformers for dense prediction[C]//Proceedings of the IEEE/CVF international conference on computer vision. 2021: 12179-12188. ↩︎
pip install -e viser #2 ↩︎
Using custom number of points#482 ↩︎
OSError: Unknown compute capability. Ensure PyTorch with CUDA support is installed.
#1177 ↩︎tinny-cuda wont install. CUDA not found#1206 ↩︎
GaussianEditor/script/ ↩︎