HarmonyOS开发学习笔记
HarmonyOS开发
- Harmony应用开发
-
- 01-概述
-
- HarmonyOS概述
- HarmonyOS系统架构
- 开发套件
- 02-Helloworld
-
- 创建项目
- 调整代码
- 实时预览
- 本地模拟器
- 真机调试
- 项目工程结构
-
- 最外层结构
- AppScope目录结构
- entry目录结构
- 03-ArkUI功能组件
-
- Image组件
- Text组件
- TextInput组件
- Button组件
- Slider组件
- 04-ArkUI布局组件
-
- 容器组件
- 主轴方向枚举
- 交叉轴方向枚举
- 示例
- 05-ArkUI渲染控制
-
- ForEach循环渲染
- if/else条件渲染
- 06-ArkUI列表组件
-
- List
- 07-自定义组件、构建函数、样式
-
- 自定义组件
- 自定义构建函数
- 自定义公共样式
-
- @Styles
- @Extend
- 08-状态管理
-
- 状态管理
- 父子组件通信
-
- @Prop和@Link
- @Provide和@Consume
- @Observed 和 @ObjectLink
- 父子组件方法传递
- 待办任务示例
- 09-页面路由
-
- 页面路由
- 示例
- main_pages.json
- 10-动画
-
- 属性动画
- 显示动画
- 组件转场动画
- 遥感版本小游戏
Harmony应用开发
鸿蒙系统app开发。
01-概述
HarmonyOS概述
HarmonyOS官网: harmonyos.com
HarmonyOS是华为开发的一款面向未来的全场景分布式智慧操作系统,将逐步覆盖 1 + 8 + N 全场景终端设备。
1代表智能手机,8代表PC、平板、手表、智慧屏、AI音箱、耳机、AR/VR眼镜、车机,N代表IoT生态产品。
对消费者而言,HarmonyOS用一个“统一的软件系统”从根本上解决消费者面对大量智能终端体验割裂的问题,为消费者带来统一、便利、安全的智慧化全场景体验。
对开发者而言,HarmonyOS通过多种分布式技术,整合不同终端硬件能力,形成一个虚拟的“超级终端”。应用开发者可基于“超级终端”开发应用,聚焦上层业务逻辑,无需关注硬件差异。设备开发者可以按需调用其他终端能力。
HarmonyOS系统架构
HarmonyOS采用分层架构,共4层:
- 应用层
- 框架层
- 系统服务层
- 内核层
系统功能按照 系统 -> 子系统 -> 功能/模块 逐级展开,在多设备部署场景下,支持根据实际需求裁剪某些非必要的子系统或功能/模块。
内核层:
内核子系统:HarmonyOS采用多内核设计,支持针对不同 资源受限设备 选用适合的OS内核为上层提供基础操作系统能力。
驱动子系统:硬件驱动框架(HDF)是HarmonyOS硬件生态开放的基础,提供统一外设访问能力和驱动开发管理框架。
系统基础服务层:是HarmonyOS的核心能力集合,包括适用于各类设备的基础能力以及面向特定设备的专有能力。
涵盖系统基本能力子系统集、基础软件服务子系统集、增强软件服务子系统集、硬件服务子系统集。
根据不同设备形态的部署环境,基础软件/增强软件/硬件服务子系统集内部可以按子系统粒度裁剪,子系统内部还可以按功能粒度裁剪。
框架层:为HarmonyOS应用开发提供了 Java/C/C++/JS等多语言的用户程序框架、Ability框架、两种UI框架(包括适用于Java语言的Java UI框架、适用于JS语言的JS UI框架),以及各种软硬件服务对外开放的多语言框架API。根据系统的组件化裁剪程度,HarmonyOS设备支持的API也会有所不同。
应用层:支持基于框架层实现业务逻辑的原子化开发,构建以FA/PA为基础组成单元的应用(包括系统应用和第三方应用)。
Abbility是应用所具备的能力的抽象,类似java项目中的module。
FA是Feature Ability,中文名元程序。
PA是Partical Ability,中文名元服务。
这里的FA/PA是HarmonyOS应用的基本组成单元,能够实现特定的业务功能。一个应用可以包含一个或多个FA/PA。FA有UI界面,PA无UI界面。例如:一个视频通话应用,视频通话主界面FA提供UI界面以便与用户交互,PA1进行摄像头视频采集,PA2进行视频美颜处理,PA3提供超级夜景能力。FA/PA可以按需下载、加载和运行。

基于FA/PA构建的新型应用生态,能够实现三方服务跨设备智能分发,提供一致、高效的用户体验。以上面的视频通话应用为例,当手机下载该应用时,将同时拥有主界面FA、摄像头视频采集PA、视频美颜处理PA、超级夜景PA;当智慧屏下载该应用时,如果智慧屏不支持美颜和超级夜景,则会只下载主界面FA、摄像头视频采集PA。
开发套件
HarmonyOS开发套件:
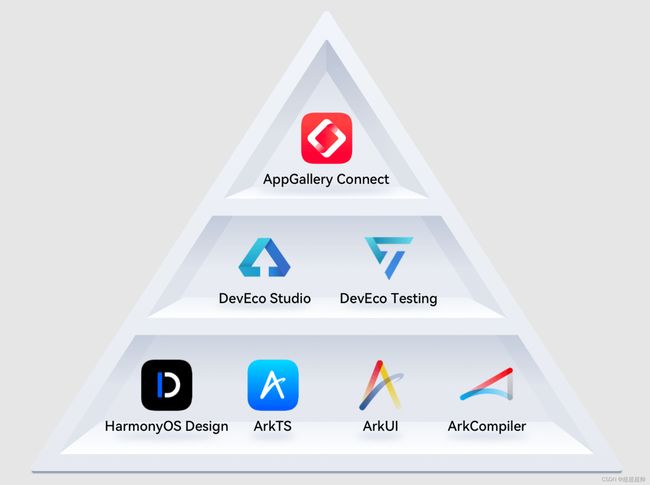
HarmonyOS Design:设计套件。是面向万物互联的设计系统。
DevEco Studio:面向全场景多设备提供的一站式开发平台。鸿蒙生态应用、元服务开发配套的集成开发环境(IDE)。
DevEco Testing:测试套件。包括测试标准和测试工具两部分。
AppGallery Connect:运维套件。包括上架分发测试和运维分析两大能力。
ArkTS语言:是鸿蒙生态应用的开发语言,使用 .ets 作为ArkTS语言源码 文件后缀。在保持 TypeScript 基本语法风格的基础上,对TS的动态类型特性施加更严格的约束,引入静态类型。同时提供了声明式UI、状态管理等相应能力。TypeScript 教程
ArkUI:是鸿蒙生态原生的UI开发框架。提供了两种开发方式:基于ArkTS的声明式开发范式(更加简洁高效)、基于JS扩展的类Web开发范式(对Web及前端开发者更友好)。
ArkCompiler:方舟编译器。支持多种编程语言、多种芯片平台联合编译、运行而设计的统一编译运行时平台。支持包括动态类型和静态类型语言在内的多种编程语言,如ArkTS、TS、JS。
02-Helloworld
下载安装DevEco Studio
进入DevEco Studio下载官网,单击立即下载下载安装DevEco Studio。
详细教程点击这个大哥已经写好的,懒得在总结一遍了跳转文章
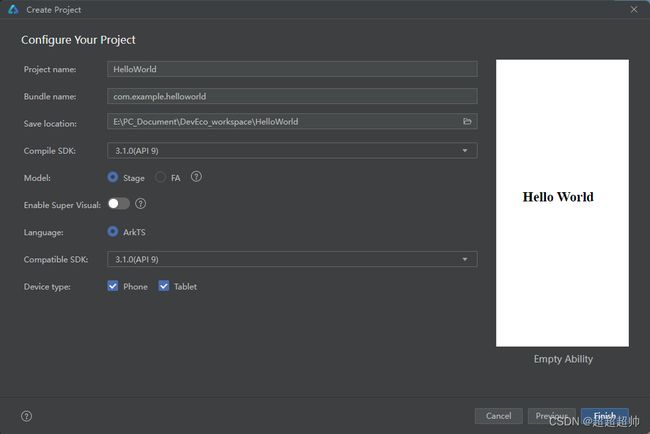
创建项目
- Project name:项目名称
- Bundle name:包名称。默认情况下应用ID也会使用该名称,应用发布时对应的ID需要保持一致
- Save location:工程保存路径
- Compile SDK:编译的API版本,默认选择API9
- Model:模型,默认Stage
- 其他保持默认
Compile SDK版本为4到8时,Model只有FA(Feature Ability)模型,已不再主推。
9版本时新增了Stage模型,在该模型中,由于提供了AbilityStage、WindowStage等类作为应用组件和窗口的“舞台”,因此这种应用模型称为Stage模型。
配置好之后,等待工程同步完成,便会看到一个HelloWorld页面: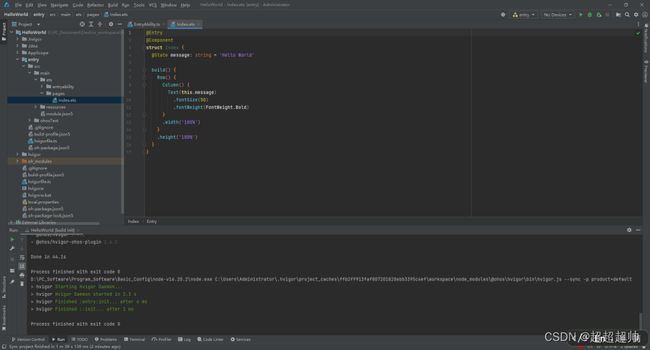
调整代码
修改Index.ets文件中的Helloworld的代码:
@Entry  // Entry装饰器:标记当前组件是入口组件
@Component  // Component装饰器:标记自定义组件
struct Index {  // struct 自定义组件:可复用的UI单元
  @State message: string = 'Hello World'  // State装饰器:标记该变量是状态变量,值变化时会触发UI刷新

  build() {  // UI描述:其内部以声明式方法描述UI结构
    Row() {  // Row、Column、Text都是ArkUI的内置提供组件。这些组件分2类:容器组件(例如Row、Column)用来完成页面布局;基础组件(例如Text)自带样式和功能的页面元素
      Column() {
        Text(this.message)
          .fontSize(50)
          .fontWeight(FontWeight.Bold)  // 调用属性方法,设置组件的UI样式
          .fontColor("#36D")
          .onClick((event) => {  // 调用事件方法来设置事件的回调
            this.message = 'lalala'
          })
      }
      .width('100%')
    }
    .height('100%')
  }
}
实时预览
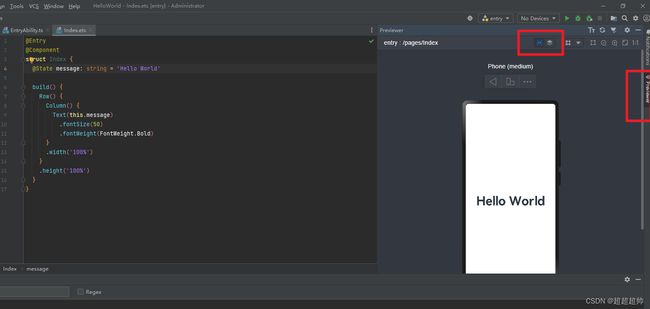
页面布局与Idea一样,右上角previewer可以实时预览当前文件:
*可以切换设备、旋转屏幕等 *
本地模拟器
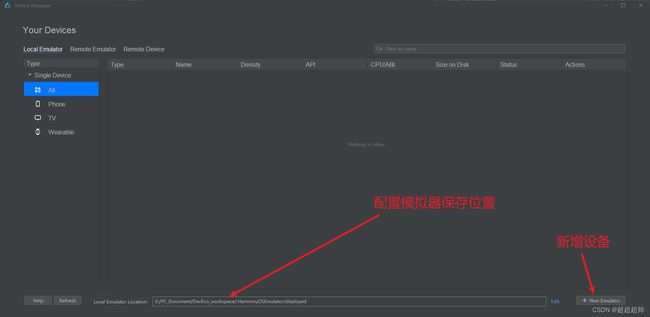
点击Tools -> Device Manager 打开虚拟设备管理器。

选择 Local Emulator(本地模拟器),如果没有使用过,需要先点击 Install 安装该模块SDK。
然后便可以设置模拟器保存位置、新增模拟器:
选择要新增的设备: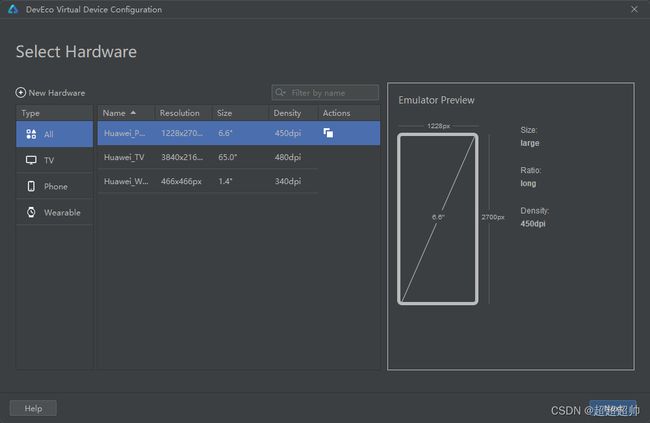
如果设备还没有下载,需要先下载设备的镜像:
镜像下载好之后,便可以选中添加进本地虚拟设备管理器中。点击虚拟设备管理器中,华为手机最右侧 Actions(绿色三角) 的运行按钮:
等待手机开机。然后在项目中选中该设备运行程序。
必须等待手机完全开机(进入桌面),才可以运行程序,否则会报错Unable to find the BMS service。

真机调试
需要先配置签名。
打开 File -> Project Structure -> Project -> Signing Config,如果没有登录华为开发者账号,点击Sign In 打开网页进行登录验证。
签名之后便可以连接手机进行真机调试。
项目工程结构
最外层结构
项目工程最外层包括:
HelloWorld
|-- AppScope:存放应用全局所需要的资源(应用名称版本号等配置)
|-- entry:应用的主模块,存放HarmonyOS应用的代码、资源等
|-- oh_modules:工程的依赖包,存放工程依赖的源文件(即以前的node_modules)
|-- build-profile.json5:工程级配置信息,包括签名、产品配置等
|-- hvigorfile.ts:工程级编译构建任务脚本,hvigor是基于任务管理机制实现的一款全新的自动化构建工具,主要提供任务注册编排、工程模型管理、配置管理等核心能力
`-- oh-package.json5:工程级依赖配置文件,用于记录引入包的配置信息(即以前的package.json、package-lock.json)
AppScope目录结构
AppScope包括:
AppScope
|-- resources
|   `-- base
|       |-- element:主要存放公共的字符串、布局文件等资源
|       `-- media:存放全局公共的多媒体资源文件
`-- app.json5:项目信息配置文件

AppScope>app.json5是应用的全局配置文件,用于存放公共的配置信息:
{
  "app": {
    "bundleName": "com.example.helloworld",  // 包名
    "vendor": "example",   // 应用程序提供商
    "versionCode": 1000000,   // 用于区分应用版本
    "versionName": "1.0.0",   //  版本号
    "icon": "$media:app_icon",  // 应用的显示图标
    "label": "$string:app_name"  // 应用名
  }
}
entry目录结构
entry
|-- .preview:页面预览时自动生成的缓存等
|-- build:项目打包自动生成的编译后文件
|-- build-profile.json5:模块级配置信息,包括编译构建配置项
|-- hvigorfile.ts:模块级构建脚本
|-- oh-package.json5:模块级依赖配置信息文件(即以前的package.json、package-lock.json)
`-- src
    |-- main
    |   |-- module.json5:模块的配置文件
    |   |-- ets:存放ets代码(即ArkTS源码)
    |   |   |-- entryability:存放ability文件,用于当前ability应用逻辑和生命周期管理
    |   |   `-- pages:存放UI界面相关代码文件,初始会生成一个Index页面
    |   `-- resources:存放模块内的多媒体及布局文件
    |       |-- base
    |       |   |-- element
    |       |   |-- media
    |       |   `-- profile
    |       |       `-- main_pages.json:保存页面page的路径配置信息。所有需要进行路由跳转的page页面都需要在这里进行配置
    |       |-- en_US
    |       |-- zh_CN
    |       `-- rawfile
    `-- ohosTest:单元测试目录
        |-- module.json5
        |-- ets
        `-- resources
            `-- base
                |-- element
                |-- media
                `-- profile
                    `-- test_pages.json

其中,entry>src>main>module.json5模块配置文件:
{
  "module": {
    "name": "entry",  // 当前module的名称,module打包成hap后表示hap的名称。该名称在整个应用中需要唯一
    "type": "entry",  // 模块的类型(三种类型:entry、feature、har)
    "description": "$string:module_desc",  // 描述
    "mainElement": "EntryAbility",  // 该HAP包的入口ability名称或extension名称。
    "deviceTypes": [  // 允许ability运行的设备类型
      "phone",
      "tablet"
    ],
    "deliveryWithInstall": true,  // 当前module是否在用户主动安装时安装该Module对应的HAP是否跟随应用一起安装。true:主动安装时安装,false:主动安装时不安装
    "installationFree": false,  // 当前Module是否支持免安装特性
    "pages": "$profile:main_pages",  // 对应main_page.json文件,用于配置ability中用到的page信息
    "abilities": [  // 存放当前模块所有的ability元能力的配置信息
      {
        "name": "EntryAbility",  // 当前ability名称,该名称在整个应用中唯一。
        "srcEntry": "./ets/entryability/EntryAbility.ts",  // ability的入口代码路径
        "description": "$string:EntryAbility_desc",  // 描述
        "icon": "$media:icon",  // ability的图标。可为空,但如果该ability是mainElemengt,则必须配置
        "label": "$string:EntryAbility_label",  // 标签名
        "startWindowIcon": "$media:icon", // 启动页面的图标
        "startWindowBackground": "$color:start_window_background",  // 启动页面的背景色
        "exported": true,
        "skills": [  // 能够接收的意图的action集合,取值通常为系统预定义的action值,也允许自定义
          {
            "entities": [
              "entity.system.home"
            ],
            "actions": [
              "action.system.home"
            ]
          }
        ]
      }
    ]
  }
}
src>main>resources>base>profile>main_page.json`保存的是页面page路径配置信息,所有需要进行路由跳转的page页面都需要在这里配置:
{
  "src": [
    "pages/Index"

  ]
}
03-ArkUI功能组件
Image组件
Image:图片显示组件。参考文档
接口:
// 参数src为图片源,支持string、PixelMap、Resource三种格式
Image(src: string | PixelMap | Resource)
其中:
- string格式,通常用于加载网络图片(加载网络图片需要先申请网络访问权限)。
Image("http://xxxx.png")
- PixelMap格式,可以加载像素图,构造该格式比较复杂,通常用于图片编辑中
Image(pixelMap)
- Resource格式,加载本地图片,经常使用
Image($r('app.media.mate60'))  // 加载 entry/src/main/resources/base/media/mate60.png
Image($rawfile('mate60.png'))  // 加载 entry/src/main/resources/rawfile/mate60.png
Image($r('app.media.mate60'))
	.width(100)  // 宽度 (组件通用属性,所有组件都有该属性)
	.height(120)  // 高度, 宽高可以指定为数字形式,默认单位为vp虚拟像素。也可以指定为字符串的百分比'100%'
	.borderRadius(10)  // 边框圆角
	.interpolation(ImageInterpolation.High)  // 图片插值,消除锯齿(Image组件特有属性,只能在Image组件中使用)
配置授权访问网络:编辑module.json5,添加INTERNET授权
{
  "module": {
      // ......

      // 申请权限
    "requestPermissions": [
      {
        "name": "ohos.permission.INTERNET"  // 申请网络访问权限,该权限类型为system_grant,只需要填写name即可
      }
    ]
  }
}
添加网络图片:
Image('https://res.vmallres.com/pimages//uomcdn/CN/pms/202309/gbom/6942103109546/428_428_D8C79AD546E4A12920F05B427036ED8Bmp.png').width(250)
Text组件
Text:文本显示组件。
接口:
// 参数content非必输,可以为string类型或Resource类型
Text(content?: string | Resource)
其中:
- string格式,直接填写文本内容
Text('图片宽度')
- Resource格式,读取国际化本地资源文件中的字符串
Text($r('app.string.width_label'))
使用国际化文本时,需要在国际化资源包中进行配置。

在Text组件中使用国际化资源包中的字符串,来进行国际化自动转换:
Text($r('app.string.with_label')).fontSize(20)
TextInput组件
TextInput:文本输入框
接口:
// 参数为json对象格式。placeholder提示语,text文本框当前文本内容,controller控制器可以用来控制光标位置等
TextInput(value?:{placeholder?: ResourceStr, text?: ResourceStr, controller?: TextInputController})
示例:
使用TextInput组件输入值改变图片的大小
@Entry
@Component
struct Index {
  @State imageWidth: number = 250;

  build() {
    Row() {
      Column() {
        Image($r('app.media.mate60'))
          .width(this.imageWidth)
          .interpolation(ImageInterpolation.High)

        Row() {
          Text($r('app.string.with_label'))
            .fontSize(20)

          TextInput({placeholder:'请输入宽度', text: this.imageWidth.toFixed(0) })  // toFixed将数字转换为字符串
            .width(150)
            .type(InputType.Number)
            .onChange(text => {
              if(text.length > 0) {
                this.imageWidth = parseInt(text);
              }
            })
        }

      }
      .width('100%')
    }
    .height('100%')
  }
}
Button组件
Button:按钮组件
接口:
 // 方法1。接口参数options为一个JSON对象,其中type属性描述按钮显示样式,stateEffect表示按钮按下时是否开启按压态显示效果
 Button(options?: {type?: ButtonType, stateEffect?: boolean})

 // 方法2。label为按钮文本内容,options参数同方法1。
 Button(label?: ResourceStr, options?: { type?: ButtonType, stateEffect?: boolean })
示例:
// type: ButtonType.Capsule 胶囊形状(圆角矩形)按钮
// stateEffect: true 按下按钮时按钮颜色变深
Button('登录', {type: ButtonType.Capsule, stateEffect: true})

// 自定义按钮,设置按钮内展示一个图标、圆形
Button(){
    Image($r('app.media.icon')).width(40).margin(20)
}
通过按钮点击调整图片大小:
Row() {
    Button('放大')
        .width(80)
        .fontSize(20)
        .onClick(() => {
        if(this.imageWidth < 300) {
            this.imageWidth += 10;
        }
    })

    Button('缩小')
        .width(80)
        .fontSize(20)
        .onClick(() => {
        if(this.imageWidth > 10) {
            this.imageWidth -= 10;
        }
    })
}
Slider组件
Slider:滑动条组件
接口:
// 参数options是一个JSON对象格式。
// value当前进度值,min最小值,max最大值,step步长,style滑块与滑轨样式,direction设置水平或竖直方向,reverse是否滑动反向
Slider(options?: {value?: number, min?: number, max?: number, step?: number, style?: SliderStyle, direction?: Axis, reverse?: boolean})
示例:
Slider({
    value: 30,
    min: 0,
    max: 100,
    step: 1,
    style: SliderStyle.OutSet,  // 滑块大小超过滑轨
    direction: Axis.Horizontal,  // 水平方向
    reverse: false
})
  .showTips(true)  // 通过提示框显示当前滑块在滑轨的百分比
使用滑动条控制图片大小:
Slider({
    min: 100,
    max: 300,
    value: this.imageWidth,
    step: 10
})
    .width('90%')
    .blockColor('#36D')
    .trackThickness(7)   // 滑轨厚度
    .showTips(true)
    .onChange((value) => {
        this.imageWidth = value
    })
04-ArkUI布局组件
Row容器控制行,Column容器控制列。

在容器内部,元素的排列是有方向的:
- Column容器内的元素排列为从上往下
- Row容器内的元素排列为从左往右
我们将元素排列方向的这根轴称为主轴,与主轴垂直方向的轴称为交叉轴。
容器内的元素与元素之间还会存在间隔,这些间隔称为space,默认是0(即元素使紧贴在一起的)。
| 属性方法名 | 说明 | 格式 |
|---|---|---|
justifyContent |
设置子元素在主轴方向的对齐格式 | FlexAlig 枚举 |
alignItems |
设置子元素在交叉轴方向的对齐格式 | Row 枚举 容器使用VerticalAlign枚举 |
Column容器使用HorizontalAlign枚举 |
容器组件
Column接口:
// value是一个JSON对象,其中space为容器内元素间隔,默认0
Column(value?: {space?: string | number})
示例:
@Entry
@Component
struct Index {
  build() {
    Column({space: 20}){
      Text('item1')
      Text('item2')
      Text('item3')
      Text('item4')
    }
    .width('100%')
    .height('100%')
    .justifyContent(FlexAlign.Center)
    .alignItems(HorizontalAlign.Center)
  }
}
Row容器与之类似。接口为:
Row(value?:{space?: number | string })
主轴方向枚举
FlexAlign枚举:
Start:与起点位置对齐(Column内元素从上到下排列,所以与起点位置对齐就是从页面上边框排列Center:在主轴中间位置End:与页面终点位置对齐(Column中与页面下边框对齐)SpaceBetween:把空间分配到元素中间(第一个元素与上边框对齐,最后一个元素与下边框对齐,其余元素平均对齐)SpaceAround:和SpaceBetween相比,第一个元素、最后一个元素不再与边框挨着,其与边框的space是其他元素之间间隔的一半SpaceEvenly:和spaceAround相比,第一个元素、最后一个元素和边框的间隔不再是其他元素之间间隔的一半,而是和其他元素之间的间隔相等
交叉轴方向枚举
HorizontalAlign是Column容器在交叉轴方向上的枚举:
- Start
- Center
- End
VerticalAlign是Row容器在交叉轴方向上的枚举:
- Start
- Center
- End
示例
调整之前编写的页面,增加布局:
@Entry
@Component
struct Index {
  @State imageWidth: number = 250;

  build() {
      Column() {
        Row() {
          Image($r('app.media.mate60'))
            .width(this.imageWidth)
            .interpolation(ImageInterpolation.High)
        }
        .width('100%')
        .height(400)
        .justifyContent(FlexAlign.Center)

        Row() {
          Text($r('app.string.with_label'))
            .fontSize(20)

          TextInput({placeholder:'请输入宽度', text: this.imageWidth.toFixed(0) })
            .width(150)
            .type(InputType.Number)
            .onChange(text => {
              if(text.length > 0) {
                this.imageWidth = parseInt(text);
              }
            })
        }
        .width('100%')
        .justifyContent(FlexAlign.SpaceBetween)
        .padding({left: 20, right: 20})

        // 分割线
        Divider()
        .width('91%')

        Row() {
          Button('放大')
            .width(80)
            .fontSize(20)
            .onClick(() => {
              if(this.imageWidth < 300) {
                this.imageWidth += 10;
              }
            })

          Button('缩小')
            .width(80)
            .fontSize(20)
            .onClick(() => {
              if(this.imageWidth > 10) {
                this.imageWidth -= 10;
              }
            })
        }
        .width('100%')
        .justifyContent(FlexAlign.SpaceEvenly)
        .margin({top: 35, bottom: 35})

        Slider({
          min: 100,
          max: 300,
          value: this.imageWidth,
          step: 10
        })
          .width('90%')
          .blockColor('#36D')
          .trackThickness(7)
          .showTips(true)
          .onChange((value) => {
            this.imageWidth = value
          })

      }
      .width('100%')
  }
}
05-ArkUI渲染控制
ForEach循环渲染
ForEach接口基于数组类型数据来进行循环渲染,需要与容器组件配合使用,且接口返回的组件应当是允许包含在ForEach父容器组件中的子组件(例如ListItem组件要求ForEach的父容器必须为List组件)。
ForEach(
  arr: Array,  // 要遍历的数组
  itemGenerator: (item: any, index?: number) => void,  // 页面组件的生成函数
  keyGenerator?: (item: any, index?: number): string => string  // 键的生成函数
)
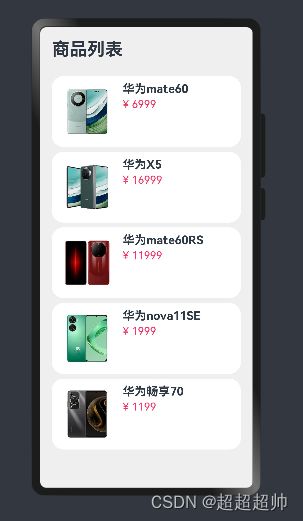
示例:商品列表循环
class Item {
  id: string
  name: string
  image: ResourceStr
  price: number

  constructor(id: string, name: string, image: ResourceStr, price: number) {
    this.id = id
    this.name = name
    this.image = image
    this.price = price
  }
}

@Entry
@Component
struct Index {
  private items: Array<Item> = [
    new Item('1', '华为mate60', $r('app.media.mate60'), 6999),
    new Item('2', '华为X5', $r('app.media.X5'), 16999),
    new Item('3', '华为mate60RS', $r('app.media.mate60RS'), 11999),
    new Item('4', '华为nova11SE', $r('app.media.nova11SE'), 1999),
    new Item('5', '华为畅享70', $r('app.media.cx70'), 1199)
  ]

  build() {
    Column({space: 8}) {
      Row() {
        Text('商品列表')
          .fontSize(30)
          .fontWeight(FontWeight.Bold)
      }
      .width('100%')
      .margin({bottom: 20})

      // 单条商品信息
      // Row({space: 10}) {
      //   Image($r('app.media.mate60'))
      //     .width(100)
      //
      //   Column({space: 4}) {
      //     Text('华为Mate60')
      //       .fontSize(20)
      //       .fontWeight(FontWeight.Bold)
      //
      //     Text('¥ 6999')
      //       .fontColor('#F36')
      //       .fontSize(18)
      //   }
      //   .height('100%')
      //   .alignItems(HorizontalAlign.Start)
      // }
      // .height(120)
      // .width('100%')
      // .padding(10)
      // .backgroundColor('#FFF')
      // .borderRadius(20)

      // 将单条商品信息配置成ForEach循环
      ForEach(
        this.items,
        (item: Item, index) => {
          Row({ space: 10 }) {
            Image(item.image)
              .width(100)

            Column({ space: 4 }) {
              Text(item.name)
                .fontSize(20)
                .fontWeight(FontWeight.Bold)

              Text('¥ '+ item.price)
                .fontColor('#F36')
                .fontSize(18)
            }
            .height('100%')
            .alignItems(HorizontalAlign.Start)
          }
          .height(120)
          .width('100%')
          .padding(10)
          .backgroundColor('#FFF')
          .borderRadius(20)
        },
        (item: Item, index) => {
          return item.id
        }
      )
    }
    .width('100%')
    .height('100%')
    .padding(20)
    .backgroundColor('#EFEFEF')
  }
}
if/else条件渲染
可以使用 if、else、else if进行条件判断进行渲染。
例如:
if(item.discount) {
    Text('¥ '+ item.price)
        .fontColor('#CCC')
        .fontSize(18)
        .decoration({type: TextDecorationType.LineThrough})  // 设置删除线

    Text('折扣价格: ¥ '+ item.discount)
        .fontColor('#F36')
        .fontSize(18)

    Text('补贴: ¥ '+ (item.price - item.discount))
        .fontColor('#F36')
        .fontSize(18)
} else {
    Text('¥ '+ item.price)
        .fontColor('#F36')
        .fontSize(18)
}
06-ArkUI列表组件
List
列表List是一种复杂容器,具备下列特点:
- 列表项ListItem 数量过多超出屏幕后,会自动提供滚动功能
- 列表项ListItem既可以纵向排列,也可以横向排列
接口:
// List可以包含ListItem、ListItemGroup子组件
// space:主轴方向的间隔
// initialIndex 初次加载时起始位置显示的item
// scroller 可滚动组件的控制器
List(value?:{space?: number | string, initialIndex?: number, scroller?: Scroller})

ListItem(value?: string)

ListItemGroup(options?: {header?: CustomBuilder, footer?: CustomBuilder, space?: number | string})
示例:
List({ space: 20, initialIndex: 0 }) {
    ForEach([1,2,3,4,5], (item) => {
        ListItem() {

            // ListItem中只能包含一个根组件,所以此处只能有一个Text组件
            // 如果想要多个Text组件,可以将多个Text再包进Row容器中,最终给ListItem暴露的只有一个根组件
            Text('' + item)
        }
    }, item => item)
}
将原有的代码使用List进行修改后,便可以实现超出页面时滚动:
如果不使用List,则商品条目过多超出屏幕时,屏幕展示不全,而且不能拖动滚动
      List({space: 8}) {

        ForEach(
          this.items,
          (item: Item, index) => {
            ListItem() {
              Row({ space: 10 }) {
                Image(item.image)
                  .width(100)

                Column({ space: 4 }) {
                  Text(item.name)
                    .fontSize(20)
                    .fontWeight(FontWeight.Bold)

                  if(item.discount) {
                    Text('¥ '+ item.price)
                      .fontColor('#CCC')
                      .fontSize(18)
                      .decoration({type: TextDecorationType.LineThrough})  // 设置删除线

                    Text('折扣价格: ¥ '+ item.discount)
                      .fontColor('#F36')
                      .fontSize(18)

                    Text('补贴: ¥ '+ (item.price - item.discount))
                      .fontColor('#F36')
                      .fontSize(18)
                  } else {
                    Text('¥ '+ item.price)
                      .fontColor('#F36')
                      .fontSize(18)
                  }
                }
                .height('100%')
                .alignItems(HorizontalAlign.Start)
              }
              .height(120)
              .width('100%')
              .padding(10)
              .backgroundColor('#FFF')
              .borderRadius(20)
            }
          },
          (item: Item, index) => {
            return item.id
          }
        )

      }
      .width('100%')
      .layoutWeight(1)
07-自定义组件、构建函数、样式
自定义组件
在ArkUI中,UI显示的内容均为组件,由框架直接提供的称为系统组件,由开发者定义的称为自定义组件。
在entry>src>main>ets下创建文件夹components用于存放自定义组件。
在该文件夹下创建自定义标题组件Header.ets:
自定义组件可以直接在页面中定义(类似内部类),可以在外面单独编写成一个文件
@Component  // 只需要使用@Component声明这是一个组件,不需要使用@Entry声明页面
export struct Header {  // export导出该组件,使其他页面可以导入
  private title: ResourceStr // 将需要外部传入的可变内容设置为变量,外部页面使用该组件时便可以传入该变量值

  // 将标题代码移到该组件中
  build() {
    Row() {

      Image($r('app.media.ic_public_back'))
        .width(30)

      Text(this.title)
        .fontSize(30)
        .fontWeight(FontWeight.Bold)

      Blank() // 撑满剩余空间
      Image($r('app.media.ic_public_refresh'))
        .width(30)
    }
    .width('100%')
    .height(30)
  }
}
在商品页面使用该组件:
// 导入Header组件
import {Header} from '../components/Header'

@Entry
@Component
struct Index {
  build() {
    Column({space: 8}) {

      // 使用自定义的Header组件,传入Header中的变量字段
      Header({title: '商品列表'})
        .margin({bottom: 20})  // 可以像其他组件一样声明margin等属性、动作

     //........

    }
    .width('100%')
    .height('100%')
    .padding(20)
    .backgroundColor('#EFEFEF')
  }
}
自定义构建函数
自定义构建函数和自定义组件类似,自定义构造函数可以接收参数。
ets文件中,自定义构造函数如果定义在struct的外面,那么这个ets文件中的所有组件(一个ets文件可以写多个@Component)都可以使用。
示例:
// 使用@Builder声明全局自定义构建函数
@Builder function ItemCard(item: Item) {
    // .......
}

@Entry
@Component
struct Index {
    //.........
   // ItemCard(item)   使用自定义构建函数
   //.......

}
如果定义在某个struct内部,则只有这一个组件可以使用。而且定义构建函数时,不能加function关键字。调用时需要使用this.调用。
示例:
@Entry
@Component
struct Index {

   //.........
   // this.ItemCard(item)  使用时需要用this.
   //.......

  // 局部自定义构建函数,不能使用function关键字
  @Builder ItemCard(item: Item) {
      // ......
  }
}
将商品列表的商品项修改为自定义构建函数:
class Item {
  id: string
  name: string
  image: ResourceStr
  price: number
  discount: number

  constructor(id: string, name: string, image: ResourceStr, price: number, discount: number = 0) {
    this.id = id
    this.name = name
    this.image = image
    this.price = price
    this.discount = discount
  }
}

import {Header} from '../components/Header'

@Entry
@Component
struct Index {
  private items: Array<Item> = [
    new Item('1', '华为mate60', $r('app.media.mate60'), 6999, 6499),
    new Item('2', '华为X5', $r('app.media.X5'), 16999),
    new Item('3', '华为mate60RS', $r('app.media.mate60RS'), 11999),
    new Item('4', '华为nova11SE', $r('app.media.nova11SE'), 1999),
    new Item('5', '华为畅享70', $r('app.media.cx70'), 1199),
    new Item('6', '华为P60', $r('app.media.p60'), 5988)
  ]

  build() {
    Column({space: 8}) {
      Header({title: '商品列表'})
        .margin({bottom: 20})

      List({space: 8}) {
        ForEach(
          this.items,
          (item: Item, index) => {
            ListItem() {
              this.ItemCard(item)  // 调用自定义构建函数
            }
          },
          (item: Item, index) => {
            return item.id
          }
        )
      }
      .width('100%')
      .layoutWeight(1)
    }
    .width('100%')
    .height('100%')
    .padding(20)
    .backgroundColor('#EFEFEF')
  }


  // 自定义构建函数
  @Builder ItemCard(item:Item) {
    Row({ space: 10 }) {
      Image(item.image)
        .width(100)

      Column({ space: 4 }) {
        Text(item.name)
          .fontSize(20)
          .fontWeight(FontWeight.Bold)

        if(item.discount) {
          Text('¥ '+ item.price)
            .fontColor('#CCC')
            .fontSize(18)
            .decoration({type: TextDecorationType.LineThrough})  // 设置删除线

          Text('折扣价格: ¥ '+ item.discount)
            .fontColor('#F36')
            .fontSize(18)

          Text('补贴: ¥ '+ (item.price - item.discount))
            .fontColor('#F36')
            .fontSize(18)
        } else {
          Text('¥ '+ item.price)
            .fontColor('#F36')
            .fontSize(18)
        }
      }
      .height('100%')
      .alignItems(HorizontalAlign.Start)
    }
    .height(120)
    .width('100%')
    .padding(10)
    .backgroundColor('#FFF')
    .borderRadius(20)
  }
}
自定义公共样式
@Styles
可以将背景色等全局所有页面都要用的样式抽取出来,做成一个自定义公共样式。
示例:
与
@Builder声明自定义构建函数类似,自定义样式使用@Styles进行声明,也分全局自定义公共样式和局部自定义公共样式。
@Styles function fillScreen() {
  // 直接将样式写到方法里
  .width('100%')
  .height('100%')
  .padding(20)
  .backgroundColor('#EFEFEF')
}
调用时只需要调用fillScreen()方法即可:
build() {
    Column({space: 8}) {
       //.......
    }
    .fillScreen()  // 使用自定义样式

}
局部自定义样式与局部自定义构建函数类似,也不能加function关键字:
// 局部自定义样式不加funciton关键字
// 调用时,可以不加this.
@Styles fillScreen() {
    .width('100%')
    .height('100%')
    .padding(20)
    .backgroundColor('#EFEFEF')
  }
@Extend
@Styles自定义公共样式封装的样式,必须是width等组件通用属性样式,不能是fontColor这些组件特有样式。
如果想要专门为Text组件封装fontSize、fontColor这些样式,需要使用@Extend。
示例:
@Extend不能写在组件内部,只能写在全局位置
// 为Text组件封装fontSize、fontColor属性
@Extend(Text) function priceText() {
  .fontColor('#F36')
  .fontSize(18)
}
使用时直接调用即可:
Text('折扣价格: ¥ '+ item.discount)
   .priceText()
08-状态管理
状态管理
在声明式UI中,以状态驱动视图更新:

状态(State):指驱动视图更新的数据(被@State装饰器标记的变量)
视图(View):基于UI描述(build()函数内部)渲染得到的用户界面
@State注意事项:
@State装饰器标记的变量必须初始化,不能为空值。
@State支持Object、class、string、number、boolean、enum类型以及这些类型的数组。
嵌套类型以及数组中的对象属性无法触发视图更新。
例如:
Object变量的某个属性又是Object类型,外层的Object变量的属性变化时可以触发更新,而内层的Object对象的属性发生变化时无法触发视图更新。
如果数组的元素不是简单对象,而是Object等复杂类型,其内部的属性变化时也无法触发更新。
父子组件通信
@Prop和@Link
当父子组件之间需要数据同步时,子组件可以使用@Prop和@Link装饰器:
@Prop |
@Link |
|
|---|---|---|
| 同步类型 | 单向同步(父组件的值会拷贝一份,将拷贝传递给子组件。所以父组件修改该值时,会传递给子组件;而子组件对该值进行修改,不会传递给父组件) | 双向同步(父组件会将该变量的引用传递给子组件,所以父子组件操作的实际是同一个变量) |
| 允许装饰的变量类型 | 允许装饰的变量类型 父子类型一致:string、number、boolean、enum; 父组件对象类型,子组件是对象属性; 不可以是数组、any |
父子类型一致:string、number、boolean、enum、objectclass,以及他们的数组数组中元素增、删、改会引起刷新; 嵌套类型以及数组中的对象属性无法触发视图更新 |
| 初始化方式 | 允许子组件初始化 | 父组件传递,禁止子组件初始化 |
@Provide和@Consume
@Provide和@Consume可以跨组件提供类似于@State和@Link的双向同步。
@Provide+@Consume消耗的资源要比@State+@Link高
在使用@State和@Link做数据传递时,如果父组件需要给孙子组件传递数据,需要以下步骤:
- 父组件的变量使用
@State声明,调用子组件时通过子组件的参数传递给子组件 - 子组件中变量使用
@Link声明,通过孙子组件的参数传递给孙子组件 - 孙子组件中变量使用
@Link声明,达到双向同步
如果使用@Provide和@Consume则无需这么麻烦:
- 父组件的变量使用
@Provide装饰器进行声明(类似export向外暴露了该变量),无需作为参数传递给其他组件 - 子组件如果不用该变量,则无需处理该变量
- 孙子组件如果需要操作该变量,在孙子组件中使用
@Consume装饰器声明该变量(类似import引入了该变量)
@Observed 和 @ObjectLink
@ObjectLink和@Observed装饰器用于在涉及嵌套对象或数组为元素对象的场景中进行双向数据同步。
示例:
@Observed  // 添加@Observed装饰器
class Person {
  name: string
  age: number
  gf: Person

  constructor(name: string, age: number, gf?: Person) {
    this.name = name
    this.age = age
    this.gf = gf
  }
}

@Entry
@Component
struct Parent {

  @State p: Person = new Person('Jack', 21, new Person('Rose', 18))

  build() {
    Column() {
       // 将对this.p.gf的操作封装成一个新的组件,在组件中将item设置成@ObjectLink
      Child({p: this.p.gf})   // 将Jack的gf属性当做变量传递给Child组件,此时修改Jack的gf对象的属性时,也可以触发视图重新渲染
        .onClick(() => this.p.gf.age++)
    }
  }
}

@Component
struct Child {
  @ObjectLink p : Person  // 添加@ObjectLink装饰器
  build() {
    Column() {
      Text(`${this.p.name} : ${this.p.age}`)
    }
  }
}
父子组件方法传递
如果父组件的handlerTaskChange中使用了this,该this本来应该指向父组件,传递给子组件后,在子组件中调用时会变为使用子组件的this。如果需要使this一直保持为父组件,需要父组件在传递该方法时,使用.bind(this)绑定this。
示例:
// 父组件给子组件传递该方法时,绑定this
TaskItem({onTaskChange: this.handlerTaskChange.bind(this)})
待办任务示例
示例:
@Observed  // task是数组元素。数组元素为对象的,对象属性发生变化时,@State装饰器无法触发视图更新。需要使用@Observed
class Task {
  static id: number = 1
  name: string = `任务${Task.id++}`
  finished: boolean = false
}

@Styles function card() {
  .width('95%')
  .padding(20)
  .backgroundColor(Color.White)
  .borderRadius(15)
  .shadow({radius: 6, color: '#1F000000', offsetX: 2, offsetY: 4})
}

@Extend(Text) function finishedTask(finished: boolean) {
  .decoration({type: finished ? TextDecorationType.LineThrough : TextDecorationType.None})
  .fontColor(finished ? '#B1B2B1' : '#000')
}

class StateInfo {
  totalTask: number = 0
  finishTask: number = 0
}

@Entry
@Component
struct PropPage {

  @State state: StateInfo = new StateInfo()

  build() {
    Column({space: 10}) {

      TaskStatistics({finishTask: this.state.finishTask, totalTask: this.state.totalTask})

      TaskList({state: $state})  // @Link传递的是变量的引用,使用$传递变量引用
    }
    .width('100%')
    .height('100%')
    .backgroundColor('#F1F2F3')
  }
}

// 任务进度组件
@Component
struct TaskStatistics {

  @Prop finishTask: number  // 使用Prop装饰,父组件的值修改时会传递给子组件

  @Prop totalTask: number

  build() {
    // 任务进度
    Row() {
      Text('任务进度: ')
        .fontSize(30)
        .fontWeight(FontWeight.Bold)

      Stack() {  // 堆叠在一起

        // 圆形进度条
        Progress({
          value: this.finishTask,
          total: this.totalTask,
          type: ProgressType.Ring
        })
          .width(100)

        Row() {
          Text(this.finishTask.toString())
            .fontSize(24)
            .fontColor('#36D')

          Text(' / ' + this.totalTask.toString())
            .fontSize(24)
        }
      }

    }
    .card()
    .margin({top: 20, bottom: 10})
    .justifyContent(FlexAlign.SpaceEvenly)
  }
}

// 任务项组件
@Component
struct TaskList {

  @State tasks: Task[] = []

  @Link state: StateInfo  // 该组件中会修改该变量值,所以父子组件需要双向同步, 使用@Link装饰

  handlerTaskChange() {
    this.state.totalTask = this.tasks.length
    this.state.finishTask = this.tasks.filter(task => task.finished).length
  }

  build() {

    // 子组件的build中只能有一个根组件,所以需要封装一个Column容器
    Column() {
      // 新增任务按钮
      Button('新增任务')
        .width(200)
        .onClick(() => {
          this.tasks.push(new Task())
          this.handlerTaskChange()
        })

      // 任务列表
      List({space: 10}) {
        ForEach(
          this.tasks,
          (item: Task, index) => {
            ListItem() {

              TaskItem({
                item: item,  // 将对item的操作封装成一个新的组件,在组件中将item设置成@ObjectLink
                onTaskChange: this.handlerTaskChange.bind(this)  // 该方法需要在子组件中使用,所以this.handlerTaskChange需要传递给子组件。另外,该方法中使用了this,传递给子组件时需要保证该this还是父组件,所以需要使用.bind(this)绑定this为父组件的this
              })
            }
            .swipeAction({end: this.DeleteButton(index)})  // 设置ListItem向左滑出后出现的删除按钮(start向右滑动时左边出现的组件,end向左滑动时右边出现的组件)

          }
        )
      }
      .width('100%')
      .layoutWeight(1)  // 如果list不设置高度,则也不能实现超出页面的滚动效果。layoutWeight设置除了其他元素之外的高度全部给List组件
      .alignListItem(ListItemAlign.Center)
    }
  }

  @Builder DeleteButton(index: number) {
    // 设置删除按钮的样式,按钮图标为删除
    Button() {
      Image($r('app.media.ic_public_delete_filled'))
        .fillColor(Color.White)
        .width(20)
    }
    .width(40)
    .height(40)
    .type(ButtonType.Circle)
    .backgroundColor(Color.Red)
    .margin(5)
    .onClick(() => {
      this.tasks.splice(index, 1)
      this.handlerTaskChange()
    })
  }
}

@Component
struct TaskItem {

  @ObjectLink item: Task  // 将对数组元素item的操作封装为一个独立组件,然后将该变量设置为@ObjectLink

  onTaskChange: () => void  // 用于接收父组件传递过来的函数,用来调用父组件函数

  build() {
    Row() {
      Text(this.item.name)
        .fontSize(20)
        .finishedTask(this.item.finished)

      Checkbox()
        .select(this.item.finished)
        .onChange((val) => {
          this.item.finished = val
          this.onTaskChange()
        })
    }
    .card()
    .justifyContent(FlexAlign.SpaceBetween)
  }
}
09-页面路由
页面路由
页面路由是指在应用程序中实现不同页面之间的跳转和数据传递。包括跳转到应用内的指定页面、用应用内的某个页面替换当前页面、返回上一页面或指定的页面等。
页面路由需要在页面渲染完成之后才能调用,在
onInit和onReady生命周期中页面还处于渲染阶段,禁止调用页面路由方法。
页面会保存在页面栈中,展示当前栈顶的页面。页面间跳转,实际上是在页面栈中将新页面压入栈,如果进行了返回,则将上面的页面弹出栈。
页面栈的最大容量上限为32个页面,使用router.clear()方法可以清空页面栈,释放内存。
Router有两种页面跳转模式:
router.pushUrl():目标页会被压入页面栈,可以使用router.back()返回当前页router.replaceUrl():目标页替换当前页,当前页会被销毁并释放页面栈资源,无法返回当前页
Router有两种页面实例模式(router.RouterMode):
Standard:多实例模式(默认模式),每次跳转都会新建一个目标页并压入栈顶。Single:单例模式。如果目标页已经在栈中,则离栈顶最近的同Url页面会被移动到栈顶并重新加载
接口:
// options:JSON对象格式,用于配置url、params等
// mode:打开页面的实例模式,router.RouterMode
// callback:打开页面出现异常响应时的回调,包含异常的状态码、异常的消息
pushUrl(options: RouterOptions, mode: RouterMode, callback: AsyncCallback<void>): void

// 参数同pushUrl
replaceUrl(options: RouterOptions, mode: RouterMode, callback: AsyncCallback<void>): void

// options如果不传,则返回上一页,传入options则返回指定页
back(options?: RouterOptions ): void
示例
页面跳转使用方法:
- 导入Harmony提供的
Router模块
import router from '@ohos.router'
- 利用
router实现跳转返回等操作:
// 跳转页面,并传递参数
router.pushUrl({
              url: 'pages/SecondPage',
              params: {
                src: 'hello'
              }
            })
目标页面接收参数示例:
- 导入Harmony提供的Router模块
import router from '@ohos.router'
- 利用router实现跳转返回等操作:
// 通过router.getParams()接收router传入的参数,获取其中的src参数,并赋值给aaa变量
@State aaa: string = router.getParams()?.['src']

// 返回上一页
router.back()
main_pages.json
src>main>resources>base>profile下有main_pages.json文件,所有需要进行路由跳转的page页面都需要在这里进行配置:
{
  "src": [
    "pages/Index",
    "pages/SecondPage"
  ]
}
如果是在DevEco Studio中使用new --> page创建出来的页面,IDE会自动将新建的页面添加进main_page.json文件中。
如果是new -->ArkTS file 创建出来的文件,则需要手动配置进main_page.json中。
10-动画
属性动画
属性动画是通过设置组件的animation属性来给组件添加动画,当组件的width、height、opacity、backgroundColor、scale、rotate、translate等属性变更时,可以实现渐变过渡效果。动画API链接
import router from '@ohos.router'
@Entry
@Component
struct AnimationPage {
  // 小鱼图片
  @State src: Resource = $r('app.media.tortoise_R')
  // 是否开始游戏
  @State isBegin: boolean = false
  // 小鱼坐标
  @State fishX: number = 200
  @State fishY: number = 180
  // 小鱼角度
  @State angle: number = 0

  build() {
    Row() {
      Column() {

        Stack() {
          //  返回按钮
          Button('返回')
            .position({x: 10, y: 10})
            .backgroundColor('#20101010')
            .onClick(() => {
              // 跳转到自己(返回开始状态)
              router.replaceUrl({url: 'pages/AnimationPage'})
            })

          if(!this.isBegin) {
            // 开始按钮
            Button('开始游戏')
              .onClick(() => {
                this.isBegin = true
              })
          } else {
            // 显示小鱼图片
            Image(this.src)
              .position({x: this.fishX - 16.8, y: this.fishY - 12.5})  // 图片宽高是337*250,一半就是168.5*125
              .rotate({angle: this.angle, centerX: '50%', centerY: '50%'})
              .width(33.7)
              .height(25.0)
              .animation({   // animation需要放在监控变化的属性的后面,比如此处需要放到position属性后面
                duration: 500
              })

            // 操作按钮
            Row() {
              Button('←')
                .backgroundColor('#20101010')
                .onClick(() => {
                  this.fishX -= 20
                  this.src = $r('app.media.tortoise_L')
                })

              Column({space: 40}) {
                Button('↑')
                  .backgroundColor('#20101010')
                  .onClick(() => {
                    this.fishY -= 20
                  })
                Button('↓')
                  .backgroundColor('#20101010')
                  .onClick(() => {
                    this.fishY += 20
                  })
              }
              Button('→')
                .backgroundColor('#20101010')
                .onClick(() => {
                  this.fishX += 20
                  this.src = $r('app.media.tortoise_R')
                })
            }
            .height(240)
            .width(240)
            .position({x: 35, y: '40%'})

          }

        }
        .width('100%')
        .height('100%')

      }
      .width('100%')
      .height('100%')
    }
    .height('100%')
    .width('100%')
    .backgroundImage($r("app.media.animation_bg"))
    .backgroundImageSize(ImageSize.Cover)  // 背景图比较小,无法铺满屏幕,所以需要设置让其放大到溢满整个屏幕
  }
}
显示动画
显式动画是通过全局animateTo函数来修改组件属性,实现属性变化时的渐变过渡效果。
接口:
// 第一个参数为AnimateParam对象,设置动画效果相关参数,和animate属性参数一样
// 第二个参数为函数,在该函数内部修改组件属性关联的状态变量。指定显示动效的闭包函数,在闭包函数中导致的状态变化系统会自动插入过渡动画。
animateTo(value: AnimateParam, event: () => void): void
示例:
-
- 小龟图片去掉
animateTo属性:
- 小龟图片去掉
// 显示小鱼图片
  Image(this.src)
  	.position({ x: this.tortoiseX - 16.8, y: this.tortoiseY - 12.5 }) // 图片宽高是337*250,一半就是168.5*125
    .rotate({ angle: this.angle, centerX: '50%', centerY: '50%' })
    .width(33.7)
    .height(25.0)
    // .animation({ // animation需要放在监控变化的属性的后面,比如此处需要放到position属性后面
    //   duration: 500
    // })
-
- 按钮按下时,修改状态变量this.fishX的代码放到animateTo函数中:
Button('←')
                .backgroundColor('#20101010')
                .onClick(() => {
                 // this.tortoiseX -= 20
                 // this.src = $r('app.media.tortoise_L')
                 // 在animateTo函数中调整状态变量this.tortoise_L,那么这个状态变量对应的组件属性(小龟的位置)便会自动加上动画效果
                  animateTo({
                    duration: 500
                  },()=>{
                    this.tortoiseX -= 20
                    this.src = $r('app.media.tortoise_L')
                  })

                })
组件转场动画
转场动画分为:
- 页面间转场
- 组件内转场
- 共享元素转场
此处是组件内转场。
组件转场动画是在组件插入或移除时的过渡动画,通过组件的transition属性来配置。
transition属性的参数是一个JSON对象,可以设置组件动画效果作用于新增还是删除、不透明度的变化值、平移的距离、缩放的比例、旋转的角度等。
因为是转场动画,涉及到入场、离场问题,所以组件是否显示肯定是通过
if条件判断一个变量的值来实现的。这个变量值的修改必须在animateTo函数中进行,需要配合animateTo才能生效,动效时长、曲线、延时跟随animateTo中的配置。
示例:
if(this.isShow){ //是否显示
	Text('hello')
		.transition({
			opcity:0,//不透明度
			rotate:{angle:-360}, //旋转角度
			scale:{x:0,y:0} //横向、纵向的缩放倍数
		})
}

//只有用animateTo控制状态变量,才能有动画
animateTo(
	{duration:1000}, //设置动画的时长
	() => {
		this.isShow = false //在animateTo函数中调整状态变量,控制上面的组件是否显示,从而让上面的组件入场、立场动画
	}
)
遥感版本小游戏
示例代码:
import router from '@ohos.router'
import curves from '@ohos.curves'
@Entry
@Component
struct AnimationPage {
  // 小龟图片
  @State src: Resource = $r('app.media.tortoise_L')
  // 是否开始游戏
  @State isBegin: boolean = false
  // 小龟坐标
  @State tortoiseX: number = 200
  @State tortoiseY: number = 180
  // 小龟角度
  @State angle: number = 0

  @State circleFill: string = "#403A3A3A"

  // 摇杆中心区域坐标
  private centerX: number = 120
  private centerY: number = 120

  // 摇杆大小圆半径
  private maxRadius: number = 100
  private radius: number = 20

  // 摇杆小圆球初始位置
  @State positionX: number = this.centerX
  @State positionY: number = this.centerY

  // 摇杆角度的正弦、余弦(不需要计算出具体角度值,只需要正余弦即可)
  // 手指移动可能会超出摇杆区域,需要根据手指位置的角度得出摇杆内小圆的角度位置
  sin: number = 0
  cos: number = 0

  // 小龟移动速度(摇杆位移长度)
  speed: number = 0
  // 定时任务id
  taskId: number = -1

  build() {
    Row() {
      Column() {

        Stack() {
          //  返回按钮
          Button('返回')
            .position({x: 10, y: 10})
            .backgroundColor('#20101010')
            .onClick(() => {
              // 跳转到自己(返回开始状态)
              router.replaceUrl({url: 'pages/AnimationPage'})
            })

          if(!this.isBegin) {
            // 开始按钮
            Button('开始游戏')
              .onClick(() => {

                // 通过animateTo函数改变isBegin的值,使小龟出现转场动画效果
                animateTo(
                  {duration: 500},
                  () => {
                    this.isBegin = true
                  }
                )
              })
          } else {
            // 显示小乌龟图片
            Image(this.src)
              .position({ x: this.tortoiseX - 16.8, y: this.tortoiseY - 12.5 }) // 图片宽高是337*250,一半就是168.5*125
              .rotate({ angle: this.angle, centerX: '50%', centerY: '50%' })
              .width(33.7)
              .height(25.0)
                // .animation({ // animation需要放在监控变化的属性的后面,比如此处需要放到position属性后面
                //   duration: 500
                // })
              .transition({
                type: TransitionType.Insert,
                opacity: 0,
                translate: { x: -250 }
              })
          }

          // 摇杆
          Row() {
            Circle({width: this.maxRadius * 2, height: this.maxRadius * 2})
              .fill("#20101010")
                // position的位置是组件左上角的位置在父组件容器内的坐标。
                // (centerX,centerY)是当前Row容器的中心点坐标(Row容器宽高都是240,所以内部中心点是(120,120))
                // 用centerX/centerY减去半径,即可计算出圆心处于Row容器中心点时,圆容器左上角的坐标值
              .position({x: this.centerX - this.maxRadius, y: this.centerY - this.maxRadius})

            Circle({width: this.radius * 2, height: this.radius * 2})
              .fill(this.circleFill)
              .position({x: this.positionX - this.radius, y: this.positionY - this.radius})
          }
          .height(240)
          .width(240)
          .justifyContent(FlexAlign.Center)
          .position({x: 0, y: 120})
          .onTouch(this.handleTouchEvent.bind(this))  // 触摸时触发

        }
        .width('100%')
        .height('100%')

      }
      .width('100%')
      .height('100%')
    }
    .height('100%')
    .width('100%')
    .backgroundImage($r('app.media.animation_bg'))
    .backgroundImageSize(ImageSize.Cover)  // 背景图比较小,无法铺满屏幕,所以需要设置让其放大到溢满整个屏幕
  }

  // 处理手指移动的事件
  handleTouchEvent(event: TouchEvent) {

    if(event.type == TouchType.Up) {
      // 还原小龟初始状态
      this.speed = 0
      this.angle = 0
      clearInterval(this.taskId);
      // 还原摇杆初始状态
      animateTo(
        {curve: curves.springMotion()},
        () => {
          this.circleFill = '#403A3A3A'
          this.positionX = this.centerX
          this.positionY = this.centerY
        }
      )

    }else if(event.type == TouchType.Down) {
      // 配置成定时任务,使得小龟可以一直游动,而不是只跟随手指滑动
      this.taskId = setInterval(() => {
        animateTo(
          {},
          () => {
            // 修改小龟的坐标
            this.tortoiseX += this.speed * this.cos
            this.tortoiseY += this.speed * this.sin
          }
        )
      }, 40)

    } else if(event.type == TouchType.Move) {

      // 获取手指位置坐标
      // event.touches获取触摸点信息,支持多点触控所以是数组形式。
      let x = event.touches[0].x // x是相对于父容器的容器内坐标,screenX是相对于整个屏幕的坐标,此处用容器内坐标计算
      let y = event.touches[0].y

      // 计算手指与摇杆中心点坐标的距离
      let vx = x - this.centerX
      let vy = y - this.centerY

      let distanceFinger = Math.sqrt(Math.pow(vx, 2) + Math.pow(vy, 2));

      // 计算手指与中心点连线和x轴正半轴的夹角(单位弧度)
      let angleRadian = Math.atan2(vy, vx)
      this.sin = Math.sin(angleRadian)
      this.cos = Math.cos(angleRadian)

      // 计算摇杆小球与中心点的距离 = 手指超出大圆外 ? 大圆半径 : 手指与摇杆中心点距离。
      // (手指超出摇杆大圆之后,小圆只能移动到大圆最边缘而不能超出大圆)
      let distance = Math.min(distanceFinger, this.maxRadius)
      this.speed = 3

      // 计算小球相对于中心点的横、纵距离
      let distanceX = distance * this.cos
      let distanceY = distance * this.sin

      // 计算摇杆小球的坐标(中心点位置 + 距离中心点的横/纵距离)(渲染小球时减去了小球半径,所以此处无需再减)
      animateTo(
        {curve: curves.responsiveSpringMotion(), duration: 0.5},
        () => {
          // 修改摇杆坐标
          this.positionX = this.centerX + distanceX
          this.positionY = this.centerY + distanceY
          this.circleFill = '#803A3A3A'

          // 调整小龟的图片方向、角度
          if(Math.abs(angleRadian * 2) < Math.PI) {
            this.src = $r('app.media.tortoise_R')
          } else {
            this.src = $r('app.media.tortoise_L')
            angleRadian = angleRadian < 0 ? angleRadian + Math.PI : angleRadian - Math.PI
          }

          this.angle = angleRadian * 180 / Math.PI  // 弧度转换成角度方便旋转
        }
      )
    }
  }
}


