学习笔记(狂神Spring5 P1-P13)
学习笔记源码下载地址
1、Ioc
Spring是一个轻量级的控制反转(IoC)和面向切面(AOP)的容器(框架)。
官网: http://spring.io/
Spring 框架是一个分层架构,由 7 个定义良好的模块组成。(核心容器,Spring 上下文,Spring AOP,SpringDAO,SpringORM,Spring Web模块,Spring MVC 框架)Spring 模块构建在核心容器之上,核心容器定义了创建、配置和管理 bean 的方式 .组成 Spring 框架的每个模块(或组件)都可以单独存在,或者与其他一个或多个模块联合实现。
- 回顾
UserDao接口
public interface UserDao {
    public void getUser();
}
UserDaoImpl
package dao;

public class UserDaoImpl implements UserDao {
    @Override
    public void getUser() {
        System.out.println("默认获取用户数据");
    }
}
UserService
package service;

public interface UserService {
    public void getUser();
}
UserServiceImpl
package service;

import dao.UserDao;
import dao.UserDaoImpl;
import dao.UserDaoMySqlImpl;

public class UserServiceImpl implements UserService {
    private UserDao userDao = new UserDaoImpl();

    private UserDao userDao1 = new UserDaoMySqlImpl();


    @Override
    public void getUser() {
        userDao.getUser();
        userDao1.getUser();
    }
}
MyTest
import dao.UserDaoImpl;
import dao.UserDaoMySqlImpl;
import dao.UserDaoOracleImpl;
import org.junit.Test;
import service.UserService;
import service.UserServiceImpl;

public class MyTest {
    @Test
    public void test() {
        UserService service = new UserServiceImpl();
        service.getUser();
    }
  }
- 修改后
增加一个UserDao实现类
public class UserDaoMySqlImpl implements UserDao {
    @Override
    public void getUser() {
        System.out.println("MySql获取用户数据");
    }
}
还得再再Impl中增加一个实现类的实现
public class UserServiceImpl implements UserService {
    private UserDao userDao = new UserDaoMySqlImpl();

    @Override
    public void getUser() {
        userDao.getUser();
    }
}
解决反复增加实现类的时候又得要去修改增加Service中的实现所以在service的实现中利用set
public class UserServiceImpl implements UserService {
    private UserDao userDao;

    // 利用set实现
    public void setUserDao(UserDao userDao) {
        this.userDao = userDao;
    }

    @Override
    public void getUser() {
        userDao.getUser();
    }
}
测试:
@Test
    public void test1() {
        UserServiceImpl service = new UserServiceImpl();


        service.setUserDao(new UserDaoMySqlImpl());
        service.getUser();


        service.setUserDao(new UserDaoImpl());
        service.getUser();

        service.setUserDao(new UserDaoOracleImpl());
        service.getUser();
    }
2、HelloSpring
编写实体类
package pojo;

import lombok.Data;

@Data
public class Hello {
    private String string;

    public void show() {
        System.out.println("Hello," + string);
    }
}
编写我们的Sprng配置文件命名为beans.xml
<beans xmlns="http://www.springframework.org/schema/beans"
       xmlns:xsi="http://www.w3.org/2001/XMLSchema-instance"
       xsi:schemaLocation="http://www.springframework.org/schema/beans
        http://www.springframework.org/schema/beans/spring-beans.xsd">


    <bean id="hello" class="pojo.Hello">
        <property name="string" value="Spring"/>
    bean>
beans>
测试
import org.junit.jupiter.api.Test;
import org.springframework.context.ApplicationContext;
import org.springframework.context.support.ClassPathXmlApplicationContext;
import pojo.Hello;

public class MyTest {
    @Test
    public void test(){
        //解析beans.xml文件 , 生成管理相应的Bean对象
        ApplicationContext context = new ClassPathXmlApplicationContext("beans.xml");
        //getBean : 参数即为spring配置文件中bean的id .
        Hello hello = (Hello) context.getBean("hello");
        hello.show();
    }
}
完善我们的上一个案例
在我们的上一个案例中新增文件beans.xml
<beans xmlns="http://www.springframework.org/schema/beans"
       xmlns:xsi="http://www.w3.org/2001/XMLSchema-instance"
       xsi:schemaLocation="http://www.springframework.org/schema/beans
        http://www.springframework.org/schema/beans/spring-beans.xsd">


    <bean id="DaoImpl" class="dao.UserDaoImpl">bean>
    <bean id="MySqlImpl" class="dao.UserDaoMySqlImpl">bean>
    <bean id="OracleImpl" class="dao.UserDaoOracleImpl">bean>


    <bean id="UserServiceImpl" class="service.UserServiceImpl">

        <property name="userDao" ref="OracleImpl">property>
     bean>
beans>
测试
    @Test
    public void test2() {
        //解析beans.xml文件 , 生成管理相应的Bean对象
        ClassPathXmlApplicationContext classPathXmlApplicationContext = new ClassPathXmlApplicationContext("beans.xml");
        //getBean : 参数即为spring配置文件中bean的id .
        UserServiceImpl userServiceImpl = (UserServiceImpl) classPathXmlApplicationContext.getBean("UserServiceImpl");
        userServiceImpl.getUser();
    }
- 验证IOC创建对象方式
通过无参构造方法来创建
实体类
package pojo;

public class User {

    private String name;

    public User() {
        System.out.println("user无参构造方法");
    }

    public String getName() {
        return name;
    }

    public void setName(String name) {
        this.name = name;
    }

    public void show() {
        System.out.println("name=" + name);
    }

}
beans.xml
<beans xmlns="http://www.springframework.org/schema/beans"
       xmlns:xsi="http://www.w3.org/2001/XMLSchema-instance"
       xsi:schemaLocation="http://www.springframework.org/schema/beans
        http://www.springframework.org/schema/beans/spring-beans.xsd">

    <bean id="user" class="pojo.User">
        <property name="name" value="zzzzz"/>
    bean>
beans>
测试
 @Test
    public void test4() {
        ClassPathXmlApplicationContext classPathXmlApplicationContext = new ClassPathXmlApplicationContext("beans.xml");
        //在执行getBean的时候, user已经创建好了 , 通过无参构造
        User user = (User) classPathXmlApplicationContext.getBean("user");
        //调用对象的方法 .
        user.show();
    }
结果显示在调用show方法之前,User对象已经通过无参构造初始化了!
通过有参构造方法来创建
有参实体类
package pojo;

public class User {

    private String name;
/*    public User() {
        System.out.println("user无参构造方法");
    }*/

    public User(String name) {
        this.name = name;
    }


    public String getName() {
        return name;
    }

    public void setName(String name) {
        this.name = name;
    }

    public void show() {
        System.out.println("name=" + name);
    }

}
beans.xml 有三种方式编写
方式一:
<bean id="user" class="pojo.User">

    <constructor-arg index="0" value="111112"/>
bean>
方式二:
<bean id="user" class="pojo.User">

    <constructor-arg name="name" value="222222"/>
bean>
方式三:
<bean id="user" class="pojo.User">
    <constructor-arg type="java.lang.String" value="3333332"/>
bean>
测试
    @Test
    public void test5(){
        ApplicationContext context = new ClassPathXmlApplicationContext("beans.xml");
        User user = (User) context.getBean("user");
        user.show();
    }
3、配置
- 别名
alias 设置别名 , 为bean设置别名 , 可以设置多个别名
<alias name="user" alias="user2"/>
- Bean的配置
<bean id="hello" name="hello2 h2,h3;h4" class="pojo.Hello">
    <property name="name" value="Spring"/>
bean>
一般用于团队开发使用,多个配置文件合并为一个文件
<import resource="{path}/beans.xml"/>
4、DI依赖注入
方式一:
- 构造器注入(已经讲过)
方式二:
- Set注入
准备工作
pojo.Address.java
package pojo;

import lombok.Data;

@Data
public class Address {

    private String address;

}
pojo.Student.java
package pojo;


import java.util.*;


public class Student {

    private String name;
    private Address address;
    private String[] books;
    private List<String> hobbys;
    private Map<String, String> card;
    private Set<String> games;
    private String wife;
    private Properties info;

    public Student() {
    }

    public Student(String name, Address address, String[] books, List<String> hobbys, Map<String, String> card, Set<String> games, String wife, Properties info) {
        this.name = name;
        this.address = address;
        this.books = books;
        this.hobbys = hobbys;
        this.card = card;
        this.games = games;
        this.wife = wife;
        this.info = info;
    }

    public String getName() {
        return name;
    }

    public void setName(String name) {
        this.name = name;
    }

    public Address getAddress() {
        return address;
    }

    public void setAddress(Address address) {
        this.address = address;
    }

    public String[] getBooks() {
        return books;
    }

    public void setBooks(String[] books) {
        this.books = books;
    }

    public List<String> getHobbys() {
        return hobbys;
    }

    public void setHobbys(List<String> hobbys) {
        this.hobbys = hobbys;
    }

    public Map<String, String> getCard() {
        return card;
    }

    public void setCard(Map<String, String> card) {
        this.card = card;
    }

    public Set<String> getGames() {
        return games;
    }

    public void setGames(Set<String> games) {
        this.games = games;
    }

    public String getWife() {
        return wife;
    }

    public void setWife(String wife) {
        this.wife = wife;
    }

    public Properties getInfo() {
        return info;
    }

    public void setInfo(Properties info) {
        this.info = info;
    }

    @Override
    public String toString() {
        return "Student{" +
                "name='" + name + '\'' +
                ",\n address=" + address.toString() +
                ", \n books=" + Arrays.toString(books) +
                ",\n hobbys=" + hobbys +
                ", \ncard=" + card +
                ", \ngames=" + games +
                ", \nwife='" + wife + '\'' +
                ", \ninfo=" + info +
                '}';
    }
}
配置beans.xml
<beans xmlns="http://www.springframework.org/schema/beans"
       xmlns:xsi="http://www.w3.org/2001/XMLSchema-instance"
       xsi:schemaLocation="http://www.springframework.org/schema/beans
        http://www.springframework.org/schema/beans/spring-beans.xsd">

    <bean id="address" class="pojo.Address">
        <property name="address" value="陕西"/>
    bean>


    <bean id="student" class="pojo.Student">

        <property name="name" value="小明"/>


        <property name="address" ref="address"/>


        <property name="books">
            <array>
                <value>西游记value>
                <value>红楼梦value>
                <value>水浒传value>
                <value>三国演绎value>
            array>
        property>


        <property name="hobbys">
            <list>
                <value>听歌value>
                <value>看电影value>
                <value>爬山value>
            list>
        property>


        <property name="card">
            <map>
                <entry key="工商" value="1234567890"/>
                <entry key="长安" value="234567890"/>
            map>
        property>


        <property name="games">
            <set>
                <value>DATAvalue>
                <value>LOLvalue>
                <value>COCvalue>
            set>
        property>


        <property name="wife">
            <null/>
        property>


        <property name="info">
            <props>
                <prop key="学号">1234567890prop>
                <prop key="性别">男prop>
                <prop key="姓名">小明prop>
            props>
        property>
    bean>


beans>
测试:
import org.junit.jupiter.api.Test;
import org.springframework.context.support.ClassPathXmlApplicationContext;
import pojo.Student;


public class MyTest {
    @Test
    public void test() {
        ClassPathXmlApplicationContext classPathXmlApplicationContext = new ClassPathXmlApplicationContext("beans.xml");
        Student student = (Student) classPathXmlApplicationContext.getBean("student");
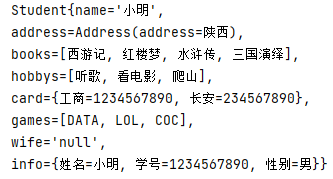
        System.out.println(student.toString());
    }
}
- 拓展
p命名
User.java
package pojo;

public class User {
    private String name;
    private int age;

    public User() {
    }

    public User(String name, int age) {
        this.name = name;
        this.age = age;
    }

    public String getName() {
        return name;
    }

    public void setName(String name) {
        this.name = name;
    }

    public int getAge() {
        return age;
    }

    public void setAge(int age) {
        this.age = age;
    }

    @Override
    public String toString() {
        return "User{" +
                "name='" + name + '\'' +
                ", age=" + age +
                '}';
    }
}
在xml文件中加入头文件约束
xmlns:p="http://www.springframework.org/schema/p"
<bean id="user" class="pojo.User" p:name="zzzz" p:age="18">
测试:
    @Test
    public void test01(){
        ClassPathXmlApplicationContext classPathXmlApplicationContext = new ClassPathXmlApplicationContext("beans.xml");
        User user = (User) classPathXmlApplicationContext.getBean("user");
        System.out.println(user);
    }
c命名注入
加入头文件约束
xmlns:c="http://www.springframework.org/schema/c"
配置
<bean id="user" class="pojo.User" c:name="狂神" c:age="18"/>
测试
    @Test
    public void test01(){
        ClassPathXmlApplicationContext classPathXmlApplicationContext = new ClassPathXmlApplicationContext("beans.xml");
        User user = (User) classPathXmlApplicationContext.getBean("user");
        System.out.println(user);
    }
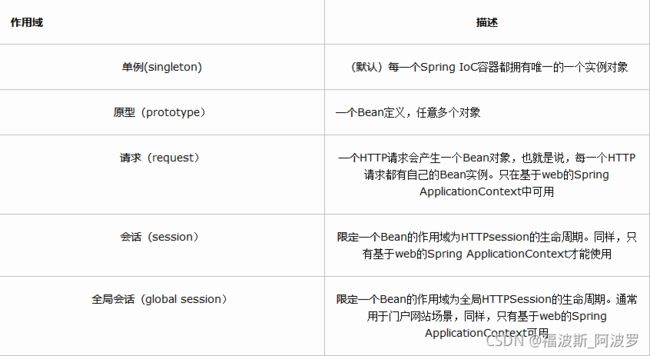
<bean id="user" class="pojo.User" c:name="zzzzzzzzzzz" c:age="18" scope="singleton">
原型模式(每次丛容器中get的时候都会产生一个新对象)
<bean id="user" class="pojo.User" c:name="zzzzzzzzzzzzz" c:age="18" scope="singleton">
其余(request、session)的都是在WEB开发中才能用得到的
5、Bean的自动装配
Spring中bean有三种装配机制,分别是:
在xml中显式配置;
在java中显式配置;
隐式的bean发现机制和自动装配。(重要主讲)
- 搭建环境
新建maven项目
创建两个实体类
package pojo;

import lombok.Data;

@Data
public class Cat {
    public void shout() {
        System.out.println("miao~");
    }
}
package pojo;

import lombok.Data;

@Data
public class Dog {
    public void shout() {
        System.out.println("wang~");
    }
}
创建一个people类
package pojo;

import lombok.Data;

@Data
public class People {
    private Cat cat;
    private Dog dog;
    private String str;
}
配置spring配置文件
<beans xmlns="http://www.springframework.org/schema/beans"
       xmlns:xsi="http://www.w3.org/2001/XMLSchema-instance"
       xsi:schemaLocation="http://www.springframework.org/schema/beans
        http://www.springframework.org/schema/beans/spring-beans.xsd">

    <bean id="dog" class="pojo.Dog"/>
    <bean id="cat" class="pojo.Cat"/>
    <bean id="people" class="pojo.People">
        <property name="cat" ref="cat"/>
        <property name="dog" ref="dog"/>
        <property name="str" value="zzzzzz"/>
    bean>
beans>
测试
import org.junit.Test;
import org.springframework.context.support.ClassPathXmlApplicationContext;
import pojo.People;

public class MyTest {

    @Test
    public void testMethodAutowire() {
        ClassPathXmlApplicationContext classPathXmlApplicationContext = new ClassPathXmlApplicationContext("beans.xml");
        People user = (People) classPathXmlApplicationContext.getBean("people");
        user.getCat().shout();
        user.getDog().shout();
    }
}
- autowire byName (按名称自动装配)
修改bean配置,增加一个属性 autowire=“byName”
    <bean id="user" class="pojo.People" autowire="byName">
        <property name="str" value="zzzzzzzzzzzz"/>
    bean>
再次输出,显示正常
修改上面注入bean中的id属性的值如:catXXXX或者dogXXX再次运行时就会报错。
结论:byname会自动在容器上下文中查找和自己对象set方法后面值对应的 bean id
- autowire byType (按类型自动装配)
将people的bean配置修改一下 : autowire=“byType”
<bean id="people" class="pojo.People" autowire="byType">
    <property name="str" value="zzzzzzzzzzzzz"/>
bean>
测试正常输出
结论:byType会自动在容器上下文中查找和自己对象属性类型对应的 bean
- 使用注解
准备工作:
导入spring配置文件中context文件头并开启属性注解支持!
<beans xmlns="http://www.springframework.org/schema/beans"
    xmlns:xsi="http://www.w3.org/2001/XMLSchema-instance"

    xmlns:context="http://www.springframework.org/schema/context"

    xsi:schemaLocation="http://www.springframework.org/schema/beans
        https://www.springframework.org/schema/beans/spring-beans.xsd
        http://www.springframework.org/schema/context
        https://www.springframework.org/schema/context/spring-context.xsd">

    <context:annotation-config/>

beans>
@Autowired(按类型自动转配的,不支持id匹配)
package pojo;

import lombok.Data;
import org.springframework.beans.factory.annotation.Autowired;

@Data
public class People {
    @Autowired
    //如果允许对象为null,设置required = false,默认为true
    private Cat cat;
    @Autowired
    private Dog dog;
    private String str;
}
xml
<beans xmlns="http://www.springframework.org/schema/beans"
       xmlns:xsi="http://www.w3.org/2001/XMLSchema-instance"
       xmlns:context="http://www.springframework.org/schema/context"
       xsi:schemaLocation="http://www.springframework.org/schema/beans
        https://www.springframework.org/schema/beans/spring-beans.xsd
        http://www.springframework.org/schema/context
        https://www.springframework.org/schema/context/spring-context.xsd">
    <context:annotation-config/>
    <bean id="dog" class="pojo.Dog"/>
    <bean id="cat" class="pojo.Cat"/>
    <bean id="people" class="pojo.People">
    bean>
beans>
@Qualifier
- @Autowired是根据类型自动装配的,加上@Qualifier则可以根据byName的方式自动装配不能单独使用。
配置文件修改内容,保证类型存在对象。且名字不为类的默认名字!
<bean id="dog1" class="pojo.Dog"/>
<bean id="dog" class="pojo.Dog"/>
<bean id="cat1" class="pojo.Cat"/>
<bean id="cat" class="pojo.Cat"/>
在属性上添加Qualifier注解
@Autowired
@Qualifier(value = "cat2")
private Cat cat;
@Autowired
@Qualifier(value = "dog2")
private Dog dog;
@Resource
@Resource如有指定的name属性,先按该属性进行byName方式查找装配;

其次再进行默认的byName方式进行装配;

如果以上都不成功,则按byType的方式自动装配。

都不成功,则报异常。
实体类
package pojo;

import lombok.Data;
import org.springframework.beans.factory.annotation.Autowired;
import org.springframework.beans.factory.annotation.Qualifier;

import javax.annotation.Resource;

@Data
public class People {

    @Resource(name = "cat1")
    private Cat cat;
    //如果允许对象为null,设置required = false,默认为true

    @Autowired
    @Qualifier(value = "dog1")
    private Dog dog;
    private String str;
}
xml
<bean id="cat1" class="pojo.Cat"/>
小结
1、@Autowired与@Resource都可以用来装配bean。都可以写在字段上,或写在setter方法上。
2、@Autowired默认按类型装配(属于spring规范),默认情况下必须要求依赖对象必须存在,如果要允许null 值,可以设置它的required属性为false,如:@Autowired(required=false) ,如果我们想使用名称装配可以结合@Qualifier注解进行使用
3、@Resource(属于J2EE复返),默认按照名称进行装配,名称可以通过name属性进行指定。如果没有指定name属性,当注解写在字段上时,默认取字段名进行按照名称查找,如果注解写在setter方法上默认取属性名进行装配。当找不到与名称匹配的bean时才按照类型进行装配。但是需要注意的是,如果name属性一旦指定,就只会按照名称进行装配。
它们的作用相同都是用注解方式注入对象,但执行顺序不同。@Autowired先byType,@Resource先byName。
下一篇文章笔记的地址

